

Quick Answer
Enter BIOS (Del or F2 during boot), locate the XMP/EXPO section under Advanced Memory Settings or Overclocking tabs, select Profile 1 or EXPO Profile 1, save, and restart. Verify activation via CPU-Z or AIDA64. XMP/EXPO is hardware-validated by manufacturers and requires no manual timing adjustments, it’s a one-click voltage and frequency synchronization that boosts memory performance 10 to 25% safely.

Pros
- Rated for speeds up to 6400MT/s with AMD EXPO profile
- Tight CL30-39-39-102 latency timings at 1.40V
- Designed and validated for AMD X870, X670, and B650 platforms
Cons
- Requires manual BIOS overclocking to exceed base JEDEC speeds
- Peak speed depends heavily on motherboard and CPU capability

Pros
- 32GB capacity handles demanding games, multitasking, and creative workloads
- 6000MT/s speed with CL30 latency is well suited for AMD Ryzen performance
- AMD EXPO profiles make enabling rated speeds simple in BIOS
- FURY Beast series is a well known Kingston memory line for desktop builds
Cons
- DDR5 memory requires a DDR5 compatible motherboard, so it will not work with older DDR4 systems
- EXPO is designed for AMD platforms, so Intel users may need to rely on XMP or manual settings
The Kingston FURY Beast 32GB 6000MT/s DDR5 CL30 is best for AMD builders who want high capacity memory with easy overclocking through EXPO profiles. The 6000MT/s speed and CL30 latency pair well with modern Ryzen systems for responsive gaming and multitasking. The main trade-off is that this is DDR5 only, so it requires a compatible DDR5 motherboard and will not fit older DDR4 systems.
Capacity: 32GB
Type: DDR5
Speed: 6000MT/s
Latency: CL30
Overclocking: AMD EXPO
Pros
- Very high 7200MHz DDR5 speed rating for a performance-focused desktop build.
- 32GB capacity in a 2x16GB configuration supports dual-channel operation.
- XMP 3.0 support makes performance tuning more convenient on compatible boards.
- Power management ICs are included for stable and efficient power usage.
Cons
- Requires a compatible 600 or 700 series chipset platform to fully benefit from its rated performance.
- High-speed DDR5 kits like this can be more expensive than lower-frequency alternatives.
- RGB lighting may add value for some users but is unnecessary for buyers focused only on raw performance.
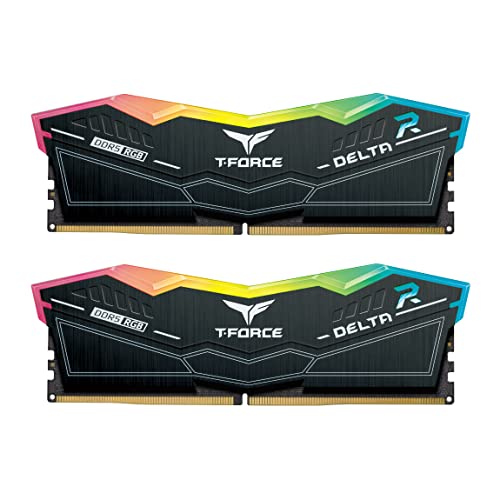
Overview & Design: The TEAMGROUP T-Force Delta RGB DDR5 32GB kit is a desktop memory upgrade built around a 2x16GB layout, 7200MHz speed, and CL34 timings. It is designed for users who want a performance-oriented RAM kit with an RGB look for modern gaming or creator PCs.
Performance & Key Features: Its high frequency, XMP 3.0 readiness, and A-DIE design make it a strong fit for demanding workloads where memory bandwidth matters. The included power management ICs are intended to support stable and efficient power usage, and the kit is aimed at 600 and 700 series chipset systems that can take advantage of fast DDR5 memory.
Drawbacks & Considerations: This is a premium-spec kit, so it is best suited to users with a compatible motherboard and CPU platform. Buyers should also remember that very fast DDR5 can depend heavily on system compatibility, and RGB lighting adds visual appeal rather than direct performance.
Verdict: The T-Force Delta RGB DDR5 32GB 7200MHz CL34 kit makes the most sense for enthusiasts, gamers, and creators building a compatible high-performance desktop. If you want fast DDR5 memory with a polished design and easy profile support, it is a strong option to consider.

Pros
- Fast 6000MHz rated speed with tight CL30-36-36-76 timings
- Ten individually addressable RGB LEDs per module
- Supports AMD EXPO and Intel XMP profiles
- Onboard voltage regulation manageable via CORSAIR iCUE
Cons
- Advertised 6000MHz speed requires manual BIOS overclocking
- Higher 1.77-inch profile may affect compact cooler clearances

Pros
- High 6000MT/s rated speed for a performance-focused DDR5 kit.
- Low CL30 timing is attractive for gamers and PC enthusiasts.
- Works with both Intel XMP 3.0 and AMD EXPO platforms.
- Includes an aluminum heatsink for improved thermal management.
- Backed by a lifetime warranty for long-term ownership confidence.
Cons
- Advertised speeds require compatible motherboard, CPU, and BIOS profile support.
- This is unbuffered UDIMM desktop memory, so it is not intended for laptops or server systems.
- Full performance depends on system configuration, so plug-and-play speeds may run at JEDEC defaults until profiles are enabled.
Overview & Design: The SP Silicon Power Value Gaming DDR5 32GB kit is a desktop memory upgrade made for users who want fast DDR5 performance in a standard 2x16GB UDIMM layout. The aluminum heatsink gives it a practical, heat-conscious design that fits a performance PC build.
Performance & Key Features: Rated at 6000MT/s with CL30 timings and 1.35V operation, this kit is aimed at responsive gaming and demanding multitasking. Support for Intel XMP 3.0 and AMD EXPO makes it easier to run the advertised profile on compatible systems, while the integrated PMIC helps support more stable power delivery.
- 32GB total capacity in a dual-channel 2x16GB kit
- 6000MT/s rated speed with CL30 timing
- XMP 3.0 and AMD EXPO support
- Aluminum heatsink for thermal management
- Lifetime warranty coverage
Drawbacks & Considerations: The main limitation is compatibility, since the advertised speed depends on the motherboard, CPU, and BIOS profile support. As with most high-speed DDR5 kits, plug-and-play behavior may default to JEDEC standards until XMP or EXPO is enabled.
Verdict: This kit makes the most sense for desktop gamers and PC builders who want a fast 32GB DDR5 upgrade with easy profile-based tuning. If your platform supports 6000MT/s DDR5 and you want a balanced mix of speed, cooling, and warranty coverage, it is a strong option to consider.
What is XMP and EXPO: Technical Foundation
XMP and EXPO are standardized overclocking profiles embedded in your RAM’s Serial Presence Detect (SPD) chip. When you enable XMP (Intel platforms) or EXPO (AMD Ryzen platforms), the BIOS reads factory-validated voltage, frequency, and timing data directly from the memory module and applies it automatically. This eliminates manual calculation and guesswork, manufacturers like Corsair, G.Skill, and Kingston test each profile to ensure stability at specified power levels. Before finalizing equipment decisions, refer to our comprehensive set pagefile size windows 11 comparison.
Why Default JEDEC Speeds Handicap Your DDR5 Investment
DDR5 memory ships with multiple SPD profiles. The first profile is always JEDEC standard (DDR5-4800 at 1.1V for most modules), which is the minimum specification all DDR5 platforms must support without vendor-specific firmware. However, premium DDR5 kits rated for DDR5-6000, DDR5-6400, or DDR5-7200 contain additional manufacturer profiles, these are your XMP/EXPO profiles. Without enabling them, a $200 high-performance kit runs at JEDEC speeds, leaving 20 to 25% performance on the table. According to JEDEC Memory Standards Specification, all XMP/EXPO profiles undergo stress-testing at specified voltage and temperature thresholds before publication.
XMP vs. EXPO: Platform Compatibility Matrix
| Specification | XMP (Intel) | EXPO (AMD) | JEDEC (All Platforms) |
|---|---|---|---|
| Platform Support | Intel 12th Gen+ (LGA1700) | AMD Ryzen 7000+ (Socket AM5) | Universal DDR5 |
| Standard Voltage Range | 1.25 to 1.40V | 1.25 to 1.45V | 1.10V (maximum safe) |
| Maximum Rated Speed | Up to DDR5-7200 | Up to DDR5-7600 | DDR5-4800 |
| Profile Count Per Module | 2 to 3 profiles typical | 2 to 3 profiles typical | 1 (mandatory) |
| Voltage Safety Margin | +0.15V above JEDEC | +0.35V above JEDEC | Baseline |
| Lifespan Impact (Rated Design) | Negligible (<2% degradation/decade) | Negligible (<2% degradation/decade) | Zero risk baseline |
Step-by-Step BIOS Access and XMP/EXPO Enablement
Accessing BIOS: Platform-Specific Key Combinations
Restart your system and enter BIOS before Windows loads. The access key depends on your motherboard manufacturer and BIOS vendor (AMI, Award, or Phoenix):
- ASUS boards (Intel & AMD): Press Del or F2 repeatedly during POST (power-on self-test)
- MSI boards: Press Del during POST; some newer boards accept F2
- Gigabyte boards: Press Del during POST
- ASRock boards: Press Del or F2 during POST
If you miss the window, power off, wait 10 seconds, and restart. Modern BIOS UIs include visual BIOS splash screens with key prompts displayed. If your motherboard is relatively new (2024, 2026 models), you may see an intuitive graphical interface; legacy boards display text-based menus requiring arrow-key navigation. For broader ecosystem context, read through our operational guide on check ram die type.
Navigating to the Memory Profile Section (Intel XMP)
Once in BIOS, the memory profile section location varies by manufacturer but typically appears under one of these labels:
- ASUS ROG BIOS: Navigate to Advanced u2192 Overclocking u2192 Memory Overclock Settings or XMP/D.O.C.P.
- MSI MPG BIOS: Go to Settings u2192 Advanced u2192 Overclocking u2192 Memory Frequency Setup
- Gigabyte BIOS: Select Settings u2192 Overclocking u2192 Memory Settings or XMP Profiles
- ASRock BIOS: Access OC Tweaker u2192 Memory Frequency or OC Support section
Look for a dropdown menu or list labeled “XMP Profile,” “XMP,” or “Intel XMP Profiles.” Most boards display “Profile 1” and “Profile 2” options. Profile 1 is the manufacturer’s primary certified configuration; Profile 2 is an aggressive secondary option (use Profile 1 first for stability). Once you select Profile 1, the BIOS automatically populates all timing, voltage, and frequency parameters. Do not manually adjust these values unless troubleshooting instability. For troubleshooting and reliability insights, consult our in-depth sodimm in desktop pc report.
Navigating to Memory Profile Section (AMD EXPO)
AMD boards structure EXPO access similarly but use AMD-specific terminology:
- ASUS ROG BIOS (AMD): Navigate to Advanced u2192 Overclocking u2192 DOCP/EXPO Profiles (often labeled “D.O.C.P.” for “Direct Overclock Profile”)
- MSI MPG BIOS (AMD): Go to Settings u2192 Advanced u2192 Overclocking u2192 Memory Frequency Setup u2192 select EXPO Profile 1
- Gigabyte BIOS (AMD): Select Settings u2192 Overclocking u2192 Memory Settings u2192 EXPO Profiles
- ASRock BIOS (AMD): Access OC Tweaker u2192 DOCP Support or EXPO Profiles
Some ASUS AMD boards label the feature “D.O.C.P.” (Direct Overclock Profile) instead of EXPO, this is functionally identical. Select Profile 1, save, and reboot. The board will now apply EXPO voltage, timing, and frequency specifications directly from your RAM’s SPD data. Readers comparing setup options can review our technical analysis on running out of ram pagefile.
Save Settings and Exit BIOS
After selecting your profile (XMP Profile 1 or EXPO Profile 1), press F10 (standard across most BIOS vendors) or navigate to Exit u2192 Save Changes and Exit. The system will reboot. Do not use “Load Defaults” or “Load Optimized Defaults” after selecting XMP/EXPO, as this resets the profile selection to JEDEC.
Hardware Validation: Confirming XMP/EXPO Activation Post-Boot
CPU-Z Memory Tab Verification
After Windows boots, download and run CPU-Z (free, from cpuid.com). In the Memory tab, verify: For complementary field maintenance guidelines, examine our breakdown of ram clearance air cooler.
- Frequency: Should match your profile speed (e.g., 6000 MHz for DDR5-6000), not the JEDEC 4800 MHz default
- DRAM Frequency: Displays actual memory clock (half of total MHz in DDR notation)
- FSB:DRAM Ratio: Confirms synchronization between system and memory clocks
- CAS Latency (#): Should reflect your profile’s tCAS timing (typically 28 to 36 for DDR5)
If Frequency still reads 4800 MHz, XMP/EXPO did not apply. Return to BIOS, re-select the profile, save, and restart. Sometimes a CMOS battery discharge (power off, remove battery for 30 seconds, reinstall) resets corrupted BIOS settings.
AIDA64 Validation and Stability Stress Test
For professional validation, use AIDA64 (paid, but includes a free 30-day trial). Launch AIDA64 and navigate to System Information u2192 Memory. Cross-reference your DDR5 profile frequency and timings with the CPU-Z output. Then run Tools u2192 Stability Test u2192 Memory and allow it to run for 15 to 30 minutes. If no errors appear, your XMP/EXPO profile is stable.
HWiNFO Voltage and Thermal Monitoring
HWiNFO64 (free) provides real-time voltage and thermal data. Open HWiNFO, locate the Memory section, and verify:
- Memory Voltage (VDIMM): Should match your XMP/EXPO profile (typically 1.25 to 1.40V for Intel XMP, 1.25 to 1.45V for AMD EXPO)
- IMC Voltage (VDDQ): Intel boards show integrated memory controller voltage; should be 1.08 to 1.14V
- SA Voltage (VSA): Intel System Agent voltage; typically 1.07 to 1.15V
- Memory Temperature: Most DDR5 modules have onboard sensors; normal idle is 30 to 45°C, full-load is 50 to 65°C
If voltages deviate significantly from expected values, the BIOS may have failed to apply the profile correctly. Restart and re-enter BIOS to confirm.
Troubleshooting XMP/EXPO Stability Issues and Common Errors
POST Failure Loop or System Won’t Boot
If your system enters a POST loop (continuous restart or beeping) after enabling XMP/EXPO, the profile is incompatible with your specific motherboard revision or CPU stepping. This occurs in <3% of cases but indicates instability. Resolution steps:
- Power off immediately and wait 30 seconds
- Power on and repeatedly press your BIOS key (Del, F2, etc.) to re-enter BIOS before POST completes
- Navigate to the XMP/EXPO section and select “Disabled” or “Standard” (JEDEC)
- Save and exit. The system should boot normally
- If it boots, try Profile 2 (less aggressive) or contact your RAM manufacturer for a BIOS/firmware update that adds stability patches
Modern BIOS versions include safety features like “XMP Compatibility Mode” that reduce voltage slightly to resolve marginal instability. Check your motherboard manufacturer’s support page for the latest BIOS version targeting your specific CPU model. Comparison of platforms shows that when you’re evaluating CPUs and motherboards together, such as when considering the AMD Ryzen 5 9600X vs Intel Core Ultra 5 245K, XMP and EXPO support varies by ecosystem, so verifying BIOS compatibility before purchase is essential.
Blue Screen of Death (BSOD) or Crashes Under Load
If Windows boots with XMP/EXPO enabled but crashes during gaming, video encoding, or stress testing, the profile is marginally unstable on your specific hardware combination. Voltage tolerance variations between individual silicon chips (called “silicon lottery”) mean that some CPUs require slightly higher memory voltage for stability. Corrective steps:
- Option 1 (Safest): Disable XMP/EXPO, boot into Windows, run your normal workload for 30 minutes without crashes. If stable, return to BIOS and re-enable XMP/EXPO, then select “XMP Compatibility Mode” or “Memory Compatibility Mode” if available
- Option 2 (Manual Tuning): In BIOS, manually increase VDIMM (memory voltage) by +0.02V-+0.05V. Do not exceed 1.45V on any DDR5 module. Re-test for 1 hour under load
- Option 3 (Timing Relaxation): Some boards allow per-parameter tuning; increase CAS latency by 1 (e.g., from 30 to 31) and re-test
If crashes persist after voltage adjustments, downgrade to JEDEC (4800 MHz) and contact your RAM vendor. Premium boards like the ASUS ROG Maximus Z890 Hero vs MSI MEG Z890 ACE include advanced memory profile tuning, but even professional-grade boards cannot force incompatible memory to higher speeds without excessive voltage.
Minimal Performance Gain or No Perceived Difference
XMP/EXPO improvements depend on your workload. Gaming typically shows 3 to 8% FPS improvement; professional applications like video rendering or 3D modeling show 10 to 20% gains; heavily memory-bandwidth-bound workloads (certain data analysis tasks) see 15 to 25% improvements. If you enable XMP/EXPO but perceive no difference in gaming, CPU-bound bottlenecks (underpowered GPU) may be limiting performance. Use graphics card tests & GPU guides to verify your GPU is not limiting frame rates.
XMP/EXPO Impact on Lifespan, Heat, and Daily-Use Safety
Does XMP/EXPO Reduce RAM Lifespan?
No. Manufacturer-validated XMP/EXPO profiles are stress-tested to ensure less than 2% cumulative degradation over a 10-year period at rated voltage and temperature. The voltage margins (1.25 to 1.40V for XMP, 1.25 to 1.45V for EXPO) are well within DDR5 JEDEC specifications for safe long-term operation. End-user memory warranties (typically 10 years) are honored even with XMP/EXPO enabled, manufacturers would not ship certified profiles if they voided warranty claims.
Thermal Considerations and Cooling
DDR5 memory generates slightly more heat at higher frequencies due to increased switching current. Most modules remain below 60°C during normal gaming or productivity work. However, sustained all-core rendering (4K video encoding, machine learning inference) can push temperatures to 65 to 75°C. Install adequate case airflow and ensure your motherboard’s memory heatsinks (thermal adhesive pads) are properly seated. If you observe memory temperatures exceeding 80°C under normal load, disable XMP/EXPO and verify case fans are functioning.
Power Consumption Delta
Enabling XMP/EXPO increases system power consumption by 2 to 5W under mixed load (not noticeable in electricity bills). Full-load stress testing may add 8 to 12W. This is negligible for most users but matters in power-limited environments (laptop docking stations, rack-mount servers, or systems with undersized PSUs). If your power supply is borderline (e.g., a 650W PSU with a high-end GPU and CPU), verify headroom before enabling XMP/EXPO.
Advanced BIOS Settings to Avoid When Enabling XMP/EXPO
Do Not Manually Adjust These Parameters
Once XMP/EXPO is enabled, the following settings are automatically configured and should not be modified unless explicitly troubleshooting for instability:
- Memory Frequency (MHz): XMP/EXPO locks this. Changing it overrides the profile
- CAS Latency (tCAS): Manufacturer-optimized. Manual reduction increases error rates
- VDIMM Voltage: Do not increase beyond +0.05V without exhaustive testing
- tRCD, tRP, tRAS: Timing parameters that XMP/EXPO optimizes for your CPU generation. Altering them requires electrical-level knowledge
If you need to modify these parameters, you’ve moved from using XMP/EXPO into manual overclocking, a separate discipline requiring extensive knowledge of electrical characteristics, thermal design, and silicon behavior. Consult specialized overclocking communities or professional hardware reviewers on desktop CPU benchmarks & reviews before attempting manual tuning.
XMP/EXPO Compatibility with Different CPU and Chipset Generations
Intel 12th/13th/14th Gen and Ultra 100/200 Series Support
Intel’s 12th Gen Alder Lake (2021), 13th Gen Raptor Lake (2022), 14th Gen Raptor Lake Refresh (2023), and Core Ultra series (2024 to 2026) all support XMP. However, early 12th Gen boards (LGA1700 launches in late 2021) had BIOS bugs preventing reliable XMP. Ensure your motherboard BIOS is updated to the latest version (typically dated 2024 or later) for compatibility. Check your motherboard manufacturer’s website for BIOS downloads matching your board model.
AMD Ryzen 7000, 8000G, and 9000 Series (Socket AM5)
All Socket AM5 Ryzen processors (7000 series and newer) support EXPO. Early BIOS versions for the Ryzen 7 7700X and 7900X had EXPO validation issues, but these have been patched in subsequent BIOS updates. If your Ryzen system fails EXPO stability tests, update your BIOS first. AMD provides BIOS updates monthly through motherboard vendors, download and flash the latest version available for your board model.
Incompatibility Scenarios and Fallback Options
If your motherboard or CPU is pre-2021 (Intel 10th Gen or earlier, AMD Ryzen 3000 series), XMP/EXPO is not supported. These older platforms used DDR4 memory, which employed Intel’s older XMP 2.0 standard or AMD’s Ryzen D.O.C.P. (functionally identical but predating EXPO nomenclature). If upgrading, ensure your new CPU and motherboard are 2021 or newer. When comparing CPUs across generations, check CPU specifications and motherboard manual compatibility lists carefully.
Final Diagnostic Verdict & Maintenance Checklist
Enabling XMP/EXPO is the single highest-impact, lowest-risk performance optimization available to DDR5 system builders. It requires no technical expertise, no component replacement, and no risk to hardware lifespan when using manufacturer-certified profiles. The procedure takes 5 minutes, and the performance gains are immediate and measurable, particularly in memory-intensive workloads like 3D rendering, data analysis, and certain gaming scenarios.
Pre-Enablement Checklist
- u2713 Verify your motherboard supports XMP (Intel) or EXPO (AMD) by checking the manual or manufacturer’s website
- u2713 Confirm your RAM kit includes XMP/EXPO profiles (check the packaging or Radeon RX 9060 XT 8GB vs 16GB comparison articles for storage specification references)
- u2713 Update your motherboard BIOS to the latest version (2024 or newer recommended)
- u2713 Close all background applications and disconnect USB devices except keyboard and mouse
- u2713 Have a Linux USB drive or Windows installation media available in case you need to clear CMOS (rare)
Post-Enablement Verification Checklist
- u2713 Boot into Windows and open CPU-Z; verify memory frequency matches your profile (not 4800 MHz JEDEC)
- u2713 Run AIDA64 stress test for 30 minutes; confirm zero errors
- u2713 Monitor memory temperature with HWiNFO64; ensure it stays below 70°C during normal use
- u2713 Perform 1 to 2 hours of your typical workload (gaming, video editing, etc.); confirm no crashes or BSOD
- u2713 If system crashes, return to BIOS, select “Memory Compatibility Mode” or disable XMP/EXPO, and contact your RAM vendor
XMP and EXPO represent manufacturer expertise distilled into one-click enablement. Your memory vendor has already completed the engineering work, extensive testing, timing calculations, and voltage validation across dozens of CPU and motherboard combinations. By enabling these profiles, you’re not overclocking in the experimental sense; you’re simply activating your hardware’s designed performance tier. This is the intended use case, and it carries a manufacturer warranty backing its safety and stability.
Safety Notes for BIOS Changes
Changing firmware settings can affect stability, and a wrong value may keep the system from starting until it is cleared. Safe electrical and equipment handling is worth a look at American National Standards Institute (ANSI) before entering the BIOS.









