

How to Load String in a Weed Eater: Direct Answer
Loading string into a weed eater involves three key steps: first, identify your trimmer head type (bump feed or fixed line), then disassemble the head according to your model’s design, and finally insert and wind the new trimer line properly. Forbump feed heads, remove the cap, thread the line through the eyelets, and wind it onto the internal spool in the correct direction. For fixed line heads, cut the line to the manufacturer-specified length and secure it in the head’s slots. Always consult your specific model’s owner’s manual, as procedures vary significantly between brands and designs.
Understanding Your Weed Eater Trimer Head
The term “weed eater” is a brand name often used generically for all string trimmers or weed whackers, which can lead to confusion when searching for model-specific instructions. Understanding your trimer head type is essential before attempting to load string, as the two primary designs, bump feed and fixed line, require different procedures.
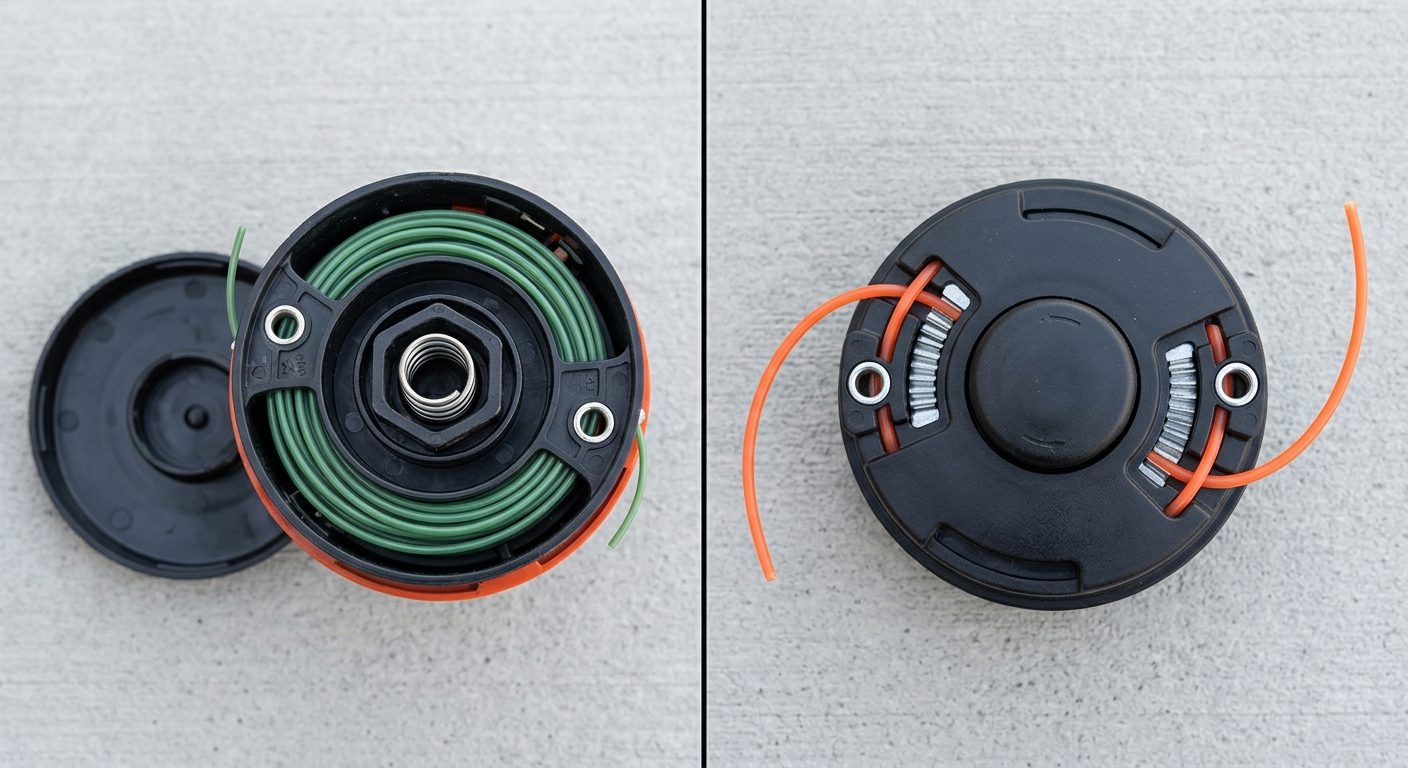
Bump Feed Heads are the most common design on modern string trimmers. These heads feature an automatic or semi-automatic feed mechanism that advances the trimer line as needed. The line is wound onto an internal spool, and a spring or bump mechanism controls how much line is fed. When the string wears down, you can either bump the head on the ground to advance it or manually pull more line through the eyelets.
Fixed Line Heads are simpler, manual designs where the trimer line is cut to a fixed length and secured in slots or eyelets on the trimer head. There is no automatic feed mechanism; instead, both ends of the line are held in place by the head’s design. These are less common on consumer models but are found on some commercial and older trimmers.
To determine which type you have, examine your trimmer head. If it has a removable cap or spool on top, you likely have a bump feed head. If the line appears to be permanently secured in slots around the head with no removable components, you have a fixed line head. Your owner’s manual will also clearly identify which type your model uses.
Key Factors Before You Start
Before loading new string, gather the necessary information and tools to ensure a smooth process.
- Trimmer Line Diameter and Type: Check your owner’s manual or the side of your trimmer head for the correct diameter specification, typically ranging from 0.065 to 0.110 inches. Using the incorrect diameter can damage the trimmer head or reduce cutting performance. Your manual will also specify whether your trimmer requires specific line materials or grades.
- Line Length and Quantity: Know how much new trimer line you need. Most bump feed heads require 15to 30 feet of line, depending on spool size. The owner’s manual will specify the exact amount.
- Tools Required: Most string loading procedures require only your hands and possibly a flathead screwdriver or the specific tool included with your trimmer. Avoid using excessive force or improper tools, which can crack the trimmer head.
- Safety Precautions: Always disconnect the spark plug wire or battery before handling the trimmer head to prevent accidental startup. Allow the trimmer to cool if recently used, and wear work gloves to protect against sharp line edges and debris.
Step-by-Step Guide: Loading String into a Bump Feed Head
Bump feed heads are the most common design on consumer string trimmers. Follow these steps for a universal procedure applicable to most bump feed models, but always refer to your owner’s manual for model-specific variations.
Step 1: Remove the Trimmer Head Cap
Locate the cap or cover on top of the trimmer head. Most bump feed heads use a clockwise threaded cap that twists off by hand or with a screwdriver. Some models feature a release button or tab that allows the cap to pop off. Gently twist or press according to your model’s design. Set the cap aside in a safe place, as it contains small springs or feed mechanisms. Users looking for related component recommendations can explore our marshall stanmore iii vs harman kardon onyx studio 8 breakdown.
Step 2: Remove the Spool (if applicable)
Once the cap is removed, you may see the internal spool. Some models allow you to lift the spool straight out; others require you to press a retaining pin or clip. Check your manual for the specific release method. If the spool is removable, take it out carefully and inspect it for cracks or damage. Before finalizing equipment decisions, refer to our comprehensive dyson v8 cyclone vs bissell featherweight stick comparison.
Step 3: Clean the Trimmer Head Interior
Before inserting new line, remove any debris, old line fragments, or grass clippings from inside the trimer head. Use a dry cloth or compressed air to clear the interior. This ensures smooth line feeding and prevents jaming. For broader ecosystem context, read through our operational guide on bissell crosswave hydrosteam vs shark stainforce.
Step 4: Insert the New Trimmer Line
Take your new trimer line and identify the eyelets or line guide holes on the sides of the trimer head. These are typically two small openings opposite each other. Thread one end of the line through one eyelet, leaving an equal length on both sides. The exact starting point and threading direction vary by model, so consult your manual for precise guidance. Some models require you to start from a specific eyelet or direction to ensure correct winding.
Step 5: Wind the Line onto the Spool
If you removed the spool, place it back into the trimmer head at this stage. Begin winding the line onto the spool by rotating it in the direction indicated by your manual, usually clockwise or counterclockwise depending on the model. Wind tightly and evenly, keeping tension on the line to prevent overlaps or loose coils. Continue until you reach the marked line or until most of the new line is wound onto the spool, typically leaving4 to 6 inches extended through each eyelet for cutting.
Step 6: Secure the Line in the Eyelets
Once the line is wound, thread the extended ends through the eyelets (if not already done) and ensure they are seated properly. Some models have small notches or groves in the eyelets that hold the line in place. Make sure both ends are equally extended and free of kinks or twists.
Step 7: Reinstall the Spool and Cap
Carefully lower the cap back onto the trimmer head, aligning any tabs or guides. Twist clockwise until snug, but do not overtighten, as this can crack the cap or strip the threads. The cap should seat flush with the trimer head.
Step 8: Test the Feed
Reconnect the spark plug or battery (if disconnected) and test the trimmer in a safe area away from people, pets, and obstacles. The line should feed smoothly when you bump the head on the ground or pull the line manually, depending on your model’s design. If the line does not advance or if it jams, stop immediately and review your manual or repeat the loading process.
Step-by-Step Guide: Loading String into a Fixed Line Head
Fixed line heads are simpler than bump feed designs and are used on some commercial and specialty trimmers. The procedure is straightforward but varies slightly by model.
Step 1: Measure and Cut the Trimmer Line
Consult your owner’s manual for the exact length of trimer line required for your model, typically between 10 and 20 feet total. Measure the line carefully using a measuring tape or ruler, and cut it cleanly with a sharp utility knife or line cutter. Ensure both ends are cut straight to prevent fraying or difficulty inserting into the head slots.
Step 2: Locate the Line Slots or Eyelets
Identify the slots or eyelets on your trimmer head where the line will be inserted. Most fixed line heads have two opposite slots, one for each end of the line. The slots may be recessed or flush with the head surface.
Step 3: Insert the Line Ends
Find the midpoint of your measured line and position it at the top or side of the trimer head, depending on your model’s design. Thread one end of the line into one slot until it seats fully, then thread the other end into the opposite slot with equal length extended on both sides. Ensure the line is straight and not twisted as you insert it.
Step 4: Secure the Line
Depending on your model, the line may be held in place by friction, small clips, screws, or locking tabs. If your model uses screws or clips, tighten or engage them firmly but not excessively. If the line is held by friction alone, ensure it is seated deeply enough that it will not slip out during operation.
Step 5: Verify Balance and Symmetry
Check that both ends of the line are equally extended and parallel to each other. Unequal line length will cause uneven cutting and reduced efficiency. Adjust as needed to ensure symmetrical, balanced positioning.
Step 6: Test Before Operating
Reconnect the spark plug or battery and test the trimmer in a safe area. The line should rotate smoothly without wobling or dragging on the trimer head housing. If issues occur, stop and reposition the line as needed.
Troubleshooting and Final Tips
Line Won’t Feed or Keeps Jaming
If the line does not advance in a bump feed head or jams during operation, verify that you wound the line in the correct direction as specified in your manual. Debris inside the trimer head can also cause jamming; clean the interior thoroughly. If the issue persists, the bump mechanism or internal springs may be damaged, requiring professional repair or head replacement.
Uneven Line Length After Loading
Unequal line length in either head type results in uneven cutting. For bump feed heads, verify that you inserted the line through the eyelets with equal lengths on both sides before winding. For fixed line heads, adjust the line in the slots until both sides are symmetrical.
Line Slips Out During Operation
In fixed line heads, this indicates the line is not seated fully in the slots or that the locking mechanism (if present) is not engaged. Reinsert the line more firmly and ensure any clips or screws are fully tightened. In bump feed heads, it may indicate a cracked or worn cap; inspect the cap and replace if necessary.
Why Consult Your Owner’s Manual
While this guide covers universal procedures, specific steps for loading string may vary significantly between manufacturers and models. Your owner’s manual contains model-specific diagrams, the correct line diameter, the proper winding direction, and the exact line length required. Deviating from these specifications can damage your trimmer or void the warranty. If you cannot locate your manual, visit the manufacturer’s website or contact customer support for guidance.
When to Replace the Entire Trimmer Head
If the trimmer head is cracked, the eyelets are damaged, the spool is warped, or the feed mechanism is not functioning, replacement of the entire head may be necessary. Attempting to load string into a damaged head will not resolve performance issues and may cause further damage. Many manufacturers sell replacement heads as separate parts that attach to your existing trimer shaft.
Buyer FAQs: How To Load String In A Weed Eater Solved
Q: What happens if I use the wrong diameter trimer line?
A: Using the incorrect diameter trimer line can damage the trimmer head by causing the line to jam in the eyelets or spool, reducing cutting performance, or straining the trimer motor. Always check your owner’s manual for the exact diameter specification (typically 0.065 to 0.110 inches) and use only that size.
Q: Can I use any brand of trimmer line, or does it have to match my trimer brand?
A: You do not need to use the same brand as your trimmer, but the line must match the diameter and material type specified in your manual. Generic trimmer line of the correct diameter from reputable manufacturers works reliably in most trimmers. Avoid unusually cheap or unfamiliar brands, as quality varies and poor-quality line may fray, jam, or wear quickly.
Q: How often should I replace the trimmer line?
A: Trimmer line wear depends on usage frequency, cutting conditions, and line quality. Inspect the line before each use; if it appears worn, short, or frayed, replace it. Most homeowners replace the line several times per season. In bump feed heads, the line advances automatically or semi-automatically, so you may reload the spool before replacing the entire line. In fixed line heads, you replace the entire line when it becomes too short to be effective.
Q: What is the correct winding direction for a bump feed spool?
A: The correct winding direction (clockwise or counterclockwise) is specified in your owner’s manual and often marked on the trimer head or spool itself with arrows. Winding in the wrong direction may cause the line to jam or not advance properly. Always check your manual before winding.

Pros
- Heavy-duty .095" nylon construction is built for tougher trimming tasks.
- Square shape can improve cutting efficiency and edging precision.
- Long 330-foot spool reduces the need for frequent replacement.
- Compatible with many trimmer types that use .095" line.
Cons
- May be less suitable for very light-duty trimming where a thinner line could be easier on smaller trimmers.
- No included trimmer head or additional accessories are listed in the product data.
- Performance can vary by trimmer power and the type of vegetation being cut.
Overview & Design: The VIABRICO .095" Weed Eater String is a square-profile trimmer line made from premium nylon-based material for general lawn care and heavier edging tasks. The orange color makes the spool easy to identify, and the 330-foot length is useful for users who go through line regularly.
Performance & Key Features: Its square shape is designed to create sharper cutting edges and a larger cutting surface than standard round line, which can help improve trimming speed and edge definition. The line is also advertised as abrasion resistant, crack resistant, and highly impact resistant, with a precision-wound spool intended to reduce tangling, misfeeds, and jams.
Drawbacks & Considerations: This is a .095" heavy-duty line, so it may be more than some lightweight trimmers need. The product data does not include accessories, and real-world results will still depend on the power of the trimmer and the type of weeds or terrain being handled.
Verdict: This VIABRICO trimmer line is a solid fit for homeowners and frequent yard-maintenance users who want a durable .095" line with better cutting performance than basic round string. It is especially relevant for edging, thicker weeds, and rougher terrain where wear resistance matters.
Related Maintenance and Operating Guides
To keep your equipment running at peak operating efficiency, explore our related technical walkthroughs and maintenance tutorials:
- Consult our detailed breakdown on cordless stick vacuum buyer guide.
- Consult our detailed breakdown on robotic pool cleaner comparison guide.
Technical Standards and Compliance
Mechanical safety standards, operational tolerances, and protective gear guidelines align with benchmark specifications established by the American National Standards Institute (ANSI).









