

Direct Answer: How to Load Weed Wacker String
To load weed wacker string, remove the trimmer head by unscrewing it counterclockwise or pressing the release button. Cut a length of trimmer line (typically 10-20 feet), insert one end into the guide hole on the spool, wind the string tightly in the direction shown by arrows until full, then thread the remaining string through the exit ports. Reassemble the head and test. For bump-feed heads, simply insert cut string into the feed holes without winding.
Understanding Your Weed Wacker’s Trimmer Head Type
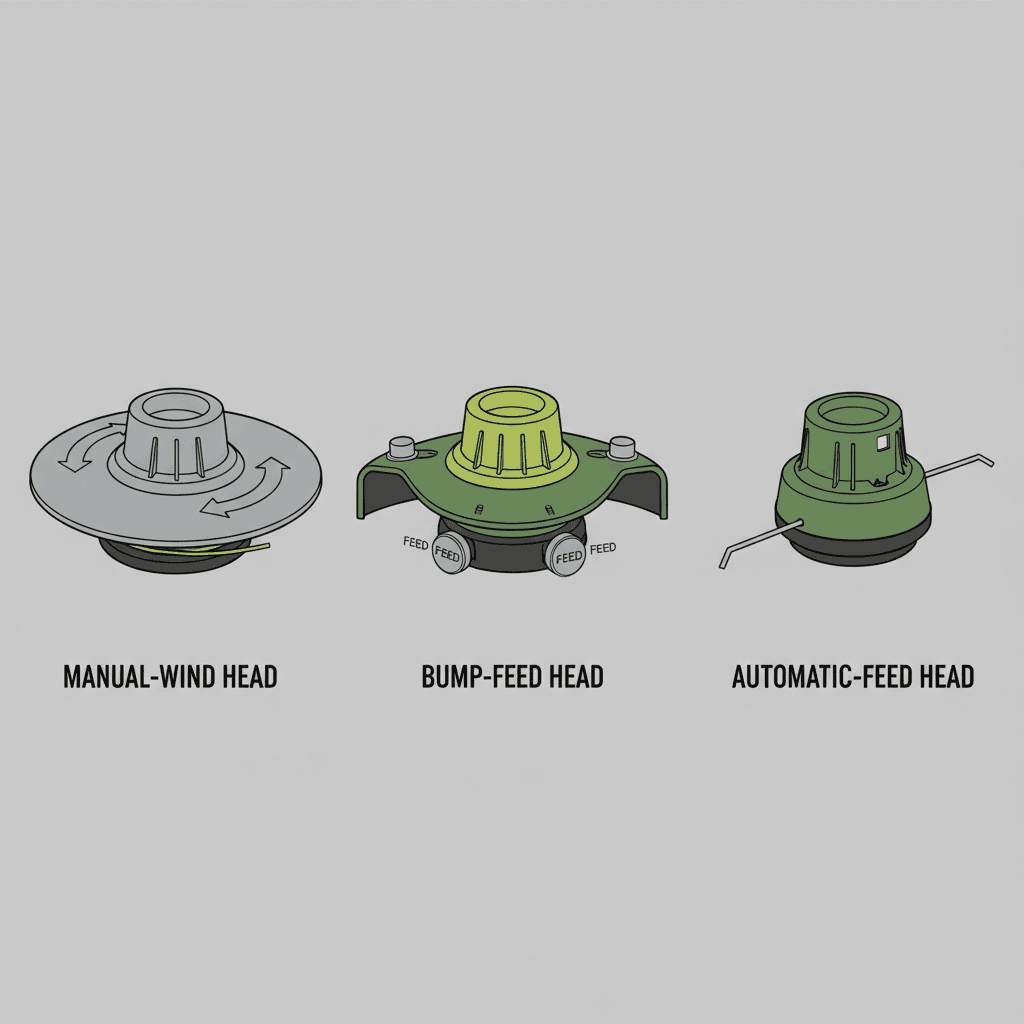
Before you begin loading string, identify which trimmer head system your weed wacker uses. The loading process differs significantly between head types, and using the wrong method can result in jamming, poor string feeding, or damage to the mechanism.
Manual-Wind Trimmer Heads
Manual-wind heads require you to physically wrap the string around an internal spool in a specific direction. This is the most common system on residential weed wackers. The spool contains grooves or channels that guide the string as you wind it tightly. Once wound, the string feeds out through ports as you trim, and you manually load new string when the old string wears down.
Bump-Feed Trimmer Heads
Bump-feed heads automatically advance string when the trimmer head taps the ground. Instead of winding string around a spool, you simply insert pre-cut lengths of string into designated feed holes. When the head strikes the ground, a spring mechanism advances the string. This system is simpler but typically requires more frequent string replacement.
Automatic-Feed Trimmer Heads
Some higher-end models feature fully automatic systems that advance string continuously as you trim. These require specialized string cartridges or spools and have limited DIY loading capability. Check your manual to determine if your model uses this system.
Preparing Your Weed Wacker and Gathering Materials
Proper preparation ensures safe and efficient string loading. Take time to gather everything you need before starting.
Materials and Tools You’ll Need
- Trimmer string: Purchase the correct diameter for your model (typically 0.065 to 0.110 inches). Common residential sizes are 0.080 and 0.095 inches.
- Scissors or cutting tool: A sharp utility knife or dedicated trimmer line cutter makes clean cuts.
- Your weed wacker: Preferably with a freshly charged or fueled engine (though you won’t run it during loading).
- Device manual: Keep it nearby for model-specific guidance and warnings.
- Work surface: A flat, clean table or workbench prevents string from tangling during the process.
Safety Considerations
Always disconnect the spark plug wire or remove the battery from your weed wacker before loading string. This prevents accidental engine start. Allow the engine to cool completely if you’ve been using the trimmer. Wear safety glasses when handling trimmer string, as cut ends can be sharp.
Removing the Trimmer Head Safely
Most trimmer heads twist off by turning them counterclockwise by hand or with a wrench. Some models feature a quick-release button or tab, press and hold this while twisting. Consult your manual if the head doesn’t budge, as forcing it may cause damage. Once removed, inspect the head for cracks or wear. A damaged head should be replaced rather than reloaded.
How to Load String on a Manual-Wind Trimmer Head
Manual-wind heads require precision and attention to detail. Following the correct sequence ensures the string feeds properly during use. Readers comparing setup options can review our technical analysis on marshall stanmore iii vs harman kardon onyx studio 8.
Step 1: Measure and Cut Your String
Cut a length of trimmer string between 10 and 20 feet long, depending on your trimmer head size. Most residential heads accommodate 15-20 feet of 0.080-inch string. If unsure, consult your manual. Make a clean, straight cut with scissors or a utility knife, ragged edges can affect feeding.
Step 2: Locate the Guide Hole and Winding Direction
Examine the trimmer head spool. You’ll see a small hole or slot near the center, this is the guide hole where string insertion begins. Look for arrows molded into the spool indicating the correct winding direction. This direction is critical; winding the wrong way will prevent the string from feeding. For complementary field maintenance guidelines, examine our breakdown of dyson v8 cyclone vs bissell featherweight stick.
Step 3: Insert the String Into the Guide Hole
Insert about 6 inches of one end of the string into the guide hole. Hold this end firmly in place with one hand while you prepare to wind with the other. Some spools have a small notch that catches the string end; make sure the string sits properly in this notch if present.
Step 4: Wind the String Tightly Around the Spool
Rotate the spool in the direction indicated by the arrows, winding the string tightly and evenly. Maintain consistent tension so the string doesn’t bunch or overlap. Wind until the spool is nearly full, leaving about 1-2 inches of space. Overlapping windings cause jamming and prevent proper feeding. The string should lay flat and organized in the spool grooves. To evaluate matched hardware tolerances, consult our detailed overview of bissell crosswave hydrosteam vs shark stainforce.
Step 5: Thread the Exit String Through the Port Holes
Most trimmer heads have one or two port holes where string exits to do the cutting. After winding, pull the remaining string end and thread it through the port hole(s) until you have equal lengths protruding from both sides (usually 4-6 inches each). Some heads require threading through a guide channel before the port, follow your manual’s diagram.
Step 6: Secure and Prepare for Reassembly
Hold the wound spool in place (some heads have a release button or latch that keeps tension on the spool). Verify that both string ends extend evenly from the port holes and that the wound string is tight and organized. If the spool rotates freely when you release it, it’s properly wound.
How to Load String on a Bump-Feed Trimmer Head
Bump-feed heads offer a simpler loading process because there’s no winding involved. However, you’ll replace string more frequently since less is loaded at once.
Understanding the Bump-Feed Mechanism
Bump-feed heads contain a spring-loaded advance mechanism. When the trimmer head strikes the ground or objects while trimming, the impact triggers a spring that advances the string automatically. The head typically holds two sections of pre-cut string that feed independently from each side.
Step 1: Identify the Feed Holes
Remove the trimmer head and locate the two feed holes where string enters the cutting chamber. These are usually on opposite sides of the head. Look for small openings or marked slots indicating where string should be inserted.
Step 2: Cut String to Appropriate Length
Cut two pieces of trimmer string, each approximately 12-18 inches long (check your manual for exact specifications). The length is typically shorter than manual-wind heads because bump-feed systems hold less string. Make clean, straight cuts.
Step 3: Insert String Into Each Feed Hole
Insert one cut string piece into each feed hole, pushing it in until it stops. Some heads require you to push string all the way through the internal channel until it exits on the other side. Others use a simpler push-in method where the string rests in the feed chamber. Consult your manual for your specific head design.
Step 4: Verify Proper Insertion
Ensure both string pieces are fully inserted and seated properly. There should be no slack or loose sections inside the head. If using a through-feed design, both string ends should protrude evenly from the exit port on the opposite side.
Reassembling and Testing Your Trimmer
Proper reassembly is essential for safe operation and correct string feeding.
Reattaching the Trimmer Head
Carefully screw the trimmer head back onto the trimmer shaft, turning it clockwise. Tighten by hand until snug, then use a wrench for an additional quarter-turn if your model requires it. Avoid over-tightening, which can damage the shaft threads or make future removal difficult. Verify that the head sits flush and straight on the shaft.
Testing String Alignment and Length
Before running the trimmer, visually inspect the string. Both ends should protrude equally from the cutting ports and appear straight, not bent or kinked. Rotate the trimmer head by hand to ensure the string doesn’t catch or bind. If resistance occurs, stop and recheck the string routing through any internal channels or guides.
Initial Operation and String Feeding
Start the trimmer and run it for 10-15 seconds at idle speed. Listen for normal operation without unusual noises or vibrations. Worn string should begin feeding or dropping evenly. If string doesn’t feed on a bump-feed head, lightly tap the head on the ground during operation, this triggers the advance mechanism. For manual-wind heads, if string doesn’t feed smoothly, the spool may be overwound; disassemble and rewind with less tension.
Common Mistakes to Avoid When Loading Weed Wacker String
Learning from common errors helps you load string correctly the first time.
Winding in the Wrong Direction
The most frequent mistake is ignoring the directional arrows on the spool. Winding counterclockwise when arrows point clockwise prevents the string from feeding. Always pause before winding and clearly identify the correct direction. When in doubt, consult your manual’s diagram.
Overlapping or Bunching the String
Uneven winding causes sections of string to overlap or bunch in the spool grooves. This prevents proper unwinding and causes jamming. Wind slowly and deliberately, maintaining consistent tension. Ensure each wrap sits neatly adjacent to the previous one without crossing over.
Cutting String Too Short or Too Long
String that’s too short doesn’t fit properly on the spool or leaves insufficient cutting length. String that’s too long can’t fit in the head without forcing, causing the case to not close. Stick to the length specified in your manual, typically 15-20 feet for manual-wind and 12-18 inches per piece for bump-feed.
Over-Tightening or Under-Tightening the String
String wound too tightly strains the feed mechanism and may not advance smoothly. String wound too loosely falls out or feeds erratically. The tension should be firm enough that the spool doesn’t slip when you release it, but loose enough to rotate freely by hand.
Using Incorrect String Diameter
Trimmer heads are designed for specific string diameters. Using string that’s too thick can jam the mechanism; too thin and it may slip or not cut effectively. Common residential sizes are 0.080 and 0.095 inches. Check your head’s marking or manual for the correct size.
Neglecting to Inspect the Head
Before loading new string, inspect the trimmer head for cracks, warping, or worn feed ports. Damage worsens during operation and prevents proper string feeding. Replace damaged heads rather than attempting to repair them.
Brand-Specific Considerations: Ryobi, Homelite, Craftsman, and Echo
While the basic loading process is similar across brands, design variations exist. Most modern weed wackers from mainstream manufacturers use either manual-wind or bump-feed systems, but the specifics differ.
Ryobi Weed Wackers
Ryobi trimmers typically feature twist-off heads and use manual-wind spools with clear directional arrows. Most models accommodate 0.080-inch string and require 15-20 feet of line. Ryobi’s design emphasizes ease of loading, with simple push-in string ends and clearly marked guide holes. Consult your specific model number’s manual, as some Ryobi models have released bump-feed alternatives.
Homelite Models
Homelite weed wackers often use manual-wind heads with side-loading string entry. The guide hole is typically on the side of the spool rather than the center. Homelite often specifies 0.095-inch string and longer lengths (up to 25 feet) due to larger spool capacity. Always check the arrow direction before winding, as some Homelite models wind counterclockwise opposite to other brands.
Craftsman Trimmers
Craftsman weed wackers span multiple head types depending on model year and product line. Many newer Craftsman models use quick-release heads (press a button or tab while twisting). The manual-wind spools typically use 0.080 or 0.095-inch string. Bump-feed alternatives are available on some Craftsman models. Always verify your head type in the manual before loading.
Echo Equipment
Echo commercial-grade and residential trimmers often feature robust manual-wind heads with large spool capacity. Echo typically recommends premium trimmer string and specific diameters matching your head model. Echo heads often allow 20+ feet of line due to larger spools. Visit Echo’s website or consult your manual for your exact model’s specifications, as Echo makes numerous variations.
Finding Model-Specific Instructions
The most reliable source for brand-specific loading instructions is your device’s manual. If you’ve lost the manual, visit the manufacturer’s website and search for your model number. Most brands offer free PDF downloads of manuals and loading diagrams. Video tutorials from official manufacturer channels also demonstrate the exact process for your specific head type.
Troubleshooting String Loading Issues
If you encounter problems during or after loading, these solutions address common issues.
String Won’t Wind Smoothly on the Spool
Cause: The guide hole may be blocked, the string diameter may be too large, or the spool may be damaged.
Solution: Inspect the guide hole for debris and clean if necessary. Verify you’re using the correct string diameter for your head. Examine the spool for cracks or warping. If damaged, replace the head rather than continuing.
String Feeds Erratically or Doesn’t Feed at All
Cause: String may be wound in the wrong direction, the port holes may be blocked, or the string may not be properly seated in the guide hole.
Solution: Disassemble the head and verify the winding direction matches the arrow markings. Clean the port holes with a small brush or compressed air to remove debris. Reload the string, ensuring one end is fully inserted into the guide hole. Test by rotating the spool by hand, it should move freely and smoothly.
The Trimmer Head Won’t Close After Loading
Cause: String may be protruding too far from the port holes, or the string may be caught in the case seam.
Solution: Trim the protruding string ends to approximately 4-6 inches and try closing the head again. Inspect the case seam to ensure no string is pinched. Disassemble and reload if necessary, using slightly less string length.
String Tangles or Jams During Operation
Cause: The string may be overlapped on the spool, wound too tightly, or the head may have internal damage.
Solution: Stop immediately and remove the trimmer head. Disassemble and inspect for tangled or bunched string. Reload, ensuring even winding with consistent tension. If jamming persists, inspect the head’s internal guide channels for debris or damage.
String Breaks Frequently During Use
Cause: The string diameter may be too thin for your cutting conditions, the port holes may have sharp edges, or the head may be damaged.
Solution: Switch to a slightly thicker string diameter (e.g., from 0.080 to 0.095 inches). Inspect the port holes for sharp edges or rough spots; gently smooth these with fine sandpaper if possible. If damage is significant, replace the head.
Common Questions on How To Load Weed Wacker String Answered
How often should I replace the string in my weed wacker?
String replacement frequency depends on usage. Casual residential users typically reload every 4-8 hours of trimming. Commercial or heavy-use applications may require reloading every 2-4 hours. Signs that you need to replace string include noticeably reduced cutting power, frequent line breakage, or visible string thinning at the cutting end. Some bump-feed heads require reloading every 1-2 hours due to lower line capacity.
Can I use any trimmer string in my weed wacker?
No. Always use the correct string diameter specified in your manual, typically 0.065, 0.080, 0.095, or 0.110 inches. Using incorrect diameter can jam the mechanism, prevent proper feeding, or damage the head. The material (nylon is standard for residential models) should also match your head’s design. Consult your manual or the head’s label for exact specifications.
What’s the difference between precut string and bulk string?
Precut string comes in measured lengths (usually on spools or cards) and is convenient for bump-feed heads. Bulk string comes in large rolls and requires you to measure and cut lengths yourself, it’s more economical for frequent users. Both types should be the correct diameter for your head. Some users prefer bulk string for cost savings, while others prefer precut for convenience.
Why does my string keep coming loose after I load it?
Loose string typically results from underwinding (not enough tension during winding) or the string not being properly seated in the guide hole. Ensure the guide hole end is pushed fully into its starting position and held there while you wind. Wind with firm, consistent tension, the spool should not slip when you release it. If looseness persists, disassemble and reload with greater tension, or inspect the spool for damage that prevents proper string retention.
Summary: Key Takeaways for Loading Weed Wacker String
Loading trimmer string is a straightforward process once you understand your specific trimmer head type. Manual-wind heads require careful winding in the correct direction with consistent tension, while bump-feed heads simply need properly cut string inserted into feed holes. Always consult your device’s manual for model-specific instructions and correct string diameter. Avoid common mistakes like winding the wrong direction, using incorrect string size, or overlapping windings. Proper loading ensures reliable string feeding, efficient cutting, and fewer operational problems. Taking time to learn your trimmer’s system now saves frustration and maintenance issues later.
Related Maintenance and Operating Guides
To keep your equipment running at peak operating efficiency, explore our related technical walkthroughs and maintenance tutorials:
- Consult our detailed breakdown on cordless stick vacuum buyer guide.
- Consult our detailed breakdown on robotic pool cleaner comparison guide.
Technical Standards and Compliance
Mechanical safety standards, operational tolerances, and protective gear guidelines align with benchmark specifications established by the American National Standards Institute (ANSI).









