

Quick Answer: How To Make A Pull Behind Rake?
A homemade pull-behind rake is a hitch-mounted frame with a row of downward tines that you tow behind a lawn tractor, ATV, or small tractor to gather leaves, clippings, or light yard debris. A practical home-shop build is a simple steel or pipe frame, a tongue that fits a drawbar or receiver hitch, tines that skim the surface, and optional…

Pros
- Manufacturer-stated 15 Amp corded power
- 18-inch size listed in the title
- Six steel tines per the listing
- Adjustable wheels included in the listing
Cons
- Corded design limits range to nearby outlets
- Power and tilling claims are unverified

Pros
- 13.5 Amp corded electric power stated
- 16-inch size listed in the title
- Steel tines per the listing
- Model SUJ-TJ604E identified
Cons
- Corded design limits range to nearby outlets
- Power and performance claims are unverified
Pros
- Two 4.0Ah batteries and charger listed
- 360 RPM speed per the manufacturer
- 9-inch tilling width stated
- 6.6-inch tilling depth stated
Cons
- RPM, width and depth figures are unverified claims

Pros
- Battery-powered for cord-free tilling
- Designed for gardening and garden rototilling
Cons
- Battery, dimensions and power details not supplied
What a pull-behind rake is for
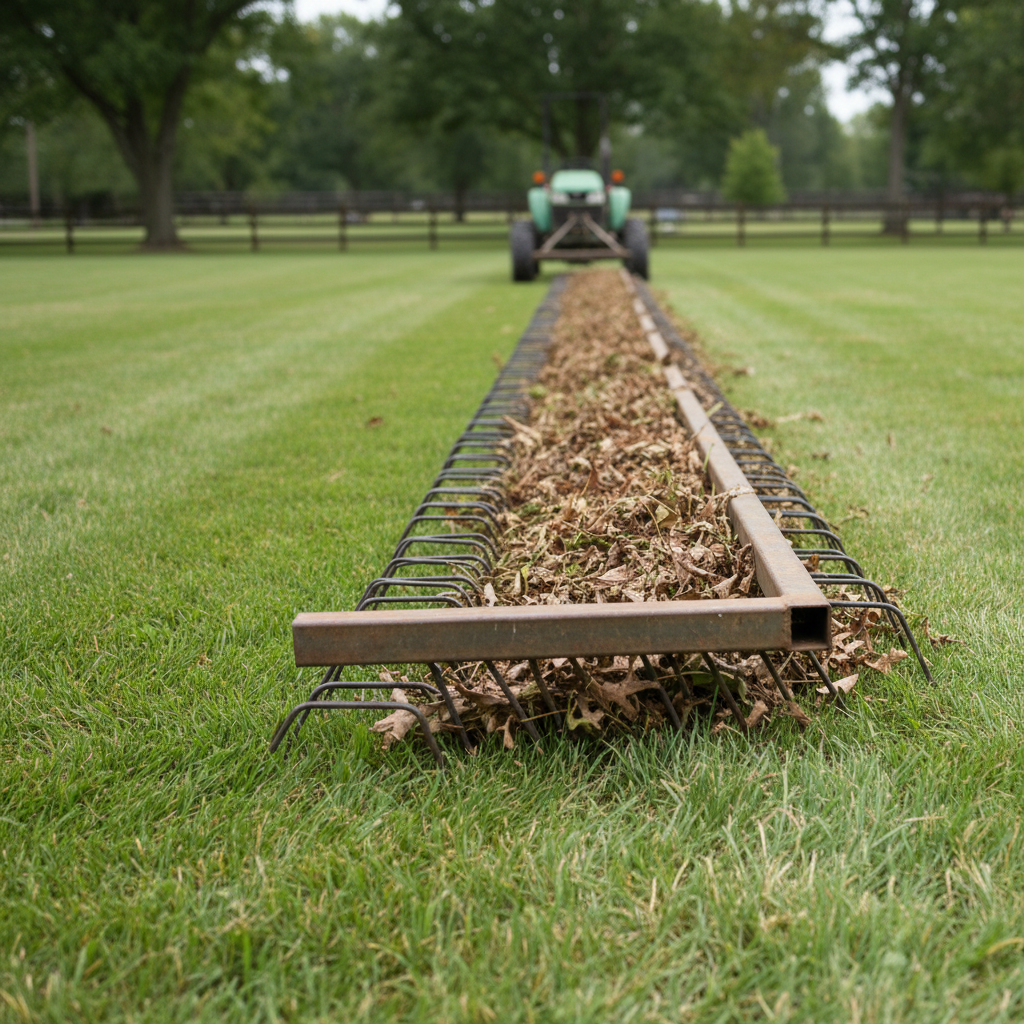
A pull-behind rake, also called a tow-behind rake or landscape rake, is a towed implement. Instead of walking a hand rake, you drag a rigid bar of teeth across turf, gravel, or bare ground so light debris loosens and piles into a windrow you can pick up later. The job is gathering and lining up material, not cutting, hauling, or finely grading a surface.
That job is different from several tools people confuse with it. A hand rake is slower and more precise. A box blade or grader blade scrapes and moves soil. An agricultural hay rake is built to handle crop in a field and is a different class of machine. A homemade landscape rake is a yard or light-field cleanup tool. It is not certified farm equipment and should not be treated as a substitute for a rated commercial implement.
A homemade version is realistically meant for dry leaves, grass clippings, pine needles, light thatch, small twigs, and similar debris. On bare soil or loose gravel it can also tease material into a line, but only if the tines skim. It is a poor fit for heavy rock, wet sod that tears in sheets, haymaking, deep ruts, or any work that needs a rated hitch and a purpose-built farm rake. It is also a poor fit for public-road travel. Keep the finished tool on private ground and within what the towing vehicle can stably pull.
Decide the design before you cut steel
Most failed homemade rakes were cut before the design was settled. Width, hitch type, tine stiffness, and whether the frame rides on skids or wheels all change how the rake tracks, how hard it pulls, and how easily it damages turf. Treat those choices as trade-offs, not as a single recipe.
Match the rake to the vehicle
Lawn tractors, ATVs or UTVs, and compact tractors can all tow a light landscape rake if the hitch is sound and the implement stays modest. A lawn tractor is best for leaves and clippings on relatively flat lawn. An ATV or UTV can cover rougher ground but is easy to unload at the front if the tongue is heavy or the tines dig. A compact tractor has more ballast and a sturdier drawbar, which helps if you want a wider frame or occasional light gravel work. None of these vehicles should be asked to yank a homemade rake through hidden roots, wet clay, or a pile of wet debris that suddenly becomes a load.
Stay inside the vehicle maker’s implement and towing guidance. If the owner’s manual is silent on homemade attachments, err on the small, light, and slow side. Do not invent a horsepower requirement or assume a receiver, pin hitch, or drawbar can take whatever you weld to it.
Width, storage, and gates
Working width should follow the vehicle, the gates you must pass, and where the rake will live when it is not in use. A wider rake gathers more in one pass, but it also adds side load in turns, more hitch stress, and a frame that is awkward to store or back through a narrow opening. A rake that is much wider than the towing machine can swing wide on slopes and catch fence posts or trees. Size the frame to the hitch, the vehicle’s stability, and your actual path of travel rather than to a published “standard” width.
Rigid, wheeled, or adjustable
A rigid, skid-style rake is the simplest build: the frame and tines sit at a fixed height and drag. That can be enough for occasional leaf cleanup on even ground if you can lift the tongue or unhitch the rake for transport. Wheels, skids with a stop, or a simple height adjustment make the rake easier to set and much kinder to turf. They also add parts, pinch points, and places for fasteners to loosen. If you need to cross a driveway, store the rake standing, or keep tines off the grass between passes, plan for wheels or a lift before you weld the frame closed.
Tine style
Tines can be rigid steel teeth, spring tines, or more flexible fingers. Rigid teeth are simple and stay put on gravel or bare soil, but they scalp grass if they are set too low. Spring or flexible tines forgive small bumps and hidden sticks, which is usually better on lawn. Spacing and stiffness matter more than a branded tooth shape. Teeth that are too close pack with wet leaves. Teeth that are too far apart leave strips of debris. Teeth that are too stiff act like a plow. Plan for replaceable tines so a bent tooth does not retire the whole implement.
Settle the ambiguities first
Before layout, decide four things: landscape debris versus gravel versus any thought of hay (hay is out of scope for this build), which vehicle will tow it, whether the hitch is a rear pin or drawbar, a receiver, or a ball, and whether the rake must float over uneven ground or stay fixed. Those answers determine tongue length, hitch hardware, and whether you need an axle. Changing them after the frame is welded is the expensive way to learn the same lesson.
The parts a homemade rake needs
Every workable homemade rake is the same handful of assemblies, even if the steel looks different from shop to shop.
- Frame. A rectangular or A-shaped structure that keeps the tine bar square to the direction of travel and carries towing load into the tongue. An A-frame or a centered spine helps the pull stay in line with the hitch instead of twisting a light crossbar.
- Tongue and hitch. A forward member that matches the vehicle’s existing drawbar, pin hitch, or receiver. This is the part that fails first if it is short, high, weak, or off-center.
- Tine bar. The cross member that holds the teeth. It should be stiff enough not to bow in the middle when a few tines catch.
- Tines. Downward teeth that loosen and windrow debris. Each tine does a small amount of work; the row does the gathering.
- Optional wheels, skids, or depth stops. These set working height and make transport possible without dragging sharp steel across pavement or turf.
- Pins, clips, and retainers. A hitch pin that cannot walk out, plus retainers on any wheel or height hardware that could drop a corner of the rake.
Keep the bill of materials conceptual until you measure the actual hitch and the steel on hand. Frame members, a tongue, a tine bar, teeth, and optional axle parts are the list. Steel grade, pipe schedule, bolt class, tine length, and wheel diameter are not universal, and treating one scrap-bin size as “the” design is how people end up with a rake that does not fit the tractor.
Fasteners belong in two different jobs. At the hitch, use a pin or coupler that matches the vehicle hardware and a retainer that stays put over rough ground. On the tine bar, use hardware that keeps each tooth from rotating or pulling out, but still lets you replace a damaged tine without cutting the frame.
How it should attach to a hitch or drawbar
The coupling is a safety part, not a detail to improvise at the end. Lawn tractors often have a rear pin hole or small drawbar. ATVs and UTVs may have a receiver, a pin hitch, or a ball. Compact tractors commonly have a drawbar hole or a three-point hitch; this article is about a simple pull-behind tongue, not a full three-point landscape rake. Match the tongue to the hitch that already exists. Do not stack adapters until the rake sits at a random height.
Plan tongue length, hitch height, and pin retainers before the frame is welded. The rake should sit roughly level so the tines skim. A tongue that is too short makes the rake follow the vehicle in a jerky arc and puts a sharp bending load into a light drawbar. A tongue that is too high or too heavy can pry the rear of a lawn tractor or ATV downward and unload the front tires. That is a control problem, not just a comfort problem. A tongue that is too low lets the tines dig like a plow.
The coupling must stay captured. Use a hitch pin that fits the hole without slop, then add a clip, linchpin, or other retainer that cannot vibrate off. A backup chain or second retainer is prudent on a homemade implement because there is no factory rating behind the joint. Do not treat a homemade hitch as belonging to a hitch class, and do not assign it a tongue-weight percentage or towing capacity. If the vehicle hitch is bent, cracked, undersized, or already loose in its mounts, fix or replace that hardware first. Improvising on a damaged hitch is how a rake becomes a free-flying frame.
Materials, tools, and a realistic shop plan
Home builds usually fall into three families: welded steel tube or angle, bolted pipe or tube, or a wood-and-steel hybrid. Welded steel is the typical choice for a lasting rake because the joints do not loosen every time a tine hits a root. A carefully bolted design can work if every joint is locked so it cannot unscrew in service, and it is the better path if you cannot make sound welds. Wood can form a temporary frame for a very light leaf rake, but wood in a towed hitch is a durability and safety compromise. If you use wood at all, keep the hitch and tine mounts in steel and inspect the timber often.
Each approach assumes different skills. Welding needs joint fit-up, a clean work area, and practice on scrap that looks like the real joints. Bolting needs accurate holes, lock hardware, and the discipline to recheck fasteners after the first uses. Cutting, drilling, and grinding are common to both. If welded joints on a towed implement are outside your competence, use a bolted design or have the structural joints made by someone who welds this kind of work regularly. A pretty bead is not the same as a joint you would trust behind a moving vehicle.
Inspect used tines, wheels, and scrap steel before they become part of a towed tool. Reject cracked, deeply rusted-through, or badly bent pieces. A used tine from an old implement is fine if it is sound. A wheel with a bent axle or a tire that will not stay seated is not a bargain. Flattened, oil-soaked, or unidentified mystery alloy is a poor choice for the tongue.
Shop hazards are real. Cutting and grinding throw sparks and sharp chips. Welding adds arc flash, hot metal, fumes, and fire risk to anything flammable in the bay. Wear eye and face protection suited to the task, gloves and clothing that will not melt, and hearing protection when grinding. Keep a clear floor, a fire extinguisher, and ventilation. Do not weld over a fuel tank, a damp concrete puddle you have not thought about, or a pile of dry leaves you intend the rake to gather later. This is safety awareness, not a welding procedure: amperage, filler, and joint design are not something an article can certify for your steel.
Build sequence: frame, hitch, tines, then wheels
Build in an order that lets you correct mistakes while the joints are still temporary. Plan and mark, square the frame, add a centered tongue and hitch fitting, mount the tine bar, install tines, then add optional wheels, skids, or a simple stop. Dry-fit against the actual vehicle hitch before any joint becomes permanent.
Square the frame first
Lay the frame members on a flat surface and mark centerlines. Cut only after you have checked that opposite sides match and that the tine bar will sit square to the tongue. Clamp, tack, or loosely bolt the rectangle or A-frame, then measure diagonals. If the diagonals do not agree, the rake will pull to one side later. Correct that now. A frame that is “close enough” in the shop becomes a dog-tracking implement in the yard.
Add a centered tongue
Align the tongue on the frame centerline so the rake tracks behind the vehicle instead of crabbing. Set hitch height with the frame blocked at the working attitude you want: tines just off the shop floor or on blocks that mimic grass height. Offer the tongue up to the real drawbar or receiver and confirm the pin slides freely. If you must twist the tongue, raise the hitch, or stack washers to make it fit, change the tongue, not the vehicle. Keep the hitch end simple: one clean hole or coupler, full pin engagement, and room for a retainer.
Mount the tine bar and tines
Mount the tine bar so the teeth point down and slightly back. That backward lean lets a tine spring over a small obstacle instead of digging like a cultivator shank. Fasten each tine so it cannot rotate into a horizontal spear and cannot pull out when it snags. Through-bolts with lock hardware, clamped saddles, or welded tabs with replaceable teeth all work if the tooth is captured. Leave access to remove a single damaged tine. Check clearance so neighboring teeth cannot clash when one flexes.
Spacing is a judgment call based on the debris you actually have. Leaves and clippings want closer teeth than light gravel. Whatever spacing you choose, keep it even. An example layout you sketch on the bar is only a starting point; adapt it to the bar length, the tines you have, and the surfaces you will rake. Do not treat a hole pattern in an article as a required specification.
Add wheels, skids, or a height stop
If the design uses wheels or skids, add them after the tines can be test-fitted, because wheel height and tine height fight each other. The goal is a setting where tines kiss the surface at working height and lift clear for transport. Skids are simpler and snag more. Wheels roll easier and introduce an axle, fasteners, and pinch points. A simple chain, pin stop, or notched bracket can hold a raised position for moving the rake across a driveway. Add retainers on every pin that sets height. A corner that drops unexpectedly puts a tine into turf or pavement.
Fit-up checks before final joints
Before final welding or final tightening, run a short checklist:
- Frame square, tongue centered, hitch pin fit confirmed on the vehicle.
- Rake attitude level enough that all tines share the work.
- Tines lean slightly back, with room to flex and a path to replace them.
- Ground clearance for transport if you built a lift, wheels, or stop.
- No sharp offcuts left where a hand will grab the frame, and no hardware that can back out.
Only then finish the joints. Never present those joints as rated, certified, or equal to a factory implement. They are as good as the materials, fit-up, and workmanship in front of you.
First hookup, adjustment, and how to use it
Do a stationary hookup check before any towing. Park on level private ground, chock the towing vehicle if needed, and back to the rake slowly. Fit the hitch pin fully and install the retainer. Confirm the rake sits level, the tines clear your heels when you walk around it, and nothing is about to pinch when the tongue rises or falls. Look under the vehicle for fuel lines, belts, or plastic guards the tongue could hit on a bounce. Keep other people away from that first coupling.
Set tine height by observation, not by a promised measurement. For leaves and clippings, the teeth should just contact the surface or ride in the top of the grass. If they bury, they will scalp turf, catch irrigation heads, and load the hitch. For light gravel or bare soil, you can let the tines work a little more firmly, but they should still skim. If the vehicle labors immediately, the front end feels light, or grass tears, raise the rake. Wet grass, hidden rocks, roots, and sprinkler heads will bend tines or peel sod even at a gentle setting.
Use overlapping passes and let the debris form a windrow. A common pattern is to work toward a pickup line, then make a finishing pass along that line. Avoid tight turns with the tines buried; lift or raise the rake for end turns if you built a way to do that. Tow at a slow walking pace or ordinary lawn-tractor working speed. Fast enough to throw debris or bounce the frame is too fast. There is no reliable acres-per-hour figure for a homemade rake, and there is no safe maximum speed to publish for an unrated implement.
Lift, tilt, or unhitch for transport, storage, and any move across hardscape. Do not drag sharp tines over a driveway if you can avoid it. Do not leave the rake parked where a child or pet can run into the teeth. After the first session, recheck the hitch pin, tine fasteners, and any wheel hardware. New joints settle. Loose joints on a towed rake are a failure in progress.
Safety limits for building and towing
Sharp tines, pinch points at the hitch and any lift, reversing, and side-hill towing are the injuries waiting in this project. Bystanders, children, and pets must stay clear of the tines and the turning path. A rake that looks slow from the seat still sweeps a wide arc and can puncture a foot or catch clothing. Never carry a rider on the rake or on the tongue. Never use the frame as a wagon for heavy debris; piling weight on an unrated hitch is how small tractors and ATVs become unstable.
Fabrication has its own limits. Anyone who cannot consistently make sound structural welds should not be the person joining a tongue to a frame that will be towed. Hire that work or bolt the joints in a way that cannot loosen. Grinding and cutting deserve the same respect you would give any shop task that throws sparks toward fuel, dry grass, or uncovered skin.
A homemade rake is not highway equipment. It is not lighted or rated as a trailer, and local road and vehicle rules may prohibit unlighted, unrated towed implements on public roads. Check those rules if there is any chance the rake would leave private property; the conservative use is private ground only. It is also not a people carrier and not a substitute for a vehicle maker’s approved implement.
Watch for failure modes instead of assuming the first successful pass proves the design. Cracked welds, a bent tongue, tines that have rotated or loosened, a hitch pin that has started to walk, a frame that will not track straight, and a towing vehicle whose front end lightens are all stop-work signs. Side slopes, sudden catches, and reversing with the tines planted can tip a light machine or jackknife the tongue. If the hitch flexes visibly, stop using the implement.
Fixes when the rake will not track, gather, or stay gentle on turf
Pulling to one side or hopping usually comes from geometry. An off-center tongue, a frame that is out of square, uneven tine height, or a bent bar after an impact will all make the rake walk. Hopping often means the tines are too vertical, too low, or hitting something hard in a rhythm. Park, unhitch if needed, and look at the centerline and the tine tips before you add more steel.
Scalped grass means the teeth are too aggressive, the frame is nose-down, or you are towing on a surface that cannot take a stiff tine. Skipping over leaves usually means the opposite: teeth too high, too far apart, or moving so fast the debris never enters the row. Wet mats of leaves can also ride up over rigid teeth; slower passes and a slightly closer spacing help more than forcing the rake down.
After any hidden object, stop and inspect. Look at welds or bolted joints at the tongue, the tine bar, and any wheel brackets. Check for bent tines that have become hooks, a hitch hole that has wallowed, and fasteners that have shifted. A repair restores strength only if the joint is remade competently. Straightening a cracked tongue “enough to finish the yard” is not a repair.
If the vehicle feels unstable, the hitch is flexing, or you would have to narrow the frame or rebuild the tongue to make the rake track, stop using it. A homemade landscape rake is worth the scrap steel and a weekend. It is not worth a rolled ATV, a torn-up lawn, or a hitch that lets go. Rebuild the coupling, narrow the implement, or park the project until the structure is honest. The useful version of this tool is the one that skims, windrows light debris, and stays attached.









