

Quick Answer: How To Reload A String Trimmer?
Reloading a string trimmer means installing fresh cutting line so the head can feed and cut again. Shut the tool down and isolate power, identify a bump-feed, auto-feed, or fixed-line head, and use line that matches the diameter marked on the head or in the manual. Wind or insert line in the direction shown on the spool, reassemble completely, and…

Pros
- Six-pack bundle listed in the product title
- Square profile line named in the product title
- Commercial 5 lb size listed for heavier use
Cons
- Trimmer compatibility is not verified in supplied data

Pros
- Six-pack bundle listed in the product title
- Star profile line named in the product title
- Commercial 5 lb size listed for heavier use
Cons
- Line length and trimmer fit are not stated in supplied data

Pros
- Title lists 1280 feet of line length
- Square profile named in the product title
- Lists a 5 lb line rating
- Title describes it as commercial-style line

Pros
- Title lists .095-inch square nylon line
- Lists 1280 feet of line length
- Manufacturer states fit with most string trimmers
- Lists a 5 lb line rating
What Reloading Means
When a string trimmer stops cutting cleanly, the cutting line is usually gone, too short to reach the grass, or stuck inside the cutting head. Reloading is the job of putting fresh trimmer line into that head so the tool can feed line out again and cut.
Reload is a broader word than it first sounds. In practice it covers three different jobs that sit next to each other on a store shelf:
- Hand-winding bulk line onto a reusable spool already inside the cutting head
- Swapping a prewound spool or drop-in cartridge so you never wind line yourself
- Pushing short, pre-cut pieces into a fixed-line head that has no inner coil at all
Those jobs use different parts. If you dismantle a cartridge-only head and treat it like a rewindable bump-feed spool, you can break index tabs that were never meant to be refilled. If you look for a spool inside a fixed-line head, you will not find one. Matching the method to the hardware is the first decision, not a later cleanup step.
Hand-winding is appropriate when the cutting head is user-serviceable, the spool, spring, and eyelets are still sound, and you have bulk line of the diameter marked on the head or listed in the owner’s manual. It is also the usual path when the spool shows winding arrows, a divider slot, parking notches on the rim, or a through-hole for quick loading.
A prewound spool, cartridge, or complete new head is the better choice when the manufacturer only supplies line as a sealed cassette, when the old spool is cracked, melted, or warped, or when clips and eyelets will no longer hold line. Some people also choose a cartridge simply to skip winding. That is a convenience choice. It does not make one method universally cheaper, faster, or more reliable.
Whatever route you take, feed means the head can pay out a controlled length of line while it spins. If the line cannot move, or if the entire coil flies out at once, the reload did not succeed even if there is nylon on the spool. If molded arrows or the owner’s manual disagree with any generic sequence, follow the arrows and the manual. They describe the mechanism you actually have.
Identify Your Cutting Head
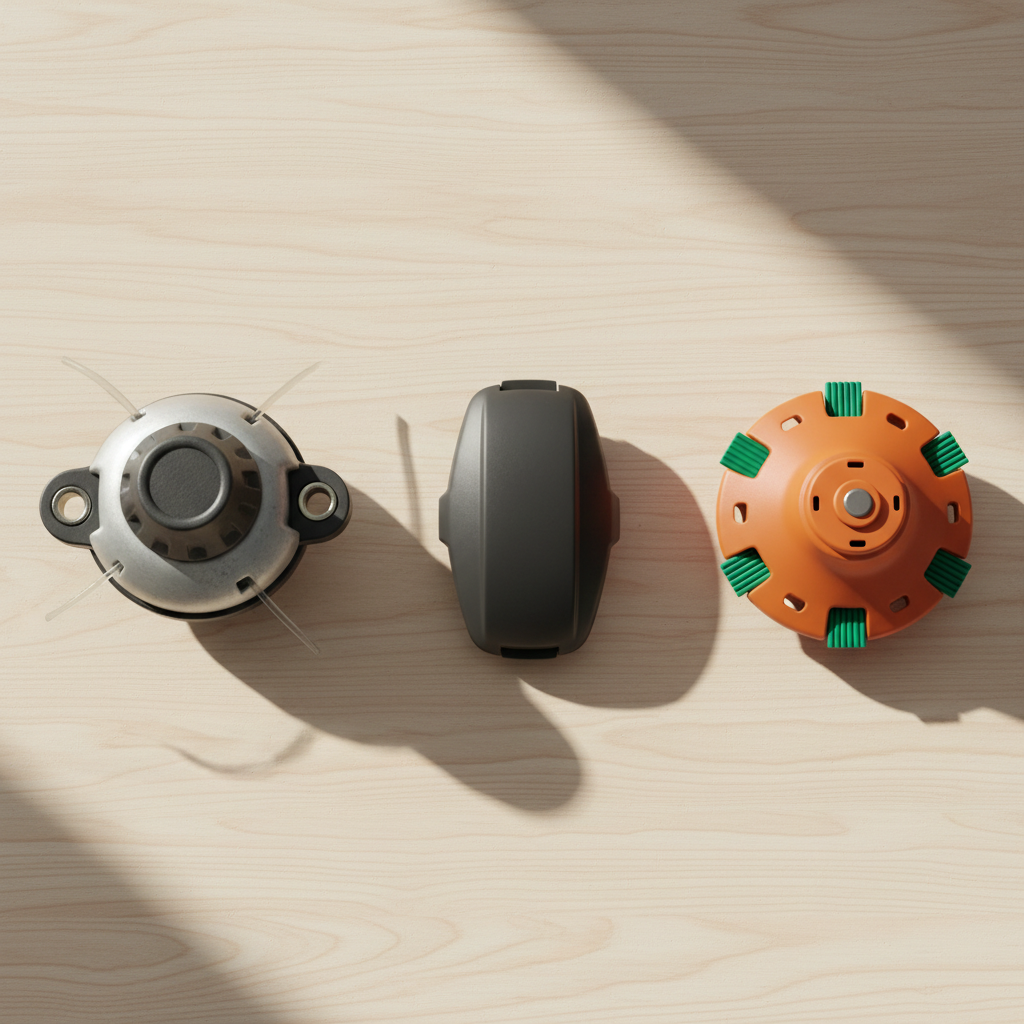
The reload method depends on the design. Look at the underside of the cutting head before you squeeze tabs or unscrew a knob. You can usually tell the type from the outside.
| Head type | What you usually see | How line is installed | How line advances |
|---|---|---|---|
| Bump-feed | Center bump knob or button; one or two side eyelets | Rewindable spool, or sometimes a prewound spool | Tap the knob on the ground while the head is spinning |
| Auto-feed | Often a flatter cover and no bump knob meant for tapping | Rewindable spool or a drop-in cartridge | The tool indexes or pulses the spool without a bump |
| Fixed-line | Slots, tunnels, or clips around the rim; no inner coil | Short pre-cut pieces locked in retainers | You replace each worn piece; the head does not pay out a coil |
How to recognize a bump-feed head
A bump-feed head has a center knob or button on the bottom. While the head is spinning, you tap that bump knob on the ground to release a short length of line. You will usually see one or two eyelets in the side of the housing where line exits. Many consumer battery, corded, and gas trimmers use this style. The cover may twist off, clip off, or come away with the knob still attached.
What usually distinguishes an auto-feed head
An auto-feed head advances line without a bump. The motor or an indexing mechanism pays out line when the remaining tails are short, or when the tool pulses the spool. The bottom may be relatively flat, with no prominent bump knob, or it may have a cover that looks similar to a bump head but is not meant to be tapped. Some auto-feed designs still use a rewindable spool. Others use a sealed prewound cartridge. Do not assume every auto-feed system opens or winds the same way.
How a fixed-line head holds line
A fixed-line head holds short pieces of line in slots, tunnels, or spring clips. There is no inner spool of coiled line. When a piece wears down or breaks, you pull out the stub and push in a new length until it locks. These heads often look simpler: a disc or cup with visible retainers around the rim. Reloading here is insertion and lock, not winding.
Quick-load and through-hole variants
Some rewindable heads are quick-load or through-hole designs. Instead of taking the spool fully apart to start the wind, you feed a long piece of line straight through the head, then twist the knob or housing to wind both sides at once. Treat these as labeled variants of a rewindable spool, not as a separate category you have to rank. Follow the arrows on that specific head.
Also note whether you have a single-line or dual-line head. One eyelet usually means one cutting strand. Two eyelets opposite each other usually mean dual-line. Dual-line spools often have a center divider and two winding chambers. If you cannot tell the type from the outside, read the molded text on the cover or the owner’s manual. Do not assume another trimmer uses the same sequence.
Safety Steps Before You Open the Head
The cutting head can store spring tension and leftover line. The tool can also start if power is still connected. Take shutdown seriously before your hands are near the eyelets or the bump knob.
Do this first:
- Release the trigger and wait until the head is fully stopped. Do not grab a still-spinning disc or reach under the debris guard while anything is moving.
- Isolate power so the tool cannot start while it is in your hands.
- Set the trimmer on a stable surface with the debris guard still attached. You will need that guard later for a safe test.
- Wear eye protection. A face shield and gloves are reasonable as well. Packed debris and short stubs of line can spring out when the cover comes off, and later tests throw grit.
How you isolate power depends on the energy source:
- Battery: Remove the battery pack and keep it away from the tool so it cannot be clicked back in by accident.
- Corded: Unplug the tool. If you only switch off a power strip, a bumped switch can restore power while the head is open.
- Gas: Let the engine and muffler cool, then disconnect the spark-plug boot so the engine cannot start. A still-hot engine and muffler are burn and fire hazards. Do not service a running or hot gas unit, and do not open the fuel system as part of a line reload.
Keep bystanders and pets away from the bench and the later test area. Even a head turned by hand can fling a short stub of line. If the head is seized on the shaft, the shaft is bent, or electrical parts are damaged, stop and use a qualified repair shop rather than forcing parts. A line reload does not require fuel-mixture work, ignition repairs, or invented lockout hardware. Follow the shutdown steps in your manual when they are more specific than this general sequence.
Choose Compatible Trimmer Line
Line diameter is the first specification that has to match. Look for a size stamped on the cutting head, printed on the spool, or listed in the owner’s manual. That marking is the authority. Sizes you see sold as common consumer diameters are only examples until you verify them for your tool.
If line is too thick for the eyelets or the spool channel, it may not seat or feed, the bump or auto-feed mechanism can bind, and the drive can work harder than it was designed to. If line is too thin, it breaks sooner, it can slip through retainers, and a dual-line head may feed unevenly. Do not treat any single diameter as universal. Compact battery units and heavier gas trimmers are often built around different sizes.
Single-line and dual-line heads also change how you buy and cut line:
- Single-line: one continuous piece wound in one chamber, or one pre-cut piece on a fixed-line head
- Dual-line: either one long piece folded or routed through a divider, or two equal pieces, depending on how the spool is built
Length is limited by spool capacity and by any fill marks or “do not overfill” ridges on the spool. There is no single length in feet or meters that fits every trimmer. If you overfill, the cover will not close cleanly or the coils will bind against the housing. If you underfill, you will reload more often, but that is safer than packing the spool until the cover stands proud.
Line shape—round, twisted, serrated, or another profile—is mostly a cutting preference unless the manual restricts the shape. Stay with nylon trimmer line made for string heads. Do not put wire, metal blades, or other unrated cutting parts in a string head. Aged, sun-baked, or tightly kinked line can also break sooner than fresh, flexible line of the same diameter. If a piece feels brittle, discard it rather than forcing it through an eyelet.
If the original spool is a sealed cartridge, buy the matching prewound part rather than forcing bulk line into a housing that was never meant to be rewound.
Reload a Bump-Feed or Rewindable Spool
This is the most common consumer sequence. Details vary by brand, so treat the steps as a typical pattern and defer to molded arrows and the manual when they differ. Labeled tap-to-advance or speed-wind covers are variants of the same idea, not a different set of physics.
Open the head and keep the parts in order
- With power isolated, turn the trimmer so you can see the bump knob and cover.
- Note how the cover comes off. Some twist after tabs are squeezed. Some use a center screw or clip. Some bump knobs stay with the cover; others stay on the spool.
- Photograph or lay out the parts in order: cover, bump knob, spring, any washers or slingers, and the spool. The spring is easy to lose and easy to install in the wrong pocket if you guess.
- Pull out leftover line. Pick packed grass, mud, and broken nylon out of the housing, eyelets, and spool slots. Debris is a common reason a freshly wound head will not feed.
- Inspect the eyelets, spool, spring, and cover latch before you spend time winding. If those parts are damaged, skip ahead to replacement rather than rewinding.
Work over a tray or a clean bench. Small washers and the spring can vanish into turf and then the head will go back together looking complete while the bump mechanism no longer moves.
Cut and seat the line
How you cut the line depends on the spool, not on a universal measurement:
- Dual-line spool with a center divider: many designs take one long piece. You seat the midpoint in a notch or slot in the divider, then wind each half into its own chamber. Other dual-line spools take two equal pieces, each anchored in its own hole.
- Single-line spool: one piece, anchored in a hole or slot, wound in one direction.
- Through-hole or quick-load head: you often do not remove the spool. You align the inner holes with the eyelets, push one long piece through until the ends are even, then wind with the knob.
Cut only as much as the spool can hold in tight, even layers. If the spool has length marks or a fill line, use those. If it does not, wind until the coils sit below the rim—never in a mound that will rub the cover. Anchor the line in the notch or hole so it cannot slip on the first turn. On through-hole heads, center the piece so both tails are similar in length.
Wind in the marked direction
Most spools have molded arrows showing winding direction. Wind that way. Winding against the arrows can keep line from feeding or cause it to dump out.
- Hold the line taut so coils lie flat and side by side.
- Keep layers even; do not stack a lump on one side of the chamber.
- Do not let coils cross.
- Do not wind so loose that the coil can slump and tangle.
- Do not wind so tight that you crush the nylon into a fused block.
On dual-line spools, wind both chambers the same way relative to their arrows and keep the two sides balanced. If one side is much fuller, that tail will behave differently in the eyelet. Tight, even coils that do not cross reduce the chance of a jam.
As you near the end, leave short tails. Most spools have parking notches on the rim. Clip each tail into a notch so the coil cannot unwind while you handle the spool. Then feed each tail through the matching eyelet in the housing as you drop the spool back in. The tails should stick out far enough to grab, but they should not be so long that they slap the guard before you test.
Close the head without trapping the line
- Seat the spring in its pocket. If you are unsure which way it faces, use your photo or the manual. A spring that is cocked or left out will keep the bump knob from working.
- Align the spool so the tails pass cleanly through the eyelets and are not pinched under the spool flange.
- Refit washers or slingers if they came off.
- Put the cover on so every tab or thread engages. The bump knob must be able to move after the cover is on. If the cover is cocked, the mechanism binds.
- Pull the parked tails out of the rim notches if they are still clipped, so they can feed freely.
- Turn the head by hand, with the tool still isolated from power, and confirm the line is not rubbing a crack or a trapped coil.
Do not overfill to get more cutting time. An overfilled spool is a common reason covers pop off and line welds itself into a solid mass.
Reload Auto-Feed and Fixed-Line Heads
Auto-feed spools and cartridges
Auto-feed heads often look similar inside to bump-feed heads: a spool, sometimes a spring, and eyelets. The difference is how line advances. Instead of a bump knob you tap on the ground, the tool indexes the spool when it senses short line or when the motor pulses.
Reloading may be a hand-wind on a reusable spool, using the same taut, even, arrow-direction rules, or a drop-in prewound cartridge that clicks into the housing. If the head takes a cartridge, do not strip the cassette to rewind it unless the manufacturer says that part is refillable. Forcing bulk line into a sealed cartridge can jam the index mechanism.
After a cartridge swap or rewind, make sure the tails exit the eyelets and the cover is fully latched. Do not tap an auto-feed head as if it were a bump head unless the manual says that model also accepts a bump. Not all auto-feed systems work the same, and slamming the wrong design can crack the cover. If the line or retainer will not seat, stop. Wrong diameter, a warped cartridge, or a broken index tooth will not improve if you force it.
Fixed-line heads
Fixed-line heads skip winding entirely.
- Remove the worn piece by pulling it out of the slot or releasing the clip as the design requires.
- Cut a new piece to the length the head or manual describes. If no length is marked, use a piece long enough to lock in the retainer and extend to a useful cutting radius, but not so long that it hits the debris guard before the head is running.
- Push the piece through the tunnel or under the clip until it locks. Many designs have a shoulder or hole the line must pass so it cannot fly out.
- Repeat for each station if the head holds more than one piece.
- Tug each piece by hand. If it slides, it is not locked.
Do not force oversized line into a small slot. Do not substitute wire, coat hangers, or metal pins. Worn or cracked retainers will not hold even the correct line; replace the head or the retainer parts.
Reassemble, Set the Feed, and Test
Before you restore power, check that the assembly is mechanically complete:
- Cover fully latched or screwed on, with no gap on one side
- Spring in its pocket, not beside the spool
- Bump knob, if present, moves and returns
- Tails through the eyelets, not trapped under the cover
- No leftover washers or clips still sitting on the bench
- Debris guard still installed, including the cut-off knife if the guard has one
The cut-off blade on the debris guard trims line that is too long once the head is spinning. Leave it in place. Exact protruding length is model-specific; the knife is how many designs set that length for you. Do not remove the guard to “get more reach.”
Restore power only after the head is closed: reinstall the battery, plug in a corded unit, or reconnect the spark-plug boot on a cooled gas unit after you have confirmed the area is clear.
Test outdoors, on stable footing, away from people, pets, windows, vehicles, and loose gravel.
- Hold the trimmer in the normal operating position with the guard between you and the head.
- Wear eye and face protection. Line and debris can whip when the head spins.
- Use a brief trigger burst. Let the head reach speed, then release.
- If you have a bump-feed head and the tails are short, tap the bump knob on firm soil or a paved surface the way the design intends. Do not slam the head on rocks, curb edges, or concrete lips. Hard impacts crack housings and flatten bump buttons.
- If a cut-off knife is present, extra-long line should trim as the head spins. If line stays wildly long and is not cutting off, stop and check that the guard is the correct one and is fully mounted.
- Listen and look for a cover that is walking off, a spool that dumps all its line, or a head that will not turn. Shut down and isolate power again before you open it.
If the tool vibrates much more than it did before the reload, the dual-line tails may be badly uneven, or the spool may be sitting crooked. Power down and correct that before you keep cutting.
When to Replace the Head or Spool Instead
Rewinding cannot fix a head that can no longer control the line. Replace parts, or the whole cutting head, when you see:
- Eyelets that are broken, egg-shaped, razor-sharp, or missing their inserts
- A spool that is cracked, melted, or warped so coils will not stay in their channel
- A spring that is missing, bent, corroded, or too weak to return the bump knob
- A cover that will not stay latched or that has sheared tabs
- A bump button that is stripped, crushed, or stuck
- Fixed-line clips that no longer lock
- A housing that is cracked around the shaft connection
A prewound spool or cartridge is the practical fix when the inner reel is the only worn part and your model sells that consumable. An entire new head is the practical fix when the housing, eyelets, or latching system is damaged.
Aftermarket heads are not universal. Shaft threads, arbor size, rotation direction, and guard clearance differ. Use the parts list for your model rather than assuming a head will fit every trimmer. Whether a specific head is user-serviceable, and what a third-party head or non-OEM line does to a warranty, are questions for that model’s documentation. If the trimmer uses a head the manufacturer does not consider owner-serviceable, do not grind or drill it open. Take it to a dealer or replace the complete assembly as the parts diagram shows.
If the Line Still Will Not Feed
An empty spool is only one reason a trimmer stops cutting. After a reload, these are the usual mechanical causes. The fix is almost always to isolate power, open the head, and correct the parts—not to force the bump knob.
The bump knob does nothing
Common causes include a spring left out, inverted, or not in its pocket; a cover that is not fully seated so the knob cannot travel; line wound against the arrows; tails still clipped in the parking notches; line that is welded or crossed so the spool cannot turn; and grass packed under the spool. Hitting the knob harder will not free a coil that cannot rotate.
Line dumps out all at once
This often means the coil was wound loose, in the wrong direction, or never anchored in the divider slot. The spool then freewheels and throws a tangle. Rewind taut and even, in the marked direction, with the midpoint or ends locked where the spool requires.
Line fuses into a solid mass
Heat and friction can weld nylon coils together, especially if the spool was overfilled, the line was very loose and then slammed, or the head was run while packed with debris. Cut out the fused block, clean the housing, and rewind below the rim. Let a hot head cool before you pull it apart.
Fresh line keeps breaking at the eyelets
Sharp or worn eyelets act like knives. Line that is too thin for the head also fails early. So does line that exits at a kink because it was pinched under the spool. Replace damaged eyelets or the head, and verify diameter against the marking on the head or in the manual.
The head will not turn, or the motor sounds strained
An overfilled spool, a cover closed on a trapped coil, or line thicker than the channel can lock the head. Isolate power immediately. Do not keep triggering a jammed head. Clear the jam and return to the specified line size.
Auto-feed never advances
Besides the winding problems above, the index mechanism may be dirty, the cartridge may be the wrong part, or the line end may not be through the eyelet. Clean first. Do not oil the inside of a string head unless the manual calls for a specific lubricant; oil plus grass becomes paste.
If you have worked through winding direction, debris, spring placement, line diameter, and visible damage, and the head still will not feed, the practical next step is a replacement spool or head from the model’s parts list. If the drive shaft or motor is the actual fault, that is a job for a qualified technician rather than another rewind.









