

Quick Answer: How To Reload String Trimmer?
Make the trimmer safe first, then match the reload method to the head you have. Isolate power, let the head stop, and read any diameter or winding marks on the cap, spool, or shield. Bump-feed and auto-feed heads take a drop-in spool or loose line wound with the molded arrows; fixed-line heads use short locked pieces. Use the specified line…

Pros
- Six-pack bundle listed in the product title
- Square profile line named in the product title
- Commercial 5 lb size listed for heavier use
Cons
- Trimmer compatibility is not verified in supplied data

Pros
- Six-pack bundle listed in the product title
- Star profile line named in the product title
- Commercial 5 lb size listed for heavier use
Cons
- Line length and trimmer fit are not stated in supplied data

Pros
- Title lists 1280 feet of line length
- Square profile named in the product title
- Lists a 5 lb line rating
- Title describes it as commercial-style line

Pros
- Title lists .095-inch square nylon line
- Lists 1280 feet of line length
- Manufacturer states fit with most string trimmers
- Lists a 5 lb line rating
Identify the head before you cut new line
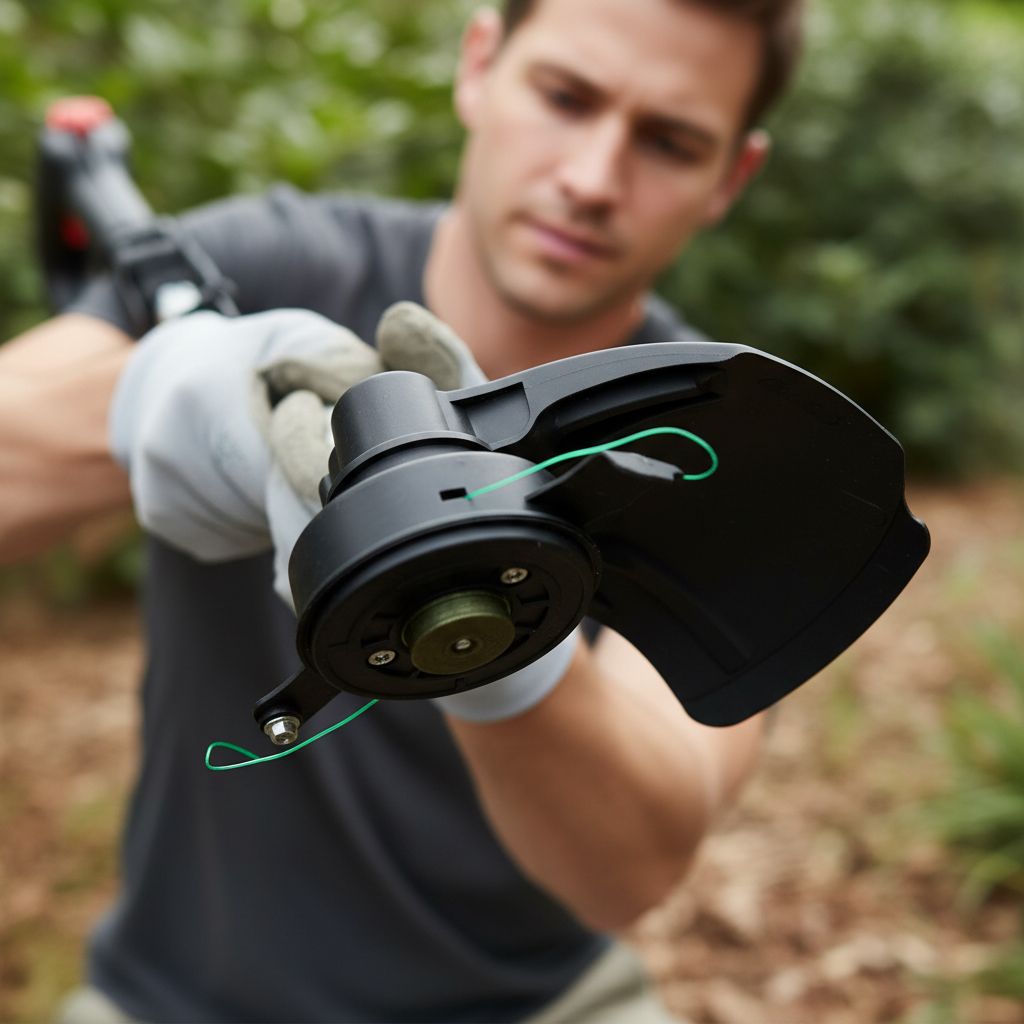
String trimmer heads are not interchangeable in method. The same brand, and sometimes the same model family, can ship a bump-feed head, an automatic-feed head, a through-eyelet winder, or a fixed-line head. If you start cutting trimmer line before you know which design you have, you can wind the wrong length, force a spool that will not seat, or try to rewind a head that never used a continuous spool at all.
Look at the underside of the cutting head and at how the last of the line behaved:
- Bump-feed head. A spring-loaded bump knob sits in the center of the cap. While the head is spinning, tapping that knob on the ground is supposed to release a short length of line. When the spool is empty, the knob still clicks or compresses, but little or no line comes out of the eyelets.
- Automatic-feed head. There is often still a cap and a hidden spool, but you are not expected to tap the ground to advance line. The mechanism is designed to pay out line as it wears. When it is empty, the motor may keep spinning while the remaining stubs stay short or disappear into the eyelets.
- Through-eyelet or external-wind head. You can usually see a clear path from one eyelet, across an inner channel or hub, and out the opposite eyelet. Fresh line is pushed through as one piece and then wound by turning the bump knob, a hex, or the spool itself. You may not need to empty a cartridge to reload.
- Fixed-line head. There is no long stored coil. Short pre-cut segments lock into slots, posts, clips, or pairs of holes. When line is spent, you see worn stubs in those holders rather than an empty spool.
Also decide how the line is stored. Some heads take a removable spool that lifts out as a unit. Others keep a spool in place and expect you to wind loose line onto it. Dual-line heads send two ends out through opposite eyelets. Single-line heads feed one end, or two ends that still share one chamber. You can often tell the difference without a manual: count the eyelets in use, look for a divider wall or two winding chambers on the spool, and see whether one continuous piece or two separate lengths were installed.
Before you cut anything, read the molded text on the cap, spool, and debris shield. Diameter callouts, “this side up,” and winding-direction arrows are more reliable than a generic how-to when they conflict with general advice.
Make the trimmer safe to open
A string trimmer can start, or the head can still be dangerous, after you think the job is over. Isolate power before any cap, knob, or spool comes off.
- On a battery model, remove the battery pack and keep it away from the tool.
- On a corded-electric model, unplug the cord from the outlet, not just from an extension-cord junction you might reconnect by habit.
- On a gasoline model, switch the engine off, wait until the head has fully stopped, and pull the spark-plug boot off the plug so the engine cannot start while your hands are on the cutting head. Do not use this job as a reason to open the carburetor, drain fuel, or service the ignition beyond that isolation step.
Wait for the cutting head to stop turning. Line that is still whipping can cut skin and throw debris. The debris shield often includes a small line-cutting blade that trims freshly fed line to the working radius. That knife stays sharp when the motor is off. Keep fingers off the inner rim of the guard.
Eye and face protection is reasonable for both the reload and the first test run. Gloves help when you handle a grooved eyelet or a stubborn cap, but they do not replace isolating power. Work on a stable surface, keep bystanders back, and treat the head as a cutting tool even when it is not spinning.
Choose line that actually fits the head
Compatible line is a fit-and-feed problem, not a “thicker is better” upgrade. The diameter that belongs in your head is usually stamped on the spool, the cap, the shield, or listed in the model manual. Use that marking. There is no single consumer size that fits every gas, electric, and battery string trimmer.
If line is too thick, it may not pass the eyelets, may keep the cap from seating, or may load the drive harder than the head was built to handle. If line is too thin, it can slip through holding notches, break at the eyelet, fail to lock on a fixed-line post, or feed in uneven bursts. The line must still let the cap close fully and must leave the bump knob or auto-feed parts free to move.
Shape is a preference and a compatibility choice:
- Round line is the most widely accepted. It flexes, winds smoothly, and is the shape many consumer heads were designed around.
- Twisted, edged, or multi-sided line can feel more aggressive on thick weeds, but it is often stiffer. Stiffer line can be noisier, harder to stuff through eyelets, and more likely to refuse a tight auto-feed or bump mechanism that expects round line.
Those are qualitative tradeoffs, not a ranking. If a head or manual specifies a shape, follow that. If it only specifies diameter, start with a shape the eyelets will actually accept.
Format matters as much as diameter. A pre-wound spool is smarter when your head is a cartridge style, the original spool is cracked, or you want to avoid winding. Bulk line is smarter when the head is designed to be rewound, a matching cartridge is not available, or you already have compatible loose line. Do not assume a generic drop-in spool from another brand will match the hub, spring pocket, or “this side up” geometry. The line still has to match the diameter the eyelets can pass.
Remove the spent line or old spool
All of the common reload methods start with the same inspection. Photograph or note the order of the cap, bump knob, spring, any washer, and the spool before parts come apart. Springs and small washers are easy to invert or lose, and an inverted spring is a frequent reason a freshly loaded head will not feed.
Release styles vary. Many consumer caps press in and turn a quarter turn. Some unscrew. Some retain the spool with a center bump knob or a nut under the head. Thread direction is not universal; if a fastener will not loosen in the direction you expect, stop and check the head marking or the model instructions rather than forcing it. Do not treat any one nut size or torque as standard.
Once the cap is off:
- Lift out the spent line or the old spool. Pull fused or tangled line off rather than leaving a welded lump in a chamber.
- Keep the spring and washers in the order you found them.
- Look through both eyelets. Grooves, egg-shaped wear, or sharp burrs will fray new line as soon as it starts to move.
- Check the spool for cracks, a missing divider on a dual-line design, and a hub that no longer locates on the shaft.
- Clear packed grass and dirt from the hub so the spool can turn.
Replace the head rather than rewinding if the housing is cracked, the bump mechanism is rounded off, the spring is missing and you cannot identify the correct replacement, or the eyelets are worn into sharp ovals. Those are wear items that a new coil of line will not fix.
Install a pre-wound replacement spool
A drop-in spool is the fastest path on many bump-feed and automatic-feed heads, but only when the cartridge actually matches the original. Compare the hub, the overall shape, the location of the spring pocket, and any “this side up” or arrow marks. If those do not line up, the cap will not lock or the line ends will not reach the eyelets.
Typical sequence:
- Confirm the spring sits in its pocket the same way it did on the old assembly. The bump knob or auto-feed plate should still compress and return.
- Set the new spool onto the hub in the marked orientation. Do not flip a dual-chamber spool just to make the line ends look closer to the holes.
- Pull each line end through its eyelet so a usable length stands outside the head. On a dual-line head the ends should exit opposite eyelets at similar lengths so the head stays balanced.
- Seat the ends so they cannot slip back inside while you close the cap. Many spools have temporary holding notches for this.
- Install the cap and turn or snap it until it is fully latched. A cap that is only partly on can fly off when the head spins.
Not every head accepts a generic cartridge. If the replacement spool rocks, leaves the spring unseated, or keeps the bump knob from moving, it is the wrong part. Do not grind or jam it in. There is also no reliable way to promise how many hours a pre-wound spool will last; that depends on what you cut and how often the line breaks.
Rewind loose line on the original spool
Rewinding the original spool is the core method on most consumer rewind-in-place heads. Do not invent a universal length or turn count. Use the length in the manual if it is printed there. If it is not, cut pieces that fill the spool without burying the rims, stacking wild overlaps, or packing line so tightly that it fuses. Equal lengths matter on a dual-line head.
Find the winding-direction arrows or “wind this way” text on the spool or housing. Winding against those marks is one of the most common reasons line will not advance. Keep tension firm and even so the coils lie side by side. Do not stretch the line so hard that it digs into itself or into a plastic divider.
Single-line winding
On a single-chamber spool you usually hook or seat one end in a slot, then wind the rest in the marked direction. Leave enough free end to reach through the eyelet after the spool goes back in the housing. If the head only uses one exit hole, do not force a second end out the unused side.
Dual-line winding
Dual-line heads typically keep the two lengths in separate paths or chambers so the ends exit opposite eyelets at similar lengths. Common patterns include:
- One piece of line folded at the midpoint and hooked in a center slot, with each half wound into its own chamber.
- Two equal pieces, each started in its own hook or hole.
Do not let one side cross over the divider into the other chamber. Crossing over, reverse winding, and overfilling are the usual causes of a no-feed head or of line that welds into a solid lump after the first hot run.
When the chambers are reasonably full but the rims are still visible:
- Clip or seat each free end in the temporary holding notches on the spool rim, if the spool has them.
- Set the spool back on the hub in the original orientation.
- Release each end from its notch and route it through the matching eyelet.
- Pull the ends even, then close the cap.
The holding notches exist so the coils do not spring loose while you handle the spool. They are not a substitute for routing the line through the eyelets before you run the tool.
Load a through-eyelet or external-wind head
Some heads never ask you to lift a full spool of loose coils. Instead you feed one piece of line through both eyelets and wind from the outside. This is not the default for every modern trimmer, and it is the wrong method if your head has no through-channel or if the line diameter will not pass both eyelets.
Generic sequence:
- Align the eyelets with the inner channel or hub slot if the design requires that alignment. Some heads have a mark or a window that shows when the path is open.
- Push one piece of compatible line through until the two ends outside the head are about even. Centering first keeps one side from running out long before the other.
- Rotate the bump knob, hex, or spool in the marked direction so the line winds onto the hub. Stop when the remaining ends are a practical working length, not when you have forced extra coils past the rim.
- Confirm both ends still exit their eyelets and that the knob or cap is fully seated.
Do not use this method on a fixed-line head, on a cartridge that has no through-path, or with line that is thicker than the eyelets. There is no universal number of knob turns. A completed wind looks like even ends, a seated cap, and coils that are contained inside the housing rather than pinched in the cap joint.
Replace line on a fixed-line head
Fixed-line heads do not use a continuous spool, so rewind steps will not help. Worn stubs are released from slots, posts, fold-through holes, or clips, and new pre-cut pieces are locked in their place. Some designs are tool-free. Others need a key, a cover off, or a specific motion to open the holder. Do not assume every fixed-line head is a simple push-in fit.
Use the same diameter on both sides, and keep the exposed lengths similar. Unequal sticks make the head vibrate. If one side breaks, replace the pair rather than running a long piece opposite a stub.
A few heads accept only the manufacturer’s pre-cut pieces because the lock geometry is unique. If the marking on the head calls for those pieces, generic bulk line may not stay seated. Treat that as a possibility, not as a rule for every fixed-line design, and go by the head marking.
After the new segments click or fold into place, tug each one to confirm it is captured before you restore power. A piece that can slide out under centrifugal force is not installed.
Reassemble the head and confirm the line feeds
Put the parts back in the order you photographed. The spring should sit in its pocket, the spool should land on the hub without rocking, and the bump knob, if present, should move and return. The cap must be fully latched, not merely resting on the threads or clips. A correctly seated assembly feels solid; a half-on cap usually has a visible gap or spins independently of the housing.
Restore power only after the head is closed: reconnect the spark-plug boot on a gas model, install the battery, or plug a corded tool back in. Wear eye protection. Start the trimmer in a clear area with no people, pets, or loose objects nearby.
- On a bump-feed head, let the head reach speed and tap the bump knob on bare ground. Fresh line should advance from the eyelets.
- On an automatic-feed head, let it run briefly. The mechanism is designed to pay out line without that tap.
- On a fixed-line head, there is nothing to advance. Confirm the sticks stay locked and the tool does not shake hard.
Extra-long ends are usually cut to working length by the line-cutting blade on the guard. Stay away from that knife while the head is spinning. Stop immediately if the head wobbles hard, the motor sounds strained, the cap starts to loosen, or line does not advance. Those are signs of a missing spring, a crossed wind, the wrong diameter, or a cap that is not locked.
Fix common feed problems and know when to replace the head
Most feed failures after a reload are mechanical, not mysterious.
- Line will not advance. The wind may be against the arrows, the spool may be overfilled, the spring may be missing or upside down, or debris may be packed in the hub. Strip the head, inspect the spring, and rewind in the marked direction with less line if the rims were buried.
- Line snaps at the eyelet. The eyelet may be grooved, the line may be too thin for that head, or a burr may be cutting the strand each time it flexes. Replace worn eyelets if they are serviceable; replace the head if they are molded in and egg-shaped.
- Line melts into a lump. Overly tight winding, crossed coils, and heat from heavy cutting can fuse nylon to itself. The spool has to be stripped and rewound. Do not keep bumping a welded spool and expecting it to peel free in use.
- Cap will not seat. The line is probably too thick, the spool is overfilled, or a washer is in the wrong place.
- Head vibrates. Dual-line ends or fixed-line sticks are unequal, or the spool is damaged.
Cleaning and rewinding fix many jams. Cracked housings, rounded bump mechanisms, and badly worn eyelets are reasons to replace the whole head. Consumable parts such as line, a cracked spool, or a tired spring are worth swapping if you can identify the correct replacements. If the molded marks on the head or the model instructions contradict these general steps, the marks and the manufacturer’s sequence win. Head designs differ by brand and model, and a sequence that works on a rewindable dual-line bump head will not work on a fixed-line or through-eyelet unit.
Stop following generic advice when the housing is broken, the drive adapter is damaged, the engine or motor shows problems beyond a stalled head, or you cannot isolate power confidently. A qualified service shop is the right next step for those repairs. Do not defeat guards, interlocks, or the shield knife to make a mismatched line “work.”









