

Quick Answer: How to Respool a Weed Wacker
To respool a weed wacker, remove the trimmer head cap or spool housing, take out the old string completely, measure and cut new trimmer line to the recommended length (typically 15 to 20 feet), wind the new string tightly onto the spool following the directional arrows, thread the ends through the eyelets, and reassemble the head. The exact process varies slightly depending on whether your trimmer has a fixed spool, bump-feed mechanism, or auto-feed design, but the core winding principle remains the same across all types.

Pros
- Rapid Replace head listed for simpler string reloading
- Digital ignition listed for easier starting
- LowVib anti-vibration system listed to reduce fatigue
- Air purge listed to aid starting
Cons
- Listed weight is 12.2 pounds
- Starting and speed claims are manufacturer-stated only

Pros
- Versatile attachment system covers multiple outdoor maintenance tasks with one machine.
- Strong gas engine is better suited to demanding cutting jobs than many lightweight trimmers.
- Extended reach helps handle high limbs and hard-to-access areas from the ground.
- Quick-Start feature adds convenience for a gas-powered tool.
Cons
- As a 2-stroke gas tool, it requires fuel mixing and regular maintenance.
- Gas-powered operation is typically louder and less convenient than battery-powered alternatives.
- The multi-tool format may be more complex than a single-purpose trimmer for users with only basic yard needs.
Overview: The PROYAMA 42.7cc 5-in-1 multi-functional trimming tool combines a hedge trimmer, pole saw, string trimmer, brush cutter, and extension rod into one gas-powered yard system. It is built for users who want one machine to cover several outdoor maintenance tasks.
Performance: Its 2 HP, 2-cycle 42.7 cc engine is positioned for more demanding cutting jobs, while the pole saw offers an adjustable working range from 8.2 to 11.4 ft and a 10-inch cutting length. The Quick-Start system and ergonomic handle are practical additions for routine use.
Considerations: Because it is gas-powered, this tool will require fuel mixing and ongoing maintenance, and it is likely less convenient and louder than battery alternatives. The multi-attachment setup is useful, but it also adds complexity when switching between tasks.
Verdict: This PROYAMA model is best suited to homeowners who need reach, power, and versatility in a single tool. It is a strong fit for mixed yard work, but less ideal for buyers who prefer lightweight, low-maintenance equipment.

Pros
- Includes the battery and charger, so the kit is ready for setup out of the box.
- Attachment changes are designed to be quick and simple, which saves time during multi-step yard work.
- Comfort-focused design aims to reduce arm fatigue and vibration during extended use.
- Versatile enough to cover several common homeowner landscaping tasks in one system.
Cons
- Only one 40V 4Ah battery is included, so longer jobs may require recharge time or an extra battery.
- The 8-inch pole saw and 10-inch brush cutter are better suited to light-to-moderate tasks than heavy-duty clearing.
- The attachment-based design adds more parts to store and manage than a single-purpose tool.
Overview: The Wild Badger Power 40V 4-in-1 Multi-Tool Kit combines a string trimmer/edger, pole saw, hedge trimmer, and brush cutter into one cordless system. It is built for homeowners who want a flexible yard tool that can handle several common maintenance jobs without switching between multiple machines.
Performance and features: The included 40V 4Ah battery gives the tool cordless freedom, while the brushless motor design is aimed at efficient operation. The 15-inch trimmer/edger, 16-inch hedge trimmer, 8-inch pole saw, and 10-inch brush cutter provide useful coverage for routine trimming, shaping, and light brush work. Quick attachment swaps make it easy to move from one task to another.
Drawbacks and considerations: This is a multi-tool kit, so it has more parts to keep track of than a dedicated trimmer. The single included battery may also be limiting for larger properties or longer sessions. Based on the listed specs, the saw and cutter sizes are practical for moderate yard work rather than heavy commercial clearing.
Verdict: This kit is a strong fit for homeowners who want one cordless platform to handle edging, trimming, hedge care, and light cutting. If you value versatility, comfort, and easy setup more than maximum-duty power, it offers a practical all-in-one solution.

Pros
- Six tool functions on one 26cc two-stroke power head
- Tool-free quick-connect system for switching attachments
- Cutting head rotates 180 degrees for tight corners
- Spill-proof fuel tank, according to the manufacturer
- EPA-certified, per manufacturer statement
Cons
- Listed at 36 pounds, which may tire you on long jobs
- Requires mixing 25:1 fuel-to-gasoline before every use
Understanding Your Weed Wacker Spool Type
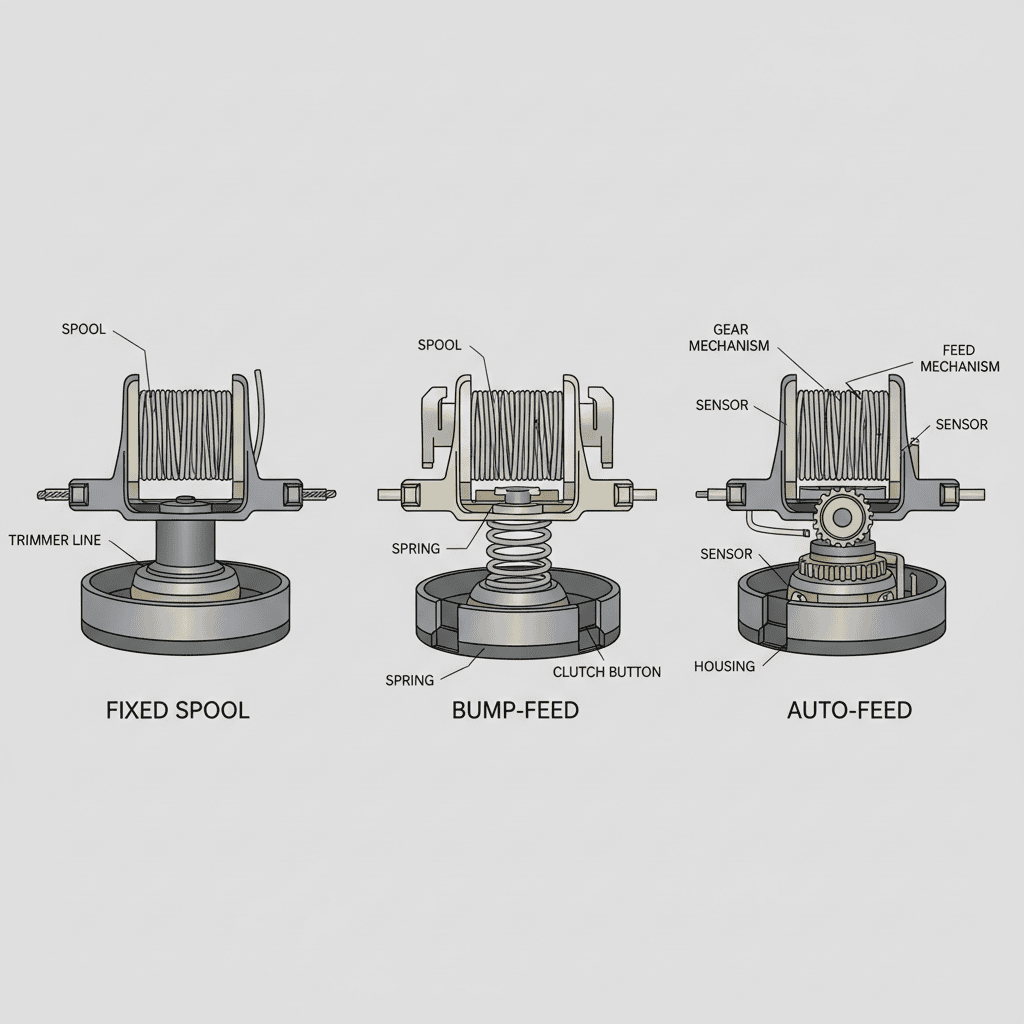
Before you start respooling, identify which type of spool mechanism your trimmer uses, as this affects how you wind the string and reassemble the head.
Fixed Spool Design
Fixed spools are the simplest type. The spool stays in place while you manually wind string onto it. Once wound, you secure the string ends in notches or eyelets, and the head doesn’t advance the line during use. You manually tap the trimmer head on the ground to extend new line, this is called the bump-feed feature, but it refers to how the line advances, not the spool type. Fixed spools are common on budget and mid-range trimmers.
Bump-Feed Mechanism
Bump-feed trimmers have a spring-loaded spool that automatically advances a small amount of line each time you tap the trimmer head on the ground. The spool is still manually wound, but the mechanism inside handles line advancement. This design is popular because it extends line length without stopping to manually feed it.
Auto-Feed Spool
Auto-feed spools advance line automatically during use without tapping. These are the most convenient but also the most complex to respool correctly. String must be wound precisely or the automatic advance won’t work properly. Some auto-feed designs use a single line, while others use two lines for wider cutting paths.
How to identify your spool type: Check your trimmer’s manual or look at the trimmer head. If you see a small spring under the cap or a mechanism that moves freely, you likely have bump-feed or auto-feed. If the cap simply snaps or screws off and the spool is fixed, you have a fixed spool design.
Tools and Materials You’ll Need
Gathering the right supplies before you start makes the respooling process faster and prevents frustration.
- Trimmer line (cutting string): Purchase the correct diameter for your trimmer. Common sizes are 0.065″, 0.080″, and 0.095″. Check your manual or the old spool for the correct size.
- Replacement spool (optional): Some trimmer designs allow you to replace the entire spool rather than rewinding the old one. This is faster but more expensive.
- Scissors or trimmer line cutter: For cutting the string to length.
- Screwdriver or socket set: Depending on your trimmer, you may need a Phillips or flathead screwdriver, or a socket to remove the spool cap.
- Work surface: A clean, flat workspace helps you see what you’re doing and prevents losing small parts.
- Safety glasses: While not essential, they protect your eyes when the old string springs loose.
How to Access Your Trimmer Head and Remove Old String
The first step is safely accessing the spool without damaging the trimmer head or your hands.
Step 1: Unplug or Disconnect the Power
If your trimmer is electric (corded or battery-powered), unplug it or remove the battery. If it’s gas-powered, let the engine cool completely and disconnect the spark plug wire to prevent accidental starting. This is critical for safety, never work on a trimmer that could start unexpectedly. Readers comparing setup options can review our technical analysis on marshall stanmore iii vs harman kardon onyx studio 8.
Step 2: Remove the Trimmer Head Cap
Most trimmer heads have a retaining cap that twists counterclockwise or snaps off. Look for arrows or markings showing which direction to turn. Some caps are held by a single bolt or screw in the center. Use the appropriate tool and turn slowly and steadily. If the cap is stuck, spray it lightly with penetrating oil and wait a few minutes before trying again.
Step 3: Remove the Old String
Pull out any remaining string from the spool. Old string is often tangled or wound tightly, so pull firmly and unwrap it completely. If the old string is extremely tangled, you may need to carefully pick at it with a flathead screwdriver. Once the spool is clear, wipe away any debris or dirt with a dry cloth. For complementary field maintenance guidelines, examine our breakdown of dyson v8 cyclone vs bissell featherweight stick.
Safety note: If the spool has a spring underneath, be gentle when removing it so the spring doesn’t fly out unexpectedly. Some springs are under tension.
Step-by-Step Instructions for Winding New String
Proper winding ensures your string feeds correctly and doesn’t tangle or break prematurely. To evaluate matched hardware tolerances, consult our detailed overview of bissell crosswave hydrosteam vs shark stainforce.
Step 1: Measure and Cut Your String
Most trimmers use between 15 and 20 feet of line per spool, depending on the trimmer size. Check your manual for the exact length. Cut the string cleanly with scissors or a trimmer line cutter. Having the line cut to the correct length prevents overloading the spool, which causes winding problems and string jams.
Step 2: Locate the Winding Direction Arrows
Look at the spool carefully. Most spools have printed arrows showing which direction to wind the string. This is crucial, winding in the wrong direction means the string won’t feed properly when you reassemble the trimmer. If you can’t find arrows, check your manual or the trimmer manufacturer’s website.
Step 3: Insert the String into the Spool Slot
Most spools have a small slot or notch near the edge where you insert the string end. This anchors the string so it doesn’t unwind while you’re winding. Insert the string about 2 inches into the slot and hold it firmly with your thumb and forefinger.
Step 4: Wind the String Tightly
Rotate the spool in the direction indicated by the arrows, winding the string in neat, overlapping layers. Maintain consistent tension, the string should be tight enough that it doesn’t slip, but not so tight that you strain your hands. Wind slowly and deliberately. Each wrap should lie flat against the previous one without gaps or bunching.
For a fixed spool, you’ll typically wind all 15 to 20 feet of string. For bump-feed and auto-feed spools, you may wind only part of the string, with the remaining length left to hang out. Check your manual for the exact configuration for your trimmer.
Step 5: Secure the Other String End
Once you’ve wound most or all of the string, secure the free end in another slot or notch on the spool. This prevents the wound string from unwinding. If your spool has only one slot, you’ll leave the free end loose for now and secure it later during reassembly.
For Dual-Line Configurations
Some trimmers use two separate lines for a wider cutting width. If your trimmer is dual-line, you’ll wind two separate pieces of string on the same spool, typically in opposite sections. Follow the same tight-winding principle for each line. Your manual will show exactly how much string to leave protruding from each eyelet.
Reassembling Your Trimmer Head
Correct reassembly is just as important as proper winding, mistakes here will cause string feed problems.
Step 1: Thread the String Through the Eyelets
The trimmer head has small holes (eyelets) where the string exits. Pull the string ends through these holes according to your manual’s diagram. For single-line trimmers, one end goes through one eyelet. For dual-line trimmers, each line goes through its own eyelet. Make sure the string is straight and not twisted as it exits.
Step 2: Leave the Correct Amount of String Protruding
The amount of string that hangs out beyond the eyelets affects cutting performance and how often you need to respool. Most manufacturers recommend leaving 4 to 6 inches of string protruding. Too much string wastes material and can cause vibration; too little reduces cutting width. Your manual will specify the exact length for your model.
Step 3: Reattach the Spool Cap
Carefully push the spool back into the head, making sure nothing is twisted or pinched. Screw or snap the retaining cap back on, twisting clockwise. Tighten it firmly but don’t overtighten, you should hear or feel a solid click, but you shouldn’t need excessive force.
Step 4: Test Before Operating
Before using the trimmer, manually rotate the head a few times to ensure the string feeds smoothly and doesn’t catch or bind. If it does, disassemble again and check that the string is threaded correctly and wound in the right direction.
Common Mistakes and Troubleshooting
Even experienced users encounter respooling problems. Here’s how to fix the most common issues.
String Isn’t Feeding Properly
Likely cause: String wound in the wrong direction or not wound tightly enough.
Fix: Disassemble the head and check the directional arrows. If you wound counterclockwise when you should have wound clockwise, rewind the string in the correct direction. Also ensure each wrap is snug against the previous one with no loose or gappy sections.
String Tangles or Bunches Up
Likely cause: Overlapping wraps, string wound too loosely, or too much string on the spool.
Fix: Rewind more carefully, ensuring each wrap lies flat. Don’t exceed the recommended string length. If you’re using a replacement spool instead of rewinding, make sure it’s the correct type for your trimmer.
String Breaks Immediately After Respooling
Likely cause: String damaged during winding, wound too tightly causing stress, or string catching inside the head during operation.
Fix: Inspect the string for cuts or kinks. Unwind and rewind with slightly less tension. Check that the string is threaded cleanly through the eyelets and isn’t pinched anywhere inside the head.
Head Won’t Close or Cap Won’t Reattach
Likely cause: Too much string on the spool or string twisted in the head.
Fix: Remove some string length and rewind, using only the recommended amount. Check that the string isn’t bunched or twisted before reassembling the cap.
Auto-Feed Isn’t Working
Likely cause: String wound incorrectly for auto-feed configuration or winding tension inconsistent.
Fix: Auto-feed spools are more sensitive to winding quality. Rewind with consistent, firm tension and follow your manual precisely for the number of wraps and string length. Some auto-feed designs require the string to be wound in a specific pattern, not random layers.
Model-Specific Considerations
While the core respooling process is similar across most trimmers, some brands and designs have unique quirks worth noting.
Major Brand Variations
Ryobi and DeWalt: Most Ryobi and DeWalt string trimmers use straightforward fixed or bump-feed spools. Their manuals are typically detailed and clearly marked with winding direction arrows.
Black+Decker: Black+Decker trimmers often use simple fixed spools, but some models have proprietary auto-feed designs. If your Black+Decker manual mentions a specific brand of trimmer line, stick to that recommendation, some auto-feed designs are picky about string diameter.
Echo and Stihl: Professional-grade trimmers from Echo and Stihl often have more complex spool mechanisms. These brands’ manuals are usually excellent, so follow them closely.
Aftermarket vs. OEM String
Aftermarket trimmer line (third-party brands) works fine in most trimmers as long as you match the diameter. However, some auto-feed designs perform better with OEM (original equipment manufacturer) string. If your auto-feed trimmer has persistent feed problems with aftermarket string, try the manufacturer’s branded string to see if it resolves the issue.
Single vs. Dual-Line Spools
Single-line spools wind one continuous string. Dual-line spools wind two separate pieces that exit opposite sides of the head for a wider cutting path. Dual-line spools require more precise winding because both lines must feed at the same rate. If one line feeds faster than the other, you’ll get uneven cutting. Wind both lines with identical tension and follow your manual’s exact configuration.
Common Questions on How To Respool Weed Wacker Answered
How often should I respool my weed wacker?
This depends on how often you use your trimmer and how much trimming you do. Light users might respool once or twice a year, while regular users may need to respool every few weeks during growing season. You’ll know it’s time when the string wears down to 1 to 2 inches or stops extending from the eyelets. Some bump-feed and auto-feed trimmers alert you when string is running low.
Can I use any trimmer line diameter in my weed wacker?
No. Using the wrong diameter can cause feed problems, poor cutting, and excessive vibration. Always use the diameter specified in your manual or printed on the old spool. Common sizes are 0.065″, 0.080″, and 0.095″, and using a thicker or thinner line than recommended will cause issues. If you’re unsure, check your trimmer’s manual or contact the manufacturer.
Is it cheaper to respool or buy a replacement spool?
Respooling is almost always cheaper, typically $3 to 8 for trimmer line versus $15 to 30 for a pre-wound replacement spool. However, replacement spools save time and eliminate winding hassle. If you use your trimmer heavily and value convenience over cost, replacement spools are worth the extra expense. For occasional users, respooling is the economical choice.
What should I do if I wind the string in the wrong direction?
Simply unwind it and rewind in the correct direction. It’s not damaged, just reassemble it properly. Check for the directional arrows on the spool again before rewinding. If you still can’t find them, consult your manual or search for a video tutorial specific to your trimmer model.
Final Tips for Successful Respooling
Keep your trimmer manual handy when respooling, it’s your best reference for spool type, string diameter, recommended length, and exact winding direction. Many manufacturers also post video tutorials on their websites, which can be incredibly helpful if you’re a visual learner.
Work in good lighting so you can see the directional arrows clearly. Take your time winding, rushing leads to loose wraps and feed problems. If something feels wrong during reassembly, stop and double-check before operating the trimmer.
Finally, buy trimmer line in bulk if you use your trimmer frequently. Pre-wound replacement spools are convenient but expensive; bulk string is much more economical. Store trimmer line in a cool, dry place, excessive heat can make string brittle and prone to breaking.
Related Maintenance and Operating Guides
To keep your equipment running at peak operating efficiency, explore our related technical walkthroughs and maintenance tutorials:
- Consult our detailed breakdown on cordless stick vacuum buyer guide.
- Consult our detailed breakdown on robotic pool cleaner comparison guide.
Respooling a Trimmer Safely
Respooling is easier with the spool and head clean, so wipe away grit before winding fresh line. Remove the battery or disconnect power, and keep hands clear of the cutting area. Anyone curious about how voluntary norms shape trimmer gear can start at American National Standards Institute (ANSI).









