

Direct Answer: How to Restring a Weed Eater
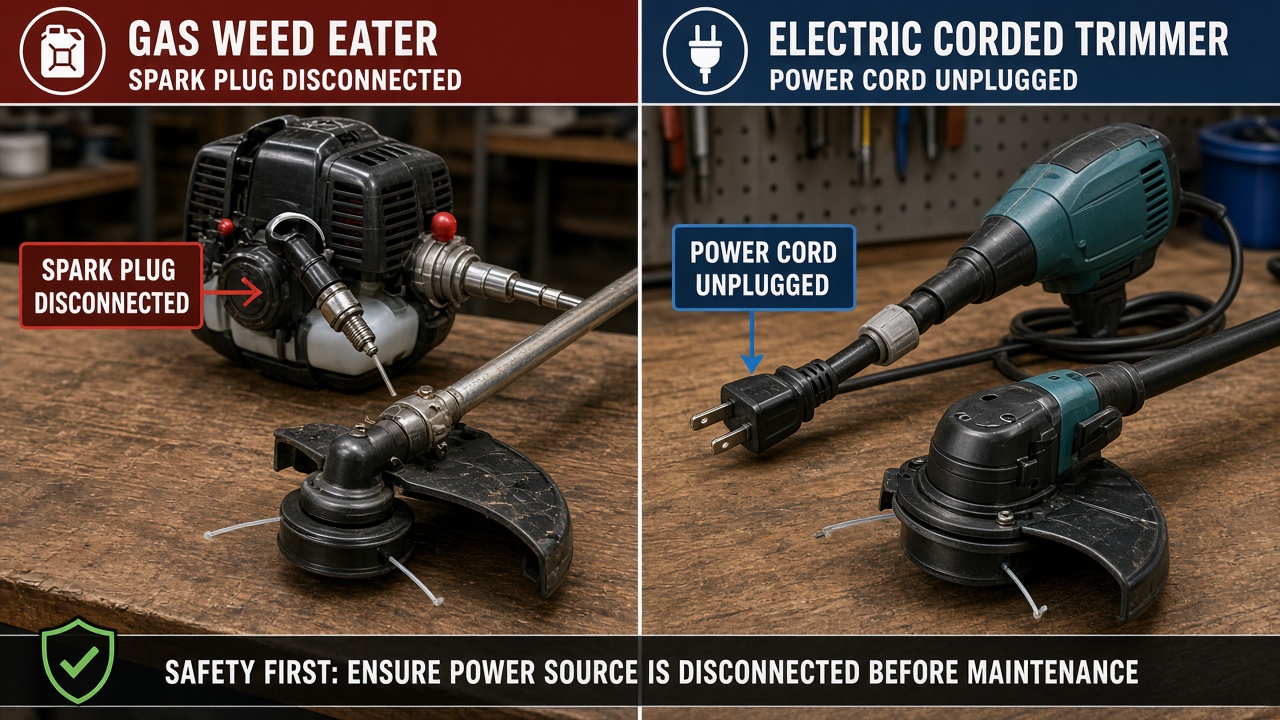
Restringing a weed eater (string trimmer) means replacing or rewinding the cutting line on the trimmer head. Start by making the trimmer safe: disconnect the spark plug on gas models, or unplug the unit / remove the battery on electric models, and wear work gloves. Remove the trimmer head or bump knob to access the spool, remove the old spool and leftover line, confirm the correct line diameter, cut a single piece of line to the length indicated on the spool, wind it tightly in the direction shown by the arrow, thread the loose ends through the eyelets, reassemble the head, and test the trimmer at low throttle.
What Does Restringing a Weed Eater Mean? (Understanding the Question)
Before you pick up a new spool of line, it helps to understand exactly what “restringing” involves and why the process can look different depending on the trimmer you own.

Pros
- Authentic BLACK+DECKER OEM part for compatible trimmers.
- Pre-wound spools reduce time spent on installation and reloading.
- Includes three replacement spools in the package.
- Compatible with many BLACK+DECKER string trimmer models.
Cons
- Only fits compatible BLACK+DECKER models, so it is not a universal trimmer line solution.
- The 0.065-inch line size may be too light for users who need a heavier-duty cutting option.
- No customer review details were provided in the manufacturer listing, so long-term user experience cannot be verified here.
Overview: The BLACK+DECKER AF1003ZP is a genuine OEM replacement spool set for compatible BLACK+DECKER string trimmers. It comes as a 3-pack of factory-wound spools with 0.065-inch line, making it a straightforward choice for routine yard upkeep.
Performance & Features: This spool system is designed to remove the hassle of hand winding and uses centrifugal force to feed the line as needed. For homeowners with supported BLACK+DECKER trimmers, that means quicker swaps and less downtime when trimming grass, edges, and light overgrowth.
Drawbacks & Considerations: The main limitation is compatibility, since it is intended for specific BLACK+DECKER models rather than all trimmers. The 0.065-inch line is also best suited to lighter trimming jobs, so users with tougher vegetation may want a more heavy-duty solution.
Verdict: If you own a compatible BLACK+DECKER trimmer and want an easy, ready-to-use refill, the AF1003ZP is a practical and dependable option. It is most valuable for homeowners who prioritize convenience, proper fit, and fast spool replacement.

Pros
- 271 ft donut spool of .095" line
- High-strength nylon copolymer blend
- Round profile designed for snag-free feeding
- Includes a heavy-duty cutting tool
- High-visibility orange color
Cons
- Round shape is less aggressive on woody weeds
- Requires manual spool winding
Pros
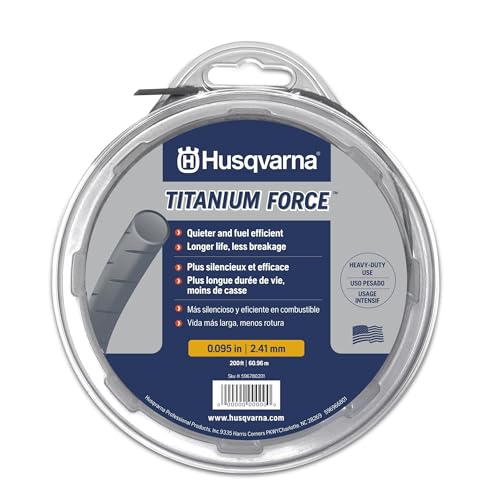
- Exceptional durability from commercial-grade co-polymer construction resists wear and breakage
- 50 percent noise reduction for quieter operation compared to standard lines
- Precise cutting performance with undulated surface for clean results
- Made in the USA ensuring quality engineering and materials
- Long 140-foot length provides extended value per spool
Cons
- Supplied as a continuous spool that requires manual winding into the trimmer head and cutting to length
- 0.095-inch diameter may not match the preferred thickness for every trimmer model
- Limited to basic cutter accessory with no pre-cut segments or extra tools included
The Husqvarna Titanium Force 0.095-Inch 140-Foot Spooled String Trimmer Line is a professional-grade copolymer weed eater line built for reliability. Its co-extruded polymer construction with a round dimpled profile offers immediate impressions of solid build quality aimed at both homeowners and those seeking gifts for men or Fathers Day. Manufactured in the USA, the continuous spool design prioritizes longevity and flexibility right out of the package.
In real-world performance this line excels through its undulated surface that cuts noise by 50 percent while delivering precise cutting and improved energy efficiency. The commercial-grade resins provide strong abrasion resistance and reduced breakage, making it suitable for tackling thick weeds and grass around standard trimmer heads. The included cutter allows easy length customization for consistent results across various landscaping tasks.
Potential drawbacks include the need to manually wind the full 140-foot spool into the head and cut segments as required, which adds a minor setup step. The fixed 0.095-inch diameter also means it may not optimally match every trimmer model that prefers thinner or thicker line options.
Overall this Husqvarna Titanium Force line is an excellent choice for homeowners and yard maintenance users who value quiet durable performance and USA-made quality. Those needing a versatile professional-grade replacement will find strong value in its design and features.

Pros
- Heavy-duty .095" nylon construction is built for tougher trimming tasks.
- Square shape can improve cutting efficiency and edging precision.
- Long 330-foot spool reduces the need for frequent replacement.
- Compatible with many trimmer types that use .095" line.
Cons
- May be less suitable for very light-duty trimming where a thinner line could be easier on smaller trimmers.
- No included trimmer head or additional accessories are listed in the product data.
- Performance can vary by trimmer power and the type of vegetation being cut.
Overview & Design: The VIABRICO .095" Weed Eater String is a square-profile trimmer line made from premium nylon-based material for general lawn care and heavier edging tasks. The orange color makes the spool easy to identify, and the 330-foot length is useful for users who go through line regularly.
Performance & Key Features: Its square shape is designed to create sharper cutting edges and a larger cutting surface than standard round line, which can help improve trimming speed and edge definition. The line is also advertised as abrasion resistant, crack resistant, and highly impact resistant, with a precision-wound spool intended to reduce tangling, misfeeds, and jams.
Drawbacks & Considerations: This is a .095" heavy-duty line, so it may be more than some lightweight trimmers need. The product data does not include accessories, and real-world results will still depend on the power of the trimmer and the type of weeds or terrain being handled.
Verdict: This VIABRICO trimmer line is a solid fit for homeowners and frequent yard-maintenance users who want a durable .095" line with better cutting performance than basic round string. It is especially relevant for edging, thicker weeds, and rougher terrain where wear resistance matters.
Manual Winding vs. Pre-Wound Spool
There are two common ways to put new line into a trimmer head. The first is to buy loose trimmer line and wind it onto the existing spool yourself. The second is to buy a pre-wound spool, which comes with the line already installed; in that case, you simply remove the old spool, drop in the new one, and thread the two loose ends through the head. This guide focuses on the manual winding method, but the same disassembly and reassembly steps apply to a pre-wound spool swap.
Does “Weed Eater” Mean a Brand or Any String Trimmer?
“Weed Eater” is both a brand name and a generic term. Many people use the word to describe any gas or electric string trimmer, regardless of the manufacturer. The restringing steps below are model-agnostic, meaning they work for most common trimmer heads. If you own a Weed Eater brand unit, the same general process applies, but always check the owner’s manual for any brand-specific winding direction or head-release method.
How to Identify Your Trimmer Head Type
- Bump-feed head: You tap the head on the ground while the trimmer is running to advance more line. This is the most common type on residential trimmers.
- Fixed-line head: The line is set to a fixed cutting length and is not advanced by tapping. You replace the line when it wears down.
- Auto-feed head: The trimmer automatically feeds line as needed without a bump action. These heads often have specific winding instructions printed on the spool.
Knowing which head you have matters because it changes how the line exits the head and how much line you should leave exposed after reassembly.
Key Factors to Consider Before Restringing
Getting the prep work right prevents most restringing failures. The three things to confirm before you start are line diameter, line type, and line length.
What Line Diameter (Thickness) Does Your Trimmer Need?
The line diameter, or thickness, is usually printed on the spool itself, on the trimmer head, or in the owner’s manual. Common sizes range from 0.065 to 0.110 inches. Using the wrong thickness can cause the line to jam inside the head, feed poorly, or cut inefficiently. If you cannot find the size printed anywhere, take the old spool to the store with you, or look up your model number online.
Round vs. Twisted Line: Does It Matter?
Round line is the standard all-purpose choice and works well for most trimming jobs. Twisted or multi-sided line is often more aggressive and can cut through thicker weeds faster, but it may be noisier and can wear out quicker on hard surfaces. For a typical homeowner, round line in the diameter recommended by the manufacturer is the safest choice. If you use a heavier-duty line, confirm that your trimmer head is rated for it.
How Much Line Should You Cut?
Most spools list the recommended length, usually between 15 and 25 feet depending on the head size. If no length is listed, cut a single piece long enough to fill the spool without overlapping layers. It is better to cut a little too much than too little, because the final wraps must be tight and even. You will leave the last 4 to 6 inches unwound so the ends can be threaded through the eyelets. For troubleshooting and reliability insights, consult our in-depth marshall stanmore iii vs harman kardon onyx studio 8 report.
Do Gas and Electric Trimmers Use the Same Steps?
Yes, the winding and threading steps are essentially the same for gas, electric corded, and battery-powered trimmers. The only real difference is the safety step: gas trimmers require disconnecting the spark plug, while electric trimmers require unplugging the unit or removing the battery.
Step-by-Step: How to Restring a Weed Eater
Follow these steps in order. Work slowly the first time, and keep the spool and head parts organized so reassembly is straightforward. Readers comparing setup options can review our technical analysis on dyson v8 cyclone vs bissell featherweight stick.
Step 1: Make the Trimmer Safe
- For gas trimmers: disconnect the spark plug wire so the engine cannot accidentally start.
- For electric trimmers: unplug the cord or remove the battery.
- Wear work gloves to protect your hands from sharp edges and old line.
- Work on a clean, flat surface so small parts do not roll away.
Step 2: Remove the Trimmer Head or Access the Spool
Depending on your model, you will either press the tabs on the side of the head and turn the cap, or use the notches on the spool to hold it while you turn the knob. On many bump-feed heads, the entire bottom cap twists off to reveal the spool. If the head will not come apart by hand, check the manual for the correct release method. Do not force it, as you may break the plastic housing.
Step 3: Remove the Old Spool and Leftover Line
Lift the old spool out of the head. Pull off any remaining line and discard it. Inspect the spool for cracks or wear; if it is damaged, replace the spool rather than reusing it. Also check the inside of the head for dirt, grass, or debris and clean it out with a cloth or small brush. For complementary field maintenance guidelines, examine our breakdown of bissell crosswave hydrosteam vs shark stainforce.
Step 4: Confirm the Line Size and Cut the New Line
Look for the line diameter marking on the spool or head, then cut a single piece of new line to the recommended length (typically 15 to 25 feet). If the spool has two separate chambers, you may need two pieces of line, one for each chamber; check the spool or manual for the exact setup.
Step 5: Anchor the Line and Wind in the Correct Direction
Find the arrow on the spool that shows the winding direction. Hook the end of the line into the anchor slot near the center of the spool, then wind the line tightly in the direction shown by the arrow. Keep each wrap flat and even, and do not let the line cross over itself. Overlapping layers cause jams and uneven feeding.
Step 6: Leave the Ends Loose and Thread the Eyelets
Stop winding when you have about 4 to 6 inches of line left. Hold the loose end so it does not unwind, and push it through the eyelet (the small exit hole) on the spool. If the spool has two line exits, repeat the process for the second piece of line. Then tuck the loose ends through the corresponding holes in the trimmer head so they stick out slightly.
Step 7: Reassemble the Head
Place the wound spool back into the head, making sure the line ends line up with the exit holes. Reattach the cap or knob and tighten it securely. Pull the line ends firmly to release any slack from inside the spool. For bump-feed heads, the line should extend just past the cutting head; for fixed-line heads, the line is already at the correct cutting length.
Step 8: Test the Trimmer
Reconnect the spark plug or battery, then start the trimmer at low throttle. Let the head spin briefly and confirm that the line does not fly out or jam. For bump-feed heads, tap the head on the ground to advance fresh line, then trim normally. If the line feeds too fast, jams, or will not advance, stop and re-check your winding direction and line diameter.
Troubleshooting Common Restringing Mistakes
Even careful DIYers run into problems after restringing. Here is how to fix the most common issues.
Why Does the Line Keep Jamming or Snapping?
Jamming is usually caused by one of three things: the line is too thick for the head, the line was wound in the wrong direction, or the line crossed over itself during winding. Remove the spool, check the diameter marking, re-wind evenly in the direction of the arrow, and try again. Snapping often happens when the line is old, brittle, or too thin for heavy weeds.
Why Is the Trimmer Feeding Too Much Line at Once?
Too much line is usually a sign that the line was wound too loosely, or that too much line was left exposed after reassembly. Pull the line ends to remove slack, and if the problem continues, re-wind the spool more tightly. On bump-feed heads, avoid tapping the head repeatedly, as each tap advances additional line.
Why Won’t the Line Advance on a Bump-Feed Head?
If tapping the head does not feed line, the line may be wound in the wrong direction, the ends may not be threaded through the eyelets correctly, or the spool may be installed upside down. Disassemble the head and verify the winding direction arrow and the spool orientation. Also confirm that the line ends are long enough to reach the cutting edge.
What If the Manual’s Steps Don’t Match My Trimmer Head?
Some heads, especially auto-feed systems and certain Weed Eater brand models, have unique winding directions or require special tools. If the steps printed on the spool or in the manual differ from the general method above, follow the manufacturer’s instructions. Forcing a head apart or winding against the arrow can damage the feed mechanism.
When to Consult the Owner’s Manual or a Professional
Most restringing jobs are simple, but there are times when you should stop and get help.
Which Trimmer Models Have Special Heads?
Auto-feed heads, speed-feed heads, and some brand-specific bump heads have their own winding procedures. The spool itself usually has printed instructions, and the owner’s manual will show the exact path for the line. If you no longer have the manual, search online using the model number printed on the trimmer or the head.
When Should You Replace the Spool or Head Instead of Just the Line?
Replace the spool if it is cracked, warped, or if the anchor slot no longer holds the line. Replace the entire head if the bump mechanism is broken, the eyelets are worn into sharp edges that keep cutting the line, or the head will not stay assembled. A damaged head can be a safety hazard, so do not try to repair it with tape or glue.
What Should You Do If You Don’t Have the Owner’s Manual?
Look for the model number on the trimmer housing, then search the manufacturer’s website for a downloadable manual or a parts diagram. You can also check the spool itself for line size and winding direction markings. If you are still unsure, a small engine repair shop can show you the correct procedure for your specific head.
Frequently Asked Questions About How To Restring A Weed Eater
Can I use any trimmer line to restring my weed eater?
No. You must use the line diameter recommended for your trimmer head, usually printed on the spool or in the owner’s manual. Using a line that is too thick can jam the head, and a line that is too thin may break or cut poorly. Round line is the safest general-purpose choice.
How long should the trimmer line be when I wind the spool?
Most spools recommend a single piece of line between 15 and 25 feet, depending on the head size. Wind it tightly and evenly in the direction of the arrow, and leave the last 4 to 6 inches loose so the ends can be pushed through the eyelets.
Do I need to disconnect the spark plug before restringing a gas weed eater?
Yes. Disconnect the spark plug wire on gas models, and unplug or remove the battery on electric models, before touching the trimmer head. This prevents the engine from starting accidentally and is the most important safety step in the process.
Why does my new line fly out of the head when I start the trimmer?
This usually means the line was wound in the wrong direction, the spool was installed upside down, or the line ends were not threaded through the eyelets correctly. Disassemble the head, re-check the winding direction arrow, and make sure the line ends are seated in the exit holes before tightening the cap.
Related Maintenance and Operating Guides
To keep your equipment running at peak operating efficiency, explore our related technical walkthroughs and maintenance tutorials:
- Consult our detailed breakdown on residential zero-turn lawn mower guide.
- Consult our detailed breakdown on heavy-duty chainsaw buyer guide.
Restringing a Weed Eater Head
Most trimmer heads use either a bump feed or a manual wind, and the steps differ between them. Cutting line to the correct length and winding it in the indicated direction prevents jams. Eye and hand protection while working with a trimmer is a good habit, and general background is available from American National Standards Institute (ANSI).









