

How to String a Weed Whacker: The Direct Answer
To string a weed whacker: Identify your trimmer head type (fixed spool or bump-feed), remove all spent line from the spool, measure and cut new trimmer line to the correct length for your model (typically 15–20 feet), wind the line tightly around the spool following the directional arrows, leaving 6–8 inches extending from each side, reinstall the spool, thread the line through the eyelets, reattach the head cover, and test by tapping the head on the ground to advance the line.
Understanding Your Trimmer Head Type
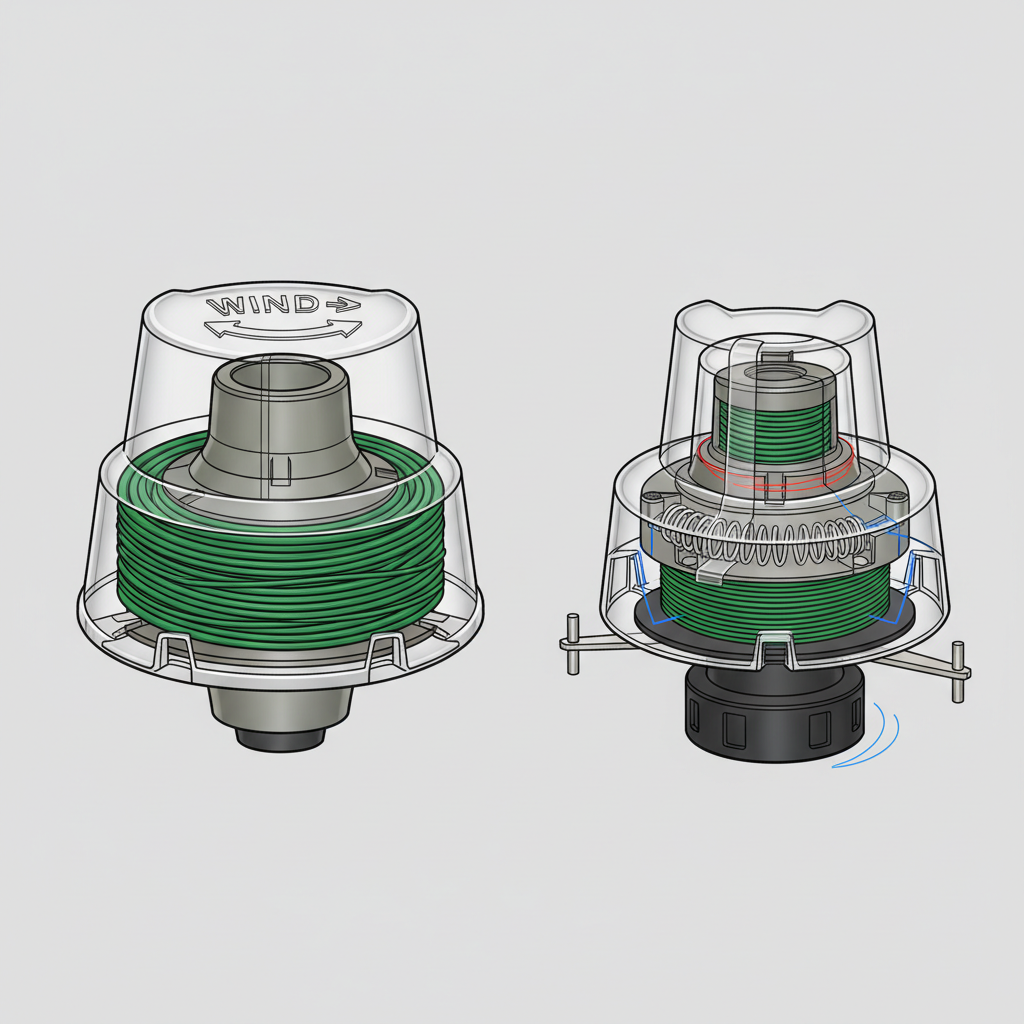
Before you begin stringing your weed whacker, you need to identify which type of trimmer head you have. The two most common designs are fixed spool heads and bump-feed auto-advance heads. This distinction is critical because the stringing technique differs significantly between the two.
A fixed spool head has a stationary spool inside the trimmer head housing. The line is wound tightly around this spool and remains in place until manually replaced. Fixed spool heads are typically found on budget-friendly and professional-grade trimmers. To identify one, look for a solid, non-rotating base and visible arrows indicating winding direction molded into the spool. To compare alternative configurations, check our hands-on review of jbl partybox club 120 vs sony srs xv500.
A bump-feed auto-advance head automatically feeds new line when you tap the trimmer head on the ground while running. These heads have a spring-loaded mechanism and feeding pins. If your trimmer advances line by bumping it against the ground, you have a bump-feed head. These are common on consumer-grade gas and cordless trimmers. To compare alternative configurations, check our hands-on review of jbl partybox club 120 vs sony srs xv500.
Knowing your head type prevents wasting time and frustration. If you wind line the wrong way on a fixed spool head, it simply won’t feed. Bump-feed heads require the line to be inserted into a specific feed mechanism before reassembly, making the process slightly different. Users looking for related component recommendations can explore our z890 vs x870e motherboard breakdown.
Selecting the Right Trimmer Line
Not all trimmer line is created equal. Selecting the correct line for your weed whacker ensures proper operation, cutting performance, and safety.
Line Gauge (Thickness)
Trimmer line comes in various thicknesses, measured in inches and called gauge. Common residential line gauges range from 0.065 to 0.110 inches in diameter. Lighter-duty trimmers typically use 0.065 to 0.080-inch line, while heavier-duty gas and commercial models use 0.095 to 0.110-inch line. Users looking for related component recommendations can explore our z890 vs x870e motherboard breakdown.
Using line that’s too thin may break frequently and leave uncut grass. Line that’s too thick can overload your trimmer’s motor and prevent proper feeding. Check your trimmer’s manual or the head itself—most manufacturers stamp the correct gauge directly on the spool or housing.
Line Material
Most residential trimmer line is made from nylon, which is durable and affordable. Some premium lines incorporate twisted or serrated designs for better cutting on thick weeds and brush. Unless your manual specifies otherwise, standard nylon line works for most applications. Specialty materials like square-twisted or diamond-shaped line offer improved cutting performance but cost more. Before finalizing equipment decisions, refer to our comprehensive marshall stanmore iii vs harman kardon onyx studio 8 comparison.
Determining Line Length
The amount of line you need depends on your trimmer head’s capacity. Most residential heads require 15–20 feet of line total. A useful rule of thumb: if your trimmer head is 2 inches in diameter, you’ll typically need about 15 feet of line. Larger heads may accommodate 20 feet or more. Your trimmer’s manual will specify the exact length required.
Safety and Preparation
Before you begin stringing, take these essential safety steps: For broader ecosystem context, read through our operational guide on dyson v8 cyclone vs bissell featherweight stick.
- Disconnect the power source: Unplug electric trimmers or remove the battery from cordless models. For gas trimmers, ensure the engine is completely cool and remove the spark plug wire to prevent accidental starting.
- Wear protective gear: Gloves protect your hands while handling sharp line and metal parts. Safety glasses shield your eyes from spring components in bump-feed heads that may be under tension.
- Work on a clean, stable surface: Lay your trimmer on a flat work surface like a workbench or table. This prevents the head from rolling and gives you better access to the spool.
- Gather your tools: You’ll need scissors or line cutters, your replacement trimmer line, and possibly a small screwdriver if your head cover is secured with screws rather than snaps.
You do not typically need to remove the entire head from the trimmer shaft—most heads are easily accessible by simply pointing the trimmer upward or laying it on its side. However, some models benefit from head removal for easier handling. Check your manual to determine if removal is necessary.
Step-by-Step Stringing for Fixed Spool Heads
Fixed spool heads are the most straightforward to string and represent the majority of residential weed whacker models. For troubleshooting and reliability insights, consult our in-depth bissell crosswave hydrosteam vs shark stainforce report.
Step 1: Remove the Head Cover
Most fixed spool heads have a cover held by two or three snap tabs or screws. Press the tabs inward or use a screwdriver to release the cover. Set it aside in a safe place—these covers are easy to lose.
Step 2: Remove the Old Line
Unwind all remaining line from the spool by hand. Discard it in the trash. Inspect the spool for debris, dried grass, or line fragments and wipe it clean with a dry cloth. A clean spool ensures the new line winds smoothly and feeds properly.
Step 3: Prepare Your New Line
Cut a length of new trimmer line according to your trimmer’s specifications (typically 15–20 feet). Cut the line straight across using sharp scissors or line cutters for a clean edge.
Step 4: Locate the Anchor Slot
On the fixed spool, you’ll find a small slot or notch near the center where the line anchors. Look for arrows molded into the spool indicating the correct winding direction—this is critical. The slot is usually positioned at the 3 o’clock or 9 o’clock position relative to the spool face.
Step 5: Wind the Line
Insert one end of your trimmer line into the anchor slot, leaving about 4–6 inches of line extending outward. Wind the line tightly around the spool following the directional arrows. Keep tension on the line as you wind to ensure tight coils with no gaps. Wind in smooth, even layers—overlapping or crossing line creates feeding problems.
Wind until you have approximately 6–8 inches of line remaining on the spool (about 2–3 feet total line remaining unwound). This remaining line will extend from each side of the head when reassembled.
Step 6: Create the Second Line Length
After winding, insert the free end of the line into the second anchor slot (usually directly opposite the first on the spool). Some spool designs use a single slot with the line doubling back; follow your specific spool’s design. The goal is to have two equal lengths of line extending from the head, each roughly 6–8 inches long after reassembly.
Step 7: Thread Through Eyelets
Once the line is wound and anchored, identify the eyelets (small holes or slots) on the trimmer head housing. These guide the cutting line outward. Thread each extending line through its corresponding eyelet. The eyelets hold the line in cutting position.
Step 8: Reinstall the Head Cover
Carefully position the head cover back onto the spool housing, ensuring the line passes smoothly through both eyelets without pinching. Snap the cover tabs firmly into place or tighten the screws hand-tight (do not overtighten, as this can crack plastic covers).
Step-by-Step Stringing for Bump-Feed Auto-Advance Heads
Bump-feed heads require a slightly different approach because of their spring-loaded feed mechanism.
Step 1: Access the Feed Mechanism
Remove the head cover by pressing the snap tabs or unscrewing fasteners. Bump-feed heads often have a more complex interior with springs, pins, and a central cap. Take a photo with your phone before disassembly—this helps you reassemble correctly.
Step 2: Remove Old Line and Springs
Unwind and remove all old line. Carefully note the position of any springs or pins inside the head. Some models have a central retaining cap; remove it by turning counterclockwise (most use reverse-thread design to prevent accidental loosening). Do not lose small springs or feeding pins—these are essential for auto-advance function.
Step 3: Prepare the Replacement Line
Cut two equal lengths of new trimmer line, each typically 7–10 feet long (total 14–20 feet). Cut ends straight using scissors.
Step 4: Insert Line Into Feed Slots
Most bump-feed heads have small slots or channels labeled for line insertion. Insert one end of your first line segment into one slot until it reaches a stopping point. Insert the second line segment into the opposite slot. The line should sit firmly in place, with no slack.
Step 5: Reinstall Internal Components
If you removed springs or a central cap, reinstall them now. Springs must be seated correctly—incorrect positioning prevents the auto-advance mechanism from working. Tighten the central retaining cap clockwise by hand until snug (do not force it, as this can strip the threads).
Step 6: Arrange Line and Reinstall Cover
Ensure the line extends equally on both sides (typically 6–8 inches per side). Position the head cover and secure it with snap tabs or fasteners. Verify that the line passes freely through the eyelets without bunching or twisting.
Threading and Reinstallation
Once your spool is wound and reassembled, proper threading and reinstallation ensure your trimmer operates correctly.
Eyelets and Line Routing
Your trimmer head has eyelets (guide holes) that direct the cutting line. Typically, there are two eyelets positioned at the trimmer head’s outer edge, roughly 180 degrees apart. Thread each extending line through its nearest eyelet. The line should lie flat against the eyelet opening without twisting or folding over itself.
If your line twists at the eyelet, unwind slightly, straighten the line, and rethread. Twisted line at the eyelet causes uneven cutting and premature line breakage.
Head Cover Alignment
When reinstalling the head cover, align it carefully with the housing so the line doesn’t get pinched. Snap tabs should click firmly into place. If using screws, tighten them evenly by hand—over-tightening cracks plastic covers and may strip threads.
Final Inspection
Before using your trimmer, visually inspect the entire head. Confirm that line extends equally from both eyelets, that no line is twisted or bunched, and that the head cover is secure. Gently pull on each line segment to ensure it’s anchored firmly in the spool—it should not slide or come loose with light pulling.
Testing and Troubleshooting
Initial Testing
Start your trimmer and let it warm up for 30 seconds. Listen for the line to cut cleanly through grass. The cutting should be even on both sides. If one side cuts noticeably shorter or not at all, the line may not be feeding properly through that eyelet.
Bump-Feed Testing
For bump-feed heads, the line should advance automatically when you tap the trimmer head gently on the ground while the engine runs. If line doesn’t advance, the feed mechanism may not be activated properly. Stop the engine, cool it, and verify that springs and pins are seated correctly inside the head.
Common Issues and Solutions
Line won’t feed or advances unevenly: Verify that both line segments pass smoothly through their eyelets without twisting. Rethread if necessary. For fixed spool heads, ensure line was wound in the correct direction per the arrows on the spool.
Line breaks immediately during use: Check that line is secured firmly in the anchor slots and that you didn’t wind it too loosely. Loose line creates slack that causes shock loads and breakage. Also verify you’re using the correct line gauge for your trimmer model.
Trimmer pulls to one side during cutting: Uneven line length causes this issue. Stop the engine and manually pull the eyelet to extend the shorter line segment until both sides are even. Some bump-feed heads self-adjust; others require manual adjustment.
Line won’t retract into the head after use: This indicates the anchor slots aren’t holding line securely. Remove the head cover and rewind the line, ensuring it’s wedged firmly into the anchor slot. The line should not slide out with gentle pulling.
Everything You Need to Know: How To String A Weed Whacker FAQ
How often should I replace the trimmer line on my weed whacker?
This depends on usage frequency and terrain. Residential users with light-duty use might replace line every 2–3 months during mowing season. Heavy users or those trimming dense weeds and woody growth may need replacement every 2–4 weeks. As a practical rule, when you notice line breakage during normal use or when the line becomes noticeably shorter despite bump-feeding, it’s time to restring.
Can I use thicker or thinner line than what my trimmer specifies?
It’s not recommended. Using line too thick overloads the motor and prevents proper feeding, potentially causing the trimmer to stall. Line too thin breaks easily and leaves uncut grass. Manufacturers specify line gauge based on the motor’s power and the head’s design. Always use the gauge listed in your manual or on the head housing.
What’s the difference between twisted and standard nylon trimmer line?
Twisted line has helical grooves running along its length, which provides a sharper cutting edge and better performance on thick weeds and brush. Standard round nylon line is smoother and adequate for regular lawn trimming. Twisted line costs slightly more but lasts longer under heavy use. For light residential use, standard line is sufficient.
Why won’t my newly strung trimmer feed line even though I followed all the steps?
The most common cause is incorrect winding direction on fixed spool heads—line wound backward (opposite the directional arrows) simply won’t feed. Remove the head cover and verify winding direction. For bump-feed heads, ensure springs and the feed pin are properly seated and that the line is fully inserted into the feed slots. Also check that the line passes freely through the eyelets without twisting or being pinched by the head cover.

Pros
- Six-pack bundle listed in the product title
- Square profile line named in the product title
- Commercial 5 lb size listed for heavier use
Cons
- Trimmer compatibility is not verified in supplied data

Pros
- Six-pack bundle listed in the product title
- Star profile line named in the product title
- Commercial 5 lb size listed for heavier use
Cons
- Line length and trimmer fit are not stated in supplied data

Pros
- Title lists 1280 feet of line length
- Square profile named in the product title
- Lists a 5 lb line rating
- Title describes it as commercial-style line

Pros
- Title lists .095-inch square nylon line
- Lists 1280 feet of line length
- Manufacturer states fit with most string trimmers
- Lists a 5 lb line rating
For more detailed testing breakdowns and top recommendations, check our in-depth guide to cordless stick vacuum buyer guide.
For more hands-on benchmarks and buying recommendations, consult our guides on robotic pool cleaner comparison guide, as well as deep carpet cleaning machine reviews, as well as automated robotic vacuum cleaning systems, as well as all-in-one vacuum steam mop combo guide.
Mechanical safety standards, operational tolerances, and protective gear guidelines align with benchmark specifications established by the American National Standards Institute (ANSI).









