

Direct Answer: How to Use a Zero Turn Lawn Mower
To operate a zero turn lawn mower safely, start by reading your owner’s manual and performing pre-operation checks on fuel, oil, blade condition, and tire pressure. Engage the safety interlock system, start the engine using the choke, then understand the lap bars or dual levers, push both forward to move forward, pull both back to reverse, and move one lever forward while pulling the other back to turn. Engage the blade clutch, set throttle to full, and mow in overlapping passes while controlling speed through lever pressure. Always disengage blades before stopping, and park on level ground before shutdown.
What Is a Zero Turn Lawn Mower and Why Does It Require Different Operation?
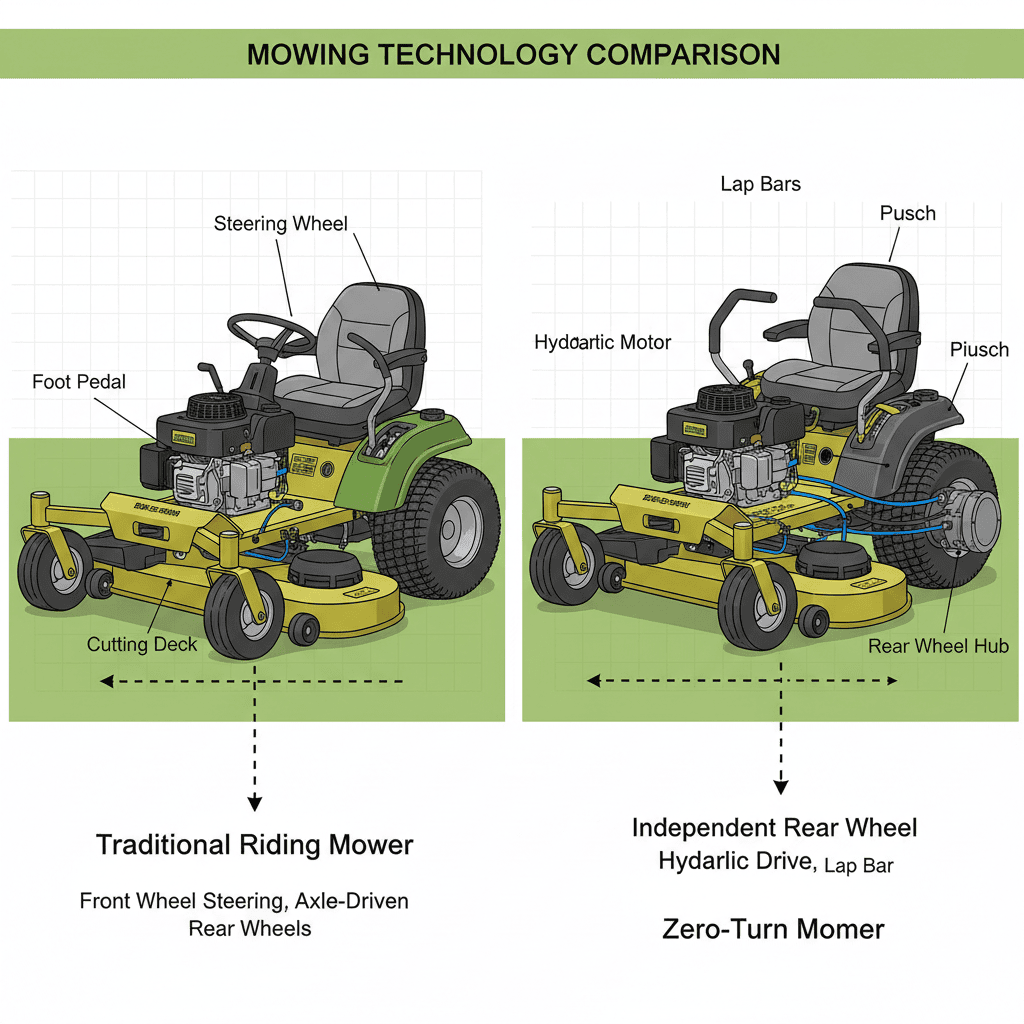
A zero turn radius mower is a riding lawn mower with independent hydraulic motors on each rear wheel, allowing the mower to pivot in place with a turning radius of zero degrees. This design differs fundamentally from traditional riding mowers, which use a single engine and steering wheel system similar to cars.
The key operational difference is steering control. Instead of a steering wheel, zero turn mowers use dual lap bars or lever handles that independently control each rear wheel’s speed and direction. This requires operators to think about steering differently, you’re not turning a wheel, you’re controlling two separate drive wheels.
Understanding this system is critical because:
- Improper lap bar use causes uneven mowing, scalping, or equipment damage
- The learning curve is steeper than traditional mowers but mastery enables precise, efficient mowing
- Safety interlocks are designed specifically for this control system and must be respected
Pre-Operation Safety Checks: What You Must Do Before Starting
Never operate a zero turn mower without completing these mandatory inspections. They prevent accidents, equipment damage, and ensure optimal cutting performance.
Fuel and Oil Level Checks
- Fuel: Fill the tank with the fuel type specified in your owner’s manual (typically regular unleaded gasoline). Never use fuel older than 30 days without stabilizer added. Check the fuel level before each use.
- Engine oil: Locate the dipstick (consult your manual for exact location). Wipe it clean, reinsert fully, then withdraw to check the level. Oil should reach the “full” mark. Add the correct oil type if low, do not overfill.
- Hydraulic fluid: Some zero turn mowers have separate hydraulic reservoirs. Check the level according to your manual and top off if necessary with the specified hydraulic fluid.
Blade and Mower Deck Inspection
- Blade sharpness: Dull blades tear grass instead of cutting cleanly, promoting disease. Inspect blades for visible nicks or dullness. Sharp blades have clean, reflective edges. Replace or sharpen blades if dull.
- Blade security: Ensure blades are tightly bolted to the deck. Loose blades can detach during operation, creating serious safety hazards.
- Mower deck debris: Clear grass clippings, sticks, and debris from under the deck. Buildup reduces airflow and cutting efficiency.
- Deck damage: Look for cracks, bent sections, or rust that could affect performance or safety.
Tire Pressure and Condition
- Check tire pressure using a gauge. Refer to your owner’s manual for the correct PSI (pounds per square inch) for front and rear tires, they often differ.
- Underinflated tires reduce traction and cause uneven mowing. Overinflated tires can burst or cause a harsh ride.
- Inspect tires for cuts, cracks, or embedded debris.
Safety Interlock System
The safety interlock system is a critical safety feature that prevents the engine from starting or the blades from engaging unless specific conditions are met. Typically:
- The operator must be seated on the mower seat
- Both lap bars must be in the neutral (center) position
- The blade engagement lever must be disengaged
Never bypass or disable these interlocks. They exist to prevent accidental blade engagement or unintended movement.
Starting Your Zero Turn Mower: Engine Ignition and Initial Setup
Follow these steps in order to safely start your mower:
Step 1: Position and Seat Engagement
- Sit firmly on the mower seat. The seat switch must register your weight for the safety interlock to allow starting.
- Ensure both lap bars are in the neutral (center) position. They should not be pushed forward or pulled back.
- Verify the blade engagement lever is in the “off” or “disengaged” position.
Step 2: Choke and Throttle Positioning
- Cold start: Move the choke lever to the “closed” or “cold” position. This enriches the fuel mixture for easier starting in cool conditions.
- Warm start: If the engine was recently running, use the “open” or “warm” choke position.
- Set the throttle to the “start” position, typically marked on the control panel. This is usually a lower RPM setting than full throttle.
Step 3: Engine Ignition
- Insert the key into the ignition switch.
- Turn the key to the “start” position and hold until the engine cranks and fires. Release immediately once the engine starts.
- If the engine doesn’t start after 5-10 seconds, release the key, wait 30 seconds, and try again. Continuous cranking can damage the starter.
Step 4: Choke Adjustment and Warm-Up
- Once the engine starts, gradually move the choke to the “open” position over 10-15 seconds. This allows the engine to adjust to normal fuel mixture.
- Let the engine idle for 30-60 seconds before moving or engaging the blades. This allows oil to circulate and stabilizes RPM.
- If the engine stalls, repeat the starting procedure.
Understanding the Controls: Lap Bars, Levers, and Blade Engagement
Zero turn mowers replace a traditional steering wheel with dual lap bars or levers. Mastering these controls is essential for safe, efficient operation.
Lap Bar and Lever System
Each lap bar or lever independently controls one rear wheel. Think of them as individual gas pedals for each wheel: When planning workspace deployment, consider the engineering criteria outlined in our marshall stanmore iii vs harman kardon onyx studio 8 guide.
- Forward motion: Push both lap bars forward equally. The mower moves straight ahead. The harder you push, the faster it moves.
- Reverse motion: Pull both lap bars backward equally. The mower moves in reverse. Control speed by adjusting pull pressure.
- Turning right: Push the left lap bar forward while pulling the right lap bar backward (or reducing forward pressure). The left wheel moves faster than the right, causing the mower to pivot right.
- Turning left: Push the right lap bar forward while pulling the left lap bar backward. The mower pivots left.
- Zero radius turn: Push one lap bar fully forward while pulling the other fully backward. The mower spins in place, achieving a zero-degree turning radius. This is the signature feature of zero turn mowers.
Blade Engagement Clutch
The blade engagement lever or clutch controls whether the cutting blades spin:
- Disengaged position: Blades do not spin. Use this position when transporting, turning, or avoiding obstacles.
- Engaged position: Blades spin at full speed, cutting grass. Engage only when you’re ready to mow and moving forward over grass.
- Never engage blades when stationary. Always disengage before stopping or reversing.
Throttle Control
The throttle lever or switch controls engine RPM: For additional operational safety benchmarks, see our published testing notes on dyson v8 cyclone vs bissell featherweight stick.
- Idle position: Low RPM, used during warm-up and shutdown.
- Full throttle: Maximum RPM, used during mowing for optimal blade speed and cutting performance.
- Operate at full throttle during mowing. Partial throttle reduces blade cutting efficiency and may cause uneven cuts.
Operating the Mower: Driving, Steering, and Mowing Patterns
With controls understood, you’re ready to mow. Proper technique ensures even cutting, efficiency, and safety.
Mowing Patterns and Technique
Choose a mowing pattern based on your lawn shape and size: To compare alternative configurations, check our hands-on review of bissell crosswave hydrosteam vs shark stainforce.
- Stripe pattern: Mow in parallel lines across the lawn. This is the most common pattern and creates the classic striped appearance. Start at one edge and mow to the opposite edge, then turn and mow a parallel line slightly overlapping the previous pass.
- Spiral pattern: Start at the lawn’s perimeter and spiral inward toward the center. This works well for irregularly shaped lawns.
- Checkerboard pattern: Mow in one direction, then mow perpendicular lines on a second pass. This ensures complete coverage and looks visually appealing.
Overlap and Coverage
- Overlap each mowing pass by 2-3 inches. This prevents missed strips of grass between passes.
- Watch the right edge of the mower deck as you mow. Use it as a visual guide to maintain consistent overlap.
- Mow slowly enough to maintain straight lines and consistent blade engagement. Rushing causes uneven cuts and missed sections.
Speed Control and Terrain Adjustment
- Normal conditions: Mow at moderate speed, approximately 3-5 mph. This allows the blades to cut cleanly without scalping.
- Tall grass: Reduce speed and make a higher blade height adjustment. Cutting tall grass in one pass at high speed causes uneven cuts and engine strain.
- Slopes: Mow slowly and avoid steep inclines. Zero turn mowers can tip on slopes steeper than 15 degrees. Always mow up and down slopes, never across them.
- Wet grass: Reduce speed and increase blade height. Wet grass clumps and doesn’t cut cleanly. Avoid mowing immediately after rain if possible.
Turning and Tight Spaces
- Disengage blades before turning. This prevents scalping and reduces stress on the deck.
- For tight turns, use the zero radius turn by pushing one lap bar forward while pulling the other backward. The mower pivots in place.
- Re-engage blades once you’re moving forward over grass again.
Safety Considerations: Terrain, Obstacles, and Limitations
Zero turn mowers have specific operational limitations. Understanding and respecting them prevents accidents and equipment damage.
Slope and Terrain Safety
- Safe slope angle: Most zero turn mower manufacturers recommend a maximum slope of 15 degrees (approximately 27% grade). Operating on steeper slopes risks tipping.
- Mowing direction: Always mow up and down slopes, never across them. This maintains traction and stability.
- Soft or wet ground: Avoid mowing on waterlogged, muddy, or very soft soil. The mower can sink, become stuck, or tip.
Obstacles and Debris
- Scan the lawn for rocks, sticks, toys, and other debris before mowing. These can be ejected by the blades, creating projectiles that injure bystanders or damage property.
- Avoid mowing over large branches or roots. These can jam the blades or damage the deck.
- Keep the mower away from parked cars, fences, and structures. The zero radius turn can be difficult to control at first, increasing the risk of collision.
Operator Positioning and Attire
- Always sit on the mower seat during operation. Standing or leaning off the seat disengages the safety interlock.
- Wear long pants, closed-toe shoes, and avoid loose clothing that could get caught in moving parts.
- Never operate the mower while tired, under the influence of alcohol or drugs, or when distracted.
- Keep bystanders, especially children and pets, at least 50 feet away from the mowing area.
Shutting Down and Parking: Proper End-of-Use Procedures
Proper shutdown and storage extend your mower’s lifespan and ensure safety.
Blade Disengagement
- Move the blade engagement lever to the “off” or “disengaged” position while still moving. This stops blade rotation.
- Allow the blades to come to a complete stop before proceeding to the next step. Listen for blade noise to cease.
Engine Shutdown
- Move both lap bars to the neutral (center) position to stop forward or reverse motion.
- Set the throttle to the “idle” position.
- Turn the ignition key to the “off” position. The engine should shut down immediately.
- Remove the key from the ignition switch to prevent accidental starting.
Parking and Storage
- Park the mower on level, dry ground. Never park on slopes where it could roll.
- Ensure the mower is completely stopped and the engine is cool before leaving it unattended.
- Store the mower in a garage, shed, or covered area to protect it from weather.
- In winter, add fuel stabilizer to the tank and run the engine for 5-10 minutes to distribute the stabilizer through the fuel system. This prevents fuel degradation during storage.
Post-Mowing Maintenance
- Allow the engine to cool for 15-20 minutes before servicing.
- Inspect the mower deck for grass buildup. Use a brush or compressed air to remove clippings (never use water, which can cause rust).
- Check oil and fuel levels for the next mowing session.
- Perform blade sharpening or replacement as needed, typically every 20-40 hours of operation.
Common Mistakes to Avoid When Operating a Zero Turn Mower
Learning from others’ errors accelerates your mastery of zero turn mower operation.
Skipping the Owner’s Manual
Your mower’s manual contains model-specific information about controls, maintenance intervals, fuel type, and safety features. Operating without reading it invites mistakes and voids warranties.
Uneven Lap Bar Control
Pushing or pulling lap bars unevenly causes the mower to veer left or right, resulting in crooked mowing lines and scalped patches. Practice straight-line mowing in an open area before tackling your lawn.
Engaging Blades While Stationary
Engaging blades when the mower isn’t moving causes the mower to lurch forward unexpectedly and can damage the blade clutch. Always engage blades only when moving forward over grass.
Improper Blade Height
- Cutting too short (scalping) stresses grass and exposes soil, promoting weeds and disease.
- Cutting too tall leaves grass shaggy and reduces mowing efficiency.
- Adjust blade height according to grass type and season. Most lawns benefit from a 2.5-3.5 inch cutting height.
Mowing Wet Grass
Wet grass clumps under the deck, reduces cutting quality, and can cause the mower to slip on slopes. Wait at least 24 hours after rain before mowing if possible.
Ignoring Maintenance
Skipping oil changes, blade sharpening, and filter replacements reduces mower lifespan and performance. Follow the maintenance schedule in your owner’s manual.
When to Consult Your Owner’s Manual vs. Professional Service
Owner’s Manual Reference
Consult your manual for:
- Control locations and functions specific to your mower model
- Fuel and oil type and capacity
- Maintenance intervals and procedures
- Troubleshooting common issues (won’t start, blade engagement problems, etc.)
- Safety warnings and operational limitations
- Warranty coverage and claims procedures
Professional Service
Contact a dealer or professional technician for:
- Engine problems (won’t start, rough idling, loss of power)
- Hydraulic system issues (leaks, loss of drive power)
- Blade clutch or engagement problems
- Transmission or drive wheel issues
- Electrical problems (battery, starter, ignition)
- Warranty service and repairs
Frequently Asked Questions About How To Use A Zero Turn Lawn Mower
How long does it take to learn to operate a zero turn mower?
Most operators become comfortable with basic operation (straight mowing lines and simple turns) after 1-2 hours of practice. Mastering zero radius turns and mowing complex lawn shapes takes additional practice over several mowing sessions. The learning curve is steeper than traditional riding mowers, but the benefits in maneuverability and efficiency justify the effort.
Can you operate a zero turn mower on wet grass?
Operating on wet grass is not recommended. Wet grass clumps under the mower deck, reducing cutting quality and clogging the discharge chute. Additionally, wet grass reduces traction, increasing the risk of slipping, especially on slopes. Wait at least 24 hours after rain for grass to dry before mowing when possible.
What is the proper blade height for mowing?
Most lawns benefit from a cutting height of 2.5 to 3.5 inches. Adjust blade height based on grass type, season, and lawn condition. Taller grass (3-3.5 inches) is healthier and more drought-resistant. Shorter grass (2.5-3 inches) is appropriate for formal lawns. Never remove more than one-third of the grass blade in a single mowing to avoid stress and disease.
Why won’t my zero turn mower move forward even though the engine is running?
Check these common causes: (1) Ensure both lap bars are pushed fully forward and the engine is at full throttle. (2) Verify the blade engagement lever is disengaged, some mowers won’t move with blades engaged. (3) Check the safety seat switch, the mower won’t move if the operator isn’t fully seated. (4) Inspect hydraulic fluid level and look for leaks in the hydraulic lines. (5) Consult your owner’s manual or contact a dealer if problems persist, as internal transmission or hydraulic issues may require professional service.
How often should you sharpen or replace mower blades?
Sharpen or replace blades every 20-40 hours of mowing operation, or at least once per season. Dull blades tear grass instead of cutting cleanly, promoting disease and a ragged lawn appearance. Inspect blades before each mowing session for visible nicks or dullness. Replace blades if they’re cracked, bent, or too worn to sharpen effectively.
Zero Turn Operating Safety
Zero turn mowers can pivot sharply, so slow down on turns and keep both levers under control at all times. Anyone wanting broad safety context for ride-on machines can review American National Standards Institute (ANSI).









