

Quick Answer
To wind weed wacker string, remove the spool from the trimmer head by twisting it counterclockwise or pressing the release tabs. Insert the line into the anchor hole, wind it tightly in the arrow direction, leave 4 to 6 inches unwound, thread both ends through the exit holes, then reinstall the spool and pull the line taut.

Pros
- Rapid Replace head listed for simpler string reloading
- Digital ignition listed for easier starting
- LowVib anti-vibration system listed to reduce fatigue
- Air purge listed to aid starting
Cons
- Listed weight is 12.2 pounds
- Starting and speed claims are manufacturer-stated only

Pros
- Includes the battery and charger, so the kit is ready for setup out of the box.
- Attachment changes are designed to be quick and simple, which saves time during multi-step yard work.
- Comfort-focused design aims to reduce arm fatigue and vibration during extended use.
- Versatile enough to cover several common homeowner landscaping tasks in one system.
Cons
- Only one 40V 4Ah battery is included, so longer jobs may require recharge time or an extra battery.
- The 8-inch pole saw and 10-inch brush cutter are better suited to light-to-moderate tasks than heavy-duty clearing.
- The attachment-based design adds more parts to store and manage than a single-purpose tool.
Overview: The Wild Badger Power 40V 4-in-1 Multi-Tool Kit combines a string trimmer/edger, pole saw, hedge trimmer, and brush cutter into one cordless system. It is built for homeowners who want a flexible yard tool that can handle several common maintenance jobs without switching between multiple machines.
Performance and features: The included 40V 4Ah battery gives the tool cordless freedom, while the brushless motor design is aimed at efficient operation. The 15-inch trimmer/edger, 16-inch hedge trimmer, 8-inch pole saw, and 10-inch brush cutter provide useful coverage for routine trimming, shaping, and light brush work. Quick attachment swaps make it easy to move from one task to another.
Drawbacks and considerations: This is a multi-tool kit, so it has more parts to keep track of than a dedicated trimmer. The single included battery may also be limiting for larger properties or longer sessions. Based on the listed specs, the saw and cutter sizes are practical for moderate yard work rather than heavy commercial clearing.
Verdict: This kit is a strong fit for homeowners who want one cordless platform to handle edging, trimming, hedge care, and light cutting. If you value versatility, comfort, and easy setup more than maximum-duty power, it offers a practical all-in-one solution.

Pros
- Genuine 4-in-1 versatility covers grass trimming, edging, hedge shaping, and brush cutting from a single powerhead.
- Full-crank 26cc engine offers more durability and power delivery than half-crank alternatives.
- Tool-free quick-change attachments make switching tasks fast and simple.
- Vibration-reducing aluminum transmission support plus shoulder harness improve comfort during extended use.
- 3-year limited warranty provides longer coverage than many competing gas trimmers.
Cons
- The 2-cycle engine requires mixing gasoline and oil, which is less convenient than straight-gas or battery models.
- Gas powerheads with multiple stel attachments tend to be heavier and noisier than electric alternatives.
- Regular 2-cycle maintenance and fuel mixing may deter users seking low-upkeep equipment.
The Wild Badger Power 26cc 2-Cycle Gas Weed Wacker is a 4-in-1 wheeled edger kit built around a single powerhead that accepts four interchangeable attachments. The system is designed to consolidate several lawn care tools into one, pairing a 26cc engine with a rubber handle and shoulder harness for better control across different tasks.
Performance and key features center on the 26cc 2-cycle full-crank engine, which is engineered to handle both light routine trimming and more demanding jobs like clearing heavier growth. The kit includes a 17-inch string trimmer for grass, a 9-inch wheeled-edger blade for clean borders, a 16-inch hedge trimmer, and a 10-inch brush-cutter blade. The quick-change design lets you install or remove attachments in seconds, and the aluminum transmission support helps dampen vibration during longer sessions.
Drawbacks and considerations are typical of gas-powered multi-tools. The 2-cycle engine needs a gasoline-and-oil fuel mix, ading a step that battery or straight-gas users avoid. A gas powerhead loaded with steel attachments also tends to be heavier and louder than electric options, and ongoing 2-cycle maintenance may not suit those wanting minimal upkeep.
Verdict: This kit is a strong fit for homeowners and property owners who want one versatile machine to trim, edge, shape hedges, and cut brush without buying separate tools. If you are comfortable with fuel mixing and standard gas-engine care, the combination of full-crank power, quick-change attachments, and a 3-year limited warranty offers dependable, all-around yard coverage.
Understanding Your Weed Wacker Head Design
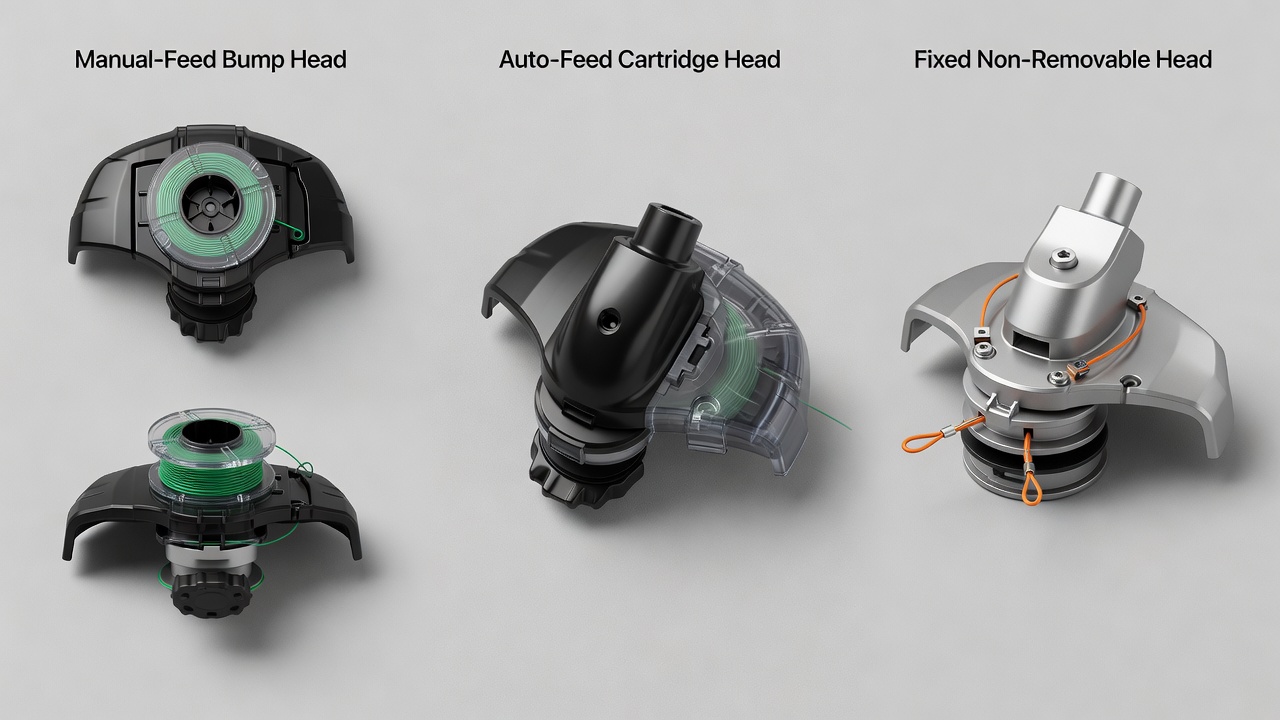
Before you attempt to wind trimmer line, it’s important to identify what type of trimmer head you’re working with. Different designs require slightly different approaches, though the core winding principle remains the same across most residential and commercial models.
Manual-Feed vs. Auto-Feed Systems
Manual-feed (bump-feed) heads require you to manually wind the line onto the spool and adjust tension by hand. These are the most common type for residential users. When the line becomes dull or breaks, you bump the spool head on the ground to release a small amount of pre-wound line.
Auto-feed systems automatically advance new line as needed during use. These still require you to wind line onto the spool initially, but the mechanism handles feeding during operation. Some auto-feed heads have a fixed spool that doesn’t need removal, you simply insert line through small holes and let the mechanism pull it through.
Single-Line vs. Dual-Line Heads
Single-line heads use one continuous strand of trimmer line and are common on smaller, lighter-duty trimmers. Dual-line heads use two strands of line wound on separate sides of the spool and deliver more cutting power. The winding process is essentially the same; you’ll just wind line on both sides of the spool for dual-line designs.
Tools and Materials You’ll Need
Gathering the right supplies before you start makes the job faster and prevents frustration.
- Replacement trimmer line: Check your trimmer manual or head design for the correct gauge. Common sizes are 0.065 inch, 0.080 inch, and 0.095 inch diameter. Thicker line (0.095 inch) is more durable but requires more power; thinner line (0.065 inch) is better for light residential use.
- Pre-cut trimmer line (optional): Many hardware stores sell pre-spooled line in convenient lengths. For manual winding, you’ll typically need 15 to 20 feet per side.
- Flathead screwdriver or coin: Some spool designs use a screw or slot that requires a tool to remove. A coin often works just as well.
- Work surface: A flat, clean workspace helps prevent line tangles and makes it easier to see what you’re doing.
- Safety glasses (optional but recommended): Protects your eyes if the line snaps or springs during unwinding.
How to Remove the Spool
Proper spool removal is the first critical step. The method varies by trimmer model, but the principles are universal.
Safety First
Before removing the spool, disconnect the spark plug wire (for gas trimmers) or unplug the trimmer (for electric models). This prevents accidental starting while your hands are near the cutting head. If your trimmer has a battery, remove or disconnect it.
Locate the Spool Release Mechanism
Examine the underside or sides of the trimmer head. Most spools are held in by one of these methods: For additional operational safety benchmarks, see our published testing notes on marshall stanmore iii vs harman kardon onyx studio 8.
- Twist-off design: The entire spool head twists counterclockwise to remove. Grip the head firmly and rotate it until it comes free.
- Release tabs or buttons: Press inward on the tabs or buttons on opposite sides of the head while pulling the spool down or outward.
- Center bolt or screw: A single bolt or screw in the center of the spool holds it in place. Use a flathead screwdriver or the appropriate wrench to remove it.
- Spring-loaded cartridge: Some newer designs feature a cartridge that clicks in and out. Push down and rotate slightly to release.
Remove and Inspect the Spool
Once you’ve loosened the mechanism, gently pull the spool away from the head. Look for any remaining line wrapped around it and unwind it completely. Inspect the spool for cracks or damage; if the plastic is cracked, broken, or severely worn, you may need to replace the entire spool or head assembly rather than just rewinding line.
Step-by-Step: Winding Trimmer Line on the Spool
This is the core process. Take your time to wind the line evenly and tightly to prevent tangling and ensure smooth feeding during use. To compare alternative configurations, check our hands-on review of dyson v8 cyclone vs bissell featherweight stick.
Step 1: Locate the Anchor Hole
Look at the spool carefully. You’ll find a small hole or notch, usually near the edge or center. This is the anchor hole, where you insert the line to secure it before winding. Some spools have a small post or ridge instead of a hole; the line wraps around this feature.
Step 2: Insert the Line and Secure It
Cut approximately 15, 20 feet of trimmer line (or use pre-cut line). Insert one end into the anchor hole or hook it around the anchor post. The line should be snug but not wedged so tightly that you can’t move it. Leave about 2, 3 inches of line extending past the anchor point, this tail will be threaded through the exit hole later. Users looking for related component recommendations can explore our bissell crosswave hydrosteam vs shark stainforce breakdown.
Step 3: Check the Winding Direction
Most spools have arrows molded into the plastic indicating the direction you should wind. If arrows are present, follow them, they’re there for a reason and ensure the line feeds correctly during use. If no arrows are visible, the standard direction for most trimmer heads is clockwise when looking down at the top of the spool. However, check your trimmer manual to confirm, as some designs wind counterclockwise.
Step 4: Wind the Line Tightly and Evenly
Wind the line slowly and deliberately, keeping tension on it with your other hand so it doesn’t slip or bunch. The line should wrap around the spool in neat, parallel layers without overlapping or crossing over itself. If you notice the line twisting as you wind, stop and unwind slightly to straighten it, then resume. Tight, even winding prevents tangles and allows the line to feed smoothly.
Step 5: Leave 4 to 6 Inches Unwound
When you’ve wound most of the line, stop and leave 4 to 6 inches of the remaining line unwound. This tail will be threaded through the exit hole in the trimmer head. If you wind too little line, you won’t have enough slack to reach the exit hole; if you wind the entire spool solid, the head won’t reassemble properly.
Step 6: Repeat for Dual-Line Heads (If Applicable)
If you have a dual-line head, the spool typically has two separate winding sections. Repeat steps 2 to 5 for the second side, winding in the same direction and leaving the same amount of line unwound.
Reinstalling the Spool and Threading the Line
You’re nearly done. This final section covers putting it all back together correctly.
Thread the Line Through Exit Holes
Before reinstalling the spool into the trimmer head, thread the unwound line tails through the exit holes in the head. The exit holes are small slots or notches on the underside of the trimmer head where the cutting line comes out during use. Slide each line tail through its corresponding exit hole until it’s snug but not pulled tight, you want just enough tension that the line won’t slip back.
Reinstall the Spool
Position the spool back into the trimmer head, aligning it with the drive shaft or center post. Depending on your trimmer:
- For twist-on designs: Align the spool and twist it clockwise until snug. Don’t over-tighten, or you may strip the threads.
- For release-tab designs: Insert the spool, then press the tabs to lock it in place. You should hear or feel a click.
- For bolt designs: Insert the spool, then replace and tighten the center bolt using a screwdriver or wrench.
Adjust Line Tension and Length
Once the spool is reinstalled, pull gently on both line tails to extend them to your desired cutting length. Most residential trimmers work best with line extending 6 to 8 inches beyond the edge of the spool head. Pull slowly and steadily; if the line doesn’t move, check that it’s properly threaded through the exit holes and not caught on anything.
Some trimmer heads have a small adjuster knob or screw that controls line tension. If present, adjust it according to your manual, too loose and the line won’t feed evenly; too tight and it may jam.
Troubleshooting Common Winding Problems
Line Twists or Kinks During Winding
Cause: The line is rotating as you wind it, causing it to spiral instead of wrap smoothly around the spool.
Solution: Pause frequently and straighten the line with your fingers. Hold the line perpendicular to the spool surface and apply gentle upward pressure as you wind. If the line is old or brittle, it may twist more easily, consider replacing it with fresh line.
Line Tangles Inside the Spool or Head
Cause: Line overlapped during winding, or too much line was wound onto the spool.
Solution: Completely unwind the spool and start over. This time, wind more slowly and ensure each wrap sits parallel to the previous one without overlapping. If tangles persist, the spool may be damaged; check for cracks or deformed edges.
Line Won’t Feed During Use
Cause: Line is wound too tightly, threaded incorrectly through exit holes, or the spool isn’t installed securely.
Solution: Remove the spool and verify that both line ends are inserted through their exit holes and extending at least 2 to 3 inches. Reinstall the spool and tighten it completely. If the problem persists, the spool may need replacement.
Line Slips or Doesn’t Stay Anchored
Cause: The line anchor wasn’t seated properly in the anchor hole, or the anchor post is damaged.
Solution: Remove the spool and re-insert the line into the anchor hole, ensuring it’s fully seated. If the line keeps slipping, wrap it once around the anchor post (if your spool design allows) before winding. If the anchor post is cracked, you’ll need to replace the spool.
Wound Line Looks Loose or Uneven
Cause: You didn’t maintain steady tension while winding, or the spool surface is worn or uneven.
Solution: Unwind and rewind, this time holding the line under constant tension with your non-winding hand. As you wind, keep the line pulled taut at approximately a 45-degree angle from the spool. This tension ensures each wrap sits firmly against the previous layer.
Model-Specific Considerations
Automatic-Feed Trimmer Heads
Auto-feed heads eliminate the bump-and-feed manual process. However, they typically still require you to pre-wind line onto a spool or cartridge.
Winding approach: Follow the standard winding steps above. Auto-feed spools often have the same anchor holes and exit holes as manual-feed designs. The difference is in how the trimmer advances the line during use, the mechanism handles it automatically, so you don’t need to bump the head.
Line insertion: Some auto-feed systems have a small cartridge that snaps into the trimmer head. You may insert pre-wound line directly into this cartridge rather than winding it yourself. Check your manual for cartridge-specific instructions.
Fixed-Head or Non-Removable Spools
A few trimmer models feature spools that cannot be removed. Instead, you insert line directly through small holes in the fixed spool head.
Winding approach: These designs typically use a figure-eight or helical feeding pattern. You manually push line through one hole, wrap it around the spool interior (which you cannot see), and pull it back out through another hole. The mechanism then feeds the line automatically.
Best practice: Use line pre-wound on a separate bobbin or spool, and feed it into the fixed head slowly. Your manual will diagram the exact insertion pattern for your model.
Dual-Head or Split-Spool Designs
Some commercial or heavy-duty trimmers have two independent spools or a spool divided into clearly separate sections.
Winding approach: Wind each section separately, as if you were working with two single-line trimmers. Ensure both sides use the same line gauge and are wound with equal tension. This balance helps the trimmer cut evenly and reduces vibration.
Straight-Shaft vs. Curved-Shaft Trimmers
The trimmer shaft design (straight or curved) doesn’t affect spool winding. However, curved-shaft trimmers may have head designs that angle differently, which can affect how comfortably you access the spool. The winding technique remains identical.
Buyer FAQs: How To Wind Weed Wacker String Solved
What’s the correct trimmer line gauge for my weed wacker?
Check your trimmer’s manual or the head housing, most manufacturers stamp or print the correct gauge there. Common residential sizes are 0.065 inch, 0.080 inch, and 0.095 inch. Thicker line (0.095 inch) cuts thicker weeds but requires more engine power; thinner line (0.065 inch) is better for light use and smaller engines. Using the wrong gauge can reduce cutting efficiency or damage your trimmer’s drive mechanism.
How long should trimmer line last before I need to rewind?
Trimmer line dulls and breaks with use, typically lasting 5 to 15 hours depending on what you’re cutting (grass vs. thick weeds), line gauge, and cutting technique. You’ll know it’s time to rewind when you notice the trimmer cuts less cleanly or requires more passes. In a bump-feed head, you’ll exhaust the pre-wound line on the spool after several bump-feeds. At that point, you need to rewind the spool with fresh line.
Can I wind line in both directions on a dual-line spool?
No. Both sides of a dual-line spool should wind in the same direction, as indicated by the arrows on the spool. Winding in opposite directions can cause the line to tangle, feed unevenly, or jam inside the head. If your spool has arrows pointing in different directions on each side, that’s intentional, follow each arrow for its respective side.
What do I do if the spool won’t twist off or the release tabs are stuck?
Apply a small amount of penetrating oil (like WD-40) around the seam where the spool meets the trimmer head. Let it sit for 5 to 10 minutes, then try again. If it’s still stuck, tap gently around the spool’s edge with a rubber mallet to break the seal. Avoid using excessive force, which can crack the plastic spool or head. If the spool remains stuck after these attempts, you may need to replace the trimmer head assembly.
Final Tips for Long-Lasting Trimmer Performance
Wind your trimmer line carefully and evenly every time you rewind the spool. Neat, tight winding prevents tangles and jams that can damage the head mechanism over time. Always use the correct line gauge for your trimmer model, using thicker or thinner line than recommended can strain the motor and cause premature wear.
Keep your trimmer head clean by removing grass clippings and debris after each use. This prevents buildup that can interfere with line feeding. Store your trimmer in a dry place, as moisture can cause the line to absorb water and become brittle, leading to breakage.
If you wind the spool correctly and the line still won’t feed or tangles repeatedly, the spool itself may be damaged. Replacing a worn spool is usually inexpensive and restores full trimmer performance.
Related Maintenance and Operating Guides
To keep your equipment running at peak operating efficiency, explore our related technical walkthroughs and maintenance tutorials:
- Consult our detailed breakdown on residential zero-turn lawn mower guide.
Winding Line on a Weed Wacker
Winding the spool tightly and evenly prevents the line from loosening once the head spins. Leaving the ends at the right length lets the line feed out without snagging. For general handling guidance on cutting tools, see material from American National Standards Institute (ANSI).









