

Quick Answer: How to Restring a Lawn Trimmer
Restringing a lawn trimmer comes down to five basic steps: disconnect the power source (unplug the cord, remove the battery, or disconnect the spark plug), remove the trimmer head and spool, take out any leftover line, cut a fresh piece of trimmer line to the correct length and diameter for your model, and wind it onto the spool in the direction shown by the arrows, threading the ends through the eyelets before reassembling the head.
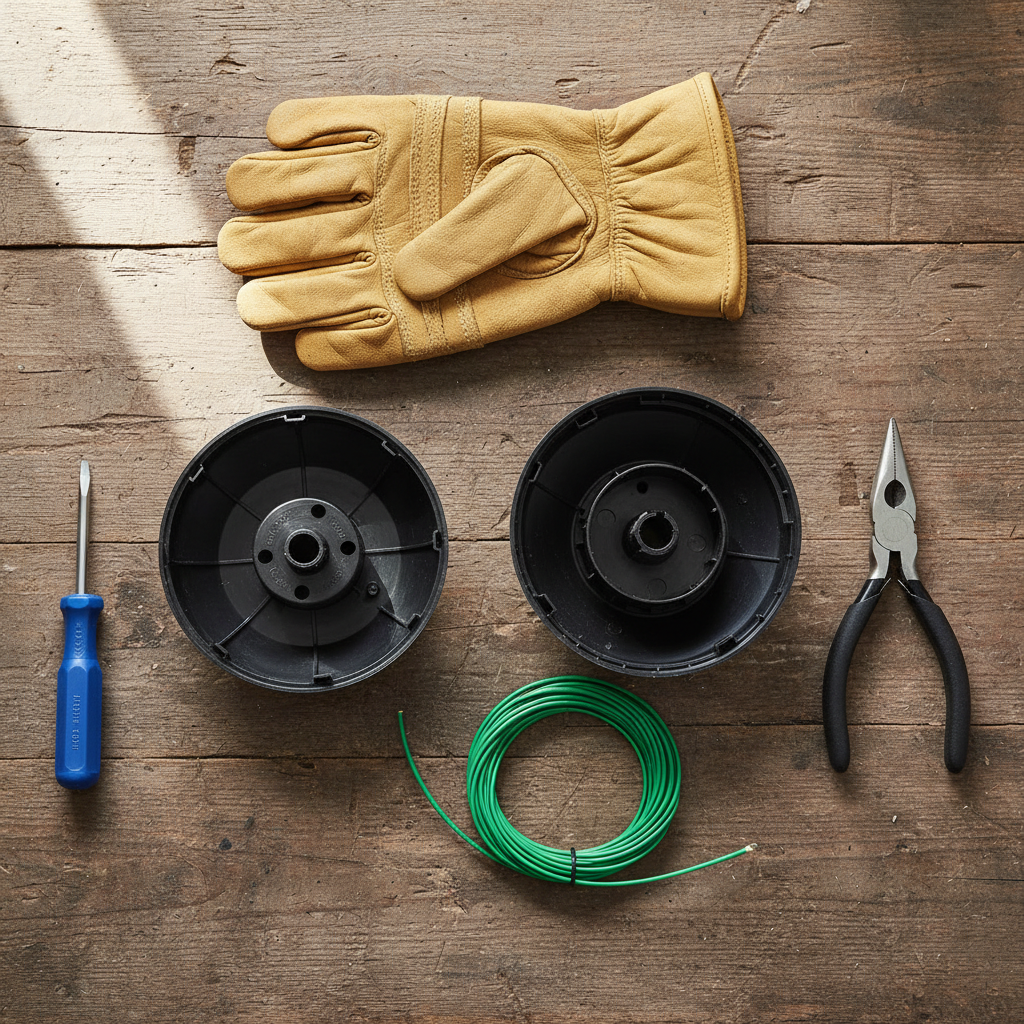
The exact procedure varies by head type: bump-feed heads let you release new line by tapping the head on the ground, fixed-line heads require manual repositioning of the line, and automatic-feed heads advance line whenever the engine starts. Always consult your owner’s manual, match the line gauge recommended for your trimmer, and work slowly to avoid spring-loaded parts popping out during disassembly.
Understanding the Different Trimmer Head Types
Before you touch a single piece of line, you need to know which trimmer head mechanism you own. The three main types are bump-feed, fixed-line, and automatic-feed. Each one is restrung slightly differently, and using the wrong technique can lead to tangles, jams, or a head that simply won’t feed.
Pros
- Precise EPOS positioning system ensures accurate navigation without boundary wires
- Handles slopes up to 45 percent and works rain or shine for year-round reliability
- Full app control for schedules, patterns, cutting height, and theft tracking
- Bundle includes ready-to-use cordless trimmer with dual-direction head and power boost
- Simple blade swaps and hose-down cleaning make ongoing upkeep quick and easy
Cons
- Maximum mowing capacity limited to 0.5 acres, unsuitable for larger properties
- Virtual mapping setup requires manually driving the mower to define boundaries, adding initial time investment
- Performance details such as exact battery runtime for the mower are not specified in available data
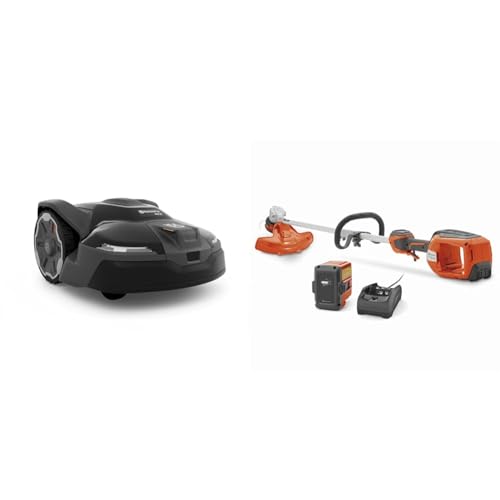
The Husqvarna 410iQ Automower Bundle combines the brand's robotic mower with the 320iL cordless string trimmer into a complete lawn care package. Built for American yards, the 410iQ features a rugged bumper, larger wheels, and solid construction that crosses paths and driveways smoothly while the included trimmer arrives with a 4 Ah battery and charger for immediate use. The overall design prioritizes wire-free convenience and ease of maintenance from the first unboxing.
In performance, the Exact Positioning Operating System uses satellite communication for centimeter-level accuracy, allowing the mower to handle slopes up to 45 percent and cut heights from 1 to 4 inches without tearing grass. App-guided virtual mapping replaces boundary wires, and the mower operates rain or shine with customizable schedules and patterns. The companion 320iL trimmer delivers a 16-inch cutting width, dual-direction head to keep clippings off beds, and a power boost mode offering 20 percent more power for heavy weeds, all while remaining 25 percent lighter with active cooling for consistent runtime.
Considerations include the 0.5-acre capacity limit, which may restrict use on bigger properties, and the initial virtual mapping process that requires driving the unit around the lawn. Available data also lacks specific battery life figures for the mower itself, so owners should plan for typical robotic charging cycles based on lawn conditions.
This bundle delivers excellent value for homeowners seeking automated mowing plus versatile cordless trimming on medium-sized properties. Those with complex landscaping who value app control, precision navigation, and a ready-to-go trimmer kit will benefit most from the Husqvarna 410iQ and 320iL combination.
Pros
- Wire-free dual-LiDAR mapping, no perimeter wires needed
- Built-in TruEdge trimmer cuts close to lawn borders
- App-adjustable cutting height from 1.18 to 3.54 inches
- AIVI 3D obstacle avoidance listed for over 200 obstacle types
- Designed for lawns up to 1/2 acre, per manufacturer
Cons
- Coverage and charging figures are manufacturer claims, not tested
- Height adjustment and setup rely on the ECOVACS HOME app

Pros
- Wire-free Dual-LiDAR navigation provides automatic mapping and 2 cm accuracy without perimeter wires or GPS dropouts.
- Integrated TruEdge edge trimmer handles borders cleanly and reduces post-mow manual string trimming.
- 32V high-power dual-blade platform delivers strong torque for thick, fast-growing grass types.
- 50-minute fast charging with 3.0Ah battery supports efficient multi-session mowing with minimal wait.
- App-based zone creation, no-go zones, and scheduling allow precise control over complex yard layouts.
Cons
- Coverage capacity is limited to yards up to 1/2 acre and may not scale for larger properties.
- Edge trimming line needs eventual replacement after the included two rolls cover approximately 6 km total.
- Exact continuous runtime details beyond the 50-minute charge time are not specified in the product data.
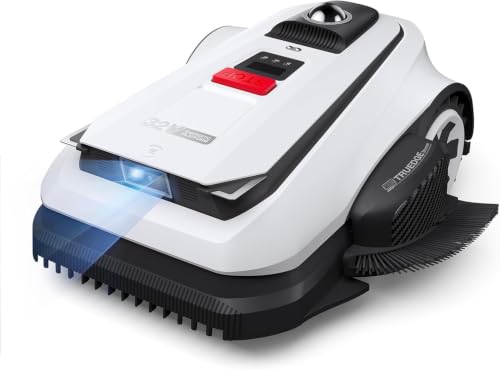
The ECOVACS Goat A2000 LiDAR PRO is a wire-free robotic lawn mower built for homeowners managing yards up to 1/2 acre. Its core design centers on the HoloScope 360° Dual-LiDAR system that auto-maps the property without any perimeter wire or RTK antenna, creating an immediate sense of advanced, self-contained automation with precise 2 cm positioning.
Performance highlights include reliable navigation even under trees, near fences, or in shaded zones where traditional GPS units struggle. The integrated TruEdge trimmer delivers clean cuts along driveways, sidewalks, and flower beds while the 32V dual-blade platform supplies the torque needed for dense Bermuda, Zoysia, Fescue, and St. Augustine grass. AIVI 3D obstacle avoidance keeps the unit safe around objects, and the ECOVACS app lets users set custom zones, no-go areas, cutting height, speed, travel paths, and schedules. Fast charging finishes in about 50 minutes so scheduled mowing stays consistent with little downtime.
Considerations include the 1/2 acre maximum coverage that may leave bigger lawns incomplete, the need to replace the two included trimming line rolls after roughly 6 km of total edging, and the absence of explicit continuous battery runtime figures beyond the rapid recharge specification. Users should plan mapping and zone setup carefully for multi-area yards.
This model is best suited for tech-oriented homeowners with medium American lawns who want wire-free convenience, built-in edging, and app-driven personalization. Those whose property size and grass type match the listed capabilities will gain the most value from automated, precise lawn maintenance.

Pros
- Wire-free optical navigation requires no perimeter wire or antenna for nearly zero-installation setup.
- App control provides real-time remote status checks and convenient operation from the charging dock.
- Includes 2.0AH battery and charger with the versatile 24V trimmer that converts easily to an edger.
- Obstacle avoidance and auto-charging support smooth hands-free mowing on defined lawns.
- Drop-N-Mow mode extends use to secondary areas up to 1600 square feet without outdoor power.
Cons
- Operates only during daylight hours due to reliance on optical vision technology.
- Designed for lawns up to 1/6 acre which limits suitability for larger properties.
- Requires clearly defined lawn edges around the full perimeter for optimal navigation.
The LawnMaster OcuMow VBRM701YAMIDR robotic lawn mower bundled with the CLGT2410S 24V 10-inch cordless string trimmer provides a ready-to-go solution for compact yards. It features nearly zero installation after unboxing by placing the charging dock and defining lawn edges. The trimmer arrives lightweight under 6 lbs with a telescopic shaft and stabilizing wheels for comfortable handling.
Performance centers on optical navigation using advanced sensors and a wide-angle camera to identify grass even in tricky lighting plus ultrasonic obstacle avoidance for objects as small as 6 inches. The mower auto-returns to the station for a 2-hour charge and covers up to 1/6 acre while Drop-N-Mow mode runs up to 3 hours for 1600 square feet without a dock. The trimmer offers a 10-inch cutting width and converts to an edger via 5-position pivoting head and 90-degree rotating shaft for precise edges.
Drawbacks include daylight-only operation to protect nocturnal wildlife which prevents evening use. It works best on smaller defined lawns up to 1/6 acre and needs clear perimeter edges without additional power for secondary zones. Available data focuses on specifications so long-term durability depends on individual conditions.
This LawnMaster bundle delivers strong value for homeowners with compact primary and secondary lawns who want wire-free robotic mowing plus a versatile cordless trimmer. Ideal users prioritize simple app-controlled setup and wildlife-friendly features for efficient complete yard maintenance.
What Is a Bump-Feed (Tap-to-Advance) Trimmer Head?
A bump-feed head is the most common type found on residential gas and electric trimmers. It stores a length of line wound around an internal spool. When the cutting line wears down to the blade tip, you tap the bottom of the head on the ground while the trimmer is running at full throttle. The impact releases a small amount of line from the spool, and centrifugal force flings it out to the correct cutting length. Because the spool is spring-loaded, the bump mechanism can pop apart suddenly during disassembly, so always hold the head over a workbench and keep your fingers clear of the center knob.
What Is a Fixed-Line Head?
A fixed-line head, sometimes called a manual-feed or fixed-length head, uses short, pre-cut pieces of line that are locked into slots or holes on the head. There is no spool and no bump mechanism. When the line wears down, you must stop the trimmer, remove the head, and manually reposition or replace the line pieces. These heads are common on entry-level, lightweight, and older trimmers because they are cheaper to manufacture and have fewer moving parts. The trade-off is convenience: you cannot feed new line without stopping and opening the head.
What Is an Automatic-Feed Head?
An automatic-feed head advances new line automatically whenever the engine starts or the trimmer is switched on. Inside the head, a centrifugal mechanism senses the change in speed and releases a set amount of line without any tap or manual adjustment. Some designs also feed line during operation when the line shortens. Automatic-feed heads are convenient but can be finicky: if the spool is wound incorrectly or the line gauge is wrong, the mechanism may feed too much line or none at all.
How Can I Tell Which Type of Head Is on My Trimmer?
Look at the bottom of the head. If you see a knob or button in the center that you can press or tap, it is a bump-feed head. If you see short line ends sticking out of fixed slots with no visible spool access, it is a fixed-line head. If the head has no tap knob and no visible line slots, it is likely an automatic-feed head. Your owner’s manual is the definitive source, and the model number printed on the head can help you look up the correct replacement spool and line specifications online. To evaluate matched hardware tolerances, consult our detailed overview of z890 vs x870e motherboard.
Tools and Materials You’ll Need
Gathering everything before you start saves time and prevents frustration. Most restringing jobs require nothing more than basic household tools and the correct trimmer line.
What Tools Are Required to Remove and Open a Trimmer Head?
- Screwdriver (flat-head or Phillips, depending on your head’s retainer screws)
- Pliers for gripping the spool or pulling out jammed line
- Work gloves to protect your hands from sharp line edges and spring-loaded parts
- Safety glasses or goggles to protect your eyes from debris and snapped line
- A clean, flat work surface such as a workbench or table
- A tape measure or ruler to measure line length accurately
- Scissors or a sharp knife to cut trimmer line cleanly
What Diameter (Gauge) of Trimmer Line Should I Buy?
The correct line diameter, or gauge, is printed in your owner’s manual and often on the trimmer head itself. Common residential sizes range from 0.065 to 0.110 inches. Lightweight electric trimmers typically use thinner line around 0.065 to 0.080 inches, while heavier gas trimmers can handle 0.095 to 0.110 inches. Always use the diameter recommended for your model. Oversized line can overload the trimmer motor, clog the eyelets, and cause the feed mechanism to jam; undersized line cuts poorly and breaks quickly. When planning workspace deployment, consider the engineering criteria outlined in our marshall stanmore iii vs harman kardon onyx studio 8 guide.
How Much Line Do I Need for One Full Spool?
A full spool refill typically takes 15 to 25 feet of line, depending on the spool size, line gauge, and head design. Most replacement spools come pre-wound with the correct amount, and bulk spools of trimmer line usually include a length guide on the packaging. When in doubt, wind until the spool is full but not bulging, leaving a small gap at the outer edge so the line can feed freely.
Are Round, Twisted, or Star-Shaped Lines Better for Different Grass Conditions?
- Round line is the standard all-purpose choice. It is quiet, cuts cleanly, and is the most widely compatible with residential trimmers.
- Twisted (multi-sided) line has a serrated edge that cuts through thick grass and weeds more aggressively, but it is noisier and wears faster.
- Star-shaped or serrated line offers maximum cutting power for heavy vegetation, but it puts more strain on the trimmer motor and is best reserved for gas trimmers with higher power output.
For typical residential lawns, a good-quality round line in the manufacturer-recommended gauge is the safest and most reliable choice. For additional operational safety benchmarks, see our published testing notes on dyson v8 cyclone vs bissell featherweight stick.
Safety Precautions Before You Start
Trimmer heads contain springs, tension, and sharp edges, and the machine itself can start accidentally if not properly disabled. Safety comes first, before any disassembly.
How Do I Safely Disconnect a Gas Trimmer Before Working on It?
For a gas trimmer, disconnect the spark plug wire from the spark plug and secure it away from the plug terminal. This prevents the engine from firing accidentally while you work on the head. Also make sure the engine is cool and the fuel cap is tight. If the trimmer has been running recently, give it time to cool down before handling the head area. To compare alternative configurations, check our hands-on review of bissell crosswave hydrosteam vs shark stainforce.
What Should I Do If My Trimmer Is Electric or Battery-Powered?
For a corded electric trimmer, unplug the power cord from the outlet before doing anything else. For a battery-powered trimmer, remove the battery pack completely. Do not rely on a power switch being in the off position, because switches can fail or be bumped during work.
Why Can the Trimmer Head Be Dangerous to Remove?
Bump-feed heads are spring-loaded. When you unscrew the center knob or retainer, the spring can release suddenly, sending the spool, knob, or line flying. This can cause cuts, eye injuries, or lost parts. Always hold the head assembly over a workbench, wear eye protection, and apply steady pressure as you release the retainer. If a part feels stuck, do not force it, check for a hidden screw or clip first.
Should I Wear Gloves or Eye Protection While Restringing?
Yes. Wear eye protection while trimming or restringing, because the line operates at high speed and can throw debris, and a snapped line can whip toward your face. Gloves protect your hands from the sharp edges of trimmer line, the cutting blade at the base of the head, and any burrs on the spool. A simple pair of work gloves and safety glasses is inexpensive insurance against a painful accident.
Step-by-Step Guide: How to Restring a Bump-Feed Head
This is the most common procedure, and it applies to the majority of residential trimmers. Follow these steps in order, and refer to the arrows molded into the spool and head for winding direction.
Step 1: Remove the Bump-Feed Head from the Trimmer Shaft
Disconnect the power source as described above. Most bump-feed heads are held on by a center retainer knob, a screw, or a tab-and-notch system. Press the two locking tabs on the side of the head (if present) and twist the head to release it from the shaft. If your model uses a center screw, remove it with the correct screwdriver. Set the head assembly on your workbench, keeping the spring and spool contained.
Step 2: Remove the Spool and Leftover Line
Press down on the spool and turn it counterclockwise to release the spring tension, then lift the spool out of the head housing. Pull off any old line that remains and discard it. Check the spool for cracks or deep grooves; if it is damaged, replace it rather than rewinding it.
Step 3: Cut a Fresh Piece of Line to the Correct Length
Cut a single piece of trimmer line between 15 and 25 feet, depending on your spool size and line gauge. The exact length is usually printed on the spool or in the manual. It is better to cut slightly less than the maximum so the spool does not bulge.
Step 4: Wind the Line onto the Spool in the Direction Shown by the Arrows
Find the small slot or hole in the middle of the spool and insert the midpoint of the line into it. Hold the two halves together and begin winding in the direction indicated by the arrows on the spool. Winding in the opposite direction causes tangling and prevents the feed mechanism from working. Wind tightly and evenly, keeping the line in the grooves and leaving about 6 inches unwound at the end of each half.
Step 5: Thread the Ends Through the Eyelets and Lock Them
Place the spool back into the head housing, aligning the ends of the line with the two eyelets (the small holes or notches on the outside of the head). Push each line end through its eyelet so it sticks out a few inches. Pull the line gently to seat the spool, then press down and turn the spool to lock it into place, following the arrows on the housing.
Step 6: Reassemble the Head and Test the Bump-Feed Mechanism
Reinstall the retainer knob or screw, then reattach the head to the trimmer shaft. Reconnect the power source, start the trimmer at full throttle, and tap the head on the ground to release the correct amount of line. The cutting tip should extend just past the blade guard. If no line releases, the spool may be wound in the wrong direction or the line ends may not be threaded through the eyelets properly.
How to Restring a Fixed-Line Trim Head
Fixed-line heads are simpler but require more frequent attention because you cannot feed new line on demand.
How Does a Fixed-Line Head Differ from a Bump-Feed Head When Restringing?
There is no spool, no spring, and no winding. Instead, you insert short, pre-cut pieces of line directly into slots or holes on the head. This makes the process faster, but it also means the line cannot be advanced while the trimmer is running.
How Do I Measure and Insert the Replacement Line for a Fixed-Line Head?
Disconnect the power source, then remove the head from the shaft according to your manual. Cut two pieces of line to the length specified in the manual, usually between 6 and 12 inches each, depending on the head design. Insert each piece through the matching slot or hole on the head, pushing until the line locks into the retaining notch. Some heads require you to push the line through one side and out the other; others use a simple push-and-lock channel.
How Far Should the Line Extend from the Head After Installation?
The line should extend just far enough to reach the cutting tip of the blade guard. As a general rule, the cutting line should be about the same length as the diameter of the head, but your manual is the final authority. Too much exposed line strains the motor and whips debris; too little line cuts poorly.
What Do I Do When the Line Wears Down Below the Cutting Tip?
Stop the trimmer, disconnect the power source, and remove the head. Pull the worn line out of its slot and replace it with a fresh pre-cut piece. Some fixed-line heads allow you to push the line through to expose a fresh section, but most require full replacement. Keep a few pre-cut spares in your pocket or garage so you can swap them quickly.
Choosing the Right Trimmer Line for Your Machine
Matching the line to your trimmer is the single most important factor in avoiding jams, birds-nesting, and poor cutting performance.
Which Line Thickness Is Right for My Trimmer?
Check the owner’s manual or the label on the trimmer head for the recommended gauge. Typical recommendations are 0.065 to 0.080 inches for electric and battery trimmers and 0.080 to 0.110 inches for gas trimmers. If you cannot find the specification, start with 0.080 inches, which is a safe middle ground for many residential models.
What Happens If I Use a Thicker Line Than Recommended?
Oversized line can overload the trimmer motor, clog the eyelets, and jam the feed mechanism. On electric trimmers, thick line can cause the motor to overheat or trip the thermal cutoff. On gas trimmers, it can strain the engine and cause the head to vibrate excessively. Always follow the manufacturer’s specification.
Are Professional-Grade or Commercial Lines Worth Using on a Residential Trimmer?
Professional-grade lines are often thicker and stiffer, designed for high-power commercial equipment. On a residential trimmer, they may be too thick to fit the eyelets and too stiff for the motor to spin effectively. Unless your manual explicitly supports a heavier gauge, stick with residential-grade line in the recommended diameter.
Do Electric Trimmers Have Different Line Requirements Than Gas Trimmers?
Yes. Electric and battery trimmers generally have less torque, so they require thinner, more flexible line that does not overload the motor. Gas trimmers have more power and can spin thicker, stiffer line that cuts heavy vegetation more effectively. Using a gas-trimmer line on an electric model is a common cause of jamming and motor strain.
Troubleshooting Common Restringing Problems
Even with careful technique, problems can arise. Here is how to diagnose and fix the most frequent frustrations.
Why Does the Line Keep Tangling or Birds-Nesting on the Spool?
Birds-nesting, when the line bunches up into a tangled mess inside the head, is almost always caused by winding the line in the wrong direction or overfilling the spool. Rewind the spool following the arrows exactly, and leave a small gap at the outer edge. Also confirm the line ends are threaded through the eyelets before locking the spool, and that the line is not caught under the spool rim.
Why Is the Trimmer Not Dispensing New Line When I Tap the Bump Feed?
First, make sure you are tapping the head on the ground while the trimmer is running at full throttle, the bump mechanism needs centrifugal force to release line. If it still will not feed, the spool may be wound in the wrong direction, the line may be too thick for the eyelets, or the spring inside the head may be broken or dislodged. Disassemble the head and inspect the spring and spool.
Why Does the Line Fly Out of the Head or Unwind All at Once?
This usually means the line was not locked into the spool’s anchor slot before winding, or the spool was not locked into the housing correctly. It can also happen if the line is too thin for the eyelets, allowing it to slip out. Recheck the anchor, the winding direction, and the line gauge.
Why Does the Line Break Repeatedly Right After Restringing?
Repeated breakage is often caused by using a line gauge that is too thin for the job, cutting against hard surfaces like concrete or stone, or letting the line extend too far past the blade guard. Switch to the recommended gauge, trim the line to the correct length, and avoid contacting hard surfaces while trimming.
When to Replace Parts or Seek Professional Help
Not every restringing problem is a line problem. Sometimes the head itself is worn out and needs replacement.
How Do I Know If the Spool or Bump Knob Needs Replacement?
Replace the spool if it is cracked, warped, or has deep grooves that catch the line. Replace the bump knob if the tap surface is worn smooth, the knob no longer clicks, or the spring inside is broken. If the head will not stay assembled even after correct reassembly, the locking tabs or threads are likely stripped.
Why Won’t the Head Stay Assembled Even After Restringing?
A head that keeps popping apart usually has a worn retainer, stripped threads, or a broken locking tab. Inspect all plastic parts for cracks and check that the spring is seated correctly. If any part is damaged, replace it, forcing the head back together will only cause more damage.
Is It Worth Taking the Trimmer to a Service Center for Head Repair?
If the head housing is cracked, the shaft threads are stripped, or the internal spring mechanism is broken beyond simple replacement, a service center is the safer option. A new head assembly is relatively inexpensive, and a technician can confirm whether the problem is in the head or the drive shaft.
Where Can I Find the Exact Parts for My Trimmer Brand and Model?
Write down the trimmer’s brand, model number, and the part number printed on the head. Search for the part number online or check the manufacturer’s website for an official parts diagram. Many hardware stores also stock universal replacement heads and spools that fit common trimmer brands, but a factory part is always the safest match.
Frequently Asked Questions About How To Restring A Lawn Trimmer
How long does it take to restring a lawn trimmer?
For a bump-feed head, the process takes about 10 to 15 minutes once you have the correct line and tools. Fixed-line heads are faster, often taking less than 5 minutes, because there is no spool to wind. The first time you do it will be slower; after a few refills, you will be able to complete the job quickly.
Can I use any brand of trimmer line in my trimmer?
Yes, as long as the diameter (gauge) matches your trimmer’s specification. Trimmer line is largely interchangeable across brands when the thickness is correct. The head design determines the maximum gauge it can accept, so check your manual before buying an off-brand line.
Why does my trimmer line keep falling out of the head?
Line falls out when it is not anchored in the spool slot, wound in the wrong direction, or threaded through the eyelets incorrectly. It can also happen if the line gauge is too thin for the eyelets. Disassemble the head, re-anchor the line, and rewind following the arrows on the spool.
Do I need to remove the whole trimmer head to restring it?
For most bump-feed and automatic-feed heads, yes, you need to remove the head or at least the spool to access the line. Some newer heads have a tool-free spool release that lets you pop the spool out without removing the entire head from the shaft. Check your manual; if the spool is accessible without removing the head, you can skip the shaft disassembly step.
Further Reading on Trimmer Care
A lawn trimmer should be unplugged or switched off during any repair, and the cutting head should stop completely before you touch it. Use the line diameter your model calls for. For general safety information about lawn equipment, visit American National Standards Institute (ANSI).









