

Direct Answer: Your Three Sharpening Options
You can sharpen a lawn mower blade in three ways: (1) at home using a metal file, the safest and most accessible option for most homeowners; (2) with power tools like an angle grinder or bench grinder, faster but requiring experience and proper safety equipment; or (3) at a professional sharpening service, recommended when blades are damaged, cracked, or if you lack confidence with hand tools or power equipment. A sharp blade cuts cleanly, reduces fuel consumption, and promotes healthy grass growth.

Pros
- Large-size design named in product title
- Sharpening and balancing functions listed
- Listed as a new upgraded version

Pros
- Adjustable 15-to-45-degree range in title
- Sharpening and balancing functions listed
Pros
- Includes replacement gaskets and a 98079-55846 spark plug
- Matches Honda HRR216 and HRS216 lawn mower models
- Designed around the 16100-Z8B-901 carburetor specification
Cons
- Restricted to select Honda GCV160 mower applications
- Installation requires basic mechanical tools and skills
Understanding Your Lawn Mower Blade
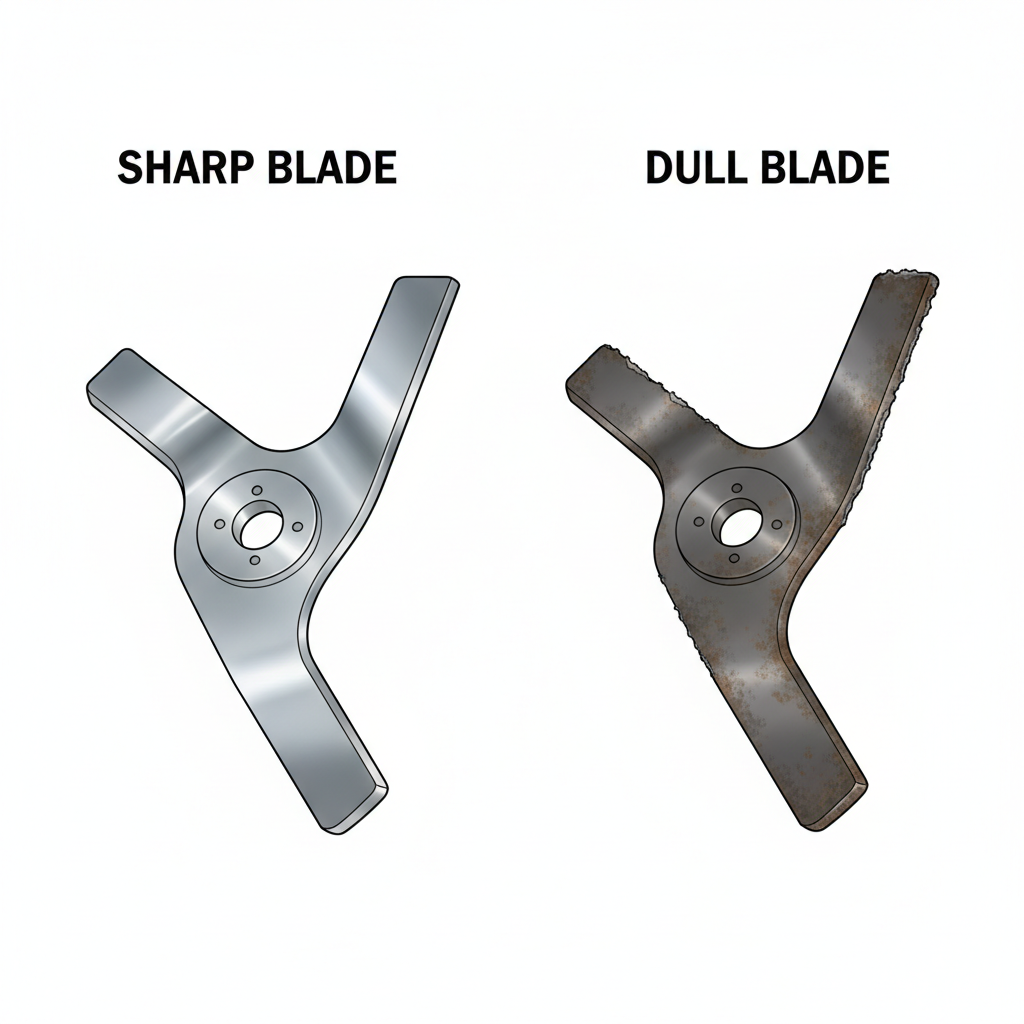
Blade Types and Identification
Most residential lawn mowers use rotary blades, flat, horizontally spinning blades that rely on speed to cut grass. Some specialized mowers use reel blades, cylindrical spirals that cut grass against a stationary bar, more common in commercial or precision cutting equipment. Rotary blades are far more common in residential settings.
A sharp rotary blade has distinct, clean edges. A dull blade appears rounded or frayed at the cutting edge and may have visible discoloration or nicks. When dull, blades tear grass rather than cut it, creating brown-tipped lawns and inviting disease.
How Often Should You Sharpen?
Industry standards recommend sharpening every 20-50 hours of mowing, or roughly every 1-3 months during active growing season, depending on lawn size and terrain. Rocky or sandy soils dull blades faster. Inspect your blade monthly during peak season; if grass appears torn or your mower vibrates excessively, sharpening is overdue.
Safety Precautions Before Starting
Disconnecting Your Mower Safely
- Turn off the engine and wait 5-10 minutes for it to cool completely
- Disconnect the spark plug wires to prevent accidental engine ignition, critical safety step
- Drain fuel if you’re uncomfortable with the mower sitting with a full tank, though this isn’t mandatory for brief blade work
- Tip the mower carefully, if necessary, tilt toward the carburetor side, never the air filter, to prevent oil leakage into the engine
Personal Protective Equipment (PPE)
- Heavy work gloves (leather or cut-resistant)
- Safety glasses to protect eyes from metal shavings
- Dust mask if using grinders or creating fine metal particles
- Steel-toed boots in case the blade falls
Why Blade Balance Matters
An unbalanced blade causes severe vibration, increases engine stress, damages the crankshaft, and creates an unsafe mowing experience. When sharpening, you must remove equal amounts of metal from both blade ends. A blade balancer (a cone-shaped tool that costs $10-20) checks balance by hanging the blade horizontally; if one side dips lower, it needs additional sharpening.
Step-by-Step DIY Sharpening with a Metal File
A metal file is the most accessible, safest method for most homeowners. This approach requires no electricity and minimal skill. For troubleshooting and reliability insights, consult our in-depth z890 vs x870e motherboard report.
Materials and Tools Needed
- 10-inch or 12-inch flat or mill bastard file (coarse-to-medium grit)
- Work gloves and safety glasses
- Marking tape or marker to track equal sharpening on both ends
- Blade balancer (optional but recommended)
- Socket wrench or wrench matching your blade bolt
- Block of wood or bench vise to secure the blade
Blade Removal Process
- Mark the blade orientation, use tape or paint to mark which side faced down; reinstalling backwards causes severe problems
- Remove the center bolt, most mower blades use one center bolt; turn counterclockwise. Place the bolt in a safe location
- Slide the blade off the spindle shaft carefully, supporting its weight
- Inspect for damage, bent, cracked, or severely nicked blades should be replaced, not sharpened
Sharpening Technique
- Secure the blade, clamp it in a bench vise or hold it firmly on a workbench with a wooden block
- Determine sharpening angle, lawn mower blades are typically sharpened at 30-45 degrees, matching the blade’s existing bevel. Examine the original edge to identify the angle
- File one end first, hold the file at the correct angle and stroke away from your body with steady, moderate pressure. File in one direction only (don’t saw back and forth); make 10-15 strokes
- Stroke count matters, count your strokes on the first end, then match that exact count on the opposite end to maintain balance
- File the second end, flip the blade or reposition it, then apply the same number of strokes at the same angle to the other cutting edge
- Check your progress, the blade edge should appear shiny and sharp, not rounded or dull
- Feel, don’t look, gently run your thumb perpendicular (at 90 degrees) across the sharpened edge; a sharp blade feels noticeably sharper than the unsharpened sections
Checking and Maintaining Blade Balance
- Use a blade balancer, hang the blade on the cone tool and observe if either side dips lower
- If unbalanced, adjust sharpening, file the heavier end slightly more to remove additional weight and achieve equilibrium
- Re-check after adjustment, balance is achieved when the blade remains level on the balancer cone
Blade Reinstallation
- Orient correctly, match your marked-side position; blade orientation matters for cutting direction
- Slide onto spindle shaft, guide the blade’s center hole onto the shaft carefully
- Insert and tighten bolt, thread the center bolt clockwise, using hand-tight force initially
- Final tightening, with your wrench, tighten firmly but not excessively; over-tightening strips threads and makes future removal difficult. Most residential mower blades require 35-90 foot-pounds of torque, but snug-tight by hand is adequate for most homeowners
- Reconnect spark plug wires before starting the engine
Alternative Methods: Power Tool Sharpening
Angle Grinder Sharpening
An angle grinder with a fine metal-cutting wheel sharpens blades in minutes, ideal for high-use commercial properties or impatient homeowners. However, grinders generate extreme heat, which can weaken blade temper if not managed carefully. Hold the blade at the proper angle (30-45 degrees) and make light passes; let the tool do the work. Remove equal material from both ends. This method requires significant experience to avoid over-grinding, ruining the blade’s hardness and durability.
Bench Grinder Sharpening
Bench grinders are stationary and safer than handheld angle grinders for beginners. Position the blade against the grinding wheel, maintain consistent angle and pressure, and sharpen both ends equally. Again, multiple light passes prevent overheating. Allow the blade to cool between passes; dunking in water can cause thermal shock and cracking. Readers comparing setup options can review our technical analysis on marshall stanmore iii vs harman kardon onyx studio 8.
Power Tool Safety Warnings
- Always wear face shield and heavy gloves
- Never force the blade into the wheel
- Stop frequently to check heat and progress
- Risk of blade over-thinning, weakening, or breakage
- Sparks can ignite loose clothing or nearby materials
When to Use Professional Sharpening Services
Signs Your Blade Needs Professional Service
- Blade is bent, cracked, or severely nicked
- Large chunks of metal are missing from the cutting edge
- You lack experience with hand tools or power equipment
- You’re uncomfortable working around rotating mower components
- Blade balance is severely off and repeated sharpening hasn’t corrected it
Finding Professional Sharpening Services
Options include local lawn mower repair shops, small engine repair services, landscaping equipment dealers, and some hardware stores with sharpening departments. Search online for “lawn mower blade sharpening near me” or ask your mower’s manufacturer for local service centers. Cost typically ranges from $10-25 per blade, depending on location and condition.
Advantages of Professional Service
- Guaranteed proper angle and balance using calibrated equipment
- Damaged blades are identified and replaced appropriately
- No personal injury risk
- Quick turnaround (often same-day service)
- Technicians inspect other mower components while working
Common Mistakes to Avoid
Unbalanced Blade Problems
An unbalanced blade causes severe vibration that can damage the engine’s crankshaft, bend the blade mount, and create an unsafe mowing experience with unpredictable mower behavior. Always use a blade balancer or mark your stroke count to ensure equal sharpening. For complementary field maintenance guidelines, examine our breakdown of dyson v8 cyclone vs bissell featherweight stick.
Difference Between Rotary and Reel Blade Sharpening
Rotary blades (most common) are sharpened on both cutting edges at a consistent bevel angle. Reel blades are sharpened only on the outer edge that contacts the stationary bar and require specialized knowledge, professional service is strongly recommended for reel-type mowers.
Preventing Blade Damage During Sharpening
- Avoid excessive pressure that creates deep gouges
- Don’t heat the blade excessively with power grinders; this weakens temper
- Stop sharpening if the blade feels hot to the touch
- Never sharpen a cracked or bent blade, replacement is safer
Maintenance Tips to Extend Blade Life
Reduce Blade Wear
- Remove debris before mowing, rocks, sticks, and hardened soil quickly dull blades
- Mow when grass is dry, wet grass clumps and increases friction against blade edges
- Adjust cutting height appropriately, cutting too short or over extremely tall grass strains blades
- Avoid repeated mowing of the same path, variety reduces wear on individual blade sections
Proper Mower Storage
- Store blades clean, wipe away grass and moisture after each use to prevent corrosion
- Use a dry storage location, humidity accelerates rust
- Drain fuel for off-season storage (fall through winter) to prevent varnish buildup
When to Replace Rather Than Sharpen
Replace blades if they are bent (bending affects cut quality even when sharpened), cracked (cracking worsens under load), or excessively worn (if more than 1/4-inch of metal is missing from the cutting edge). Replacement blades cost $15-40 and are safer, more cost-effective than attempting to restore severely damaged blades. To evaluate matched hardware tolerances, consult our detailed overview of bissell crosswave hydrosteam vs shark stainforce.
Buyer FAQs: Where To Sharpen A Lawn Mower Blade Solved
What is the best metal file for lawn mower blades?
A 10-inch or 12-inch flat or mill bastard file works well for most lawn mower blades. Bastard-cut files have medium grit, ideal for removing dull edges without excessive material removal. Avoid fine-tooth files; they’re too delicate and clog with metal shavings quickly. Hardware stores typically stock suitable files for $8-15.
Can I sharpen a bent lawn mower blade?
A bent blade should not be sharpened, even if straightened, bending weakens the metal’s structural integrity, and the blade may fail or vibrate dangerously during use. Replacement is the safe, appropriate choice. Attempting to sharpen a compromised blade risks injury and mower damage.
How do I know if my blade sharpening is complete?
Run your gloved thumb perpendicular (at 90 degrees) across the sharpened edge, a sharp blade feels noticeably sharper than dull sections. Visually, the edge should be reflective/shiny, not rounded or dark. If you’ve filed 10-15 consistent strokes at the correct angle and both ends are balanced, sharpening is typically complete. When in doubt, take the blade to a professional for confirmation.
Why does my newly sharpened blade still tear grass?
Torn grass after sharpening may indicate: (1) the blade is still not sharp enough (sharpen longer), (2) blade balance is off (check with a balancer and re-sharpen as needed), (3) cutting height is too low (adjust upward), or (4) you’re mowing wet grass (mow when dry). If sharpening and balance appear correct, other mower issues may be responsible, check blade installation, spindle bearings, or engine power.
Key Takeaways
- For most homeowners, a metal file is the safest, most accessible sharpening method, requiring minimal tools and experience
- Blade balance is critical, use a blade balancer or count file strokes to remove equal metal from both ends
- Sharpen at 30-45 degrees to match your blade’s original bevel angle and maintain cutting efficiency
- Professional sharpening (cost $10-25) is recommended for damaged blades, inexperienced users, or when rapid results matter
- Maintenance extends blade life, remove debris before mowing, mow dry grass, and inspect regularly for damage
Related Maintenance and Operating Guides
To keep your equipment running at peak operating efficiency, explore our related technical walkthroughs and maintenance tutorials:
- Consult our detailed breakdown on residential zero-turn lawn mower guide.
Local Options for Blade Sharpening
A single blade can be sharpened by a professional or at home with a bench grinder and steady hands. Professional service often costs less than buying a replacement blade that has worn unevenly. If you plan to grind at home, read broader guidance on bench tool safety from American National Standards Institute (ANSI).









