Quick Answer: How to Edge Around Flower Beds
Flower bed edging creates clean borders that separate beds from lawn, contain soil, and prevent grass encroachment. The two main approaches are maintenance edging—cutting sharp borders with manual spades or power edgers—and permanent edging—installing physical barriers (metal, plastic, stone, or wood). Most gardeners use a combination: permanent edging for long-term definition and regular maintenance cutting to keep edges crisp. Your choice depends on soil type, budget, aesthetic preference, and how much maintenance you’re willing to do.
Understanding Flower Bed Edging: Why It Matters
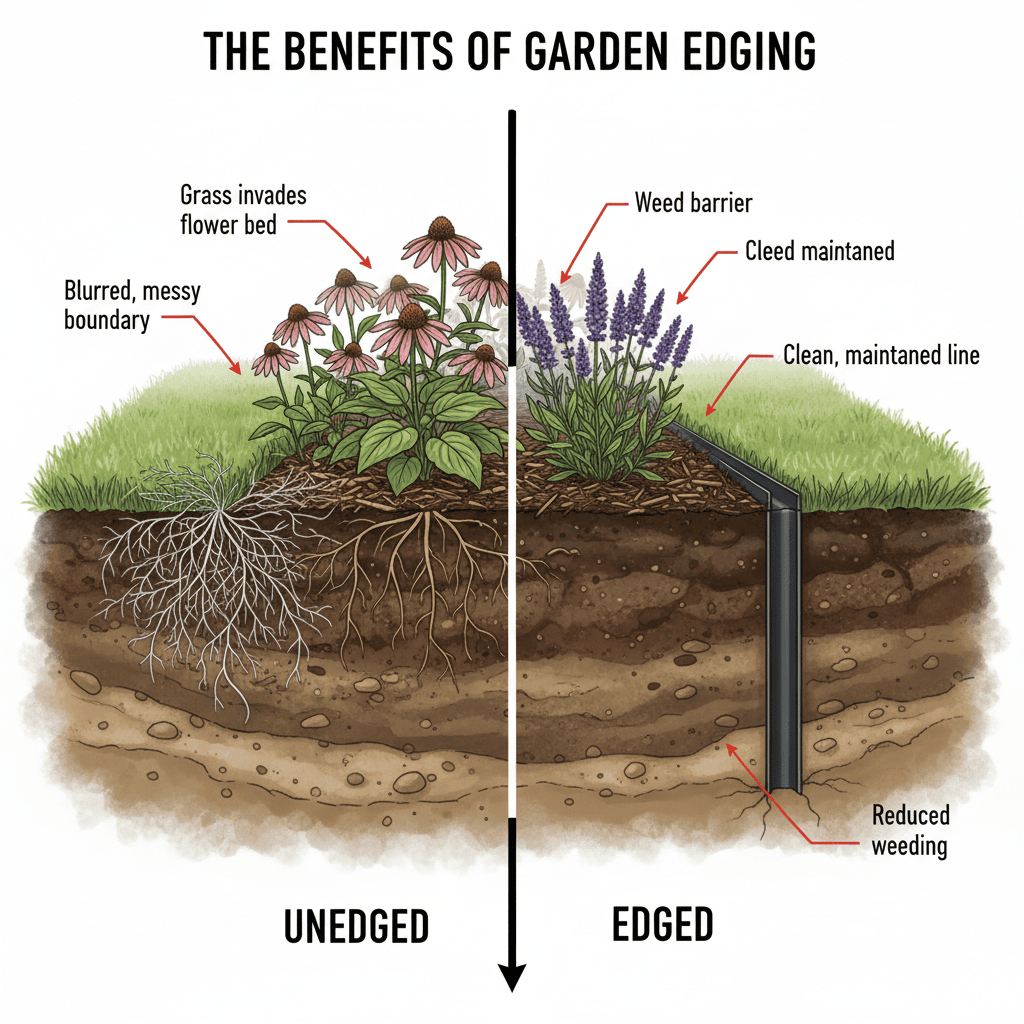
Flower bed edging serves multiple purposes beyond aesthetics. Clean borders define planting areas, prevent grass roots and runners from invading beds, contain mulch and soil within designated zones, protect lawn mower blades from flower stems, and create visual separation that makes gardens appear intentional and well-maintained.
The distinction between maintenance edging and permanent edging is important. Maintenance edging is the regular practice of cutting or defining a border line using tools—it’s an ongoing task performed throughout the growing season. Permanent edging refers to physical barriers installed into the ground (metal strips, plastic borders, stone, wood) that provide lasting definition and require less frequent cutting. Most effective gardens use both: permanent edging installed for structure, plus regular maintenance cutting to keep lines sharp.
Maintenance Edging: Cutting Clean Borders
Creating and maintaining clean edges through cutting is the most accessible method for existing flower beds. This approach works well for established beds where the edge line is already established.
Step-by-Step Manual Edge Cutting
- Mark your edge line. Use garden twine or a chalk line to define the border you want to cut. For straight edges, run twine between two stakes. For curves, lay out a garden hose or rope to visualize the line.
- Remove debris. Clear grass, weeds, and loose soil from the edge area so you can see exactly where you’re cutting.
- Cut the edge. Using a sharp spade or edging tool, press straight down along your marked line, cutting through grass and soil roots. Work in segments, making vertical cuts rather than angled ones for the cleanest line.
- Remove the cut material. After cutting, remove loose grass clippings and soil from the lawn side of the edge so the border line is clearly visible.
Tools for Manual Edge Cutting
- Spade or garden spade: A standard spade works but isn’t ideal—use the straight edge, keep it sharp, and work slowly for precision.
- Edging spade: Designed specifically for edging with a half-moon or straight blade and shorter handle. Easier to control than a full spade.
- Edging shears: Long-handled shears for trimming grass and plant growth at the edge line. Good for maintaining established edges between deeper cutting sessions.
- Power edger: Electric or gas-powered tool with a circular blade that cuts vertical edges. Faster for large beds but requires more skill to maintain a straight line.
Maintenance Frequency
How often you need to maintain edges depends on grass growth rate and your climate. In active growing seasons, edges typically need refreshing every 2-4 weeks. Spring and early summer are peak maintenance periods. Fall and winter require less frequent edging. Established permanent edging reduces cutting frequency significantly—you may only need light maintenance cutting 2-3 times per season.
Physical Edging Materials and Installation
Installing permanent edging provides lasting definition and substantially reduces future maintenance. Different materials offer varying aesthetics, durability, and installation requirements.
Metal Edging
Description: Steel or aluminum strips, typically 4-6 inches tall, installed vertically around bed perimeters.
Pros: Extremely durable (10+ years), clean modern look, effectively prevents grass and soil migration, works on curved and straight edges, doesn’t decompose.
Cons: Higher initial cost, can rust if not powder-coated, sharp edges pose injury risk, reflects heat in some finishes, may require professional installation for large areas.
Installation depth: Bury 3-4 inches below soil surface with 1-2 inches visible above grade to prevent grass from growing over it.
Plastic Landscape Borders
Description: Flexible or rigid plastic strips in various heights and colors, often with curved or wavy tops for aesthetic appeal.
Pros: Affordable, lightweight, easy DIY installation, flexible for curves, variety of colors and styles, no rust or rot.
Cons: Shorter lifespan (5-7 years before brittleness and fading), less effective at preventing determined grass encroachment, can look cheap if low quality, degrades in UV exposure, may require annual adjustment as soil settles.
Installation depth: Install 3-4 inches below soil surface with 1-2 inches above grade. Flexible plastic benefits from staking every 2-3 feet for stability.
Stone or Brick Edging
Description: Individual stone pavers, bricks, or manufactured stone blocks laid end-to-end or partially buried along bed edges.
Pros: Excellent durability (20+ years), attractive natural appearance, effective soil containment, increases planting bed definition, works well with traditional or cottage garden styles.
Cons: High material and labor costs, heavier installation requirements, settlement can shift stones out of alignment, grass may grow between joints, not ideal for very curved edges.
Installation depth: Set stones 2-3 inches into ground with 1-2 inches above grade. Use landscape fabric below stones to reduce weed growth between joints.
Wood Edging
Description: Cedar, redwood, or treated lumber boards (typically 2×6 or 2×8) installed as raised bed borders or surface edging.
Pros: Warm aesthetic, easy DIY installation, creates raised planting area, relatively affordable, flexible for curved designs.
Cons: Shorter lifespan (5-10 years before rot, depending on wood type and climate), requires regular maintenance and potential replacement, can splinter or warp, untreated wood decomposes faster, attracts insects in some regions.
Installation depth: For surface edging, bury 2-3 inches and leave 2-3 inches above grade. For raised beds, install boards 6-8 inches deep depending on desired planting depth.
Concrete Edging
Description: Poured concrete borders or prefabricated concrete edge sections installed along bed perimeters.
Pros: Very durable (20+ years), extremely effective at preventing grass and soil migration, permanent solution, available in various colors and finishes.
Cons: High installation costs, not easily modified or removed, can look industrial unless specially finished, difficult to install curves, requires professional installation in most cases.
Installation depth: Typically 4-6 inches into ground with 2-3 inches above grade for proper soil containment.
Key Factors in Choosing an Edging Method
Soil Type Considerations
Clay soils benefit most from physical edging because clay compacts and is prone to grass creep; maintenance edging alone may not prevent encroachment. Sandy soils are easier to maintain with cutting alone but still benefit from permanent edging. Loamy soils work well with either method.
Budget Considerations
Maintenance edging (manual or power tool cutting) has minimal upfront cost but requires ongoing time investment. Permanent edging costs vary: plastic borders are most affordable ($1-3 per linear foot), stone and wood mid-range ($3-8), and metal/concrete most expensive ($5-15+). Calculate total cost over 10 years, factoring in replacement cycles and your labor value.
Aesthetic Preferences
Modern and minimalist gardens often use metal or concrete. Traditional and cottage gardens suit stone, brick, or wood. Tight budgets and rental properties favor low-cost plastic. Large landscapes benefit from durable materials to avoid repeated replacement.
Garden Scale and Scope
Small residential gardens with just a few beds can manage maintenance edging indefinitely. Large landscape areas benefit from permanent edging to reduce ongoing labor. Consider whether you’re edging new beds or retrofitting existing ones—new installations are easier to plan; retrofitting requires more site preparation.
Installation Basics: Getting Started
Preparation Steps (All Edging Types)
- Mark the desired edge line using twine or chalk.
- Remove existing grass and weeds from a 2-3 inch band along the line.
- Level the ground and compact soil to create a stable base.
- Install landscape fabric if desired to reduce weed growth under edging.
Basic Installation Process
- Metal and plastic: Unfold or unroll material along marked line; drive stakes through pre-drilled holes (every 2-3 feet) into ground; adjust height for consistent exposure.
- Stone and brick: Dig shallow trench; set stones in sand base (1-2 inches); backfill with soil; tap into place for alignment.
- Wood: Cut boards to length; dig trench; install boards level or slightly curved; secure corners with brackets or drive stakes through ends.
Best Practices for Professional Results
Maintaining Sharp Edges Season to Season
- With permanent edging, perform light maintenance cutting 2-3 times per season to remove grass creep and keep lines crisp.
- Without permanent edging, schedule edge cutting every 2-4 weeks during growing season.
- Use sharp tools—dull blades tear grass and make uneven cuts.
- Cut edges after rain when soil is moist enough to cut cleanly without shattering.
Preventing Grass and Weed Encroachment
- Install physical edging deep enough (3-4 inches minimum) so grass runners can’t grow over the top.
- Apply landscape fabric along the lawn side of beds to block roots and runners.
- Apply herbicide barrier products along edges if chemical weed control fits your gardening philosophy.
- Maintain regular edge cutting—consistent trimming prevents established grass from creeping inward.
- Keep edging materials in good repair; gaps allow grass invasion.
Handling Curved Versus Straight Edges
Straight edges: Use a chalk line or garden twine for precision. Use straight-edged tools and work methodically in sections. Easier with metal and plastic edging; stone and wood require more effort for perfect alignment.
Curved edges: Lay out a garden hose or rope to visualize the curve before cutting. Use a power edger or flexible plastic for easier curve maintenance. Stone and brick curves require careful individual placement. Mark curves with chalk before installing permanent edging.
Common Edging Mistakes to Avoid
- Burying edging too shallow: Less than 3 inches allows grass to creep over the top. Maintain proper depth from installation.
- Neglecting maintenance cutting: Permanent edging without regular maintenance still requires seasonal attention to look sharp.
- Choosing materials without considering replacement: Plastic may seem affordable until you replace it every 5 years. Calculate long-term costs.
- Installing edging on uncompacted soil: Settling causes edging to shift. Compact base soil thoroughly before installation.
- Using low-quality materials: Cheap plastic becomes brittle and fades quickly; cheap stakes bend easily. Invest slightly more for durability.
- Ignoring soil drainage: Improper edging installation can trap water and cause root rot. Ensure water still drains from beds appropriately.
Frequently Asked Questions
What’s the difference between edging and mulching?
Edging defines and contains bed boundaries and prevents grass/soil migration. Mulching covers soil within beds to retain moisture, regulate temperature, and suppress weeds. Both are beneficial—edging creates the border, mulch fills the interior. Edging without mulch leaves exposed soil; mulch without edging allows grass to creep inward.
Can you install permanent edging around existing flower beds without damaging plants?
Yes, but carefully. Work in sections, temporarily removing nearby plants if necessary. Install edging 2-4 inches away from plant crowns to avoid root damage. For mature beds, you may cut and slightly move existing plants to create space for edging installation. Do this in spring or fall when plants are less stressed.
How do you edge around trees and shrubs in flower beds?
Leave a mulch ring around tree bases rather than hard edging, which can damage bark. For shrubs, install edging slightly away from the plant base, creating a small buffer zone. Use flexible edging (plastic or metal) rather than rigid materials so you can work around irregular plant shapes.
Is maintenance edging effective long-term, or do you eventually need permanent edging?
Maintenance edging alone is effective if you’re committed to regular cutting—every 2-4 weeks during growing season. However, aggressive grass growth (especially with rhizomatous grasses) may overwhelm manual efforts. Permanent edging provides insurance against grass encroachment and reduces labor over time. Many gardeners start with maintenance edging, then install permanent edging after a few years when they realize the time commitment.
Takeaway: Creating and Maintaining Professional Flower Bed Edges
Successful flower bed edging combines your preferred maintenance approach (cutting or permanent barriers) with consistent seasonal care. Start by deciding whether maintenance edging suits your garden and lifestyle, or whether permanent edging offers better value for your situation. If installing physical edging, select materials based on durability, aesthetics, and budget. Regardless of method, maintain edges regularly throughout the growing season—sharp borders are the hallmark of a well-tended garden. Most gardeners find that combining maintenance cutting with permanent edging provides the best balance of visual appeal, weed control, and manageable effort over time.