

How to Use a Lawn Edger: Quick Answer
To use a power lawn edger, clear debris from the lawn border, put on safety gear, and fuel the machine if needed. Hold the edger perpendicular to the lawn edge with a firm grip, activate the blade, and walk slowly along the border in one direction. Keep the blade aligned with your desired edge line and let the tool do the cutting, avoid forcing it. For electric or manual edgers, follow the same technique with appropriate power adjustments. Edge in straight, overlapping passes for a clean, uniform border.

Pros
- No cords, fumes, or refueling required.
- Wide wheel design improves tracking and stability.
- Reinforced bracket and steel blades suggest better durability than flimsy lightweight models.
- Works well for creating neat edges on flat hardscape borders.
Cons
- Manual operation requires more physical effort than powered edgers.
- Best performance is on flat ground, so it is less ideal for landscape bed edges.
- Noisy-free and low-maintenance, but not as fast as an electric or gas edger for large areas.
Overview: The Colwelt Wheel Rotary Edger Lawn Tool is a manual lawn edging tool designed for trimming crisp lines along sidewalks, driveways, patios, and similar hard edges. Its 59-inch length, reinforced metal support bracket, and extra-wide rubber wheel give it a solid, practical feel for routine yard maintenance.
Performance: In use, the rotary blade system and serrated alloy steel cutting edges are intended to slice through grass cleanly while the wheel helps keep the tool moving straight. The three-position shear blade design is meant to reduce clogging, and the wide wheel adds traction when working through thicker grass.
Drawbacks: This is a manual tool, so it takes more effort than a powered edger and may be slower on larger properties. It is also best suited for flat ground, which means it is less effective for edging around landscape beds where the border is uneven or more complex.
Verdict: The Colwelt manual edger is a strong fit for homeowners who want a quiet, low-maintenance way to keep hardscape edges neat. If you value control, simple operation, and clean-looking borders along sidewalks and driveways, it offers a useful balance of durability and ease of use.
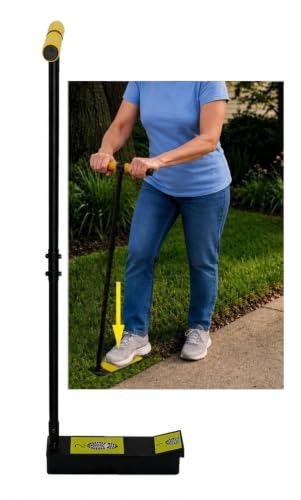
Pros
- Cuts a full 12 inches per placement, which can reduce the number of steps needed along long edges.
- Heavy duty steel build should hold up well for repeated manual use.
- Versatile enough for lawns, sidewalks, driveways, patios, gardens, and tree rings.
Cons
- Manual operation requires physical effort and may be slower than powered edging tools for very large properties.
- No dimensional details or weight are provided in the listing, which makes ergonomics harder to judge before purchase.
- There are no customer reviews included in the raw data, so long-term user feedback is limited.
GEARBOX TOOLS Garden Edger is a manual lawn edging tool designed for clean borders around sidewalks, driveways, flower beds, gardens, and tree rings. The heavy duty steel construction gives it a sturdy feel, while the step-on style platform is meant to improve control during use.
Its main performance advantage is the full 12-inch cut with every placement, which can help users edge longer stretches before moving the tool again. That makes it a practical choice for straight landscape lines and for homeowners who prefer a hand tool over a powered edger.
Considerations: this is still a manual tool, so it will require physical effort and may not be the best fit for large yards or users who want the fastest possible edging method. The listing also does not provide size, weight, or accessory details, so buyers may want more information if ergonomics are a priority.
Verdict: this edger is best suited to homeowners and gardeners who want a durable, straightforward, and fuel-free way to maintain crisp lawn edges. It offers a useful alternative to the traditional half moon edger, especially for routine trimming and defined landscape borders.

Pros
- Saw-tooth manganese steel blade is designed for tougher edging tasks and compact soil.
- Wide footplate can improve stability and reduce strain during use.
- No battery, fuel, or charging required.
- Versatile for sidewalks, driveways, patios, and garden borders.
Cons
- Manual edging requires physical effort and may be slower than powered alternatives.
- No included specifications for weight, blade width, or handle adjustability in the manufacturer listing.
- Best suited for routine edging and light to moderate landscaping rather than large-scale lawn renovation.
Overview & Design: The BCJCLTS 43-Inch Edger Lawn Tool is a manual hand edger made for creating neat borders around lawns, sidewalks, driveways, patios, and garden beds. It uses a half-moon manganese steel blade with saw-tooth edges, plus a wide footplate and T-grip handle for added control.
Performance & Key Features: In everyday yard work, the reinforced blade is designed to cut through grass roots, dense turf, compact soil, and weeds more effectively than a basic flat blade. The wide footplate helps users transfer body weight more evenly, which can improve cutting efficiency and reduce slipping on uneven ground.
Drawbacks & Considerations: This is a manual tool, so it will require regular physical effort and may take more time than a powered edger. The manufacturer listing also does not list details such as exact blade width, total weight, or handle adjustment options, which may matter to some buyers.
Verdict: This edger makes the most sense for homeowners who want a straightforward, durable, no-power edging tool for routine lawn maintenance. It is especially appealing if you value clean borders, simple operation, and a sturdy build over speed or automation.
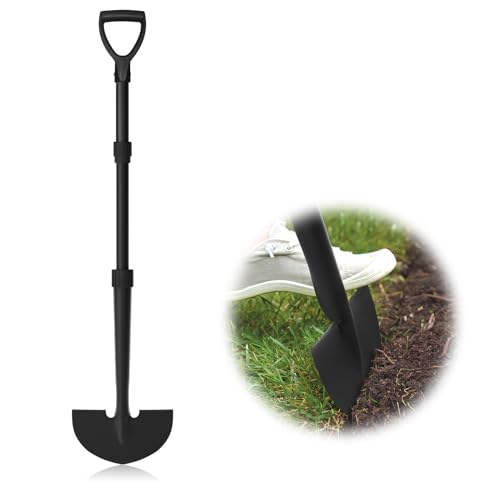
Pros
- Simple manual design with no power source, batteries, or charging required.
- Durable carbon steel blade is appropriate for clean edging tasks around common landscape surfaces.
- Long handle and D-grip improve comfort and leverage for many users.
- Fast assembly adds convenience for quick yard cleanup sessions.
Cons
- Manual edging requires physical effort and may be slower than powered lawn edgers for large properties.
- No blade width, weight, or replacement-part information is provided in the raw data.
- Best suited for edging and light landscaping tasks, not heavy-duty digging or cutting through roots.
Overview: The MANXRKUI Edger Lawn Tool is a manual half moon edger built for defining borders around garden beds, sidewalks, driveways, patios, and other landscape edges. It uses a carbon steel blade, a fiberglass shaft, and a D-grip handle for a simple, utility-focused design.
Performance: In everyday use, this tool is aimed at delivering clean, straight edging lines without electricity or fuel. The 41-inch handle can make the job more comfortable for users who prefer standing work, while the D-grip helps provide control when trimming grass edges or shaping mulch boundaries.
Considerations: Because it is a manual tool, results will depend on user effort and soil conditions. It is also designed for edging rather than heavy excavation, and the listing does not provide key details such as blade width, weight, or included accessories.
Verdict: This edger is a solid fit for homeowners and gardeners who want a straightforward, low-maintenance tool for routine border cleanup. It is most appealing to buyers who value simple assembly, manual control, and a traditional half moon edging approach.
What Is a Lawn Edger and Which Type Do You Have?
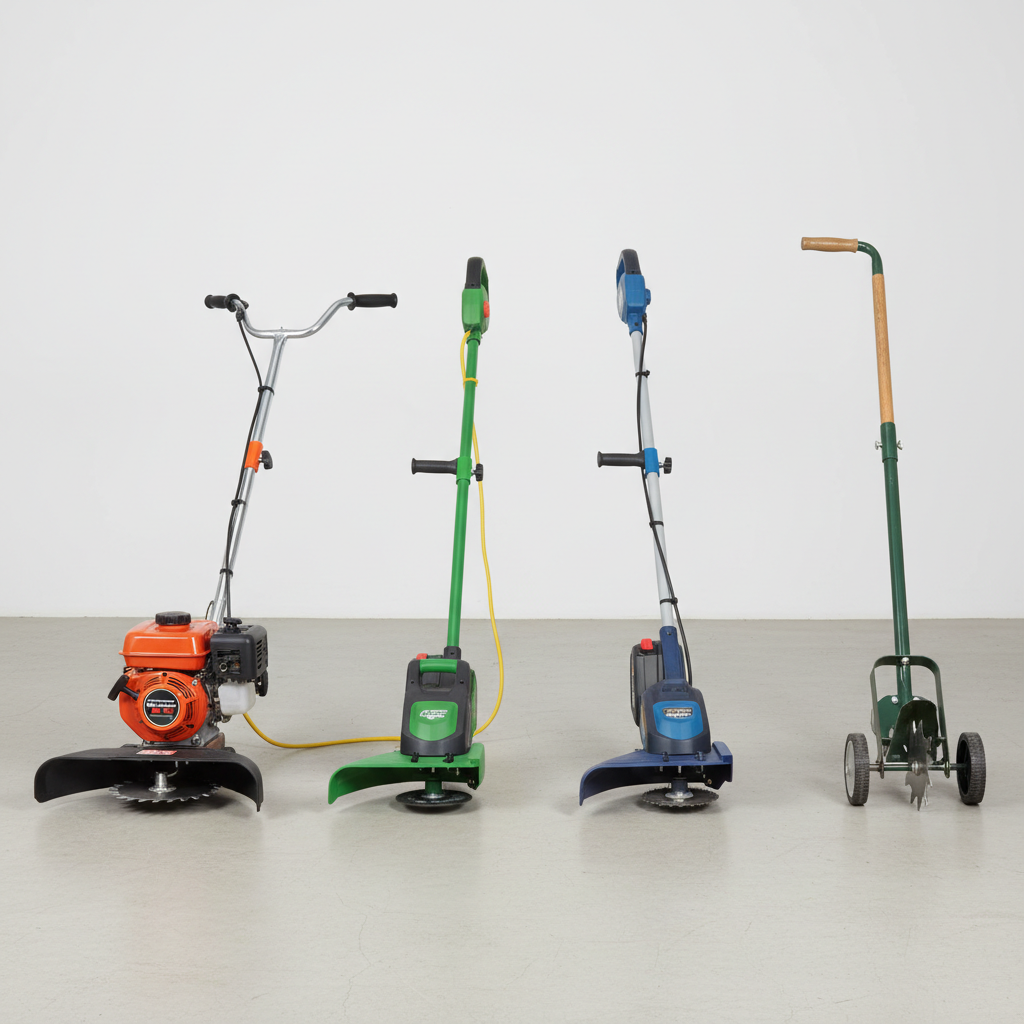
A lawn edger is a specialized tool designed to cut and define the border between your lawn and garden beds, driveways, or walkways. Understanding which type you own is essential because operation varies significantly.
Power (Gas-Powered) Edgers: These are the most common for residential use. They feature a rotating blade or wheel and run on gasoline. They’re powerful and efficient for larger lawns and tougher soil conditions.
Electric Edgers: Corded or battery-powered models offer quieter operation and lower maintenance. Ideal for smaller properties or noise-sensitive areas. Battery-powered models provide freedom of movement without a cord.
Manual Push Edgers: These non-motorized tools require physical effort but work well for small lawn sections or precise detail work around obstacles.
String Trimmer Attachments: Some multi-tool systems have edging attachments that differ from dedicated edgers, though they can handle similar tasks.
This guide focuses primarily on power edgers, as they represent the most common residential choice. Adjustments for other types are covered in later sections.
Safety Gear and Pre-Operation Preparation
Before using any edger, safety must come first. Proper preparation prevents injuries and damage to equipment. Users looking for related component recommendations can explore our z890 vs x870e motherboard breakdown.
Essential Safety Gear:
- Safety glasses or face shield: Protects eyes from flying debris and grass clippings
- Hearing protection: Power edgers are loud; earplugs or earmuffs reduce noise exposure
- Steel-toed boots: Protect feet from blade contact and heavy equipment
- Long pants: Durable fabric shields legs from flying objects
- Work gloves: Provide grip and protect hands
- High-visibility clothing: Helps others see you if working near traffic or others
- Check the blade or wheel for damage, cracks, or excessive wear
- Verify all bolts and fasteners are tight
- Inspect the fuel line and tank for leaks (gas models)
- Test the on/off switch and safety stops
- Ensure the cord is undamaged (electric models)
- Check battery charge level (cordless models)
Clearing the Work Area:
- Remove sticks, rocks, and debris from the lawn edge
- Move objects like planters, hoses, and toys away from the border
- Ensure pets and children are at a safe distance (at least 20 feet from the blade)
- Check for underground utilities before working near sidewalks or driveways
Step-by-Step Guide to Operating a Power Lawn Edger
Follow these instructions for safe, effective operation of a gas-powered lawn edger.
Step 1: Prepare the Fuel System
- Check the fuel tank level; fill with appropriate gasoline (consult your manual for octane rating)
- If your model uses a fuel-oil mixture, measure and mix according to manufacturer specifications
- Ensure the tank cap is secure but not over-tightened
Step 2: Prime and Start the Engine For troubleshooting and reliability insights, consult our in-depth bissell crosswave hydrosteam vs shark stainforce report.
- Locate the primer button (usually three small bulbs on the side of the engine)
- Press the primer button until fuel reaches the carburetor (typically 3-5 presses)
- Set the choke lever to the cold-start position
- Pull the recoil starter cord with a quick, firm motion until the engine turns over
- Once running, move the choke to the warm-running position after 10-15 seconds
- Allow the engine to idle for 30 seconds to stabilize
Step 3: Achieve Proper Grip and Body Position
- Stand with your feet shoulder-width apart for stability
- Grip the handlebars firmly with both hands, keeping thumbs wrapped around
- Position your body perpendicular to the lawn edge you’re cutting
- Keep the blade or wheel at a 90-degree angle to the ground
- Maintain a relaxed posture; let the tool’s weight rest in your hands rather than straining
Step 4: Activate the Blade and Begin Edging
- Engage the blade using the handlebar lever or button (typically requires squeezing inward)
- The blade should spin up before you move the edger
- Starting at one end of the lawn border, walk slowly and steadily along the line
- Move at a pace of about 2-3 miles per hour; faster speeds reduce cutting quality
- Keep your eye on the blade line, not on your feet
Step 5: Follow a Straight Path
- Imagine a straight line along your intended edge; use existing hardscape or landmarks as guides
- For curved borders, make small adjustments rather than sharp turns
- Maintain consistent blade depth throughout (typically 1-3 inches into the soil, depending on equipment)
Step 6: Complete Passes and Overlap
- Finish one complete pass along the entire edge before repositioning
- For a cleaner result, make a second pass slightly overlapping the first cut
- For especially thick or matted edges, a third pass may improve results
Step 7: Shutdown and Cool Down
- Disengage the blade by releasing the handlebar lever
- Allow the engine to idle for 10 seconds
- Move the choke to the cold-start position and turn the key/switch to off
- Wait at least 5 minutes before touching the blade or engine; they remain extremely hot after operation
Technique and Best Practices for Professional Results
Achieving Straight, Even Edges
The most common mistake is trying to force the edger. Power edgers are designed to cut efficiently when moved at a steady, moderate pace. Focus on maintaining a straight line rather than varying your speed. For long borders, break the work into manageable sections and mark your stopping points.
Handling Corners and Obstacles
- Right angles: Slow down at corners; make a deliberate 90-degree turn rather than a gradual arc
- Around trees and plants: Use careful, short passes; consider manual finishing work with a hand edger for tight spots
- Along driveways: Let the edger wheel guide against the edge; many models have a guide wheel for exactly this purpose
- Near flower beds: Reduce speed and increase focus to avoid damaging plants inside the bed
Understanding Lawn Moisture and Edging Conditions
Lawn moisture affects cutting quality. Slightly moist soil (not waterlogged) allows the blade to cut cleanly without clumping. Avoid edging immediately after heavy rain when soil is soft and muddy, as the edger may sink unevenly. Dry, hard soil can dull blades faster but produces clean cuts. Ideally, edge during mid-morning after dew has dried but before afternoon heat.
Blade Depth Considerations
Most power edgers cut 1 to 3 inches deep. Depth depends on your soil type and aesthetic preference. Shallow cuts (1 inch) are suitable for established lawns with defined edges. Deeper cuts (2-3 inches) are necessary when redefining heavily grown-in borders. Avoid cutting so deep that you sever underground irrigation lines or cable.
Overlapping Passes for Uniform Results
Professional landscapers typically make two passes: the first pass establishes the edge, and the second pass, overlapping by 2-3 inches, cleans up loose clippings and achieves a polished look. This is especially important for highly visible borders, such as along the front of your home.
Operating Electric and Manual Edgers
Corded Electric Edgers
Corded electric models eliminate fuel mixing and maintenance but require proximity to an outlet.
- Plug the edger into a ground-fault circuit interrupter (GFCI) outlet to prevent electrical shock
- Use a heavy-duty outdoor extension cord rated for wet conditions
- Ensure the cord is long enough to reach your entire edging area without creating hazards
- Walk carefully to avoid tripping on the cord or running it over with the blade
- Operation is otherwise identical to gas models: grip firmly, maintain steady pace, keep the blade perpendicular to the edge
- No warm-up or cool-down period is needed; simply press the on button to start and off to stop
Cordless Battery-Powered Edgers
- Charge the battery fully before each use; typical runtime is 30-60 minutes depending on battery capacity
- Turn on the edger and allow the blade to spin up before moving
- Operation is the same as gas and corded models
- Battery performance may decrease in cold weather, so avoid edging on very cold days if possible
- Some models allow mid-use battery swaps for extended coverage
Manual Push Edgers
- No fuel, electricity, or warm-up required, simply pick up and use
- Position the blade at the lawn edge at your desired depth (typically 1-2 inches)
- Push the edger forward in a straight line with steady, even pressure
- Manual edgers work best on smaller lawn sections, borders around flower beds, or detail work
- They are ideal for precision edging around tree bases and tight spaces
- Sharpen the blade regularly; dull blades require excessive force and produce ragged cuts
Maintenance and Storage After Use
Post-Use Cleaning
- After the blade and engine have cooled (wait 5-10 minutes after shutdown), use a soft brush to remove grass clippings and soil
- Wipe down the body with a dry cloth
- Do not use high-pressure water on electrical components or carburetors
- For corded models, wrap the cord loosely for storage; avoid kinks that damage the sheathing
Seasonal Maintenance Tasks
- Blade inspection: Check monthly for nicks, cracks, or dullness; sharpen or replace as needed
- Oil changes (gas models): Change oil according to your manual’s schedule, typically after every 50-100 hours of use
- Spark plug replacement: Replace annually or when the engine starts hard
- Air filter cleaning: Clean or replace monthly during heavy use seasons
- Fuel stability (gas models): Use fuel stabilizer if storing for more than a month; drain old fuel before long-term storage
Storage Guidelines
- Store in a dry, temperature-controlled location if possible (garage or shed)
- For gas models being stored for winter, drain the fuel tank or run the engine until empty to prevent carburetor buildup
- Keep blades sharp; dull blades corrode faster in storage
- Store away from children and pets; secure with a lock if necessary
- Check equipment before using after a long storage period
Frequently Asked Questions About How Do You Use An Edger
Q: How often should I edge my lawn?
A: Most homeowners edge their lawns every 2-3 weeks during the growing season, concurrent with mowing frequency. During off-season, monthly edging may suffice. Frequency depends on how quickly your grass grows back into the border.
Q: Can I use a string trimmer instead of an edger?
A: String trimmers can substitute for edgers, but they don’t create as clean or defined a border. Edgers cut vertically into the soil, creating a sharp lawn line. String trimmers cut horizontally and are better suited for cleanup. For a professional-looking lawn edge, a dedicated edger is superior.
Q: What’s the best time of year to start edging?
A: Begin edging in spring once your lawn actively grows. In most climates, this is late April through May. Continue throughout the growing season. Stop edging in late fall when growth slows, though light autumn edging can help define winter borders.
Q: Why does my edger keep getting stuck or bogging down?
A: This usually indicates the soil is too hard, the blade is dull, or you’re moving too fast. Slow your pace, ensure the blade is sharp, and consider watering the lawn lightly the day before edging to soften compacted soil. If the engine bogs after startup, check that the choke is fully moved to the run position.
Q: Is it safe to edge wet grass?
A: Edging wet grass is generally safe, but results suffer. Wet soil clumps around the blade, reducing cut quality, and increases slip hazards. Wait until the lawn surface dries or soil is only slightly moist for best results.
Related Maintenance and Operating Guides
To keep your equipment running at peak operating efficiency, explore our related technical walkthroughs and maintenance tutorials:
- Consult our detailed breakdown on marshall stanmore iii vs harman kardon onyx studio 8.
Edging Lines Along Walks
An edger cuts a crisp boundary between the lawn and paths, beds, or driveways. Pushing gently and keeping the blade at a steady depth prevents gouges in the soil. A related post on self-propelled compares that drive system with manual options. For general safety tips around rotating cutters, see American National Standards Institute (ANSI).









