

Quick Answer: How to Sharpen Mower Blade
Quick Answer: To sharpen a rotary mower blade, disconnect the spark plug, secure the mower, remove the blade with a socket wrench, clean it, then sharpen only the top cutting edge at the blade’s original bevel angle using a flat file or grinder. Avoid overheating the metal, balance the blade on a balancer, reinstall it with the sharp edge facing up, and tighten the bolt securely. Sharpen every 20 to 25 hours of use or after hitting rocks or stumps.
Why Sharpen Your Mower Blade, and How Often
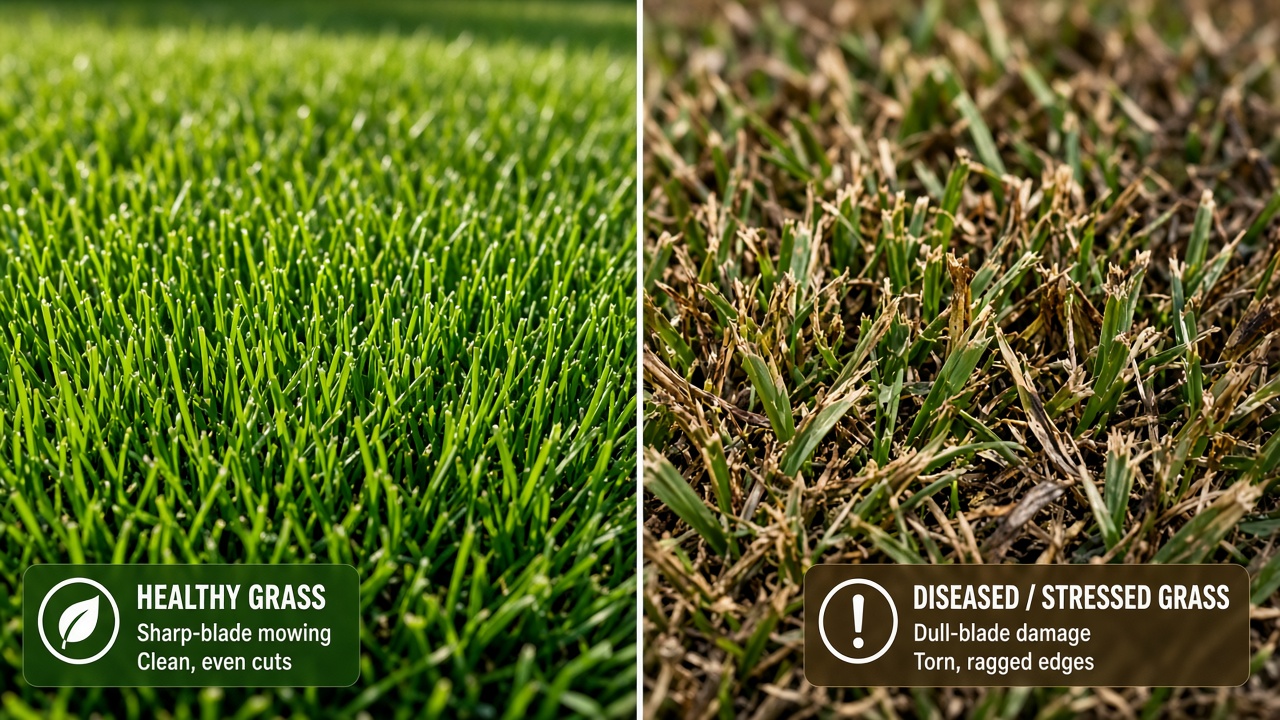
A sharp mower blade cuts grass cleanly; a dull blade tears and shreds the grass tips, leaving brown, ragged edges that invite disease and stress your lawn. Within a few weeks of mowing with a dull blade, you’ll notice your grass looking unhealthy and taking longer to recover after cutting.
Most manufacturers recommend sharpening every 20 to 25 hours of use, roughly every 4 to 6 weeks for homeowners who mow weekly. If you hit rocks, stumps, or other hard objects, sharpen immediately afterward to restore the cutting edge and check for damage.
Signs Your Blade Needs Sharpening
- Grass tips appear brown or torn rather than cleanly cut
- The mower vibrates more than usual or makes a grinding sound
- You need to make a second pass to finish cutting
- Lawn disease or stress is visible after mowing
What You’ll Need: Tools and Safety Gear
You don’t need expensive equipment to sharpen a blade well. A hand file works just as effectively as a grinder for most homeowners, it just takes a bit longer and more elbow grease.
Essential Tools
- Socket wrench or open-end wrench: To remove and reinstall the blade bolt (size depends on your mower model, typically 1/2″ or 5/8″)
- Flat file or carbide grit file: For hand sharpening; 10 to 12 inches long works best
- Blade balancer: A simple cone-shaped tool (about $5 to 15) that lets you check if the blade is balanced
- Bench vise (optional but helpful): Holds the blade steady while you file
- Bench grinder or angle grinder (optional): Speeds up sharpening, but requires caution and is not essential
Safety Gear
- Safety glasses or face shield
- Work gloves (cut-resistant preferred)
- Hearing protection if using a grinder
- Dust mask if grinding metal
Step 1: Prepare the Mower Safely
This is the most important step. A running mower or one that accidentally starts can cause serious injury. Follow these rules without exception:
For Push Mowers
- Turn off the mower and let the engine cool for 5 to 10 minutes
- Disconnect the spark plug wire from the spark plug (or remove the spark plug entirely)
- Tip the mower onto its side, with the carburetor facing up and the air filter facing up (this prevents oil from leaking into the air filter)
- Secure the mower or have someone hold it steady
For Riding Mowers
- Turn off the engine and remove the key
- Disconnect the negative battery terminal (if equipped)
- Disconnect the spark plug wires from all spark plugs
- Engage the parking brake and block the wheels with chocks
- Raise the mower deck to its highest position
Do not drain the gas: Modern mowers handle tilting well; draining is unnecessary and adds hassle. Just tilt carefully and in the correct direction (carburetor and air filter up).
Step 2: Remove the Blade
With the mower secured and spark plug disconnected: For troubleshooting and reliability insights, consult our in-depth z890 vs x870e motherboard report.
- Locate the blade bolt at the center of the blade (usually underneath the mower deck)
- Use your socket wrench to loosen and remove the bolt; you may need to hold the blade steady with your other hand (wrap a cloth around the blade edge to protect your hand from the sharp edges)
- Before taking the blade off, mark which side faces down, use a paint marker or tape to label it. This orientation matters when you reinstall it
- Remove the blade and set it aside on a clean surface
Stuck bolt? Apply penetrating oil (like WD-40) and wait 10 minutes, then try again. If still stuck, carefully tap the wrench handle with a rubber mallet to break the corrosion.
Step 3: Clean and Inspect the Blade
Before sharpening, clean the blade thoroughly: Readers comparing setup options can review our technical analysis on marshall stanmore iii vs harman kardon onyx studio 8.
- Scrub away grass, dirt, and rust with a wire brush or steel wool
- Wipe the blade clean with a cloth
- Inspect the entire blade carefully for cracks, bends, or deep gouges
When to Replace Instead of Sharpen
Replace the blade if:
- There is a crack or severe bend in the blade
- A chunk is missing from the cutting edge
- The blade is worn so thin that filing would make it weaker
- The blade has hit rocks or stumps so hard that damage is visible
A damaged blade is unsafe to use and will not cut evenly even after sharpening. Replacement blades cost $15, 40 and are worth the investment. For complementary field maintenance guidelines, examine our breakdown of dyson v8 cyclone vs bissell featherweight stick.
Step 4: Sharpen the Cutting Edge
This is where technique matters. The goal is to sharpen only the top cutting edge at the blade’s original bevel angle, never the underside.
Identifying the Bevel Angle
Look at the blade edge closely. The cutting edge is beveled (angled) on one side, usually 30, 45 degrees. Your job is to match that angle with every stroke of the file or grinder. If the blade is very worn and the bevel is hard to see, start at roughly 35 degrees and adjust as needed. To evaluate matched hardware tolerances, consult our detailed overview of bissell crosswave hydrosteam vs shark stainforce.
Hand Sharpening with a File
- Secure the blade in a bench vise or on a sturdy work surface (wrap cloth to protect the vise jaws)
- Place the flat file against the cutting edge, matching the existing bevel angle
- Push the file smoothly from the center of the blade toward the cutting edge; lift the file at the end of each stroke
- Repeat 5 to 10 strokes, then check your progress
- Move to the other end of the blade and sharpen it the same way, matching the first side’s angle and sharpness
- Continue until both ends have a consistent, slightly dull edge (not razor-sharp)
Key rule: Sharpen only the top of the blade (the side that was facing down on the mower). Never sharpen the underside, this creates an unsafe, unbalanced blade.
Grinder Sharpening (Bench or Angle Grinder)
- Secure the blade in a vise
- Wear safety glasses and hearing protection
- Turn on the grinder and lightly touch the cutting edge at the correct bevel angle
- Move the blade smoothly along the grinding wheel; do not force it
- Work both ends evenly until the edge is sharp
- Inspect for even sharpness and balance
Avoiding Overheating
If the blade steel turns blue during grinding, you have overheated it. This blue discoloration means the metal’s temper has been lost, weakening the edge permanently. If this happens, let the blade cool completely and either stop sharpening or have it replaced.
To avoid overheating: work slowly, do not force the blade against the grinder, and let the blade cool between passes.
Step 5: Balance the Blade
An unbalanced blade causes dangerous vibration that can damage the mower spindle and bearings. Balancing takes 2 to 3 minutes and is essential.
- Place the blade horizontally on a blade balancer (a simple cone-shaped tool that supports the blade’s center hole)
- One end should hang lower if the blade is unbalanced
- File small amounts of metal off the heavier (lower) side until the blade hangs level on both ends
- Recheck balance after each filing
Once balanced, the blade should sit level and stay in place without tipping.
Step 6: Reinstall the Blade Correctly
Now reinstall the sharpened and balanced blade:
- Return the mower to its normal position (wheels on the ground for push mowers)
- Position the blade so the sharpened edge faces upward (the opposite side from your mark)
- Align the blade’s center hole with the bolt hole on the mower
- Insert the bolt and tighten it firmly, it should not move or rattle when you try to wiggle the blade
- Torque spec varies by mower; most use 35 to 90 ft-lbs. Check your manual if available, or tighten until snug and firm
- Reconnect the spark plug wire (or reinstall the spark plug and reconnect the negative battery for riding mowers)
Test the mower on a small area before mowing the full lawn. It should run smoothly without vibration.
Common Sharpening Mistakes to Avoid
- Sharpening the underside: This unbalances the blade and creates an unsafe, ineffective edge. Sharpen only the top
- Ignoring the bevel angle: If you sharpen at the wrong angle, the edge will not cut well and the blade will wear unevenly
- Over-sharpening: A razor-sharp edge is fragile and dulls faster than a slightly dull edge. Stop when the blade is sharp but not knife-like
- Forgetting to balance: Skipping this step leads to vibration and spindle damage
- Sharpening a damaged blade: A cracked or bent blade will not perform safely, no matter how sharp the edge
- Overheating with a grinder: Watch for blue discoloration and let the blade cool between passes
- Not marking the blade orientation: Reinstalling the blade upside-down will damage the mower deck
Buyer FAQs: How To Sharpen A Mower Blade Solved
How do I know if my blade is a rotary or reel blade?
Look at your mower type: most residential push and riding mowers use a single rotary blade that spins horizontally under the deck. Reel mowers (often used for fine turf or lawns) have multiple spiral blades that rotate around a horizontal axis. Rotary blades are easier to sharpen at home; reel blades require specialized backlapping equipment and are best sharpened professionally.
Can I sharpen the blade while it’s still on the mower?
No. Sharpening in place creates safety hazards and makes it impossible to balance the blade or inspect it fully. Always remove the blade before sharpening.
What angle should I sharpen the blade at if I can’t see the original bevel?
A typical rotary mower blade bevel is 30 to 45 degrees. Start at 35 degrees and adjust as needed. Hold the file or grinder at the angle you choose, and keep it consistent across both ends of the blade.
How do I know when to replace the blade instead of sharpening?
Replace the blade if it is cracked, severely bent, has chunks missing, or is worn so thin that further filing would weaken it. A replacement blade ($15 to 40) is safer and more cost-effective than trying to salvage a damaged one. If in doubt, replace it.
Why does my newly sharpened blade still seem dull after I reinstall it?
Check blade balance and reinstallation angle. If the blade is unbalanced or installed upside-down, it will not cut well even if the edge is sharp. Also, the blade may need more passes with the file to reach a truly sharp edge, test on a small area of lawn first.

Pros
- Powerful 1/3 HP motor with 1750 RPM enables quick and effective sharpening
- Compatible with blades from all brands and a range of sizes
- Includes built-in safety kill switch and one 8-inch sharpening stone
- Easy to use design supports blade reuse and longer service life
- Compact heavy duty build suits both large and small blade work
Cons
- Limited to single direction action without multi-directional options
- Kit provides only one 8-inch sharpening stone requiring future replacements
- Basic economy setup includes no extra accessories beyond the grinder and stone
The Oregon 88-025 Economy Lawn Mower Blade Sharpener and Grinder is a compact heavy duty tool built for sharpening lawn mower blades across various sizes. Its sturdy design and adjustable features create a solid first impression for anyone focused on practical blade maintenance.
Performance relies on the 1/3 horsepower motor at 1750 RPM with single direction action that makes quick work of blades from all manufacturers. Standout elements include the built-in safety kill switch and the included 8 inch sharpening stone, which together enable simple operation to reuse and extend the life of grass cutter blades.
Considerations include the single direction grinding that may limit flexibility for certain techniques, plus the kit containing just one sharpening stone so replacements become necessary with ongoing use. The economy focus keeps things straightforward without extra complex options.
This product suits homeowners and small lawn care operators who need a reliable way to keep blades sharp and avoid frequent new purchases. It provides clear value through its power and ease for everyday maintenance routines.

Pros
- Rigid metal construction delivers durable performance for repeated blade maintenance tasks
- Easy-turn handle makes clamping and releasing quick and user-friendly
- Wide model compatibility covers numerous popular MTD-related lawn mowers
- Improves safety by locking blades securely to prevent spinning during nut removal
Cons
- Limited to mower decks measuring no larger than 42 inches
- Compatibility focuses on listed models from specific brands which may not cover all mowers
- Manual clamp requires physical effort without any powered assistance
The KINTLE 490-850-0005 Universal Mower Blade Removal Tool is a specialized clamp built to hold lawn mower blades securely during removal and replacement. With its rigid metal construction and easy-turn clamp handle, it creates a durable first impression as a practical accessory for walk-behind and riding mowers. This universal style tool is crafted for users seeking safer blade work on compatible equipment.
Performance centers on clamping to the mower deck to stop the blade from spinning, which enables easier and safer loosening of the blade nut. It works with single and twin blade models on decks up to 42 inches and supports extensive compatibility lists for Troy-Bilt, Yard Man, MTD, and Yard Machines models such as 11A-B13M729, 13A326JC058, and many others. As a replacement for 339079 and 490-850-0005, it focuses on reliable holding power for routine maintenance.
Considerations include its restriction to decks of 42 inches or less and primary verification for the specified model ranges, so owners of other brands should confirm fit. Being a basic manual clamp, it lacks extras or powered features and depends on user strength for operation.
In verdict, the KINTLE 490-850-0005 offers solid value for owners of compatible walk-behind and riding lawn mowers who need a dependable way to handle blade changes more safely and efficiently. It suits regular yard care where blade security is essential.

Pros
- Accurate balancing reduces blade wobble and engine wear effectively
- Works with nearly all standard lawnmower blade shapes for true universality
- Durable zinc die-cast construction ensures long-term rust resistance
- Intuitive design makes it easy for beginners and DIY users to operate
- Supports better cutting efficiency after blade sharpening sessions
Cons
- Lacks advanced precision indicators so users must rely on visual leveling judgment
- May not fit highly specialized or non-standard irregular blade designs perfectly
- Basic single-tool package includes no carrying case or extra accessories
The SporGain Lawn Mower Blade Balancer is a compact universal tool built from premium zinc die-cast metal for balancing lawnmower blades after sharpening. Its solid rust-resistant construction gives an immediate impression of durability suited for garage storage or occasional outdoor exposure, making it a practical accessory for standard lawn care routines.
In performance, the tool excels at simple balance checks by letting users place nearly any round, square, or common blade shape on it to detect imbalances. This process helps reduce wobble, vibration, and engine strain while verifying bent blades, leading to smoother cuts and longer mower life based on its core design features. The intuitive layout supports quick adjustments without specialized skills.
Drawbacks include the absence of built-in precision markers, which means results depend on careful visual assessment, and potential fit issues with highly custom blades outside standard shapes. It also comes as a basic 1pk unit without extras like storage options.
Overall, this SporGain balancer delivers strong value for DIY homeowners and lawn maintenance enthusiasts who regularly sharpen blades and want an affordable, reliable way to maintain cutting performance. It is ideal for those seeking universal compatibility and lasting metal quality without needing professional-grade equipment.

Pros
- Heavy-duty zinc alloy build for long-term use.
- Universal fit for many common blade shapes.
- Simple design is easy to use after sharpening.
- Compact size is convenient for storage and transport.
Cons
- It is a single-purpose tool and does not sharpen blades.
- Compatibility is broad, but the product data does not list exact mower model support.
- No instructions or extra accessories are mentioned in the manufacturer listing.
Overview and design. The Silcpall Lawn Mower Blade Balancer is a compact universal tool made from zinc alloy. Its round, simple shape is designed to hold mower blades at the center for quick balance checks after sharpening.
Performance and key features. In use, the balancer is meant to help you spot uneven blades before they cause vibration, poor cut quality, or extra wear on the mower. The universal design is intended to work with most common blade shapes, including round and square styles.
Drawbacks and considerations. This is a single-purpose accessory, so it will not sharpen blades or provide model-specific mounting guidance. Compatibility is broad, but users should still confirm their blade sits securely on the center slot before relying on it.
Verdict. For homeowners, DIY users, and anyone who sharpens mower blades at home, this is a practical maintenance tool that can make blade balancing faster and more consistent. It is best suited to buyers who want a simple, durable balancer rather than a multi-function kit.
Dressing a Dull Mower Blade
A dull blade tears grass tips, which leaves brown edges that look ragged for days. Removing nicks and restoring a clean bevel noticeably improves cut quality. For general information about handling sharp metal edges, see American National Standards Institute (ANSI).









