Direct Answer: How to Put String on a Weed Eater
To put string on a weed eater, first identify your trimmer head type (bump feed, fixed line, or auto-feed). For the most common bump-feed head: remove the spool from the head, cut a length of the correct gauge line (typically 8–12 feet, or per your owner’s manual), fold it in half, and insert the midpoint through the eyelet on the spool. Wind both halves tightly in the direction shown by the arrow on the spool, leaving a few inches free at the ends. Place the spool back into the head, thread the free ends through the eyelets on the head housing, and press the spool down until it clicks. Pull each line end firmly to release any slack, then trim the lines to the recommended length (usually 4–6 inches).
For fixed-line heads, you typically remove the head, push the remaining line out, and insert a precut piece through the eyelet. For auto-feed heads, follow the manufacturer’s reloading path, which often involves winding the spool and tapping the head to advance the line. Always check your owner’s manual for the correct line diameter and winding direction, since using the wrong gauge can jam the head or damage the motor.
Understanding the Question: What Kind of Weed Eater Head Do You Have?
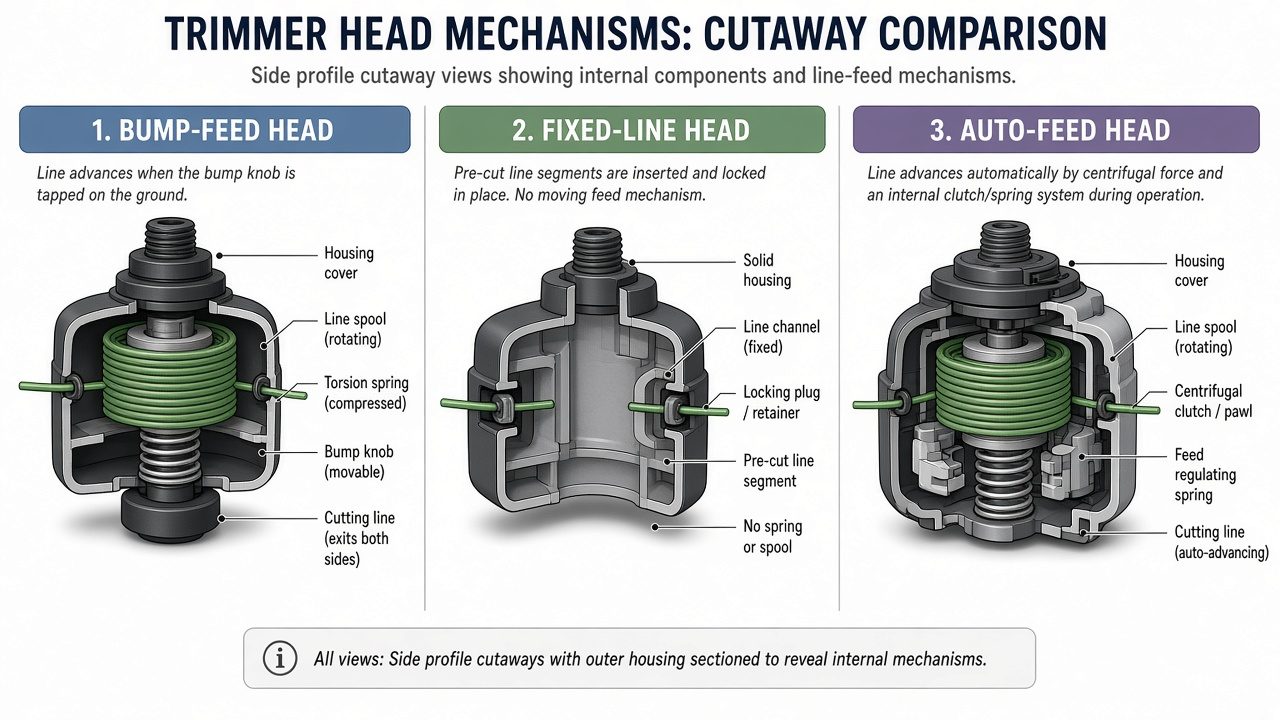
Before you can put string on a weed eater, you need to know which type of trimmer head you are working with. The term “weed eater” is often used generically for any string trimmer, but different head designs have different reloading methods. If you do not identify your head type first, you may struggle to remove the spool or wind the line correctly.
What Are the Different Types of Weed Eater Heads?
- Bump feed head: The most common type. You tap the head on the ground while the trimmer is running to release more line. The spool is housed inside the head and is usually held in place by tabs or a locking ring.
- Fixed line head: A simpler design that uses a precut length of line. When the line wears down, you must stop and manually replace it. There is no bump-feed mechanism.
- Auto-feed head: A design that automatically advances the line when the motor reaches a certain speed or when the line becomes short. Reloading usually requires a specific spool-winding path described in the owner’s manual.
How Do I Know Which Trimmer Head My Weed Eater Has?
Look at the head housing. If you see a knob or cap that can be twisted or pressed, and the product manual mentions “bump feed” or “tap to advance,” you have a bump-feed head. If the head has no moving release mechanism and the line is held by a simple slot or hole, it is likely a fixed-line head. If the manual describes automatic line advancement without tapping, you have an auto-feed head.
Why Does the Reloading Method Differ Between Bump Feed, Fixed Line, and Auto-Feed Heads?
Each head stores and releases line differently. Bump-feed heads rely on a spring-loaded spool that releases line when struck. Fixed-line heads simply hold a single piece of line in place. Auto-feed heads use a centrifugal or speed-sensitive mechanism to push line out as it wears. Because the internal mechanisms differ, the winding direction, line length, and reassembly steps are not identical across all three types.
Key Factors to Consider Before Loading String
Preparation prevents frustration. Before you open the head, make sure you have the correct line gauge, the right length of line, and a clear understanding of the winding direction. Skipping these steps is the most common cause of jams and tangles.
What Size String Does My Weed Eater Need?
Trimmer line comes in different diameters, commonly 0.065, 0.080, 0.095, and 0.105 inches. The correct gauge depends on your trimmer model. Check the owner’s manual or the spool itself for a printed line diameter. Using a line that is too thick can jam the head or strain the motor; using a line that is too thin will cut poorly and wear out quickly.
How Much String Should I Put on the Spool?
For most bump-feed spools, you will need roughly 8 to 12 feet of line, but the exact amount depends on the spool size. The goal is to wind the line evenly without overlapping or bulging. If the spool looks overstuffed, remove some line. Your owner’s manual will usually state the recommended length.
Do I Need to Remove the Spool from the Head First?
Yes, for most bump-feed and auto-feed heads, you must remove the spool from the head housing to wind new line. On many models, you press the release tabs on the sides of the head, then pull the spool out. On others, you unscrew a cap. Never force the spool out; check for a locking tab or arrow that indicates the release mechanism.
What Happens If I Use the Wrong Line Gauge?
Using the wrong line gauge can jam the trimmer head or damage the motor. A too-thick line may not fit through the eyelets, may bind inside the head, and can cause the trimmer to overheat. A too-thin line may snap frequently and provide poor cutting performance. Always match the line diameter to the specification in the owner’s manual.
Step-by-Step: How to Put String on a Bump-Feed Weed Eater
This is the most common head type, so follow these steps carefully. Work on a flat, clean surface so small parts do not roll away.
How Do I Open a Bump-Feed Trimmer Head?
- Turn off the weed eater and disconnect the spark plug or remove the battery to prevent accidental starting.
- Press the release tabs on the sides of the head housing while pulling the spool cap away from the trimmer.
- Remove the empty spool from the head. Note the direction arrow printed on the spool; this tells you which way to wind the new line.
How Do I Wind the String Onto the Spool Correctly?
- Cut a single length of line, typically 8 to 12 feet, using the correct gauge for your model.
- Fold the line in half so both ends are even. You will now have two equal strands.
- Insert the folded midpoint into the eyelet or slot in the center of the spool.
- Hold the midpoint in place and begin winding both strands onto the spool in the direction indicated by the arrow. Wind tightly and evenly, keeping the strands parallel to each other.
- Stop winding when about 4 to 6 inches of line remain free at each end. Do not cover the eyelets on the outer rim of the spool.
How Do I Thread the String Through the Eyelets?
- Place the wound spool back into the head housing.
- Guide the two free ends of line through the two eyelets on the head housing. If the head has a single eyelet, thread both ends through it.
- Press the spool down into the head until it clicks into place. The click indicates that the spool is locked and the spring mechanism is engaged.
How Do I Know When the Spool Is Locked in Place?
You will hear a distinct click and the spool will sit flush with the head housing. Gently tug on both line ends. If the spool stays seated and the line does not pull out, the spool is locked. If the spool pops up, press it down again until it clicks securely.
Final Steps for Bump-Feed Heads
- Pull each line end firmly to release any slack from the winding.
- Trim the exposed line to the recommended length, usually 4 to 6 inches. Some heads have a built-in cutter; otherwise, use scissors or a sharp knife.
- Reconnect the spark plug or reinstall the battery, then test the trimmer at low speed before cutting.
Step-by-Step: How to Replace String on Fixed-Line and Auto-Feed Heads
Not all weed eaters use a bump-feed mechanism. If your trimmer has a fixed-line or auto-feed head, here is how to reload it.
How Do I Replace String on a Fixed-Line Head?
- Turn off the trimmer and disconnect the power source.
- Remove the head from the trimmer shaft according to the owner’s manual. Many fixed-line heads unscrew or snap off.
- Push the remaining piece of old line out of the eyelet or slot.
- Cut a precut piece of line to the length specified in the manual, typically 8 to 12 inches.
- Insert one end of the line through the eyelet and push it through until both sides are roughly even.
- Reattach the head to the trimmer and test the line length.
How Do I Reload an Auto-Feed Head?
Auto-feed heads vary by manufacturer, so always follow the reloading path shown in your owner’s manual. In general:
- Remove the spool from the head housing.
- Cut a length of line in the correct gauge.
- Insert the line into the spool’s anchor hole or slot.
- Wind the line in the direction indicated by the arrow, keeping it tight and even.
- Thread the free end through the head’s exit eyelet.
- Reassemble the head and test by running the trimmer and tapping the head if required.
Can I Reuse Old String When Reloading?
You can reuse a piece of old line if it is long enough and not cracked, brittle, or frayed. However, for best performance, use fresh line of the correct gauge. Old line that has been stored in sunlight or extreme heat may be weak and prone to snapping.
Direct Answer: Common Mistakes and Troubleshooting
Even with clear steps, problems can occur. Here are the most frequent issues and how to fix them.
Why Won’t My Weed Eater Feed New String?
The most common causes are incorrect winding direction, a spool that is not locked in place, or line that is wound too loosely. Check the arrow on the spool and rewind if necessary. Make sure the spool clicks into the head and that the line ends are threaded through the eyelets, not caught under the spool.
How Tight Should the String Be Wound on the Spool?
The string should be wound tightly and evenly, with no loose loops or overlapping layers. If the line is too loose, it can tangle and jam the head. If it is too tight, it may be difficult to pull through the eyelets and may not feed properly.
How Do I Keep the String from Coming Loose While I Reassemble the Head?
Keep tension on the line ends while you place the spool into the head. Thread the free ends through the eyelets before pressing the spool down, and hold both ends with one hand while you seat the spool with the other. Once the spool clicks, pull the ends firmly to remove any slack.
How Long Should the Trimmer Line Be After Installation?
After installation, the exposed line should be about 4 to 6 inches long. Longer line may cause the motor to strain and can whip against the guard. Shorter line cuts less efficiently. Many heads have a built-in cutter or a marked guide to help you trim the line to the correct length.
Frequently Asked Questions
Do I need to remove the spool to put new string on a weed eater?
Yes, for most bump-feed and auto-feed heads, you must remove the spool from the head to wind new line. Fixed-line heads may not require spool removal; instead, you push out the old line and insert a precut piece through the eyelet.
How do I know which direction to wind the string?
Look for an arrow printed on the spool. The arrow indicates the correct winding direction. Following the arrow prevents tangling and ensures the line feeds properly. If the arrow is worn off, check the owner’s manual.
What happens if I use the wrong line diameter?
Using the wrong line diameter can jam the trimmer head or damage the motor. A line that is too thick may not fit through the eyelets, while a line that is too thin will break easily. Always use the gauge specified in the owner’s manual.
Why does my new string fly out of the head when I start the trimmer?
This usually happens when the spool is not locked in place, the line is wound in the wrong direction, or the line ends are not threaded through the eyelets. Recheck the spool seating, winding direction, and eyelet alignment before starting the trimmer again.