Direct Answer: How to Load Weed Eater String
To load weed eater string, first disconnect the spark plug wire and let the engine cool. Remove the spool head by unscrewing the center bolt or pressing release tabs. Wind new trimmer line onto the spool following the directional arrows, leaving 4–6 inches of line extending on each side. Insert the line ends into the guide slots, reassemble the head, and test. The exact process varies by spool type (bump feed, automatic feed, or manual load) and manufacturer.
Understanding Your Weed Eater’s String System
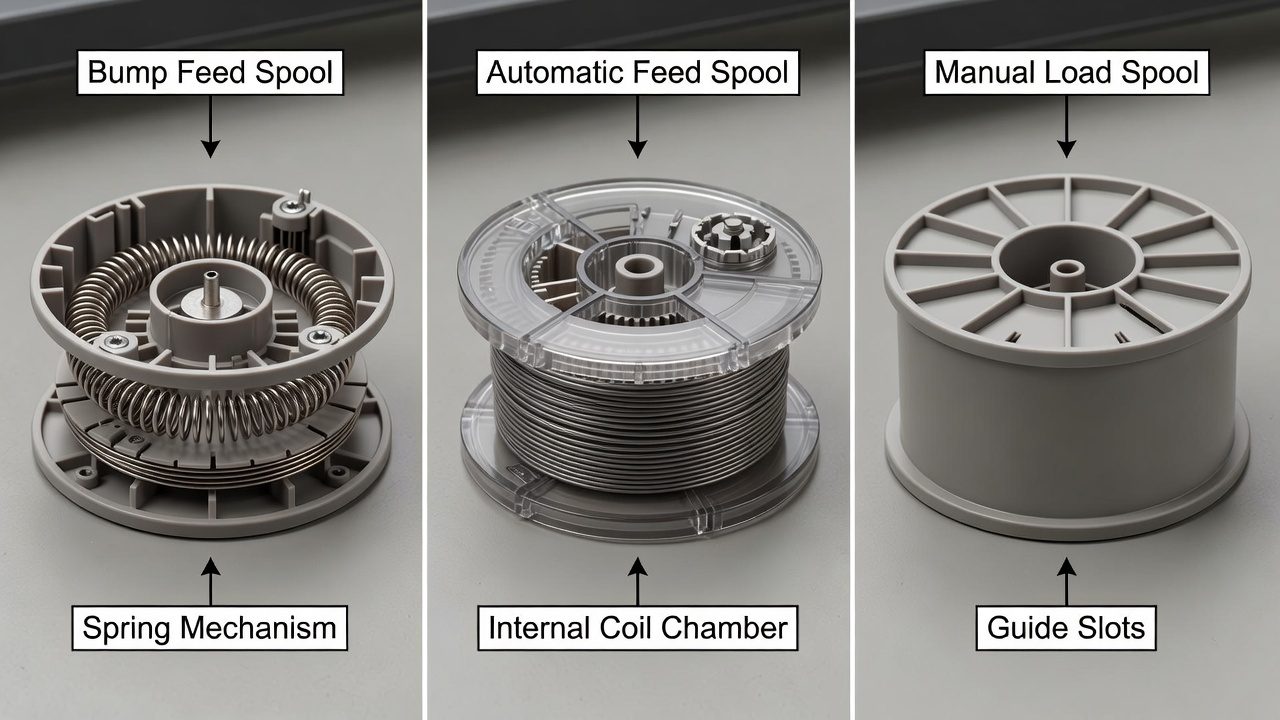
Before you attempt to load string, you need to identify which type of spool your weed eater uses. Most residential weed eaters fall into three categories, each with a different loading mechanism.
Bump Feed Spools are the most common type. They hold a fixed amount of pre-wound string and use a spring-loaded mechanism. When the spool head bumps the ground while the engine runs, it advances a small amount of new string automatically. This is popular because it requires minimal user intervention during operation.
Automatic Feed Spools advance string continuously as you use the trimmer without requiring the bump action. They’re convenient for extended use but tend to consume string faster than bump feed models.
Manual Load Spools require you to manually thread the string into slots or guides. These are less common on modern equipment but appear on some commercial-grade and older models. They offer the most control but require more setup time.
Check your owner’s manual or examine the spool head to determine which type you have. If you can’t find the manual, the spool design itself tells the story: look for directional arrows (indicating bump or automatic feed) or visible slots where string threads directly (manual load).
Before You Start: Safety and Preparation
Working with powered equipment requires basic precautions. Stop the engine and let it cool for at least five minutes. Disconnect the spark plug wire by gently twisting and pulling it away from the spark plug. This prevents accidental engine startup while you work on the spool head.
For electric or cordless models, unplug the unit or remove the battery to eliminate any risk of the motor engaging.
Gather these materials:
- Replacement trimmer line in the correct gauge for your model (typically 0.065″, 0.080″, or 0.095″)
- A pair of scissors or a utility knife to cut the line
- A socket wrench or screwdriver (depending on your spool head design)
- The owner’s manual if available
- A clean, well-lit workspace
Trimmer line diameter matters. Using the wrong gauge can cause the spool to jam, reduce cutting efficiency, or damage the feeding mechanism. Your manual specifies the correct size, or you can check the spool head itself, where the size is often molded or printed.
How to Remove the Spool Head
The spool head is the rotating assembly at the end of the trimmer shaft. Access methods vary by design.
For Screw-On Heads: Locate the center bolt or locking nut at the middle of the spool head. Using the appropriate socket or wrench, turn it counterclockwise to loosen. Some models use reverse threads—if turning counterclockwise doesn’t work, try clockwise. Once loose, carefully unscrew by hand and set it aside. Note the orientation of any springs, washers, or spacers; take a photo if helpful.
For Snap-Off Heads: Look for small release tabs or buttons on opposite sides of the spool head. Press these tabs inward while pulling the head away from the trimmer shaft. The head should separate with modest force; don’t force it or you may break the clips.
When removing the head, carefully inspect the inside of the spool cavity. Remove any old string fragments, dirt, or debris. A clean spool prevents line from jamming and ensures smooth feeding.
Step-by-Step: Loading String on a Bump Feed Spool
Bump feed spools are the most straightforward to load. The spool has two small notches or slots on the outer edge where the string anchors.
Step 1: Cut a length of trimmer line approximately 15–20 feet long. For most residential bump feed spools, this is sufficient; check your manual for the exact capacity.
Step 2: Examine the spool and locate the two anchor notches. These are typically positioned on opposite sides of the spool perimeter, slightly recessed.
Step 3: Insert one end of the string into the first notch. Push it firmly until it seats securely in the groove.
Step 4: Wind the string onto the spool following the directional arrows embossed on the spool face. The arrows show the direction the spool rotates. Wind tightly and evenly, keeping tension on the line as you wrap. Make multiple passes, spacing the wraps neatly.
Step 5: Leave approximately 4–6 inches of string unwound. Insert this remaining end into the second anchor notch on the opposite side of the spool. Ensure it’s seated firmly.
Step 6: Verify that the wound string doesn’t overlap itself significantly. Overlapping can cause jamming when the spool rotates. If you’ve wound too much string, unwind some and try again.
Step-by-Step: Loading String on an Automatic Feed Spool
Automatic feed spools simplify the process by eliminating the need to wind string manually.
Step 1: Locate the spool’s center hole or guide port. This is where the string feeds into the mechanism.
Step 2: Cut a single length of trimmer line, typically 15–30 feet depending on spool capacity. Check your manual for the recommended length.
Step 3: Thread one end of the string through the guide port or center hole. Follow any arrows or directional indicators on the spool.
Step 4: Continue feeding the string into the spool chamber, allowing it to coil inside. The internal mechanism is designed to hold and advance the line automatically.
Step 5: Once the string is fully inserted, verify that a small amount protrudes from the cutting head (usually 1–2 inches on each side of the head). Trim excess if needed.
Step 6: Some automatic feed spools have a locking collar or retaining cap. If yours has one, ensure it’s properly seated before reassembling the head.
Automatic feed spools consume line faster than bump feed models because they advance continuously. Inspect the spool regularly during use and be prepared to refill more frequently.
Step-by-Step: Loading String on a Manual Load Spool
Manual load spools are straightforward but require careful threading.
Step 1: Examine the spool head and identify the guide slots or holes where string inserts. These are typically large enough to accept trimmer line easily.
Step 2: Cut two equal lengths of trimmer line, each approximately 12–15 feet. Some manual load heads accept a single long line; check your manual.
Step 3: Insert the first line end into one guide slot. Push it through until it emerges from the cutting head opening. The string should pass through smoothly without resistance.
Step 4: Insert the second line end into the opposite guide slot and push it through in the same manner.
Step 5: Verify that both strings extend equally from the cutting head, typically 3–4 inches on each side. Trim excess line if one side is longer.
Step 6: Check that the strings are seated fully in their slots and won’t slip out when the head rotates.
Reassembling and Testing Your Weed Eater
Once the string is loaded, carefully reassemble the spool head.
For Screw-On Heads: Align the head with the trimmer shaft and insert the center bolt. Hand-tighten first to ensure the threads engage properly. Then use your wrench or socket to tighten firmly, but avoid over-tightening, which can strip the threads or crack the spool head. The head should be snug but not forced.
For Snap-Off Heads: Align the head with the shaft and press firmly until the release tabs click into place. You should hear or feel a distinct click when fully seated.
Reconnect the spark plug wire by pushing it firmly onto the spark plug until it seats. For electric models, plug in the unit or reinstall the battery.
Before full use, run the trimmer in a safe area without obstacles for 10–15 seconds. Listen for unusual sounds and observe the string. It should rotate smoothly without wobbling, and the string should extend evenly. If the string appears to be feeding inconsistently or the head vibrates, stop and inspect your work.
Troubleshooting Common String Loading Issues
String Keeps Coming Loose: The string isn’t seated firmly in the anchor notches. Remove the spool head, unwind the string, and try again, pushing the string ends more forcefully into the notches. For automatic feed spools, ensure the locking collar or cap is fully engaged.
Spool Head Won’t Screw Back On: The threads may be misaligned or partially engaged. Remove the head completely and start over, turning slowly until you feel the threads catch. Hand-tighten before using tools.
String Is Wound Incorrectly: If the string overlaps significantly or the wraps are loose, remove the head and unwind the string completely. Start fresh, maintaining steady tension and following the directional arrows precisely.
String Doesn’t Feed During Use: The string may be jammed in the spool cavity or not properly inserted into the guide slots. Stop the engine, let it cool, and inspect. Manually rotate the spool by hand to check for obstructions. Remove any debris or tangled string fragments.
String Frays or Shreds During Operation: The string may be the wrong gauge, or the cutting head may be damaged. Verify you’re using the correct trimmer line size. Inspect the cutting head for cracks or bent edges that might snag the line.
Frequently Asked Questions
What size trimmer line does my weed eater use?
Common trimmer line sizes are 0.065 inches, 0.080 inches, and 0.095 inches in diameter. Larger-diameter line is more durable but consumes more power. Check your owner’s manual or examine the spool head, where the size is often printed or molded. Using the wrong gauge can cause feeding problems or reduced cutting efficiency.
How often should I replace the string in my weed eater?
The frequency depends on use. If you use your trimmer weekly, you’ll likely need to refill the spool every 2–4 weeks. Heavy use may require more frequent refills. Some users buy pre-wound spools and swap them out rather than reloading string manually, saving time if you trim frequently.
Can I use any brand of trimmer line in my weed eater?
Any trimmer line of the correct gauge will work, regardless of brand. Generic or store-brand line is typically less expensive than premium brands and performs similarly. However, some users report that thicker or more durable line brands last longer. Experiment to find what works best for your budget and usage patterns.
Why does my weed eater string keep breaking?
String breaks due to hitting hard objects like rocks or tree roots, using the wrong gauge (too thin for your model), or poor spool loading causing the string to feed inconsistently. Inspect your trimming area for obstacles, use the correct line size, and ensure the spool is loaded properly. Keep the cutting head at the recommended distance from hard surfaces.
Key Takeaways
Loading trimmer string requires identifying your spool type, following safety protocols, and carefully winding or threading the line according to your spool’s design. Bump feed and automatic feed spools use different mechanisms but follow similar anchor-and-wind principles. Manual load spools are simpler but less forgiving if the string isn’t threaded correctly. Take time to load the string properly the first time; poor loading causes frustration and wasted string during operation. If you’re unsure, consult your owner’s manual or contact the manufacturer’s support line—most provide phone or online guidance at no charge.