

Direct Answer: How to Replace a Lawn Mower Pull Rope
To replace a pull rope on a lawn mower, disconnect the spark plug wire for safety, locate the recoil starter assembly on top of the engine, remove the starter cover by unscrewing it, extract the old rope from the pulley, thread new rope through the housing and wind it tightly around the pulley, reattach the handle with a secure knot, and test the pull action. The entire process takes 15 to 30 minutes for most gas-powered push mowers and costs $10 to 20 in materials, compared to $75 to 150 for professional service.

Pros
- Long 100 ft spool provides flexibility for multiple repairs or custom-length replacements.
- Polyester woven cord offers strong load-bearing support and wear resistance.
- Two included handles add convenience for replacement or new installs.
Cons
- Compatibility depends on the equipment's required rope diameter and starter design, so size should be checked before purchase.
- It is a rope-and-handle replacement, not a full recoil starter assembly.
- The product notes that nails are inside the rope ends for storage, so handling requires care.
Overview & Design: The Saillong 3mm 100ft Starter Rope is a replacement pull cord made for small-engine equipment. It uses a high-strength polyester woven material and includes two starter handles, giving it a practical, ready-to-install feel for routine maintenance jobs.
Performance & Key Features: The 100-foot length is a major advantage because it can be cut to the needed size for different machines. Its low-stretch, wear-resistant construction is intended to keep pull performance stable, while the 3mm diameter makes it suitable for many lawn mowers, chainsaws, trimmers, edgers, brush cutters, water pumps, and small generators.
Drawbacks & Considerations: Fit is the main thing to verify before ordering, since starter rope size requirements vary by machine. It is also important to note that this is a rope replacement rather than a complete recoil starter unit, and the product description warns that nails are inside the rope ends for storage, so careful handling is needed.
Verdict: This is a sensible choice for users who want a long, cut-to-size starter cord for common small-engine repairs. It should offer the best value for DIY owners, landscapers, and anyone maintaining multiple outdoor tools, provided the 3mm size matches the equipment.

Pros
- Long 10 m length supports several repairs or spare cuts.
- Compatible with many small-engine recoil starter applications.
- Durable braided construction is intended for repeated use.
Cons
- Handle and starter assembly are not included, so this is not a complete replacement kit.
- 3mm diameter may not fit every recoil starter, so size verification is necessary before buying.
- The listing provides no detailed fit guide, so compatibility depends on measuring your old cord and reel opening.
Overview: The LETAYAR 3mm x 10m White Recoil Starter Rope is a rope-only replacement designed for small-engine pull start repairs. It is intended for users who need to refresh a worn or broken starter cord without replacing the entire recoil assembly.
Performance & Key Features: The braided high-tensile fiber construction is meant to handle repeated pulling and outdoor use. With 10 meters of cord, it offers enough material for multiple repairs or custom-length installs, and the 3mm diameter works with many larger hand-pull starter reels.
- Compatible with lawn mowers, chainsaws, trimmers, generators, edgers, blowers, and pressure washers
- Rope-only format for replacing just the worn cord
- Easy to cut to size for different repair needs
Drawbacks & Considerations: This product does not include a handle or starter assembly, so buyers need existing hardware or separate parts. It is also important to compare the old rope diameter and starter reel hole before ordering, since 3mm will not suit every machine.
Verdict: This is a practical choice for DIY small-engine repairs when you only need a replacement recoil cord. It offers good length and broad application potential, but the best results will come from verifying compatibility first.
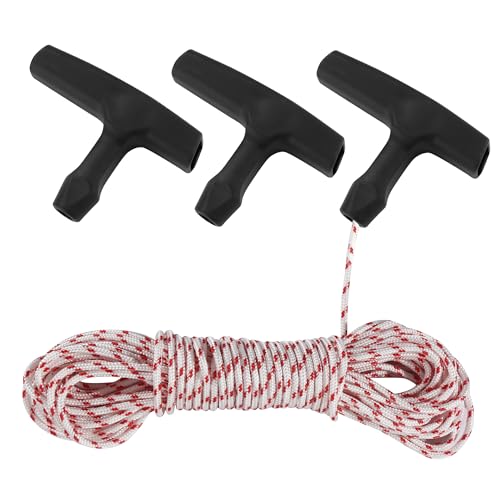
Pros
- Includes both rope and multiple handles for a complete repair kit.
- Continuous 10-meter rope offers flexible, cut-to-fit installation.
- 3.0 mm size is a common option for many small-engine starter systems.
- Universal compatibility expands use across multiple outdoor power tools.
Cons
- Compatibility still depends on measuring your existing cord or checking the equipment manual.
- Only one rope diameter is included in this listing, so it may not fit engines that need a different size.
- No exact pre-cut length is provided, so installation requires cutting and fitting the cord yourself.
Overview: The Qtcial B0D31SHNM5 is a universal recoil starter rope replacement kit designed for small-engine equipment. It includes a 10-meter continuous polyester cord and 3 starter handles, giving buyers a practical all-in-one repair option for common pull-start machines.
Performance and Features: The 3.0 mm rope size is suited to many lawn mowers and similar outdoor tools, while the long continuous coil can be cut to the exact length needed. The polyester construction is intended to handle repeated pulling force, and the included handles add convenience for a cleaner, more complete replacement.
- 10 meters of rope for custom sizing
- 3 included starter handles
- Designed for recoil-start equipment
- Compatible with many major small-engine brands
Drawbacks and Considerations: The main limitation is that fit is not universal in every case, so checking the required diameter before purchase is important. Since the rope is sold as a continuous coil, users must measure, cut, and install it themselves.
Verdict: This kit offers strong value for owners who need a flexible pull-cord replacement for lawn mowers, trimmers, chainsaws, or brush cutters. It is best for shoppers who want a durable rope with multiple handles and are comfortable confirming the correct size before installation.
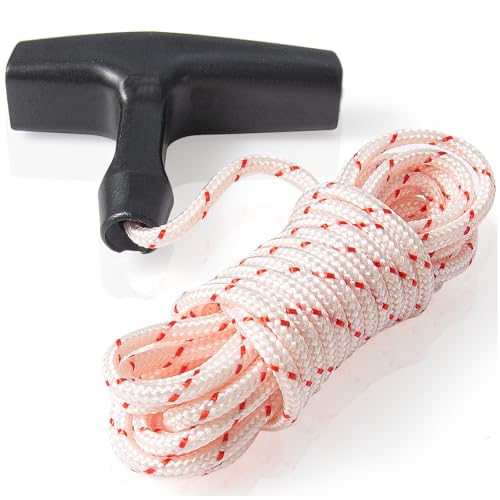
Pros
- High tensile strength rope is built for durability and repeated recoil starts.
- Cut-to-length design increases compatibility with different small engine applications.
- Handle is included, adding value for a complete starter cord refresh.
- Broad compatibility claims cover many popular engine brands and outdoor power tools.
Cons
- Compatibility is not universal, so the 3.5mm diameter and starter setup must match your equipment.
- The cord must be cut to fit, which adds a small amount of setup work before installation.
- No exact installation hardware or tool-specific parts are listed beyond the rope and handle.
Overview: The URANNBRIKS B0FL849GMS is a replacement pull cord kit for small engines, including lawn mowers, generators, weed eaters, chainsaws, and pressure washers. It uses a 10 ft, 3.5mm rope with a 16-strand braid and includes a 3-finger handle for a more comfortable grip.
Performance and features: The main appeal is durability. The rope is rated for high tensile strength, which should help it stand up to repeated recoil starts better than weaker cords. Because the rope is cut to fit, it gives users flexibility for different starter housings and equipment types.
Drawbacks and considerations: This is a generic replacement part, so fit depends on your engine’s rope diameter, starter design, and required length. It also requires cutting and installation, so it is not a plug-and-play part for every user. The kit includes the rope and handle, but no extra hardware is listed.
Verdict: This is a practical choice for DIY users and homeowners who need a durable, budget-friendly pull cord replacement for common small engines. It is best for buyers who want a simple repair kit and are comfortable matching specifications before installation.
When to Replace Your Lawn Mower Pull Rope
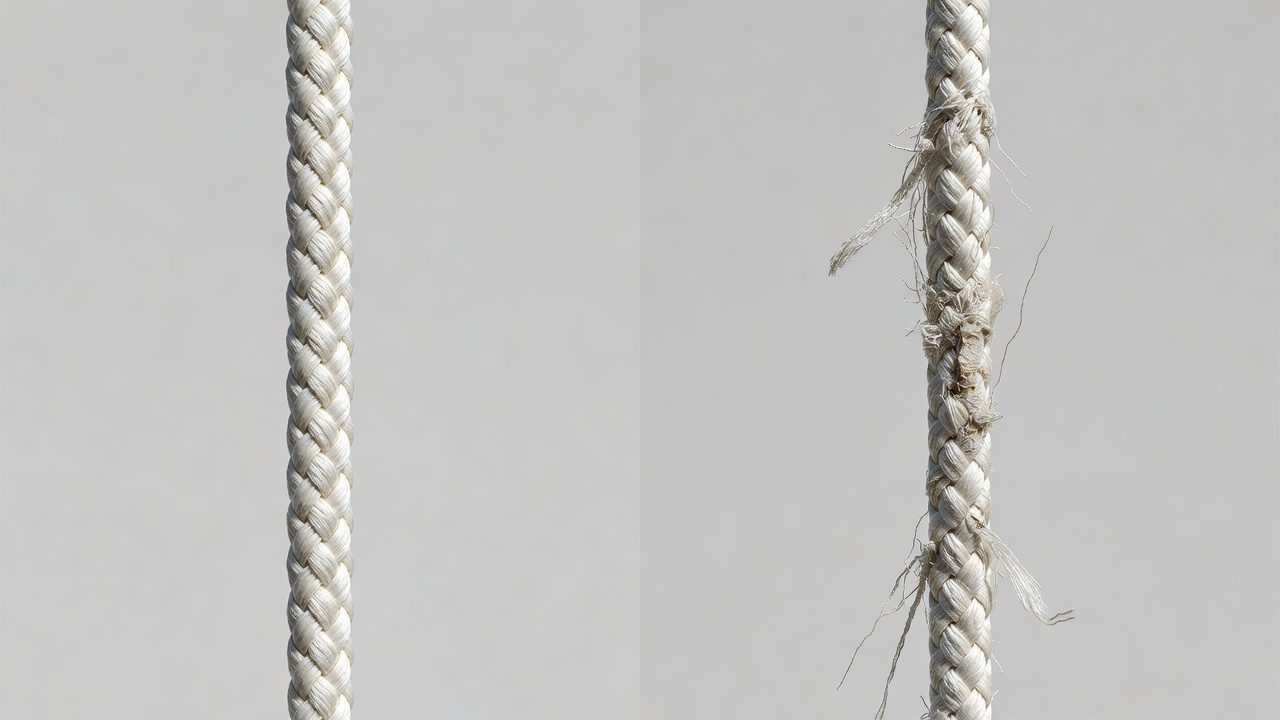
A pull rope typically lasts 3 to 5 years with regular use, depending on climate and maintenance. You should replace your rope when you notice any of these signs:
- Fraying or visible damage: The rope exterior unravels, exposing inner fibers
- Reduced tension: The rope no longer snaps back quickly or feels loose during pulls
- Difficulty starting: The rope catches, hesitates, or requires excessive force
- Rope won’t fully retract: It hangs outside the housing or retracts slowly
- Weak or broken strands: The rope is visibly thinner or has separated fibers
Minor fraying at the handle can be temporarily fixed by melting the nylon fibers with a lighter, but true damage, tears, knots, or loss of elasticity, requires replacement. Attempting to repair a damaged rope with tape or knots compromises safety and starter function.
Mower Type Considerations: Push vs. Riding Mowers
The rope replacement process is similar across mower types, but location and assembly design vary:
Gas-Powered Push Mowers
The recoil starter is mounted on top of the engine, typically on the rear half. The assembly is compact and accessible from above. Replacement takes 15 to 20 minutes and requires no special tools. This is the most straightforward rope replacement scenario.
Riding Mowers
The recoil starter is located on the side or top of the main engine, but may be partially obscured by the chassis, fuel tank, or air filter housing. You may need to move or remove components to access the starter cover. Replacement takes 20 to 30 minutes and occasionally requires a wrench to remove nearby bolts.
Electric and Battery-Powered Mowers
Electric mowers do not have pull ropes or recoil starters, so this guide does not apply. Battery-powered equipment starts via electric button.
Tools and Materials You’ll Need
Tools:
- Screwdriver (Phillips or flathead, depending on starter cover screws)
- Socket wrench or adjustable wrench (for riding mowers or stubborn fasteners)
- Pliers (for gripping and cutting rope)
- Lighter or matches (for sealing rope ends)
- Replacement pull rope (typically 5 to 6mm diameter, 10 to 15 feet long for push mowers; check your manual for exact length)
- Rope material: Universal starter cord is 100% nylon and rated for outdoor use (brands: Stens, Rotary, Oregon, or equivalent)
Where to Buy: Replacement rope kits are available at hardware stores (Home Depot, Lowe’s), online retailers (Amazon, eBay), and small-engine shops. Cost: $8 to 18 per kit. Avoid bargain-bin rope; quality nylon ensures durability and smooth operation.
Safety Precautions Before Starting
- Disconnect the spark plug wire: Remove the wire cap from the spark plug to prevent accidental engine start during work. This is the most critical safety step.
- Place the mower on a flat, stable surface: Prevent the mower from rolling or tipping during work.
- Ensure the engine is cool: Wait 15 to 20 minutes after last use to avoid burns.
- Wear work gloves: Protect hands from sharp edges and rough rope fibers.
- Work in good lighting: Use a work lamp or move to daylight to see small fasteners and pulley details clearly.
- Keep the manual nearby: Reference your specific mower model for torque specs or unique assembly details.
Step-by-Step Rope Removal Process
Step 1: Locate and Access the Recoil Starter
On push mowers, look on top of the engine near the rear. On riding mowers, check the side or top of the main engine. The recoil starter is a plastic or metal housing with a circular pulley visible through a central opening. You may see the old rope coiled inside or hanging from a handle. For complementary field maintenance guidelines, examine our breakdown of dyson v8 cyclone vs bissell featherweight stick.
Step 2: Remove the Starter Cover
Locate the screws holding the cover to the housing (typically 3 to 4 screws around the perimeter). Use the appropriate screwdriver to remove them. Carefully lift the cover straight up; do not force it, as internal springs may push back. Set the cover and screws aside in a safe place.
Step 3: Remove the Old Rope
You will see the pulley (a wheel with a groove around its edge) and the old rope wound around it. If the rope is still attached to the handle, pull the handle toward the starter to create slack in the rope. Locate where the rope is tied to the pulley or fastened with a knot. Untie or cut the rope at this attachment point. Gently unwind the rope from the pulley by hand, being careful not to disturb the spring underneath (you will see a tightly coiled metal spring; leave it undisturbed). Once unwound, pull the old rope free from the housing. To evaluate matched hardware tolerances, consult our detailed overview of bissell crosswave hydrosteam vs shark stainforce.
Step 4: Inspect the Spring and Pulley
Before installing new rope, check the recoil spring (the metal coil under the pulley). If it is broken, cracked, or has lost its tension, the starter will not function even with a new rope. If the spring is damaged, you will need to replace the entire starter assembly, this is beyond basic rope replacement and may require professional service. Assuming the spring is intact, proceed to installation.
Installing the New Pull Rope
Step 1: Cut and Prepare the New Rope
Cut a length of rope 2 to 3 feet longer than your original rope (typically 12 to 18 feet for push mowers; check your manual). Seal both cut ends by carefully passing them through a lighter flame for 1 to 2 seconds until the nylon melts slightly. Do not hold the flame on the rope too long, or it will ignite. The sealed end prevents fraying and makes threading easier.
Step 2: Thread the Rope Through the Housing
Starting from the outside of the starter housing, locate the hole where the rope exits toward the handle. Thread one end of the new rope through this hole from the inside, pulling it through until 6 to 8 inches protrude outside. This will later attach to the handle.
Step 3: Wind the Rope on the Pulley
Working from the inside of the housing, take the long end of the rope and begin winding it tightly around the pulley in a clockwise direction (viewed from above on most mowers). Wrap the rope in a neat, spiral pattern, filling the groove completely and layering each wrap next to the previous one, do not criss-cross or overlap. Typically, you will wind 3 to 5 complete layers around the pulley. Wind firmly but do not over-tension; the rope should feel snug but not strained. Once wound, the end of the rope will be on the inside of the housing.
Step 4: Secure the Rope to the Pulley
At the endpoint of the wound rope (inside the housing), tie it to the pulley using a strong knot. A simple overhand knot or double overhand knot works well. Pull tight to ensure it will not slip. Some mowers have a small eyelet or hole on the pulley for this purpose; thread the rope through it and tie a knot on both sides to lock it in place.
Step 5: Reattach the Starter Cover
Carefully lower the starter cover back onto the housing, aligning the screw holes. Press gently to reseat the cover. Screw the fasteners back in firmly but do not over-tighten, as this can crack the plastic housing. Tighten in a cross pattern (alternating opposite screws) to ensure even pressure.
Reattaching the Handle and Testing
Step 1: Attach the Rope to the Handle
Take the 6 to 8 inches of rope protruding from the housing (see Step 2 of installation). Thread this end through the hole in your pull handle (a plastic or wooden piece with a grip). Once threaded, tie a secure knot on the end to prevent slipping. A double overhand knot or figure-eight knot is recommended. Pull on the handle to confirm the rope is locked in place and will not slide through.
Step 2: Test the Rope Action
Gently pull the handle toward you in a smooth, steady motion. The rope should pull out smoothly and the handle should move 8 to 12 inches without resistance. Release the handle slowly; it should retract back into the housing with a swift snap, and the handle should return to its starting position near the mower. If the rope retracts slowly or unevenly, the tension may need adjustment (see Troubleshooting).
Step 3: Reconnect the Spark Plug Wire
Once the rope action feels correct, reconnect the spark plug wire to the spark plug. Ensure it is fully seated by pushing it on firmly until you hear or feel a click.
Your lawn mower pull rope replacement is now complete. Start the mower normally and verify that the rope continues to function smoothly during engine warm-up.
Troubleshooting Common Issues
The Rope Won’t Retract or Retracts Slowly
Cause: The recoil spring is weak, or the rope is wound too tightly.
Fix: If the rope is new and tension feels correct, the spring may be fatigued. You can slightly loosen the rope tension by re-winding it one layer lighter. If this does not help, the spring itself needs replacement, requiring a full starter assembly swap.
The Rope Feels Too Tight and Won’t Pull Smoothly
Cause: Over-tensioning during winding, or the pulley is not seated correctly.
Fix: Partially unwind the rope and re-wind with slightly less tension. Test the pull action. If tightness persists, remove the cover and check that the pulley sits flat in its seat and rotates freely by hand.
The Rope Frays Shortly After Installation
Cause: The rope ends were not sealed properly, or the rope is rubbing against a sharp edge inside the housing.
Fix: Reseal both rope ends with a lighter. If fraying continues, inspect the housing interior for rough spots or burrs and smooth them with sandpaper or a file.
The Handle Falls Off or Becomes Loose
Cause: The knot securing the rope to the handle was not tight enough, or the handle material is cracked.
Fix: Remove the handle and re-tie the knot as tightly as possible. If the handle is cracked or the hole is enlarged, you may need to purchase a replacement handle assembly (usually sold as a kit with new rope).
The Rope Still Won’t Catch or Start the Engine
Cause: The recoil spring is broken, or the pulley is damaged.
Fix: This is beyond rope replacement and requires full starter assembly replacement. Contact a small-engine repair shop or consult your mower’s manual for replacement part numbers.
When to Seek Professional Help
DIY rope replacement is suitable for most homeowners, but you should seek professional service in these scenarios:
- The recoil spring is broken or won’t hold tension: You will notice this during removal if the pulley spins freely or the spring is visibly cracked. Spring replacement requires specialized tools and expertise.
- The pulley or housing is cracked or damaged: Broken plastic or metal components require replacement parts, not just rope.
- The starter assembly won’t engage the engine: If a new rope still doesn’t turn the engine over, the entire starter mechanism may be faulty.
- You’re uncomfortable working with small engines: If you lack mechanical experience or confidence, a technician can complete the job in 20 minutes for $75 to 150, providing a warranty on the work.
Buyer FAQs: How To Replace A Pull Rope On A Lawn Mower Solved
How long does a lawn mower pull rope typically last?
A quality pull rope lasts 3 to 5 years with regular use. Factors affecting lifespan include climate (UV exposure and humidity degrade nylon), frequency of use, and proper storage. Ropes stored indoors and used seasonally last longer than those left outside year-round.
Can I use any type of rope for a lawn mower starter?
No. You must use universal starter cord rated for outdoor use, typically 5 to 6mm diameter nylon. Regular clothesline or synthetic rope will fray, stretch, and fail quickly. Specialty starter cord is designed to withstand repeated pulling and temperature extremes. Always check your mower’s manual for the correct rope diameter and length specifications.
What’s the difference between push mower and riding mower rope replacement difficulty?
Push mower replacement is straightforward: the starter is easily accessible on top of the engine, and the process takes 15 to 20 minutes with basic tools. Riding mower replacement is slightly more complex because the starter may be partially hidden by the fuel tank, air filter, or chassis, requiring you to remove or move nearby components first. Riding mower replacement typically takes 20 to 30 minutes and occasionally requires a wrench.
Do I need to drain the gas or oil before replacing the pull rope?
No. The fuel and oil systems are not affected by rope replacement. However, ensure the engine is cool before starting work, and always disconnect the spark plug wire for safety. This prevents accidental engine start while you are working inside the starter assembly.
Related Maintenance and Operating Guides
To keep your equipment running at peak operating efficiency, explore our related technical walkthroughs and maintenance tutorials:
- Consult our detailed breakdown on marshall stanmore iii vs harman kardon onyx studio 8.
- Consult our detailed breakdown on heavy-duty chainsaw buyer guide.
- Consult our detailed breakdown on durable ride-on lawn tractor guide.
Technical Standards and Compliance
Mechanical safety standards, operational tolerances, and protective gear guidelines align with benchmark specifications established by the American National Standards Institute (ANSI).









