As an Amazon Associate we earn from qualifying purchases. When you buy through our links, we may earn a commission at no extra cost to you. Prices and availability are subject to change on Amazon. Affiliate disclosure ›
How to Restring a Weed Wacker
Learn how to restring your weed wacker by identifying your trimmer head type, obtaining the correct line gauge, and following our step-by-step winding process. Most restringing jobs take 15-30 minutes and can save you money on professional service.
To restring a weed wacker, identify your trimmer head type (bump-feed, fixed spool, or auto-feed), obtain replacement line matching your manual’s specified gauge, typically 0.080″ to 0.095″ diameter, then remove the trimmer head, extract old line, wind new line onto the spool following directional arrows, reinstall the head, and test the feed mechanism. Most restringing jobs take 15 to 30 minutes and require only basic hand tools.
The Flagship Score evaluates build engineering, verified performance signals, and long-term owner satisfaction.
Updated: Oct 14, 2026
Last update on Oct 14, 2026. Product prices and availability are accurate as of that date/time and are subject to change. Any price and availability information displayed on Amazon.com at the time of purchase will apply. Affiliate links / Images, product titles, and product highlights from Amazon.
Best suited to homeowners who want a straight-shaft gas trimmer for hard-to-reach areas and routine yard work. The listing describes an 18-inch cutting width, a 28cc 2-cycle engine, and a Rapid Replace trimmer head for quicker line reloading. Listed features include digital ignition, air purge, and LowVib anti-vibration handling. At 12.2 pounds, the weight is manufacturer-stated, and the 8,000 rpm maximum speed is a rated figure rather than tested performance.
Pros & Cons
Pros
Rapid Replace head listed for simpler string reloading
Digital ignition listed for easier starting
LowVib anti-vibration system listed to reduce fatigue
Air purge listed to aid starting
Cons
Listed weight is 12.2 pounds
Starting and speed claims are manufacturer-stated only
The Flagship Score evaluates build engineering, verified performance signals, and long-term owner satisfaction.
Updated: Oct 3, 2026
Last update on Oct 3, 2026. Product prices and availability are accurate as of that date/time and are subject to change. Any price and availability information displayed on Amazon.com at the time of purchase will apply. Affiliate links / Images, product titles, and product highlights from Amazon.
The PROYAMA 42.7cc 5-in-1 is a gas-powered multi-tool for homeowners who need hedge trimming, pole sawing, string trimming, and brush cutting in one system. Its main strength is versatile, higher-power yard maintenance with extended reach.
Pros & Cons
Pros
Versatile attachment system covers multiple outdoor maintenance tasks with one machine.
Strong gas engine is better suited to demanding cutting jobs than many lightweight trimmers.
Extended reach helps handle high limbs and hard-to-access areas from the ground.
Quick-Start feature adds convenience for a gas-powered tool.
Cons
As a 2-stroke gas tool, it requires fuel mixing and regular maintenance.
Gas-powered operation is typically louder and less convenient than battery-powered alternatives.
The multi-tool format may be more complex than a single-purpose trimmer for users with only basic yard needs.
Detailed Review
Overview: The PROYAMA 42.7cc 5-in-1 multi-functional trimming tool combines a hedge trimmer, pole saw, string trimmer, brush cutter, and extension rod into one gas-powered yard system. It is built for users who want one machine to cover several outdoor maintenance tasks.
Performance: Its 2 HP, 2-cycle 42.7 cc engine is positioned for more demanding cutting jobs, while the pole saw offers an adjustable working range from 8.2 to 11.4 ft and a 10-inch cutting length. The Quick-Start system and ergonomic handle are practical additions for routine use.
Considerations: Because it is gas-powered, this tool will require fuel mixing and ongoing maintenance, and it is likely less convenient and louder than battery alternatives. The multi-attachment setup is useful, but it also adds complexity when switching between tasks.
Verdict: This PROYAMA model is best suited to homeowners who need reach, power, and versatility in a single tool. It is a strong fit for mixed yard work, but less ideal for buyers who prefer lightweight, low-maintenance equipment.
The Flagship Score evaluates build engineering, verified performance signals, and long-term owner satisfaction.
Updated: Oct 5, 2026
Last update on Oct 5, 2026. Product prices and availability are accurate as of that date/time and are subject to change. Any price and availability information displayed on Amazon.com at the time of purchase will apply. Affiliate links / Images, product titles, and product highlights from Amazon.
The Wild Badger Power 40V 4-in-1 multi-tool is a cordless yard-care system with a string trimmer/edger, pole saw, hedge trimmer, and brush cutter attachment. It is best for homeowners who want one platform for trimming, cutting, and light brush clearing with quick attachment changes.
Pros & Cons
Pros
Includes the battery and charger, so the kit is ready for setup out of the box.
Attachment changes are designed to be quick and simple, which saves time during multi-step yard work.
Comfort-focused design aims to reduce arm fatigue and vibration during extended use.
Versatile enough to cover several common homeowner landscaping tasks in one system.
Cons
Only one 40V 4Ah battery is included, so longer jobs may require recharge time or an extra battery.
The 8-inch pole saw and 10-inch brush cutter are better suited to light-to-moderate tasks than heavy-duty clearing.
The attachment-based design adds more parts to store and manage than a single-purpose tool.
Detailed Review
Overview: The Wild Badger Power 40V 4-in-1 Multi-Tool Kit combines a string trimmer/edger, pole saw, hedge trimmer, and brush cutter into one cordless system. It is built for homeowners who want a flexible yard tool that can handle several common maintenance jobs without switching between multiple machines.
Performance and features: The included 40V 4Ah battery gives the tool cordless freedom, while the brushless motor design is aimed at efficient operation. The 15-inch trimmer/edger, 16-inch hedge trimmer, 8-inch pole saw, and 10-inch brush cutter provide useful coverage for routine trimming, shaping, and light brush work. Quick attachment swaps make it easy to move from one task to another.
Drawbacks and considerations: This is a multi-tool kit, so it has more parts to keep track of than a dedicated trimmer. The single included battery may also be limiting for larger properties or longer sessions. Based on the listed specs, the saw and cutter sizes are practical for moderate yard work rather than heavy commercial clearing.
Verdict: This kit is a strong fit for homeowners who want one cordless platform to handle edging, trimming, hedge care, and light cutting. If you value versatility, comfort, and easy setup more than maximum-duty power, it offers a practical all-in-one solution.
The Flagship Score evaluates build engineering, verified performance signals, and long-term owner satisfaction.
Updated: Oct 14, 2026
Last update on Oct 14, 2026. Product prices and availability are accurate as of that date/time and are subject to change. Any price and availability information displayed on Amazon.com at the time of purchase will apply. Affiliate links / Images, product titles, and product highlights from Amazon.
This gas-powered kit suits homeowners who want one power head for trimming, hedging, brush clearing, and high pruning. The manufacturer says the telescoping pole adjusts from 6.9 to 9.5 feet, and the 180-degree cutting head helps with tight corners. The main trade-off is the 36-pound listed weight, plus the 25:1 fuel mix you must prepare before each use.
Pros & Cons
Pros
Six tool functions on one 26cc two-stroke power head
Tool-free quick-connect system for switching attachments
Cutting head rotates 180 degrees for tight corners
Spill-proof fuel tank, according to the manufacturer
EPA-certified, per manufacturer statement
Cons
Listed at 36 pounds, which may tire you on long jobs
Requires mixing 25:1 fuel-to-gasoline before every use
Understanding Your Trimmer Head Type
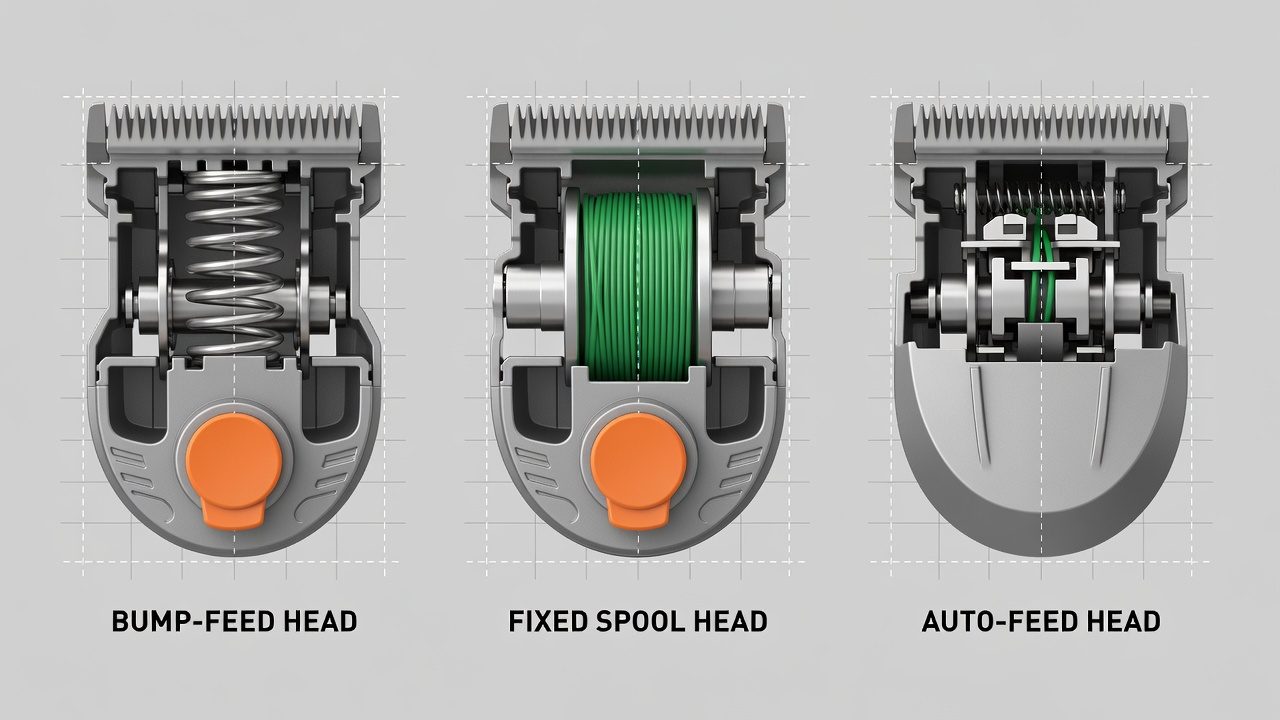
Before restringing, you must identify which type of trimmer head your weed wacker uses, as the restringing process varies slightly between designs. The three most common consumer types are:
Bump-Feed Heads (Most Common): These heads feature a button on the bottom that you tap against the ground to release more line automatically. The spool sits inside a protective housing and winds in one direction. This is the standard design for most residential string trimmers.
Fixed Spool Heads: These heads have a stationary spool with two line ports. You manually thread pre-cut line segments through the ports and tie them off. Fixed spools are less common but appear on some commercial-grade and older models.
Auto-Feed Heads: These advanced heads automatically advance line as it wears, eliminating the need to tap the bump button. They’re typically found on premium residential models and professional equipment.
To identify your trimmer head type, examine the trimmer head housing. If you see a prominent button on the bottom, you have a bump-feed head. If the head has two visible line ports and no button, it’s likely a fixed spool. Check your owner’s manual if you’re uncertain, the manual will specify the exact head design and correct line gauge for your model.
Gathering the Right Materials and Tools
Successful restringing requires the correct line diameter and a few basic tools. Having everything prepared before you begin prevents frustration mid-job.
Finding the Correct Trimmer Line Gauge
Trimmer line diameter (gauge) is critical. Using the wrong diameter may prevent proper feeding, cause tangling, or damage your trimmer head. Your owner’s manual lists the exact specification, typically 0.080″, 0.085″, or 0.095″ diameter. If you’ve lost the manual, look for a label on the trimmer head housing or search your trimmer model online. Most common residential models use 0.080″ or 0.085″ line.
Purchase replacement line from hardware stores, garden centers, or online retailers. Bulk spools (usually 100 feet or more) offer better value than pre-wound cartridges. Universal replacement line works with most trimmer heads as long as the diameter matches your specification.
Tools You’ll Need
Replacement trimmer line (correct diameter for your model)
Scissors or line cutter
Screwdriver (flathead or Phillips, depending on your trimmer head fasteners)
Small brush or compressed air (optional, for cleaning debris from the spool)
Work gloves (optional, for protecting hands from sharp line edges)
Removing the Trimmer Head and Old Line
Safe removal of the trimmer head is the first critical step. Always disconnect the spark plug wire on gas trimmers or unplug electric trimmers before disassembly to prevent accidental startup. For troubleshooting and reliability insights, consult our in-depth z890 vs x870e motherboard report.
Disconnecting and Securing Your Trimmer
Unplug electric trimmers completely or remove the spark plug wire from gas models by grasping the boot (rubber connector) and twisting it off gently.
Place the trimmer on a flat work surface, head-side up.
Locate the fastener(s) holding the trimmer head to the shaft. Most models use one large bolt or screw at the center of the head, though some may have two or three fasteners around the perimeter.
Removing the Trimmer Head
Using the appropriate screwdriver, carefully unscrew and remove all fasteners. Place them in a small container so you don’t lose them.
Gently pull the trimmer head away from the shaft. If it’s stuck, try rocking it side-to-side gently, don’t force it.
Set the trimmer head on your work surface.
Extracting Old Line
For bump-feed and auto-feed spools, the old line is typically wrapped around the spool inside the head housing. Carefully pull the loose ends of the old line to unwind it, or use your fingers to pick out wraps until the spool is clear. Discard the old line. For fixed spool heads, untie or cut the line tied to the port anchors and remove all segments. Use a small brush or compressed air to clear any debris or dried grass from the spool cavity.
Winding New Line: Bump-Feed Spools (Most Common)
Bump-feed spools are the most prevalent design in residential trimmers. Proper winding ensures reliable line feed and prevents tangling. Readers comparing setup options can review our technical analysis on marshall stanmore iii vs harman kardon onyx studio 8.
Measuring and Cutting Your Line
Cut a length of replacement line, typically 20 to 30 feet for residential spools, though your manual may specify an exact length. Check the spool cavity; some spools display a maximum fill line or markings to guide you. When in doubt, err slightly short rather than overstuffing, which can cause winding problems.
Locating the Directional Arrow
Look inside the trimmer head for an arrow or directional indicator molded or printed on the spool. This arrow shows the correct winding direction. Winding against this arrow is one of the most common restringing mistakes and will prevent proper line feed. The arrow typically indicates clockwise or counterclockwise winding, follow it exactly. For complementary field maintenance guidelines, examine our breakdown of dyson v8 cyclone vs bissell featherweight stick.
Winding the Line Onto the Spool
Hold the spool in one hand and the line in the other. Position the line end at the small hook or slot at the edge of the spool, most spools have a notch designed to anchor the line’s starting end.
Insert the line end into the anchor notch and hold it taut with your thumb.
Slowly rotate the spool in the direction indicated by the arrow, wrapping the line neatly around the spool. Keep tension on the line to ensure even, tight wraps, loose wraps cause tangling and poor feed.
Continue winding until approximately 4 to 6 inches of line remain unwound. Stop winding and note where this remaining line segment is positioned on the spool.
Locate the two line ports on the trimmer head (these are small openings on opposite sides of the head where line exits). Pull the remaining 4 to 6 inches of line through the first port, threading it through cleanly.
Thread the other end of the remaining line through the second port on the opposite side of the head.
Ensure both line segments are pulled taut and roughly equal in length, they should extend from the head ports evenly.
Securing the Line Ends
Most bump-feed heads have small tabs or anchors near the line ports. Push or hook each line end into its corresponding anchor to keep tension. If your head lacks anchors, hold the line ends manually while reinstalling the head. The line ends will be held in place by the head’s assembly once it’s reinstalled on the trimmer.
Winding New Line: Fixed Spool and Auto-Feed Models
Fixed Spool Restringing
Fixed spool heads require a different approach since line is not continuously wound on a spool: To evaluate matched hardware tolerances, consult our detailed overview of bissell crosswave hydrosteam vs shark stainforce.
Measure and cut two equal line segments, typically 15 to 20 feet each (check your manual for exact length).
Locate the two line port anchors on the fixed spool head.
Thread one line segment through the first port and tie it securely to the anchor using a reliable knot, a simple overhand knot works, or use a more secure square knot for extra assurance.
Thread the second line segment through the opposite port and tie it to the second anchor.
Trim any excess line extending from the knots with scissors, leaving approximately 1 inch of line hanging from each port.
Reinstall the trimmer head on the shaft.
Auto-Feed Restringing
Auto-feed heads automatically advance line and typically wind similarly to bump-feed spools, but check your manual for the specific winding direction and any special loading procedures. Some auto-feed models have indicator marks or guides molded into the spool. Follow these guides precisely and ensure the line is wound tightly and evenly. The auto-feed mechanism relies on proper line tension and positioning to function correctly.
Reinstalling and Testing Your Trimmer Head
Reassembling the Head
Position the trimmer head back onto the trimmer shaft, aligning it carefully with the mounting point.
Reinstall all fasteners (bolts or screws) that you removed earlier. Tighten them firmly but do not overtighten, which can strip threads or crack the plastic housing.
Double-check that the head is seated evenly against the shaft and shows no gaps or wobbling.
Testing the Line Feed
Reconnect the spark plug wire (gas models) or plug in the trimmer (electric models).
Start the trimmer and let it run at idle speed for 10 to 15 seconds. Listen for the familiar whirring sound of the line spinning.
If your trimmer has a bump-feed head, gently tap the bump button against the ground once or twice to release line. The new line should extend smoothly from the head.
Stop the trimmer and inspect the line length. Both line segments should be roughly equal in length and extend 2 to 4 inches from the head. If one segment is significantly longer, you can carefully trim it with scissors while the trimmer is off.
Restart the trimmer and let it run at full throttle for a few seconds, then return to idle. The line should spin smoothly without wobbling, tangling, or making grinding noises.
Troubleshooting Common Restringing Mistakes
Line Won’t Feed or Stays Short
This usually indicates the line was wound in the wrong direction. Check the directional arrow inside the head and verify you followed it correctly. If you wound backward, you’ll need to remove the head, unwind the line, and rewind it in the correct direction. Also check that the line ends are properly threaded through both port openings and pulled taut before reinstalling the head.
Line Tangles, Wraps Loosely, or Breaks Easily
Loose, uneven wrapping causes tangling. When rewinding, maintain steady tension on the line as you rotate the spool, ensuring each wrap sits neatly against the previous one. Wraps should feel firm and compact, not slack or twisted. If you used too much line and overstuffed the spool, the pressure can cause kinks and breakage, cut a shorter length and rewind.
Trimmer Head is Loose or Wobbles
If the head moves on the shaft, fasteners were not tightened sufficiently. Disconnect the trimmer, remove the head, and retighten all bolts or screws firmly. Check for visible damage to fastener threads or mounting points, stripped threads may require replacement parts.
Line Doesn’t Spin Smoothly or Makes Grinding Noises
This may indicate debris inside the head housing or line pinched inside the assembly. Remove the head, inspect for grass, dirt, or fragments, and clean with a brush or compressed air. Ensure no line is caught between the spool and housing. Reinstall the head and test again.
Common Questions on How To Restring A Weed Wacker Answered
How often should I restring my weed wacker?
Restringing frequency depends on usage. Light residential use may require restringing every 2 to 3 months during the mowing season, while heavy use or rocky terrain may require monthly or even weekly restringing. You’ll restring when line becomes too short to be effective or breaks during use. Many users keep a pre-wound spool or bulk line on hand to quickly reload their trimmer when needed.
Can I use any brand of replacement line?
As long as the diameter matches your manual’s specification, most universal replacement lines work across different trimmer brands and models. However, some premium trimmers may recommend specific line brands for optimal performance. Budget-friendly universal line performs adequately for most residential applications. Avoid extremely cheap or low-quality line, which may be brittle or prone to breakage.
What if I can’t find my owner’s manual to check the line gauge?
Search online for your specific trimmer model number (usually printed on a label on the trimmer housing or near the handle). Most manufacturers provide downloadable manuals on their websites. Alternatively, check the trimmer head housing for a printed gauge specification or contact the manufacturer’s customer service. If all else fails, 0.080″ is the most common residential gauge and a safe starting point, though 0.085″ is also widespread.
Why does my line keep breaking after restringing?
Breakage typically results from overstuffing the spool (too much line wound too tightly), winding in the wrong direction, using poor-quality line, or hitting hard objects like rocks or concrete during use. Verify correct winding direction and tension, use slightly less line, and try a higher-quality replacement line brand. Breakage during normal grass cutting may indicate you’re hitting harder obstacles, inspect your cutting area for hidden rocks or debris.
Restringing Safety for Wacker Heads
Power off the trimmer and let the head stop before opening it, since loose line and springs can release suddenly. For general safety reading on lawn equipment, American National Standards Institute (ANSI) is a useful source.
The best trimmer line depends on your trimmer type, the vegetation you cut, and your terrain. Round line suits light trimming, while twisted or serrated line handles thicker weeds. Learn how to match material, shape, and gauge to your equipment.
Learn how to reload a weed wacker with this complete guide. Covers safety preparation, opening the trimmer head, choosing between pre-wound spools and manual winding, and troubleshooting common reload problems.