

Correct Mower Blade Orientation: The Direct Answer
Mower blades are installed with the sharp cutting edge facing downward toward the ground and pointing forward in the direction of mower travel. The blade’s marked or stamped side (often showing the manufacturer name or model number) faces upward toward the mower deck. This orientation allows the blade to cut grass effectively as it rotates. Always disconnect the spark plug wires before installation, follow your mower’s specific torque specifications (typically 35 to 90 ft-lbs), and verify that blades rotate freely without obstruction.
Why Blade Orientation Matters
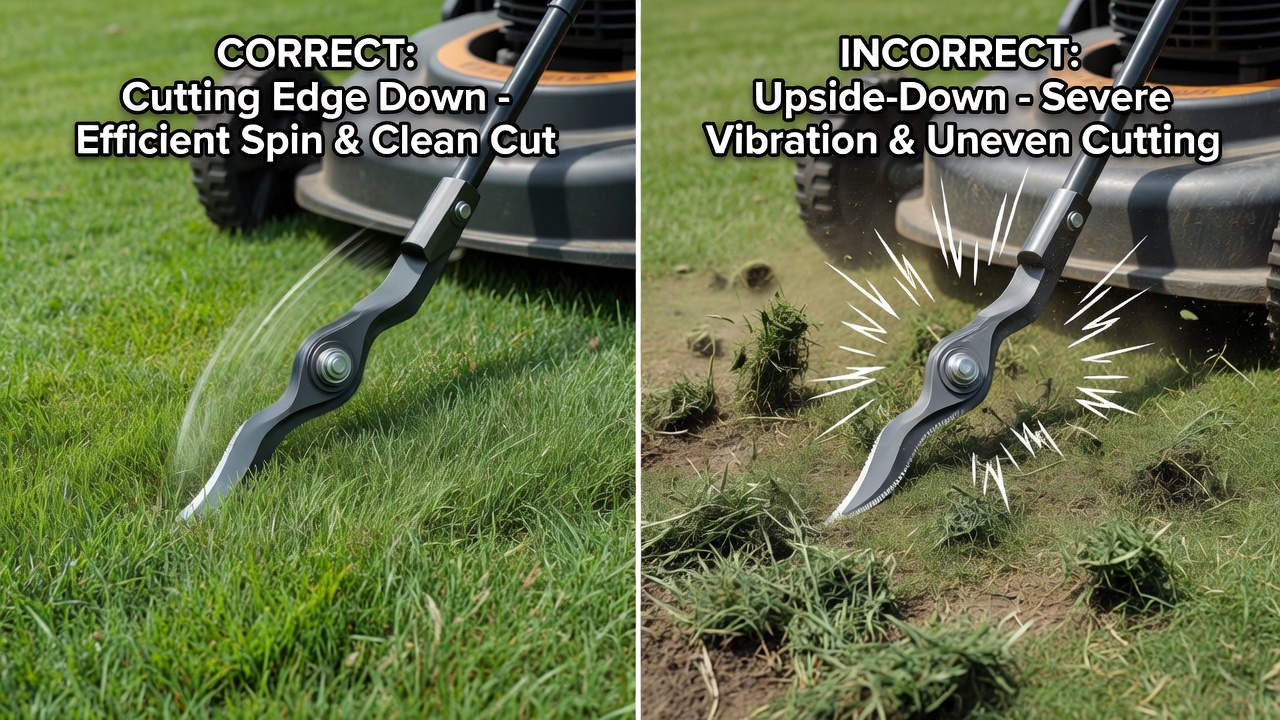
Installing blades incorrectly creates several problems. If a blade is installed upside-down (cutting edge facing up), the mower will not cut grass effectively and may damage the blade or deck. Improper orientation can also cause vibration, uneven cutting, premature wear, and strain on the engine. The blade’s design, including its angle, weight distribution, and cutting edge geometry, is engineered to work in one specific direction. Reversing this direction compromises the entire cutting mechanism.
Key Safety Considerations Before Installation
Never work on your mower while the engine is running or warm. Safety must come first:
- Disconnect spark plug wires: Remove both spark plug wires (or unplug the spark plug connectors) to prevent accidental engine ignition while your hands are near the blades.
- Allow the engine to cool: If the mower has been running, wait at least 10 to 15 minutes before touching the blade area.
- Use wheel chocks or blocks: On riding mowers, block the wheels with wood or chocks to prevent the mower from rolling.
- Wear heavy gloves and eye protection: Blades are extremely sharp and can cause serious cuts. Wear cut-resistant gloves and safety glasses.
- Use proper support: On riding mowers, use jack stands or a mower lift to safely access the blade area. Never rely on a simple hydraulic jack alone.
- Read your manual first: Manufacturer instructions provide model-specific safety protocols and torque specifications you must follow.
Step-by-Step Blade Installation Process
Step 1: Prepare Your Workspace
Gather all necessary tools before starting: wrench or socket set (size depends on your blade bolt), torque wrench, heavy gloves, eye protection, and your mower’s manual. Work on a clean, flat surface where you can safely access the blade area. On push mowers, tip the mower on its side (with the carburetor side facing up to prevent oil leakage). On riding mowers, use a lift or jack stands.
Step 2: Remove the Old Blade
Locate the blade bolt (usually a large center bolt or fastener). Use a wrench to hold the blade steady while you loosen the bolt counterclockwise. Most mower blade bolts are reverse-threaded on one side (left-hand thread), so check your manual. Mark the blade’s current position with a marker or tape so you remember its orientation. Remove the blade and inspect it for cracks, chips, or severe dullness. If the blade is badly damaged, it should be replaced rather than sharpened.
Step 3: Position the New or Cleaned Blade
Align the blade’s marked side facing upward toward the mower deck. The cutting edge should point downward and forward (in the direction the mower travels). The blade’s center hole must align with the spindle or hub. Double-check the orientation against your manual or the blade packaging before installing the bolt. To compare alternative configurations, check our hands-on review of z890 vs x870e motherboard.
Step 4: Install and Torque the Bolt
Hand-tighten the blade bolt first to ensure proper alignment. Then use a torque wrench to tighten to your mower’s specified torque value. Under-torquing allows the blade to vibrate and loosen during operation, which is dangerous. Over-torquing can strip the threads or crack the bolt. Most push mower blades require 35 to 45 ft-lbs, while riding mower blades typically need 50 to 90 ft-lbs. Check your manual for the exact specification.
Step 5: Verify Blade Rotation
Gently rotate the blade by hand to ensure it spins freely without hitting the deck or any obstruction. The blade should complete full rotations smoothly. If the blade catches or binds, remove it and check for misalignment or deck damage. Users looking for related component recommendations can explore our marshall stanmore iii vs harman kardon onyx studio 8 breakdown.
Common Blade Installation Mistakes
Installing the Blade Upside-Down
This is the most frequent error. An upside-down blade will not cut effectively and may cause the mower to vibrate excessively. The blade’s curved or angled cutting edge is designed to work in one direction only. If you notice poor cutting performance immediately after blade installation, check the blade orientation first.
Over-Torquing or Under-Torquing
Over-torquing: Applying too much force when tightening the bolt can strip threads on the spindle or crack the blade bolt, making future removal difficult and risking sudden blade failure during operation. Before finalizing equipment decisions, refer to our comprehensive dyson v8 cyclone vs bissell featherweight stick comparison.
Under-torquing: Loose bolts allow the blade to vibrate, which causes uneven cutting, excessive wear on the spindle bearings, and potential blade ejection during mowing.
Always use a torque wrench and follow your mower’s specification exactly.
Uneven Blade Height
On dual-blade or multi-blade mowers, both blades must be at the same height and angle. If one blade is higher or lower than the other, the mower will cut unevenly and strain the engine. Measure blade height from the ground to the blade’s tip on both sides before mowing. Height should be identical and match your desired cutting length. For broader ecosystem context, read through our operational guide on bissell crosswave hydrosteam vs shark stainforce.
Failing to Disconnect Spark Plugs
Accidentally starting the engine while your hands are near the blades can cause severe injury or death. Always disconnect spark plug wires before any blade work, and never assume the ignition is off.
Not Checking for Deck Damage
Before installing a new blade, inspect the mower deck for cracks, rust, or warping. A damaged deck can cause the blade to sit unevenly or strike the deck during rotation. Address deck issues before installing the blade.
Blade Type Variations by Mower
Push Mower Blades
Most push mowers use a single horizontal blade mounted perpendicular to the engine shaft. The blade runs at high speed (typically 3,000+ RPM) to cut grass efficiently. Installation is straightforward: tip the mower on its side (carburetor up), remove the center bolt, install the blade with the cutting edge down, and torque to specification (usually 35 to 45 ft-lbs).
Riding Mower Blades
Riding mowers typically have two or more blades mounted underneath the deck, each on a separate spindle. These blades operate at lower RPMs (usually 2,000 to 3,000) than push mower blades. Each blade is installed independently, so verify that all blades are oriented correctly and at the same height. Riding mower blade bolts often require higher torque (50 to 90 ft-lbs) due to the larger spindle size.
Zero-Turn Mower Blades
Zero-turn mowers have multiple spindles and blades arranged in a deck pattern. These are installed similarly to riding mower blades, but the mower’s maneuverability requires precise blade alignment and height matching. Follow the manufacturer’s blade height specification exactly, as zero-turn decks are sensitive to uneven blade heights.
Mulching vs. Standard Blades
Mulching blades have a curved or spiral design to chop grass finely and distribute it evenly. Standard or 2-in-1 blades have a simpler flat or slightly curved design. Both types are installed the same way (cutting edge down), but they are not interchangeable. Use the blade type specified in your mower’s manual.
Post-Installation Verification and Testing
Visual Inspection
After installation, visually confirm that the blade cutting edge faces downward and the marked side faces upward. Check that the bolt is fully tightened and there are no gaps between the blade and its mounting hardware.
Rotation Test
With the spark plugs still disconnected, manually rotate the blade. It should spin smoothly and complete full rotations without catching, clicking, or grinding sounds. Any resistance or noise indicates misalignment or damage.
Reconnect Spark Plugs and Test Run
After confirming blade rotation, reconnect the spark plug wires. Start the mower in an open area (not on grass yet) and listen for unusual vibration, noise, or wobbling. The mower should run smoothly. If you hear vibration or rattling, stop the engine immediately, disconnect the spark plugs again, and recheck blade installation and torque.
First Mow Test
Mow a small test area at your normal cutting height. Observe whether the grass is cut cleanly and evenly across the deck width. Uneven or ragged cutting suggests blade misalignment, incorrect height, or dullness. Multiple passes over the same area should not be necessary if blades are sharp and properly installed.
Buyer FAQs: Which Way Do Mower Blades Go On Solved
Q: How do I know which side of the blade faces down?
A: The blade’s cutting edge (the sharp, beveled side) faces downward toward the grass. The marked or stamped side (showing the manufacturer name, model, or arrow) faces upward toward the mower deck. If you are unsure, consult your mower’s manual or the blade packaging, which always shows correct orientation.
Q: What happens if I install the blade backwards?
A: A backwards blade will not cut grass effectively and may cause severe vibration, excessive noise, and damage to the mower. The blade’s cutting edge is designed to work in one direction. Operating a backwards blade can damage the spindle bearings and engine mounts. Always verify orientation before starting the mower.
Q: How often should I remove and check my mower blades?
A: Inspect blades at the beginning of each mowing season and after every 25 to 50 hours of use. Check for dullness, chips, or damage. Sharpen or replace blades as needed. Many owners sharpen blades 2 to 4 times per season depending on mowing frequency and terrain. Dull blades tear grass rather than cut cleanly, damaging the lawn and stressing the engine.
Q: What if my mower vibrates after I install new blades?
A: Excessive vibration usually indicates blade misalignment, uneven blade height (on dual-blade mowers), or incorrect torque. Stop the engine, disconnect spark plugs, and verify that both blades (if your mower has two) are at the same height and that the cutting edges face downward. Check bolt torque and ensure the blade rotates freely. If vibration persists, the spindle or deck may be damaged and require professional repair.
When to Consult Your Mower Manual
Always refer to your mower’s original manual for:
- Exact torque specifications for blade bolts
- Model-specific blade types and part numbers
- Safety procedures and precautions
- Blade height adjustment and alignment procedures
- Maintenance schedules and intervals
- Troubleshooting guides for vibration or cutting problems
If you cannot locate your manual, contact the manufacturer or search their website using your mower’s model number. Never skip the manual’s safety and installation instructions.
Mower Blade Orientation Basics
Blades must face the correct direction so the cutting edge leads the rotation and the lift side points the right way. Check the owner manual diagram, and wear gloves whenever you handle the sharp edge.
Background reading on general equipment safety can be found at American National Standards Institute (ANSI).









