

How to Install a Lawn Mower Battery: Quick Answer
To install a lawn mower battery, first consult your mower’s manual to identify the correct battery type and voltage. Disconnect the negative (black) terminal from the old battery first, then remove it from the battery tray. Position your new battery securely in the tray, connect the positive (red) terminal first, then the negative terminal, tightening all connections firmly. Finally, start the mower to verify the battery is working correctly.
Understanding Your Lawn Mower Battery
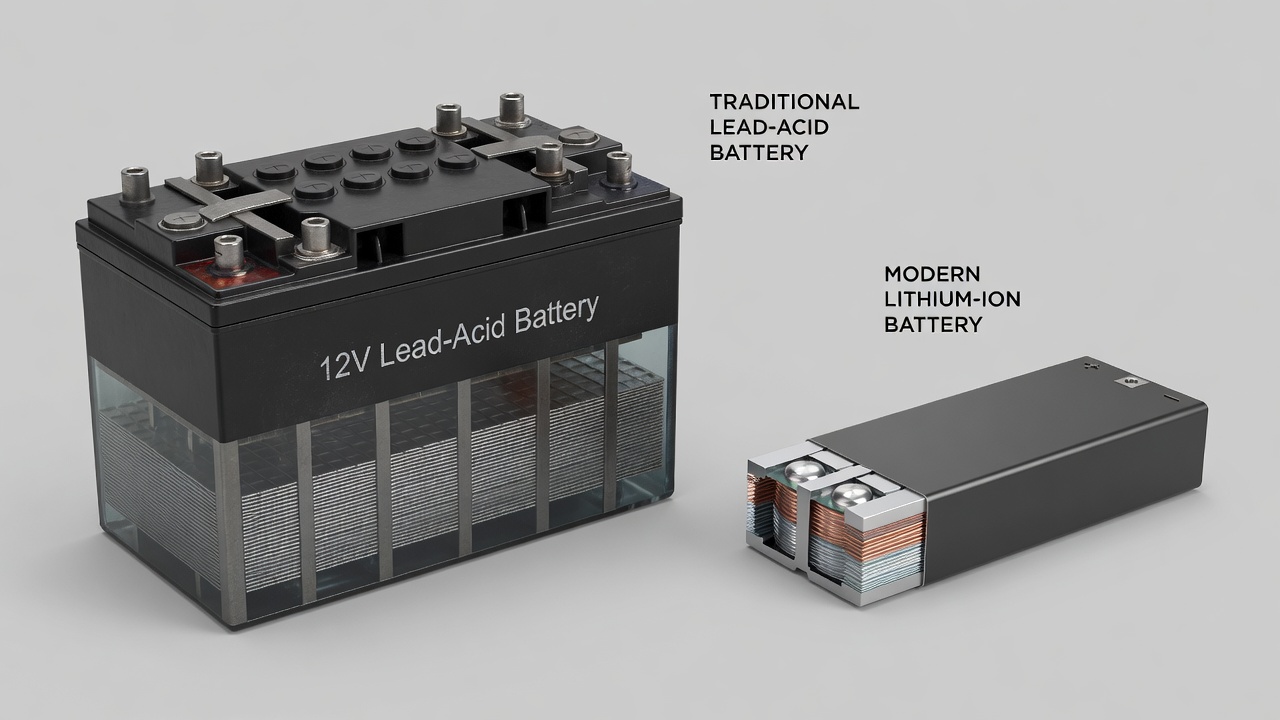
Before you install a new battery, you need to identify what type of battery your lawn mower requires. Most lawn mowers use one of two battery types: lead-acid batteries or lithium-ion batteries.
Lead-acid batteries are the traditional choice for most walk-behind and riding lawn mowers. These typically come in 12-volt configurations and require periodic maintenance. They’re generally less expensive than lithium alternatives but heavier and slower to charge.
Lithium-ion batteries are increasingly common in newer mower models, especially cordless electric mowers. These are lighter, charge faster, and hold their charge longer, but they cost more upfront. Some lithium batteries have built-in battery management systems that protect against overcharging. Users looking for related component recommendations can explore our jbl partybox club 120 vs sony srs xv500 breakdown. For complementary hardware performance, examine our breakdown on our comprehensive riding lawn mower guide.
To find the correct battery for your mower, check:
- Your mower’s owner’s manual (usually lists battery type, voltage, and amp-hour rating)
- The battery compartment label or documentation inside the mower
- Your mower’s model and serial number, which you can use to search the manufacturer’s website
The voltage and amp-hour (Ah) rating are critical. A 12-volt, 20Ah battery is common for riding mowers, while push mowers might use smaller 12-volt, 7-10Ah batteries. Using the wrong specifications can result in starting problems or equipment damage.
Safety Precautions Before Installation
Battery installation involves electrical connections, so safety is essential. Follow these precautions:
- Turn off the mower and let it cool for at least 5 minutes before beginning work
- Remove the key or disconnect the spark plug wires to prevent accidental starting
- Wear safety glasses to protect your eyes from battery acid or debris
- Wear gloves if the battery appears corroded or if you’re handling a lead-acid battery
- Work in a well-ventilated area, especially with lead-acid batteries, which can emit hydrogen gas
- Gather your tools before starting: adjustable wrench or socket set (typically 8mm or 10mm), wire brush (for corrosion), and a rag or paper towels
Never attempt battery installation while the mower is running or while the engine is hot. Allow adequate cool-down time to prevent burns.
Removing the Old Battery (If Replacing)
If you’re replacing an existing battery, proper disconnection is critical to your safety and your mower’s electrical system.
Step 1: Disconnect the negative terminal first. This is the most important safety rule. The negative (black or marked with a minus sign) terminal should always be disconnected before the positive terminal. This prevents electrical arcing and reduces shock risk. Use your wrench to loosen the nut on the negative cable clamp and carefully pull the cable away from the terminal.
Step 2: Disconnect the positive terminal. After removing the negative cable, loosen the positive (red or marked with a plus sign) terminal using your wrench and remove the cable.
Step 3: Clean corrosion if present. If you notice white, blue, or green crusty buildup on the battery terminals or cable connectors, this is corrosion. Use a wire brush to gently scrub away corrosion from both the cable connectors and the battery terminal posts. This buildup can prevent proper electrical connection with your new battery. Wipe clean with a rag.
Step 4: Remove the old battery. Most lawn mower batteries sit in a plastic or metal battery tray held down with a bracket or strap. Loosen any bolts or clips holding the battery in place and carefully lift the old battery out. Lead-acid batteries can be heavy, so use both hands and lift from the sides, not the terminals. For troubleshooting and reliability insights, consult our in-depth dyson v8 cyclone vs bissell featherweight stick report.
Installing the New Battery: Step-by-Step
Step 1: Position the new battery in the tray. Place your new battery in the same orientation as the old one, with the terminals facing the correct direction for your cable connections. The battery should sit flat and stable in the tray. Do not force the battery, it should fit snugly without excessive pressure.
Step 2: Secure the battery bracket or strap. Once positioned, tighten the battery hold-down bracket or strap to keep the battery from moving during mower operation. A loose battery can vibrate and damage cable connections, causing electrical faults. Tighten securely but do not overtighten, which could crack the battery case. Readers comparing setup options can review our technical analysis on bissell crosswave hydrosteam vs shark stainforce.
Step 3: Connect the positive terminal first. This order is opposite to disconnection and is equally important. Attach the positive (red) cable to the positive terminal first. Slide the cable connector onto the terminal post and tighten the nut with your wrench. The connection should be tight enough that the cable doesn’t move when gently tugged, typically a quarter-turn past hand-tight with a wrench.
Step 4: Connect the negative terminal second. Attach the negative (black) cable to the negative terminal and tighten it the same way. Again, ensure a firm connection.
Step 5: Route cables properly. Make sure the battery cables are routed away from sharp edges, moving parts, and hot engine surfaces. Most mowers have designated cable channels or clips to guide wires safely. Loose or rubbing cables can damage insulation and create electrical hazards.
Verifying Installation and Testing
Before considering the job complete, verify that your battery is installed correctly and functioning:
Visual inspection: Look at both terminal connections to confirm they’re tight and making full contact with the terminal posts. There should be no exposed metal gaps between the connector and the terminal. Check that the battery sits securely in its tray with no movement.
Connection test: Gently attempt to wiggle each battery cable. It should not move. If either cable shifts, tighten the nut further with your wrench.
Start the mower: Insert the key and attempt to start the mower normally. Listen for a strong cranking sound. The starter should turn over quickly and the engine should fire up. A weak or slow crank suggests a poor connection or incompatible battery.
Run briefly: Let the mower run for 30-60 seconds to ensure stable operation. The engine should idle smoothly without stalling. If the mower stalls or runs roughly, turn it off and check your connections.
If the mower starts and runs normally, your battery installation is complete.
Troubleshooting Common Installation Issues
Mower won’t start after battery installation: First, verify that both battery cables are connected tightly. Recheck the positive and negative connections by attempting to move each cable, both should be immobile. If connections are tight, verify you installed the correct battery type and voltage for your mower model. Try connecting a battery charger to the battery for 1-2 hours to ensure it’s fully charged before testing again.
Slow or weak cranking: This usually indicates a poor connection. Remove both cables and inspect the terminal posts for corrosion. Clean with a wire brush if necessary. Reattach the cables, ensuring each connection is very tight. Loose connections create resistance that reduces electrical flow to the starter motor.
Battery appears backwards or doesn’t fit properly: Never force a battery into the tray. If it doesn’t fit easily, remove it and verify you have the correct battery model for your mower. Some mowers have specific battery compartment designs. Check your manual to confirm orientation and fit.
Visible corrosion on cables or terminals: Lead-acid batteries and older cable connectors sometimes develop corrosion. Before connecting the new battery, clean all corroded connectors with a wire brush and vinegar or a commercial battery terminal cleaner. Dry thoroughly before making connections.
Clicking noise when attempting to start: This often indicates a weak battery or loose connections. Tighten both battery cable connections firmly. If clicking persists, the battery may be defective or incompletely charged. Lithium batteries with built-in management systems may click if charging systems don’t communicate properly, consult your manual.
Maintenance After Installation
After successfully installing your battery, perform these maintenance checks periodically:
- Monthly: Inspect both battery cable connections for corrosion or looseness. Tighten any loose connections.
- Every season: Visually inspect the battery for cracks, swelling, or damage. Look for corrosion buildup on terminals.
- Before winter storage: Fully charge the battery before storing your mower. For lead-acid batteries, consider a battery maintainer or trickle charger during long storage periods.
- When not in use: Lithium batteries may discharge slowly over time. Check charge level before the next use and charge if necessary.
When to Replace Your Battery
Most lawn mower batteries last 3-5 years with proper maintenance. Signs your battery may need replacement include:
- Weak or slow cranking even with a fully charged battery
- Battery won’t hold a charge for more than a few minutes
- Visible cracks, swelling, or leaking from the battery case
- Mower starts inconsistently or stalls frequently during operation
- Age, if your battery is over 5 years old, replacement is often more reliable than repeated troubleshooting
When the time comes to replace your battery, follow the installation steps outlined above, always remembering to disconnect the negative terminal first and connect it last.
Common Questions on How To Install A Lawn Mower Battery Answered
Why do I need to disconnect the negative terminal first?
Disconnecting the negative terminal first prevents electrical arcing and reduces the risk of shock or burns. If you disconnect the positive terminal first, any metal tool or accidental contact could create a direct circuit to ground through the negative cable, potentially causing a dangerous spark. The negative terminal is your safety priority.
Can I use a different voltage battery than my mower requires?
No. Using a battery with incorrect voltage can damage your mower’s charging system, starter motor, and electrical components. A higher voltage battery can overheat wiring and cause fires. A lower voltage battery will result in weak cranking or failure to start. Always use the exact voltage specified in your mower’s manual, typically 12 volts for most models.
What should I do with my old battery?
Lead-acid batteries contain hazardous materials and should never be thrown in the trash. Take your old battery to a local recycling center, auto parts store, or battery retailer. Many retailers offer core credits or discounts on new batteries when you return the old one. Lithium batteries should also be recycled through proper e-waste channels.
How do I know if my battery connections are tight enough?
A properly tightened battery connection should not move when you gently pull on the cable. Use your wrench to tighten each terminal nut until the cable is immobile, then tighten a final quarter-turn. Overtightening can crack the battery case, so stop if you feel significant resistance. The goal is firm, stable contact without excessive force.
Related Maintenance and Operating Guides
To keep your equipment running at peak operating efficiency, explore our related technical walkthroughs and maintenance tutorials:
- Consult our detailed breakdown on heavy-duty chainsaw buyer guide.
Installing a Mower Battery
A new battery should match the voltage and terminal layout that the mower expects. Tighten the clamps firmly, and route the cables so they cannot catch on moving parts.
Broad safety background for garden machines with electrical systems can be found through American National Standards Institute (ANSI).









