

Mechanical safety standards, operational tolerances, and protective gear guidelines align with benchmark specifications established by the American National Standards Institute (ANSI).

Pros
- Six-pack bundle listed in the product title
- Square profile line named in the product title
- Commercial 5 lb size listed for heavier use
Cons
- Trimmer compatibility is not verified in manufacturer listing

Pros
- Six-pack bundle listed in the product title
- Star profile line named in the product title
- Commercial 5 lb size listed for heavier use
Cons
- Line length and trimmer fit are not stated in manufacturer listing

Pros
- Title lists 1280 feet of line length
- Square profile named in the product title
- Lists a 5 lb line rating
- Title describes it as commercial-style line

Pros
- Title lists .095-inch square nylon line
- Lists 1280 feet of line length
- Manufacturer states fit with most string trimmers
- Lists a 5 lb line rating
Understanding Your String Trimmer Head Type
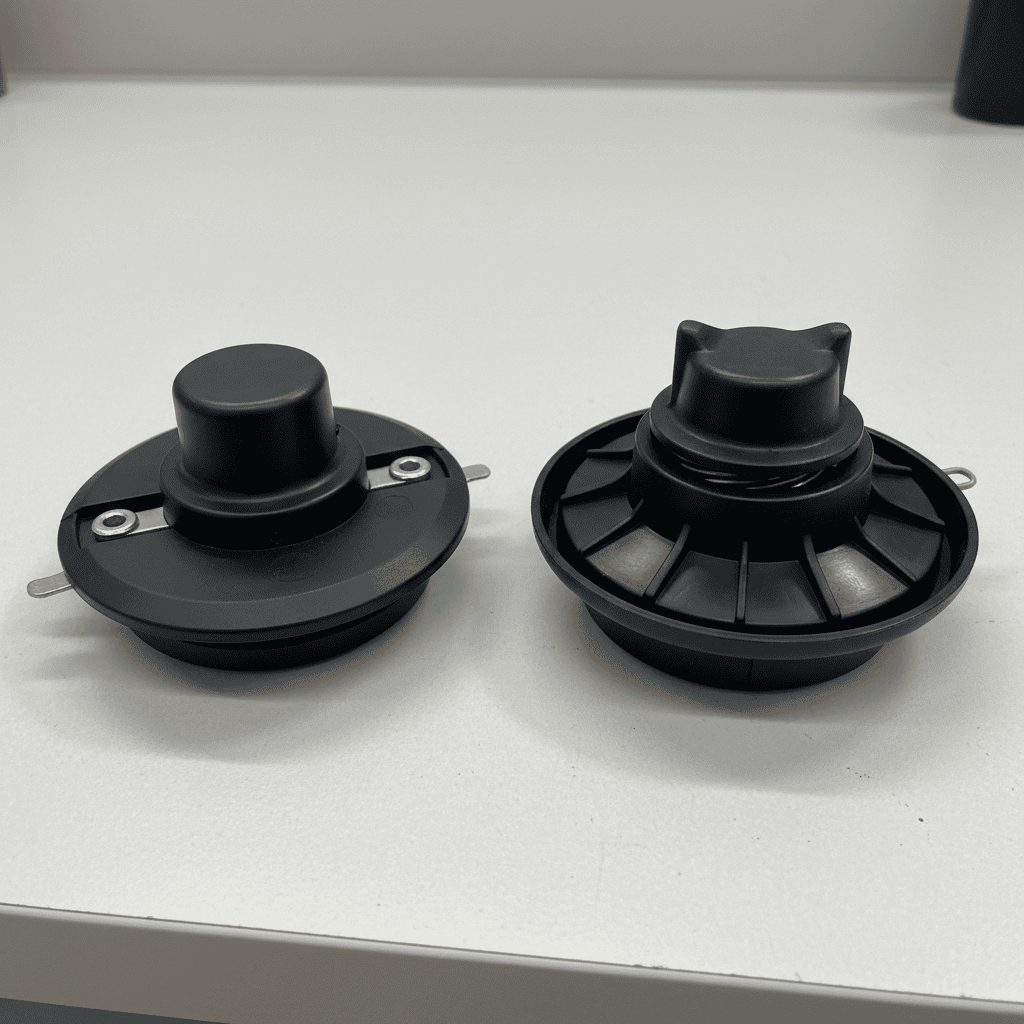
Before you start stringing your trimmer, identify which type of head your model uses. This determines your loading method and affects how the line feeds during use.
Fixed-Spool Heads (Most Common)
Fixed-spool heads are the most common design found on residential trimmers. The spool sits permanently in the trimmer head and doesn’t rotate or move. You manually wind line onto the spool and thread it through fixed eyelets. This design requires you to manually replace the line when it wears down or breaks. It’s straightforward but requires regular maintenance.
Bump-Feed Heads
Bump-feed heads automatically advance line as you work. You wind line onto a spool, but the head has a bump mechanism on the bottom. When you tap the trimmer head against the ground, it automatically feeds out a small amount of fresh line. This reduces downtime during use but requires slightly different winding technique.
How to Identify Your Head Type
- Look at the trimmer head bottom: Fixed heads have a flat or threaded base. Bump-feed heads have a distinctive bump or button on the underside.
- Check your manual: Your trimmer’s documentation will specify the head type and compatible line sizes.
- Examine the spool design: Fixed spools have two eyelets or slots visible on the spool cover. Bump-feed spools typically have a single line exit or different slot configuration.
Choosing the Right Trimmer Line
Using the wrong line diameter can damage your trimmer’s motor, reduce cutting efficiency, or cause premature line breakage. The correct size is critical.
Common Line Diameters
| Line Diameter | Best For | Common Trimmer Type |
|---|---|---|
| 0.065″ (1.6 mm) | Light residential use, thin grass | Smaller electric or cordless models |
| 0.080″ (2.0 mm) | General residential use | Most common gas and electric trimmers |
| 0.095″ (2.4 mm) | Heavy brush, thicker weeds | Larger gas-powered models |
| 0.105″ and larger | Commercial-grade cutting | Professional or commercial trimmers |
Finding Your Trimmer’s Specifications
- Check the trimmer head: Most heads have the correct line diameter stamped or printed on the plastic cover (e.g., “.080”).
- Review your owner’s manual: The manual always specifies compatible line sizes and lengths.
- Look online: Search your trimmer’s model number plus “line size” or “specifications.”
- Ask at the dealer: If you purchased from a local shop, they can confirm the correct size immediately.
Warning: Never exceed the maximum recommended diameter. Using oversized line strains the motor and creates safety hazards.
Step-by-Step: Stringing a Fixed-Spool Head
This is the most common trimmer head type. Follow these steps carefully to ensure proper line installation and tension. To evaluate matched hardware tolerances, consult our detailed overview of z890 vs x870e motherboard.
What You’ll Need
- Replacement trimmer line (correct diameter for your model)
- Phillips or flathead screwdriver (depending on your trimmer head)
- Scissors or line cutter
- Needle-nose pliers (optional, helpful for threading)
- Work gloves (optional, for grip and protection)
Removal Steps
- Unplug or turn off your trimmer: Disconnect the power source entirely. Never work on a powered tool.
- Let the motor cool: If you’ve been using the trimmer, wait 5-10 minutes for the engine or motor to cool.
- Locate the spool cover screws: Most fixed heads have two or three screws holding the cover plate. These are usually Phillips head but occasionally flathead.
- Remove the cover: Unscrew and set aside the cover plate. The spool should be loose or slightly spring-loaded.
- Remove the spool: Gently pull the spool out of the trimmer head. Some spools have a small center pin or shaft—note how it sits for reinstallation.
- Clean out old line debris: Use a brush or compressed air to remove old line pieces, grass, or dirt from inside the head housing.
Winding the Line
- Check the spool for directional arrows: Most spools have small arrows printed or molded into the plastic indicating the correct winding direction (usually counterclockwise when looking at the spool face).
- Find the line anchor or slot: There’s typically a small notch, hook, or slot where you’ll start the new line. Some spools have a small raised pin—anchor the line there.
- Insert the line: Take your new trimmer line and insert about 1-2 inches into the starting point. Hold it firmly.
- Wind the line: Slowly and evenly wind the line onto the spool following the directional arrows. Keep tension on the line as you wind—it should lay flat and not overlap itself. Wind until you have about 4-6 inches of line remaining.
- Verify wind direction: If the line bunches, overlaps, or feels wrong, you’re likely winding the wrong direction. Unwind completely and restart in the opposite direction.
- Cut the line to length: Leave 4-6 inches of line free on each side of the spool. This is important—too little line won’t reach the eyelets; too much creates tangles and feeding problems.
Loading the Line Into the Head
- Position the spool: Insert the spool back into the trimmer head, ensuring the center pin aligns properly with the shaft.
- Locate the eyelets or line slots: Look for two small holes or slots in the trimmer head cover where the line exits. These are usually on opposite sides of the head.
- Thread the first line end: Take one of the free 4-6 inch line segments and thread it through the first eyelet or slot. It should slide through smoothly.
- Thread the second line end: Thread the other free segment through the opposite eyelet or slot.
- Ensure line is seated: Both line segments should sit fully in their respective slots and not be pinched or twisted.
- Replace the cover: Align the spool cover and insert the screws. Tighten firmly but don’t over-torque—plastic can crack.
Tensioning the Line
- Rotate the head by hand: Gently turn the trimmer head (or spool inside) clockwise until you feel resistance. This takes up slack in the line.
- Test the tension: Grab one of the line segments and tug it lightly. It should move slightly—about 1/8 inch—when you pull. It should not be rigid or completely immobile.
- Adjust if needed: If the line is too loose, turn the head slightly more clockwise. If it’s too tight, slightly loosen it. Proper tension is critical: too tight causes premature breakage; too loose reduces cutting efficiency.
- Trim excess line: Once tension is correct, use scissors or a line trimmer to cut the protruding line segments down to about 1-2 inches extending from the eyelets. Some users prefer to cut them even shorter (just past the eyelet edge).
Step-by-Step: Stringing a Bump-Feed Head
Bump-feed heads work similarly to fixed heads but have a unique feeding mechanism. The process is nearly identical, with one key difference: the spool design and how the line feeds out.
Key Differences in Bump-Feed Design
- Single line storage: Instead of two separate line segments, bump-feed spools often wind a single continuous line with a small tab or knot at the center.
- Automatic advance: When you tap the head on the ground, a spring-loaded mechanism advances the line automatically.
- Different exit slot: The line typically exits from a single slot or pair of closely spaced slots rather than two opposite eyelets.
Winding for Bump-Feed Heads
- Follow directional arrows on the spool: Just like fixed heads, wind in the direction indicated. Most bump-feed spools wind counterclockwise.
- Create a center knot (if required): Some bump-feed designs require you to create a small knot in the middle of the line before winding. Check your manual for this step.
- Wind the line evenly: Wind approximately half the line onto one side of the spool, then wind the other half on the other side. This ensures balanced feeding.
- Leave the center segment free: Unlike fixed heads, bump-feed heads typically have 12-18 inches of line left free in the middle. This is intentional—it feeds out as you use the trimmer.
Loading Into the Bump-Feed Head
- Install the spool: Insert the loaded spool into the trimmer head, ensuring the center line segment feeds through the exit slot or slots.
- Route the center line: The free center line segment should extend through both exit slots (or a single slot, depending on design) with roughly equal lengths on each side.
- Tension and secure: Some bump-feed heads require you to manually tension the line slightly before closing the cover. Check your manual.
- Close the cover: Reinstall the spool cover and tighten all screws evenly.
- Test the bump mechanism: Gently tap the trimmer head on the ground. You should hear a small click and feel the line advance slightly. This confirms the bump mechanism is working.
Troubleshooting Common Stringing Mistakes
Line Keeps Breaking After Stringing
Causes: Over-tensioning is the most common culprit. Tension that’s too tight stresses the line fibers and causes premature failure. Wound line that overlaps itself creates weak spots where the line can snap. When planning workspace deployment, consider the engineering criteria outlined in our marshall stanmore iii vs harman kardon onyx studio 8 guide.
Solutions: Re-tension the line to ensure it moves slightly when tugged. Rewind the line if it overlaps or bunches during winding. Verify you’re using the correct line diameter—oversized line breaks more easily under the strain of an undersized motor.
Line Won’t Feed or Advances Inconsistently
Causes: Tangles inside the head, improper threading through eyelets, or a misaligned spool prevent smooth line feeding. Bump-feed heads may have a stuck bump mechanism. For additional operational safety benchmarks, see our published testing notes on dyson v8 cyclone vs bissell featherweight stick.
Solutions: Remove the spool and clear any tangled line inside the head housing. Ensure both line segments are fully threaded through their respective eyelets without twists. For bump-feed heads, inspect the bump button on the underside—it should move freely. Clean any grass or debris blocking the mechanism.
Line Wound in Wrong Direction
Causes: The directional arrows on the spool weren’t followed, or arrows were difficult to see and misinterpreted. To compare alternative configurations, check our hands-on review of bissell crosswave hydrosteam vs shark stainforce.
Solutions: Completely unwind the line and rewind in the opposite direction. If you’re unsure about arrow direction, try one direction first; if the line tangles or feels wrong, immediately switch directions. This is a low-cost fix.
Trimmer Head Spins Unevenly or Vibrates
Causes: Uneven line length on each side or improperly balanced spool causes vibration. Misaligned spool center causes wobbling.
Solutions: Cut both line segments to equal length extending from the eyelets. Reinstall the spool, ensuring the center pin fully seats in the shaft. Check that the spool cover is tightened evenly on all screws.
Can’t Remove or Reinstall the Spool
Causes: Stripped threads, misaligned center pin, or debris preventing full insertion or removal.
Solutions: Clean the spool shaft and center pin thoroughly. Gently rock the spool side-to-side while pulling to remove it—don’t force it. When reinstalling, align the center pin carefully before pushing the spool in fully. If the pin is bent or broken, the spool will need replacement.
Maintenance Tips to Extend Trimmer Life
How Often to Replace the Line
- Light residential use (1-2 hours weekly): Replace line every 2-3 months or as needed when it breaks or wears.
- Regular maintenance (4-6 hours weekly): Replace line monthly or every 4-8 weeks.
- Heavy use or commercial work: Check line condition weekly and replace as needed—sometimes multiple times per week.
- Visual inspection: If line appears frayed, split, or significantly shortened, replace it even if it hasn’t broken.
Storing Your Trimmer Safely
- Run the fuel tank dry (gas models): Before storing for more than a month, run the trimmer until it stalls to empty the fuel system. This prevents carburetor gum-up.
- Store in a dry location: Moisture causes rust and corrodes electrical components on cordless models.
- Charge batteries fully (cordless models): Store with batteries at 50% charge for long-term storage to preserve battery health.
- Check line before seasonal use: Inspect line condition before your first use of the season. Old line may be brittle and prone to breaking.
General Maintenance for Optimal Performance
- Clean the trimmer head of grass clippings and debris after each use to prevent tangling.
- Inspect the spool and cover for cracks or damage that could affect line feeding.
- Keep the fuel or battery charged to appropriate levels for consistent cutting power.
- Sharpen or replace dull cutting edges on fixed trimmer heads (some models allow blade replacement).
- Check trimmer head screws periodically—vibration can cause them to loosen over time.
Frequently Asked Questions About How To String A String Trimmer
What If My Trimmer Has an Auto-Feed or Automatic-Advance Head?
Auto-feed heads are similar to bump-feed but advance line more frequently, often automatically during operation without tapping. The stringing process is identical to bump-feed heads. The key difference is the feeding frequency—not how you string the line. Follow your manual for your specific model’s stringing instructions, as some auto-feed designs have unique spool configurations.
Can I Use Any Trimmer Line, or Does It Have to Be the Exact Diameter?
Always use the exact diameter specified for your trimmer. Using line that’s too thick can damage the motor; using line that’s too thin won’t cut efficiently and may break frequently. The motor is engineered for a specific line diameter. Verify the correct size before purchasing replacement line.
How Do I Know If My Line Is Properly Tensioned?
Properly tensioned line should move slightly—about 1/8 inch—when you gently tug on it with your finger. It should not be rigid or completely immobile. If it doesn’t move at all, it’s over-tensioned and will break prematurely. If it moves more than 1/4 inch, it’s under-tensioned and won’t cut efficiently. Adjust by rotating the head slightly in the appropriate direction.
Is It Normal for the Line to Break Frequently?
Occasional line breakage is normal, especially if you’re trimming thick weeds or hitting obstacles. However, frequent breaking—multiple times per session—indicates over-tensioning, incorrect line diameter, or debris inside the trimmer head. Check tension first, verify the correct line size, and clean the head interior. If breakage persists, the spool or motor may be damaged.









