

Direct Answer: How to Sharpen a Mower Blade with an Angle Grinder
To sharpen a mower blade with angle grinder, first disconnect the spark plug and remove the blade, then secure it in a bench vise. Using a flap disc or grinding disc, work along the factory bevel edge in one direction at a steady angle to match the original cutting edge, avoiding overheating (dip in water if the metal turns blue). After sharpening both ends evenly, check blade balance by hanging it on a nail or balancer, if one side dips, grind slightly more off the heavy side. Reinstall the blade with cutting edges facing the correct direction, torque the bolt to specification, and reconnect the spark plug.

Pros
- 25-pack of 4-1/2 inch Type 27 depressed center discs
- 46-grit aluminum oxide abrasive per the listing
- Listing states each disc is MPA-certified
- Discs are individually wrapped for delivery per the listing
Cons
- Removal and durability claims are manufacturer-stated, not tested
- Durability praise rests on a single anecdotal customer comment

Pros
- Ten pieces per pack
- Aluminum oxide grain listed for aggressive grinding
- 7/8-inch arbor listed for secure installation
- Listed for steel, stainless, aluminum, and copper
Cons
- Grit and wheel type are not specified in the listing
- Performance claims are manufacturer-stated only
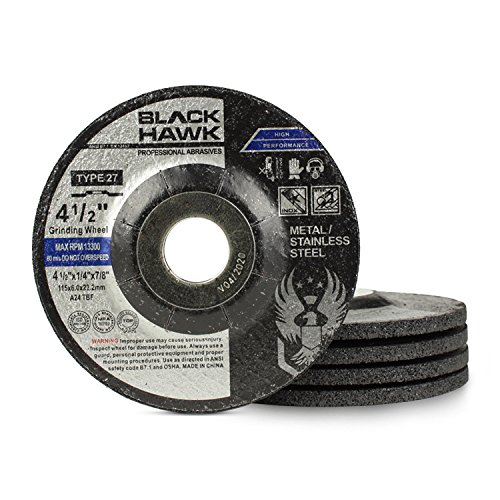
Pros
- Five-pack of Type 27 depressed center discs
- 24 grit aluminum oxide for fast material removal
- Fiberglass reinforcement stated for side-load strength
- Rated to 13,300 RPM with 7/8-inch arbor
Cons
- 24 grit is too coarse for fine finishing
- Balance and vibration claims are manufacturer-stated

Pros
- Four sharpening stones: two dual-layer, two single-layer
- Metal blade balancer included, per the listing
- Stated 1/4-inch shank for drill use
- Storage case listed to keep parts together
- Listed for shears, rototiller blades and sickles
Cons
- Drill compatibility and blade fit are manufacturer-stated only
- No customer reviews to verify sharpening performance
Why Sharpening Your Mower Blade Matters
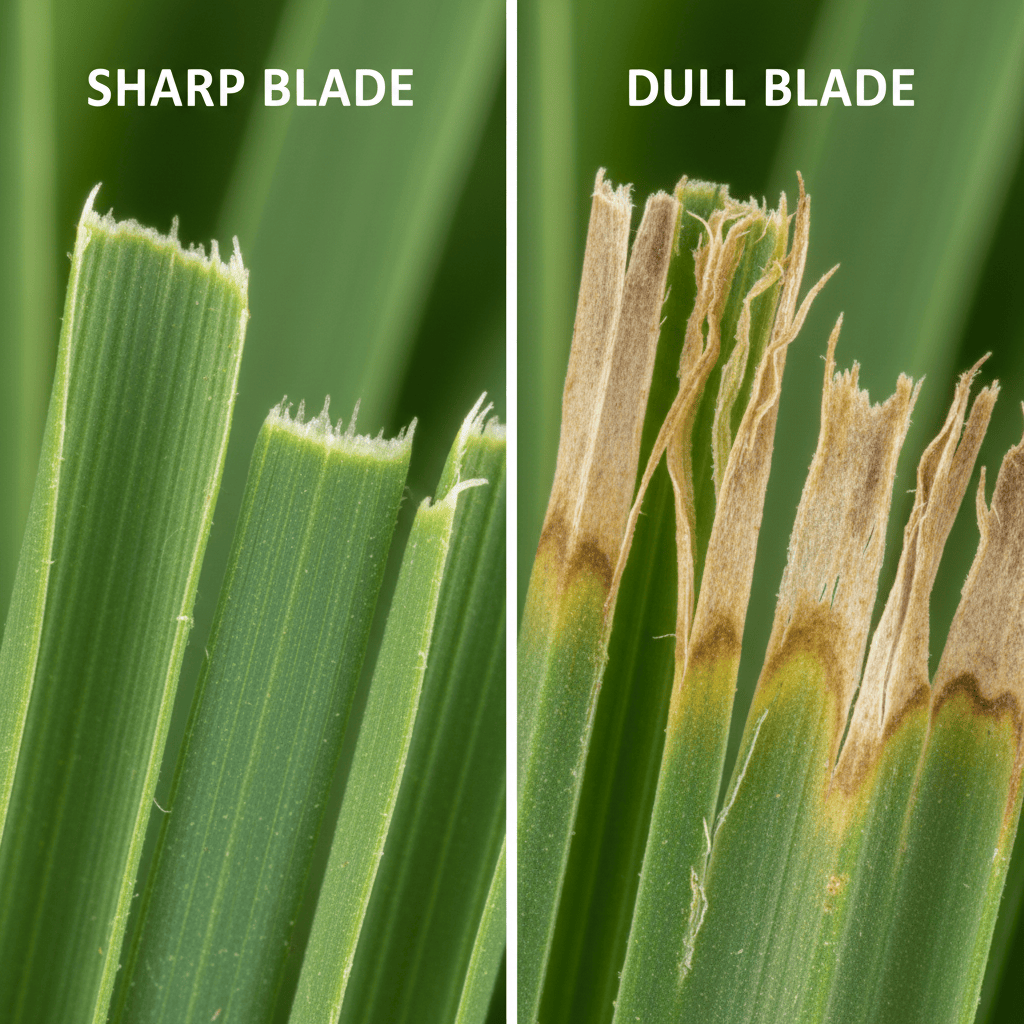
Adull mower blade tears grass rather than cutting it cleanly, leaving ragged edges that turn brown and invite disease and pest damage. Over time, adull blade also forces your mower engine to work harder, reducing fuel efficiency and increasing wear. Most lawn care experts recommend sharpening your blade every 20 to 25 hours of use or roughly every 4 to 6 weeks during active mowing season, depending on your lawn size and grass type.
Before you grab your angle grinder, inspect the blade carefully. If it has deep cracks, large bent sections, or significant pitting, replacement is safer and more cost-effective than attempting a rescue. Sharpening works best on blades with minor dullness or light nicks.
Essential Tools and Safety Gear
Angle grinder work involves high-speed rotation and flying sparks, so proper preparation is non-negotiable.
Safety Equipment:
- Safety glasses or a full face shield – Protects eyes from sparks and metal debris
- Work gloves – Leather or heavy-duty material to shield hands from heat and abrasion
- Hearing protection – Angle grinders produce 85 to 90 decibels; earplugs or earmuffs prevent hearing damage
- Dust mask or respirator – Metal particles and dust can irritate lungs
- Long sleves and closed-toe shoes – Minimize exposed skin
- Angle grinder – 4.5-inch size is standard for blade work
- Flap disc or grinding disc – Flap discs (60 to 80 grit) are gentler and easier to control than straight grinding wheels; they cut cooler and reduce the risk of overheating the blade
- Bench vise – Holds the blade securely and safely while you grind
- Socket set and wrenches – For blade removal and reinstallation
- Wire brush – Cleans debris and rust from the blade
- Blade balancer or hanging nail – Checks blade balance after sharpening
- Torque wrench – Ensures the blade bolt is tightened to manufacturer specification (typically 35 to 90 ft-lbs, varies by mower)
- Container of water – For cooling the blade if it begins to overheat
Understanding Blade Bevel Angle and Why It Matters
Mower blades are manufactured with a specific bevel angle, typically 30 to 45 degrees, ground into the cutting edge. This angle determines how the blade cuts and how long it stays sharp. Maintaining the factory bevel is critical: if you grind at too steep or shallow an angle, you reduce cutting efficiency and the blade duls faster.
To identify the existing bevel angle, look at the cutting edge of your blade before sharpening. The factory grind creates a visible facet. Your goal is to follow that same line and angle with your grinder, removing only the minimum metal necessary to restore sharpness. To compare alternative configurations, check our hands-on review of marshall stanmore iii vs harman kardon onyx studio 8.
Step-by-Step Sharpening Process
Step 1: Prepare Your Workspace and Disconnect Power
Start by removing the spark plug wire from your mower to prevent accidental starting, a critical safety measure. Clear your work area of clutter and ensure you have at least 3 feet of space on all sides of your vise and grinder. Position the vise at waist height to avoid awkward bending or reaching.
Step 2: Remove and Inspect the Blade
Consult your mower manual for the correct removal procedure. Most walk-behind mowers require you to tip the mower on its side, mark the blade orientation (often with spray paint or a marker) so you reinstall it the same way, and remove the center bolt with a socket wrench. Once removed, clean the blade with a wire brush to remove grass, dirt, and debris. Users looking for related component recommendations can explore our dyson v8 cyclone vs bissell featherweight stick breakdown.
Examine both cutting edges and the blade body carefully. Look for hairline cracks, bends, or large gouges. If damage is extensive, stop here, replacement is the safer choice. If the blade is simply dull with only minor nicks, proceed.
Step 3: Secure the Blade in the Vise
Clamp the blade horizontally in the bench vise, with one cutting edge facing up and accessible. Position it so the edge is visible and the vise jaws do not obscure the bevel angle. Leave enough room to move your grinder freely without hitting the vise. Tighten the vise firmly, a loose blade can slip and cause injury or a ruined edge. Before finalizing equipment decisions, refer to our comprehensive bissell crosswave hydrosteam vs shark stainforce comparison.
Step 4: Set Up Your Angle Grinder
Install a flap disc (60 to 80 grit) on your grinder according to the manufacturer’s instructions. Check the guard and ensure the disc spins freely without hitting the guard. Always wear all safety gear before starting the machine. Hold the grinder firmly with both hands and allow the disc to reach full speed before touching the blade.
Step 5: Grind the Cutting Edge
Position the angle grinder so the disc contacts the bevel at the same angle as the factory grind. Move the grinder smoothly along the cutting edge in one direction, typically from the blade center toward the tip. Use light to moderate pressure;do not force. Heavy pressure generates excessive heat, risks damaging the blade’s temper, and shortens disc life.
Work in short passes, checking your progress frequently. The blade should develop a bright, shiny facet along the entire cutting edge. Repeat on the same edge until you see a fine line of shine all the way across, indicating a sharp edge.
Critical: Avoid Overheating. If the blade metal turns blue or black, it is overheated. Stop immediately, let it cool, and dip the blade in water. Overheating weakens the steel, making the blade more prone to cracking and duling quickly. This is one of the most common mistakes.
Step 6: Sharpen the Opposite Edge
Rotate the blade or reposition it in the vise to access the other cutting edge. Repeat the grinding process, using the same technique and pressure. It is crucial that both edges are sharpened equally, uneven sharpening creates an unbalanced blade, which causes vibration and accelerates wear on mower bearings.
Step 7: Check Blade Balance
Balance is not optional. An unbalanced blade vibrates excessively, damaging the crankshaft and mower deck over time. After sharpening, hang the blade horizontally on a nail or place it on a blade balancer. If one side dips noticeably, that side is heavier. Grind a small amount more from the heavy side until the blade hangs level or the balancer shows equilibrium.
This step takes patience but is worth the time, poor balance shortens mower life significantly.
Step 8: Inspect and Finish
Examine the blade under good light. Both edges should have a uniform bright shine and no visible dull spots. If you spot a dull area, return it to the vise and make another pass. Once satisfied with sharpness and balance, wipe the blade clean with a dry cloth.
Step 9: Reinstall the Blade
Return the blade to the mower, aligning it with the mark you made before removal. Hand-tighten the center bolt first, then use a torque wrench to tighten to the manufacturer’s specification. Consult your mower manual for the exact torque value, which typically ranges from 35 to 90 foot-pounds depending on mower model. Over-tightening risks stripping threads; under-tightening can allow the blade to slip.
Reconnect the spark plug wire.
Key Techniques to Avoid Common Mistakes
Don’t grind the wrong surface: Only sharpen the cutting edge bevels. The blade’s top and bottom flat surfaces should not be ground. Grinding flat surfaces removes blade mass and balance.
Don’t create uneven edges: Spend equal time on both ends of the blade. Hold the grinder at the same angle and pressure throughout. Uneven sharpening creates vibration and poor cutting.
Don’t skip the balance check: Even professional sharpening services check balance. This step is as important as the grinding itself.
Don’t use a cracked or bent blade: Sharpening cannot restore a structurally damaged blade. Continued use risks blade failure during operation, which can throw blade fragments.
Don’t touch the disc with your hands: Always wait for the grinder to come to a complete stop before setting it down or adjusting anything. Friction burns from contact with a spinning disc are severe.
Frequently Asked Questions About How To Sharpen A Mower Blade With An Angle Grinder
How often should I sharpen my mower blade?
Most manufacturers recommend sharpening every 20 to 25 hours of mowing time, which for a typical homeowner equals roughly one sharpening every 4 to 6 weeks during the growing season. However, if you mow over rocky terrain, gravel driveways, or areas with lots of debris, you may need to sharpen more frequently. Some users sharpen at the start and middle of the season. A good rule: if the grass looks torn or the mower seems to be working harder than usual, it is time to sharpen.
Can I use a metal file instead of angle grinder?
Yes, a metal file works for light touch-ups on a blade that is only slightly dull. However, files are slow and tiring for full sharpening, especially if the blade is significantlydull. An angle grinder is much faster and more efficient for a thorough job. Many homeowners use a file for quick maintenance between full angle grinder sharpenings.
What should I do if my blade is cracked?
Do not attempt to sharpen a cracked blade. Cracks weaken the blade, and sharpening involves vibration and stress that can cause the crack to propagate. During operation, a cracked blade may suddenly break and throw fragments. Replacement is the safe and cost-effective choice.
How do I know if my blade is balanced?
After sharpening, hang the blade on a nail inserted through the center hole, or use a commercial blade balancer. If the blade is balanced, it will remain level with neither end dipping. If one end dips significantly, that side is heavier and needs a bit more grinding. Some blade balancers have a needle that shows imbalance, follow the balancer’s instructions.
Summary: Sharpening a Mower Blade Safely and Effectively
Sharpening your mower blade with an angle grinder is achievable DIY task that extends blade life and improves lawn health. The key steps are: disconnect power, remove and inspect the blade, secure it firmly, grind the cutting edge bevel at the correct angle, repeat on the opposite end, verify balance, and reinstall with proper torque. Always wear safety gear, avoid overheating the blade, and maintain symmetry between both edges. If you are uncomfortable with any step, have the blade professionally sharpened, a professional service typically costs $10-$25 and guarantees balance and correct bevel angle. Whether you sharpen yourself or outsource, a sharp blade is one of the simplest and most effective ways to keep your lawn healthy and your mower running efficiently.
Related Maintenance and Operating Guides
To keep your equipment running at peak operating efficiency, explore our related technical walkthroughs and maintenance tutorials:
- Consult our detailed breakdown on z890 vs x870e motherboard.
Grinder Safety for Mower Blades
An angle grinder throws sparks and spins quickly, so eye and hand protection should come before any cutting.
Weight also matters when hauling equipment, so the article on how much do zero turn mowers weigh may be worth reading next. General safety reading on power tools is available through American National Standards Institute (ANSI).









