

Quick Answer: How to Install Weed Wacker String
To install weed wacker string, turn off and disconnect your trimmer, remove the spool from the trimmer head, cut a length of new line to the recommended size (typically 20 to 30 feet for residential models), and wind it tightly onto the spool in the direction shown by the arrows. Thread both ends through the eyelets, reattach the spool, and gently pull the line to release the correct cutting length. For fixed-line heads, skip the spool entirely and simply thread a pre-cut piece of line through the holes in the head. Always check your trimmer’s manual for the correct line diameter, or gauge, since using the wrong size is the most common cause of feeding and breakage problems.

Pros
- Rapid Replace head listed for simpler string reloading
- Digital ignition listed for easier starting
- LowVib anti-vibration system listed to reduce fatigue
- Air purge listed to aid starting
Cons
- Listed weight is 12.2 pounds
- Starting and speed claims are manufacturer-stated only

Pros
- Versatile attachment system covers multiple outdoor maintenance tasks with one machine.
- Strong gas engine is better suited to demanding cutting jobs than many lightweight trimmers.
- Extended reach helps handle high limbs and hard-to-access areas from the ground.
- Quick-Start feature adds convenience for a gas-powered tool.
Cons
- As a 2-stroke gas tool, it requires fuel mixing and regular maintenance.
- Gas-powered operation is typically louder and less convenient than battery-powered alternatives.
- The multi-tool format may be more complex than a single-purpose trimmer for users with only basic yard needs.
Overview: The PROYAMA 42.7cc 5-in-1 multi-functional trimming tool combines a hedge trimmer, pole saw, string trimmer, brush cutter, and extension rod into one gas-powered yard system. It is built for users who want one machine to cover several outdoor maintenance tasks.
Performance: Its 2 HP, 2-cycle 42.7 cc engine is positioned for more demanding cutting jobs, while the pole saw offers an adjustable working range from 8.2 to 11.4 ft and a 10-inch cutting length. The Quick-Start system and ergonomic handle are practical additions for routine use.
Considerations: Because it is gas-powered, this tool will require fuel mixing and ongoing maintenance, and it is likely less convenient and louder than battery alternatives. The multi-attachment setup is useful, but it also adds complexity when switching between tasks.
Verdict: This PROYAMA model is best suited to homeowners who need reach, power, and versatility in a single tool. It is a strong fit for mixed yard work, but less ideal for buyers who prefer lightweight, low-maintenance equipment.

Pros
- Includes the battery and charger, so the kit is ready for setup out of the box.
- Attachment changes are designed to be quick and simple, which saves time during multi-step yard work.
- Comfort-focused design aims to reduce arm fatigue and vibration during extended use.
- Versatile enough to cover several common homeowner landscaping tasks in one system.
Cons
- Only one 40V 4Ah battery is included, so longer jobs may require recharge time or an extra battery.
- The 8-inch pole saw and 10-inch brush cutter are better suited to light-to-moderate tasks than heavy-duty clearing.
- The attachment-based design adds more parts to store and manage than a single-purpose tool.
Overview: The Wild Badger Power 40V 4-in-1 Multi-Tool Kit combines a string trimmer/edger, pole saw, hedge trimmer, and brush cutter into one cordless system. It is built for homeowners who want a flexible yard tool that can handle several common maintenance jobs without switching between multiple machines.
Performance and features: The included 40V 4Ah battery gives the tool cordless freedom, while the brushless motor design is aimed at efficient operation. The 15-inch trimmer/edger, 16-inch hedge trimmer, 8-inch pole saw, and 10-inch brush cutter provide useful coverage for routine trimming, shaping, and light brush work. Quick attachment swaps make it easy to move from one task to another.
Drawbacks and considerations: This is a multi-tool kit, so it has more parts to keep track of than a dedicated trimmer. The single included battery may also be limiting for larger properties or longer sessions. Based on the listed specs, the saw and cutter sizes are practical for moderate yard work rather than heavy commercial clearing.
Verdict: This kit is a strong fit for homeowners who want one cordless platform to handle edging, trimming, hedge care, and light cutting. If you value versatility, comfort, and easy setup more than maximum-duty power, it offers a practical all-in-one solution.

Pros
- Genuine 4-in-1 versatility covers grass trimming, edging, hedge shaping, and brush cutting from a single powerhead.
- Full-crank 26cc engine offers more durability and power delivery than half-crank alternatives.
- Tool-free quick-change attachments make switching tasks fast and simple.
- Vibration-reducing aluminum transmission support plus shoulder harness improve comfort during extended use.
- 3-year limited warranty provides longer coverage than many competing gas trimmers.
Cons
- The 2-cycle engine requires mixing gasoline and oil, which is less convenient than straight-gas or battery models.
- Gas powerheads with multiple stel attachments tend to be heavier and noisier than electric alternatives.
- Regular 2-cycle maintenance and fuel mixing may deter users seking low-upkeep equipment.
The Wild Badger Power 26cc 2-Cycle Gas Weed Wacker is a 4-in-1 wheeled edger kit built around a single powerhead that accepts four interchangeable attachments. The system is designed to consolidate several lawn care tools into one, pairing a 26cc engine with a rubber handle and shoulder harness for better control across different tasks.
Performance and key features center on the 26cc 2-cycle full-crank engine, which is engineered to handle both light routine trimming and more demanding jobs like clearing heavier growth. The kit includes a 17-inch string trimmer for grass, a 9-inch wheeled-edger blade for clean borders, a 16-inch hedge trimmer, and a 10-inch brush-cutter blade. The quick-change design lets you install or remove attachments in seconds, and the aluminum transmission support helps dampen vibration during longer sessions.
Drawbacks and considerations are typical of gas-powered multi-tools. The 2-cycle engine needs a gasoline-and-oil fuel mix, ading a step that battery or straight-gas users avoid. A gas powerhead loaded with steel attachments also tends to be heavier and louder than electric options, and ongoing 2-cycle maintenance may not suit those wanting minimal upkeep.
Verdict: This kit is a strong fit for homeowners and property owners who want one versatile machine to trim, edge, shape hedges, and cut brush without buying separate tools. If you are comfortable with fuel mixing and standard gas-engine care, the combination of full-crank power, quick-change attachments, and a 3-year limited warranty offers dependable, all-around yard coverage.
Understanding Your Trimmer Head Type
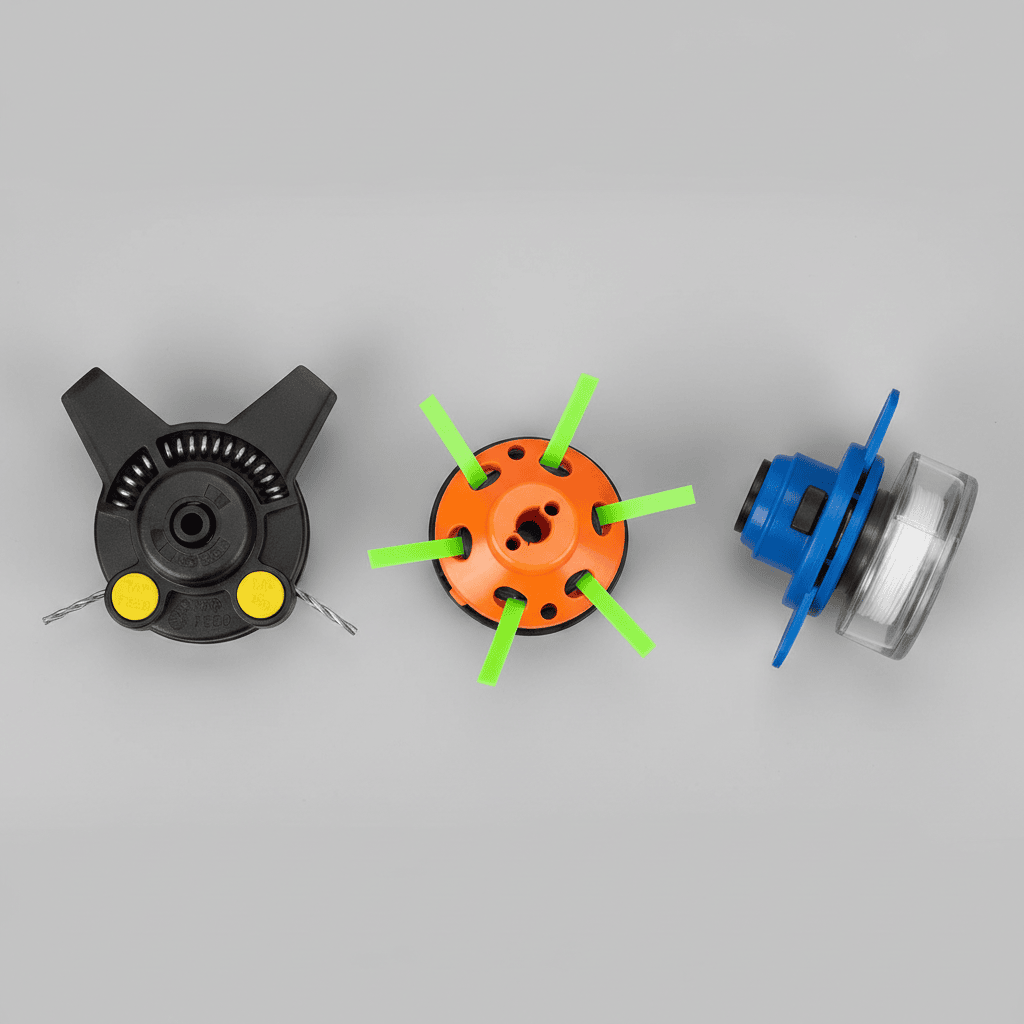
Before you touch a single piece of line, you need to know which kind of trimmer head your weed wacker uses. The installation process differs significantly between designs, and forcing the wrong method can damage the head or cause the string to jam. There are three main types you will encounter.
1. Bump-Feed Heads
The bump-feed (or “tap-and-go”) head is the most common design found on residential string trimmers. It houses a spool loaded with many feet of line. When the line wears down, you tap the head on the ground while the trimmer is running, which releases a bit more line from the spool. This design requires careful winding to function properly, so pay close attention to the direction arrows molded into the spool and the case.
2. Fixed-Line Heads
Fixed-line heads do not use a spool. Instead, they hold two (sometimes four) short, pre-cut pieces of line that you thread directly through holes or slots in the head. You cannot feed more line as it wears down; you simply replace the pieces when they get too short. This design is lightweight and simple, but less convenient.
3. Quick-Load and Pre-Wound Spools
Quick-load (also called “EZ-Load” or “Speed-Load”) heads are designed to accept replacement line with minimal winding, or to accept pre-wound spools sold as drop-in cartridges. With pre-wound spools, you usually just remove the old spool, insert the new one, and thread the two line ends through the eyelets or notches. With quick-load designs, you may only need to insert a length of line into a slot and pull it tight, letting the internal mechanism do the winding.
How to Identify Your Head
- If you see a cap with a spring-loaded mechanism and a “tap to feed” label, it is a bump-feed head.
- If the head has visible holes that hold short exposed pieces of line and no removable cap or spool, it is a fixed-line head.
- If the packaging or manual mentions “EZ-Load,” “Speed-Load,” “pre-wound,” or “drop-in spool,” you have a quick-load system.
Find your line specifications. Look for the recommended line diameter (gauge, e.g., 0.065, 0.080, or 0.095 inches) printed on the trimmer head, the spool, or in the owner’s manual. Using line that is too thick can jam the head or overload the engine; line that is too thin will break quickly and cut poorly. Users looking for related component recommendations can explore our z890 vs x870e motherboard breakdown.
Step-by-Step Guide for Bump-Feed Heads
This is the most important section for most readers, since bump-feed heads are the most common. Take your time and follow the order precisely.
Step 1: Safety First
Turn the trimmer off, disconnect the spark plug wire if it is gas-powered, or unplug it if it is electric. Set the trimmer on its side with the head facing up. Never work on the head while the trimmer is on, and wear gloves to protect your hands from the cutting edges on the housing. Before finalizing equipment decisions, refer to our comprehensive marshall stanmore iii vs harman kardon onyx studio 8 comparison.
Step 2: Remove the Spool
Most bump-feed heads have two tabs on the side. Press both tabs inward and pull the cap and spool out as one unit. Some models use a bolt or screw on the center of the cap, which you remove with a screwdriver or wrench. If the head has a “Push” arrow, press down and twist counterclockwise. Once the cap is off, lift the spool out. Remove and discard the old line, and clean any grass or debris from the spool and the inside of the head.
Step 3: Cut the New Line
Cut a single long piece of line, generally 20, 30 feet for a standard residential spool. If you are unsure, check the spool for a marker such as “Load 20 ft” or “max capacity.” Using slightly less line than the spool can hold makes winding easier and prevents tangles. For broader ecosystem context, read through our operational guide on dyson v8 cyclone vs bissell featherweight stick.
Step 4: Wind the Line Onto the Spool
Find the small slot or anchor hole on the center divider of the spool. Insert about half an inch of the line into the slot, then wind in the direction indicated by the arrows on the spool. Wind tightly and in even, adjacent rows, keeping tension with your fingers as you go. Do not overlap or cross the line. Stop winding when the line is about a quarter inch from the outer edge of the spool, overfilling is a frequent cause of jams. There should be enough line left over to leave two tails of roughly six inches each.
Step 5: Thread the Eyelets
With the spool still holding the wound line, take the two loose tail ends and snap them into the two slots or eyelets on the spool’s rim, so the line is held in place. Then route each tail through the corresponding eyelet on the outer trimmer head, aligning them with the line exit holes. For troubleshooting and reliability insights, consult our in-depth bissell crosswave hydrosteam vs shark stainforce report.
Step 6: Reassemble the Head
Push the spool back into the head while guiding the line tails through the eyelets. Press the cap back on until the tabs click into place, or replace the center bolt. Give both lines a firm pull so the spool can seat fully and any slack is taken up. Some models also require you to rotate the spool slightly until it clicks into its locked position.
Step 7: Test the Feed
Hold the trimmer so the line clears the ground, power it on, and bump the head on the ground once or twice. The centrifugal force should release more line, and the head’s blade should cut it to the correct length. If no line feeds, see the troubleshooting section below.
Step-by-Step Guide for Fixed-Line and Quick-Load Heads
Fixed-Line Heads
These are the simplest to service. Cut two (or four, depending on the head) identical pieces of line to the recommended length, typically 8 to 12 inches total with a few inches of working length outside the head. Push one end of each piece into the head’s exit holes and keep pushing until the line comes out of the insertion openings on the opposite side, or until it seats in the retention clip. With the line centered in the head, pull each side so equal lengths extend from both sides. Rotate the head to confirm the line spins freely and is trimmed to the guard length.
Quick-Load and Pre-Wound Spools
For pre-wound spools, the installation is nearly identical to the bump-feed steps, except you skip the winding entirely: remove the old spool, insert the new pre-wound spool, and thread the two line ends through the eyelets in the head. For quick-load heads, insert the end of the line into the marked entry slot, push until it catches, then pull the line through the exit hole. Many quick-load heads still require a small amount of manual winding, follow the directional arrows on the head and wind about 8 to 12 turns, leaving both ends exposed. Either way, the heads generally “click” to signal the line is locked, and you simply tug on the ends to confirm the hold.
Adjust the line length. The line should extend about 5 to 6 inches from the head, but no farther than the built-in cutter blade. If the line is too long, power the trimmer on and let the cutter trim it. If it is too short, bump the head (bump-feed) or stop and re-thread a longer length.
Troubleshooting Common String Installation Issues
| Problem | Likely Cause | Fix |
|---|---|---|
| String won’t feed when bumped | Line wound in the wrong direction, spool overfilled, or line not anchored in the eyelets | Rewind in the direction of the arrows, remove some line from the spool, and confirm the tails are seated in the eyelet slots |
| Line keeps breaking immediately | Wrong line gauge (too thin), or the line is rubbing on the head housing | Check the manual for the correct diameter; rethread so the line runs smoothly through the eyelet without catching |
| Line unwinds all at once | Line was not anchored in the spool’s center slot, or slack was left in the winding | Unwind completely, re-anchor the line in the center slot, wind tightly, and finish by locking the tails in the rim slots |
| Spool won’t reattach or is jammed | Debris inside the head, or the spool is seated wrong | Clean the head thoroughly, verify the spool orientation, and press firmly until the tabs or clips engage |
Why Won’t My New String Feed Out?
The number one cause is winding the line in the wrong direction. The spool must rotate against the direction of the head’s spin to feed on bumping, and the molded arrows indicate exactly which way to wind. The second most common cause is overfilling, the line binds against the head and cannot rotate. Remove a few feet and retry.
What Causes the String to Break or Unwind Incorrectly?
Breakage usually points to the wrong line diameter or low-quality line with thin spots. Unwinding at once points to missing the center anchor slot, which leaves the line free to spin off. Always feed the line through the rim slots before reassembly so the tails stay under control.
How Do I Fix a Spool That Is Jammed or Won’t Reattach?
Take the head apart fully and clear any grass, dirt, or string fragments from the housing and the spool spring. Check that the spring is seated correctly, align the spool’s slots with the head’s tabs, and push straight in until it clicks. If the cap still will not close, you have likely overfilled the spool, so trim off some line and retry.
Everything You Need to Know: How To Install Weed Wacker String FAQ
How much weed wacker string do I need for my trimmer?
Most standard residential spools hold 20 to 30 feet of line at a time. Check your spool or manual for the exact capacity and the recommended line gauge, which typically ranges from 0.065 to 0.095 inches for home-use trimmers. Heavier, commercial-duty trimmers generally use thicker line.
Can I use any brand of trimmer line?
Yes, trimmer line is largely universal by size and shape. What matters is the diameter (gauge) and round shape matching your head, not the brand. If your head uses a specialty shape, such as twisted or star-shaped line, stick with the shape recommended in your manual, since those lines aid cutting but can slightly reduce feed reliability.
Why does my weed wacker string keep breaking?
Usually because the line gauge is too thin for the engine’s power, the line is dry and brittle from sun exposure, or the line is catching on the head’s eyelet. Replace the line with the correct gauge, store spare line in a cool dark place, and confirm the line is routed smoothly through the eyelet.
Do I have to unplug my electric trimmer before changing the string?
Absolutely. Turning off the switch is not enough, the head can still rotate if the trigger is bumped. Unplug the trimmer, or on gas models disconnect the spark plug wire, before removing the spool or threading any line. This prevents serious injury from the cutting head.
String Installation Safety Background
Installing string in a weed wacker is usually straightforward, though the trimmer should be switched off and the head kept still throughout. For general safety reference material on handheld trimmers, see American National Standards Institute (ANSI).









