Direct Answer: How to Wind String Trimmer Line
To wind string trimmer line, remove the trimmer head by twisting it counterclockwise, insert one end of the string into the anchor hole on the spool, wind the string tightly around the spool in the direction indicated by arrows (typically counterclockwise), leaving 4–6 inches unwound, then thread the loose end through the exit guide and reassemble the head. The exact process varies depending on your trimmer type—manual-wind spools, bump-feed heads, and automatic systems each use different winding techniques.
Understanding Your Trimmer Type
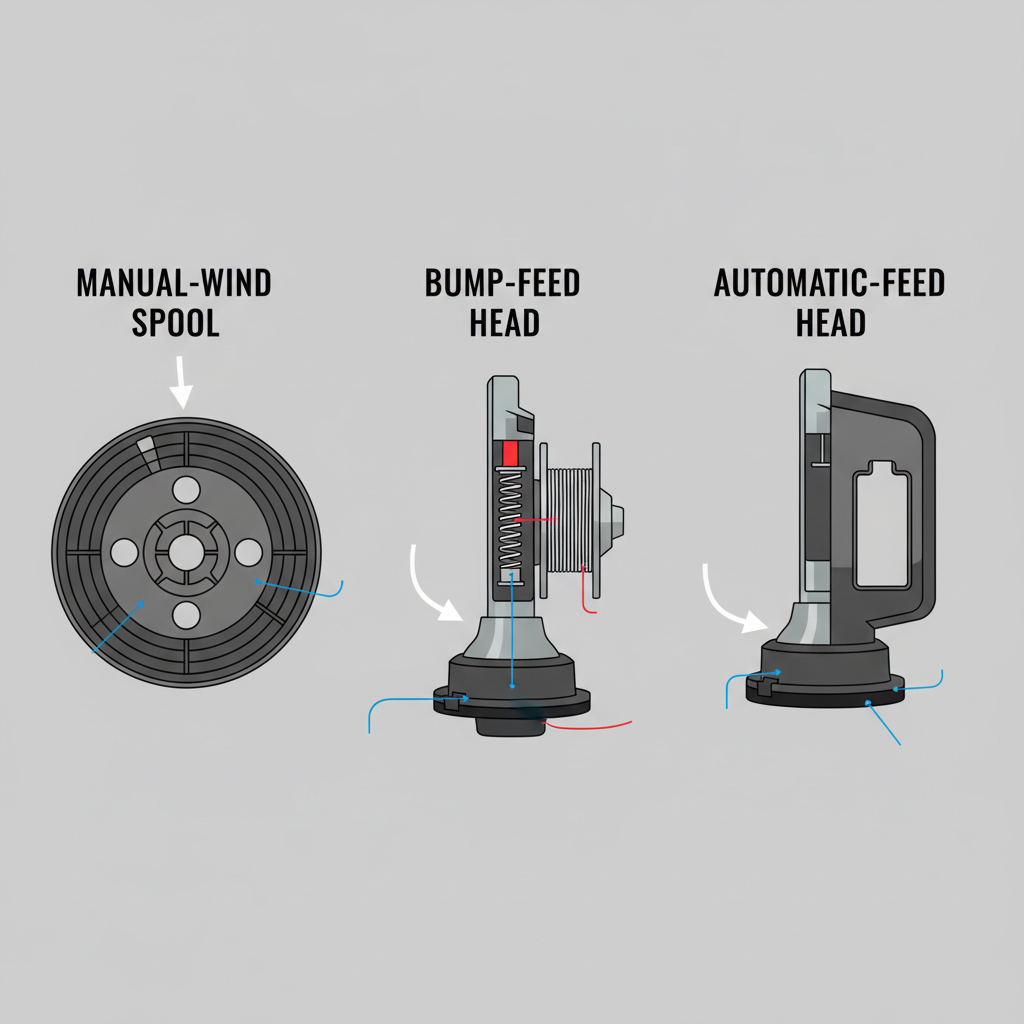
Before you start winding, it’s important to identify which type of trimmer head you have. The three main categories are manual-wind, bump-feed, and automatic-feed systems, and each requires a different approach.
Manual-Wind Spools are the most common and allow you to control exactly how much string is wound onto the spool. These typically feature a single or dual-line configuration and require you to hand-wind the string in a specific direction. Manual-wind heads are found on most budget and mid-range trimmers.
Bump-Feed Heads release string automatically when you tap the head against the ground during use. With bump-feed systems, you still wind the string manually, but the spool mechanism is designed to advance the line incrementally rather than letting you feed it continuously. These are popular on commercial-grade and heavy-duty trimmers.
Automatic-Feed Trimmers advance string as you use the trimmer without requiring manual intervention or tapping. These heads typically do not require manual winding—you simply load pre-wound spools or cartridges. Check your trimmer’s manual to confirm whether your automatic system needs manual winding.
What You’ll Need Before Winding
Gathering the right materials and tools ensures a smooth winding process and prevents damage to your trimmer.
- Replacement Trimmer String: Purchase string that matches your trimmer’s specifications. String comes in various gauges (typically 0.065 to 0.130 inches) and materials (nylon monofilament is standard). Check your trimmer’s manual or the spool packaging for the correct gauge.
- String Length: Most dual-line manual-wind spools require 15–30 feet of string, depending on spool size. If you’re unsure, purchase a pre-loaded spool or consult your trimmer’s documentation.
- Removal Tools: Most trimmer heads twist off by hand, but some may require a wrench or hex key. A small flathead screwdriver is useful for prying open the spool casing if needed.
- Work Surface: Use a clean, flat surface like a workbench to prevent losing small parts during disassembly.
How to Remove and Disassemble the Trimmer Head
Safely removing the head is the first practical step and sets you up for successful winding.
Step 1: Disconnect the Trimmer
Unplug electric trimmers from the outlet, or remove the battery from cordless models. For gas-powered trimmers, allow the engine to cool and ensure the spark plug wire is disconnected. Safety first prevents accidental start-up while you work.
Step 2: Remove the Head
Most trimmer heads are held on by a left-hand threaded collar or bolt. Grasp the shaft firmly with one hand and twist the head counterclockwise with the other. Some trimmers have a button or clip to unlock the head—check your manual if twisting doesn’t work. Once loose, unscrew the head by hand and set it aside on your work surface.
Step 3: Open the Spool Casing
Look for a center cap, button, or clip on top of the spool. Press or turn this to release the spool cover. Some spools have a small center bolt—use a wrench or hex key to remove it. Gently lift off the top cover to expose the spool. Be careful not to lose any springs, washers, or small clips that may fall out—these are essential for reassembly.
Step-by-Step Manual Winding Process
This section covers the most common dual-line manual-wind configuration. If your spool has markings or printed instructions, follow those first as some manufacturers have specific recommendations.
Step 1: Anchor the String
Locate the anchor hole on the spool—this is typically a small notch or hole on the outer edge of the spool. Insert one end of your trimmer string into this hole and pull until it’s snug. Some spools have a small hook or slot that holds the string in place; if yours does, seat the string firmly in this anchor point. This prevents the string from unraveling as you wind.
Step 2: Wind the String in the Correct Direction
Look for arrows printed on the spool indicating the winding direction. Wind the string counterclockwise in most cases, but always follow the arrows on your specific spool if they differ. Starting near the anchor hole, pull the string tight and wrap it around the spool in neat, overlapping coils. Keep tension consistent throughout to prevent loose loops or bunching.
Step 3: Maintain Proper Tension and Spacing
As you wind, hold the string at a slight angle to create an organized, layered pattern. Wind tightly enough that the string doesn’t slip or unravel, but not so tight that you strain your hands or distort the spool. Proper tension typically feels like medium firmness—similar to how you’d wrap gift ribbon. Leave approximately 4–6 inches of string unwound when you reach the end of the spool capacity, or when the string reaches the edge of the spool without bunching.
Step 4: Thread the Exit Guide
Once wound, locate the exit guide or notch on the spool edge—this is where the string feeds out during use. Thread the loose end (the 4–6 inches you left unwound) through this guide. The string should sit in the guide groove securely so it feeds straight out when the trimmer spins.
Step 5: Prepare for Reassembly
If your spool has a secondary string line (for dual-line configuration), repeat steps 1–4 with a second piece of string on the opposite side of the spool. Some spools use a single long string routed through both sides—follow your spool’s design. Ensure both string ends exit through their respective guides and are trimmed to equal lengths (typically 6–8 inches per side for balanced cutting).
Common Winding Mistakes to Avoid
Learning from others’ errors helps you get it right the first time.
Winding in the Wrong Direction
If you wind counterclockwise when you should wind clockwise (or vice versa), the string will unravel during use. Check the arrows on your spool before starting. If the string unravels mid-cut, the head likely wound in the wrong direction—remove and rewind it correctly.
Winding Too Loosely
Loose winding causes the string to slip, bunch, or feed unevenly. The string won’t advance properly, and you’ll experience gaps in cutting coverage. Tight, organized winding prevents these issues and ensures consistent string feeding.
Winding Too Tightly
Over-tightening strains the spool mechanism and can warp the spool casing or strip threads. It also makes it harder to feed new string when you need to reload. Aim for medium firmness—tight enough to hold shape but loose enough to wind smoothly by hand.
Misaligning the String at Exit Guides
If the string doesn’t sit properly in the exit guide, it will catch or wrap around the head during use, reducing cutting efficiency and potentially causing the head to jam. Double-check that both string ends are seated firmly in their respective guides before reassembling.
Leaving Too Much or Too Little String Unwound
Too much unwound string will wrap around the spool housing or get caught on obstacles. Too little means the string is fully wound with no fresh line to advance when you need it. The 4–6 inch standard prevents both problems.
Reassembling and Testing Your Trimmer Head
Step 1: Seat the Spool Back Into the Housing
Align the spool so the exit guides line up with the notches in the head casing. Gently lower the spool into the housing, ensuring any springs or washers are in place beneath it. The spool should sit flat and level.
Step 2: Replace the Center Cap and Secure All Parts
Place the center cap or bolt back onto the spool and twist or tighten clockwise until snug. Do not over-tighten—you want it secure but not strained. Ensure any clips or locks click into place.
Step 3: Reattach the Head to the Trimmer Shaft
Align the head with the shaft and thread it on by twisting clockwise. Tighten firmly but not excessively—you want it secure enough to prevent slipping during use. A hand-tight fit with a quarter turn of extra pressure is typically correct.
Step 4: Test String Feeding
Before plugging in or starting the trimmer, manually spin the head by hand to verify the string feeds smoothly and doesn’t catch or bind. If it sticks, open the head again and check that the string is seated correctly in the exit guides. Once it spins freely, you’re ready to reconnect power and test under light use.
Winding Tips for Bump-Feed and Automatic Systems
Bump-Feed Heads
Bump-feed spools wind similarly to manual spools, but the internal mechanism is designed to advance string in small increments when you tap the head against the ground. Wind the same way as described above—tight and organized in the direction indicated by the spool arrows. The difference is in use, not winding. After winding, test the bump mechanism by gently tapping the head on a wooden surface (not concrete, which can damage the head) to confirm the string advances slightly with each tap.
Automatic-Feed Trimmers
Most automatic-feed heads do not require manual winding. Instead, you load pre-wound cartridges or spools. If your automatic head does allow manual winding, follow the same steps as manual spools. However, check your trimmer’s manual first—many automatic systems are designed specifically to work with proprietary cartridges or spools, and manually winding may void the warranty or cause the feed mechanism to malfunction.
Frequently Asked Questions
Q: What gauge of string does my trimmer need?
A: String gauge depends on your trimmer’s power and cutting needs. Lightweight electric trimmers typically use 0.065–0.080 inch gauge string, while mid-range and heavy-duty trimmers use 0.095–0.110 inch. Professional or gas-powered trimmers may go up to 0.130 inch. Check your trimmer’s manual or the spool packaging for the correct specification. Using the wrong gauge can damage the head or create poor cutting performance.
Q: How often should I wind or replace trimmer string?
A: The frequency depends on how often you use your trimmer. For occasional homeowners, you might rewind or reload every 1–2 months during mowing season. Frequent users may need to rewind weekly. Some people keep pre-wound spools on hand for quick swaps. When the string becomes too short to cut effectively (typically when it wears down to 3–4 inches per side), it’s time to rewind or reload.
Q: Can I use any type of string on my trimmer?
A: No. Use only nylon monofilament string designed for string trimmers and matching your trimmer’s specified gauge. Using wire, twine, or incorrectly sized string can damage the head, create safety hazards, and produce poor cutting results. Trimmer string is inexpensive and readily available at hardware stores or online—it’s not worth risking equipment or safety by substituting.
Q: Why does my string keep breaking or shredding after I wind it?
A: Breaking or shredding usually indicates one of three issues: the string is wound too loosely (causing it to slip and fray), it’s not seated properly in the exit guide (causing it to catch or wrap), or the spool casing or trimmer head has burrs or damage that cuts the string. Inspect the head for damage, rewind tightly with proper exit guide alignment, and test again. If the problem persists, the head may need replacement.