

Direct Answer: How to Sharpen a Lawn Mower Blade with a Grinder
Disconnect the spark plug, remove and clean the blade, secure it in a vise, then grind along the existing bevel at a 20–30° angle using an angle grinder or bench grinder — moving heel to toe in smooth, even passes. Check blade balance before reinstalling. The full process takes 15–30 minutes and restores a clean cut without shop fees.

Pros
- Large-size design named in product title
- Sharpening and balancing functions listed
- Listed as a new upgraded version

Pros
- Adjustable 15-to-45-degree range in title
- Sharpening and balancing functions listed

Pros
- Sharpener and balancer functions in title
- 15-to-45-degree adjustable setting listed
- Built for lawn mower blade maintenance
Pros
- Includes replacement gaskets and a 98079-55846 spark plug
- Matches Honda HRR216 and HRS216 lawn mower models
- Designed around the 16100-Z8B-901 carburetor specification
Cons
- Restricted to select Honda GCV160 mower applications
- Installation requires basic mechanical tools and skills
Sharpening your own mower blade is one of the highest-ROI DIY lawn care tasks. A sharp blade cuts grass cleanly, reduces stress on the engine, and prevents the brown, frayed tips that dull blades cause. With basic tools and the safety steps below, you can match the quality of a professional sharpening service in under half an hour.
When Your Lawn Mower Blade Needs Sharpening
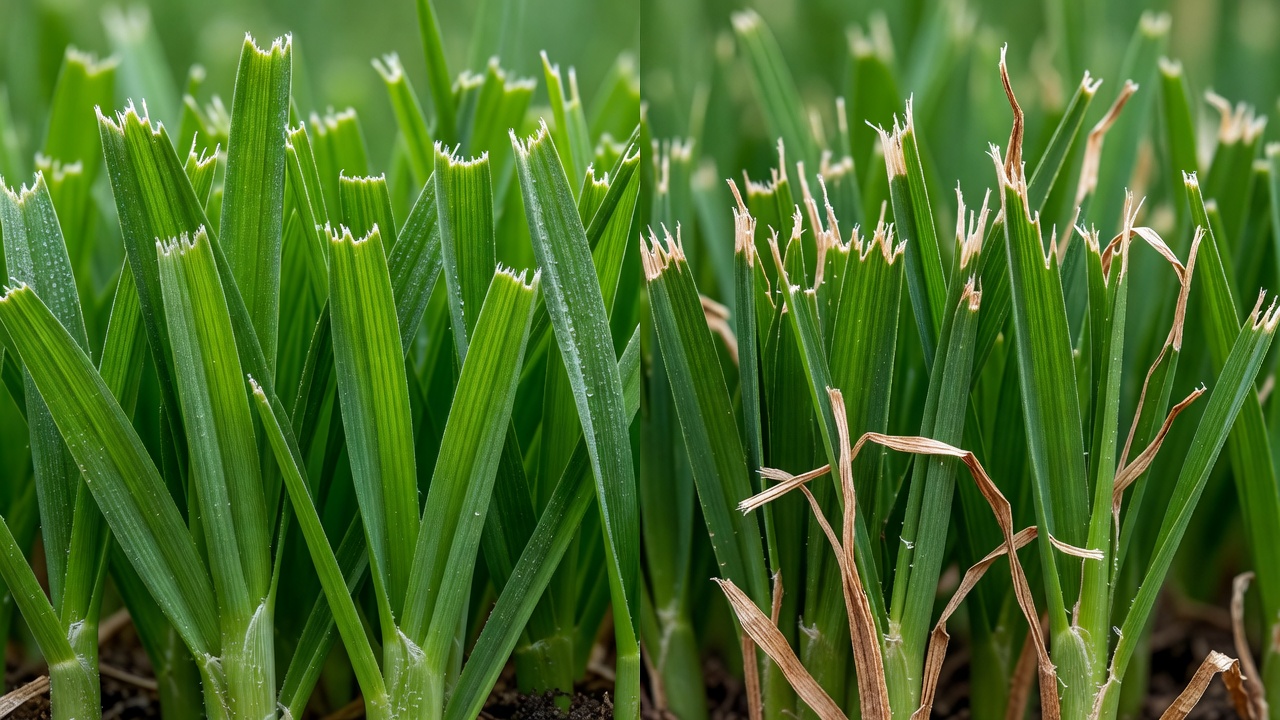
Before you pull out the grinder, confirm the blade is actually dull. Sharpening a blade that is still cutting well wastes time and removes metal unnecessarily, shortening the blade’s lifespan.
Signs of a Dull Blade
- Ragged grass tips: After mowing, look closely at the grass blades. Clean cuts are crisp and even; dull cuts look shredded or frayed.
- Brown or yellow tips: Frayed grass tips dry out within a day or two, leaving a brownish cast across the lawn.
- Uneven cut: A dull blade tears grass rather than slicing it, so the lawn looks patchy even when you overlap passes.
- Increased vibration: A blade that is dull, bent, or heavily nicked can make the mower shake noticeably.
- Visible nicks and rolled edges: If you flip the mower over and see dents, curled edges, or a reflective “worn” strip along the cutting edge, it is time to sharpen.
How Often Should You Sharpen?
Most mower manufacturers and turf extension services recommend sharpening every 20–25 hours of use, which works out to roughly once per month during the growing season or once per season for a typical home lawn. If you mow frequently, hit rocks or roots, or mow over sandy soil, sharpen more often. A quick visual check every few mows is the most reliable guide. For troubleshooting and reliability insights, consult our in-depth jbl partybox club 120 vs sony srs xv500 report.
When to Replace Instead of Sharpen
Grinding cannot fix every blade. Replace the blade if you find any of the following: For troubleshooting and reliability insights, consult our in-depth jbl partybox club 120 vs sony srs xv500 report.
- Deep nicks or chips larger than about 1/8 inch — removing that much metal weakens the blade.
- Cracks anywhere on the blade, especially near the bolt hole or mounting area.
- Bends or twists — a bent blade cannot be balanced properly and can damage the crankshaft.
- Severe thinning — if the blade has been sharpened many times and the cutting edge is noticeably thin, replace it.
- Rust pitting that has eaten into the structural metal.
Tools and Safety Gear You Need Before You Begin
Having everything ready before you start makes the job safer and faster. Here is the complete list: Readers comparing setup options can review our technical analysis on z890 vs x870e motherboard.
| Tool / Gear | Purpose |
|---|---|
| Angle grinder (4.5-inch recommended) | Primary sharpening tool; use with a 60–80 grit flap disc or grinding wheel |
| Bench grinder (optional) | Stationary alternative for sharpening |
| Blade removal wrench or socket set | Loosens the blade bolt (commonly 13/16″ or 5/8″) |
| Breaker bar or pipe for leverage | Helps break loose a stuck blade bolt |
| Bench vise with soft jaws or wood blocks | Secures the blade during grinding |
| Wire brush or scraper | Removes grass, dirt, and rust before sharpening |
| Marker or paint pen | Marks the cutting edge so you can see where you have ground |
| Blade balancer (or a nail and level surface) | Checks that the blade is evenly weighted after sharpening |
| Torque wrench | Tightens the blade bolt to specification on reinstallation |
| Penetrating oil (e.g., WD-40) | Loosens rusted or seized bolts |
| Safety glasses | Protects eyes from sparks and metal debris |
| Work gloves | Protects hands from sharp edges and hot metal |
| Hearing protection | Angle grinders and bench grinders are loud |
| Dust mask or respirator | Prevents inhaling fine metal and paint dust |
PPE Is Non-Negotiable
Grinders throw sparks, metal filings, and occasionally broken abrasive fragments. Safety glasses are mandatory — not just sunglasses, but rated impact protection. Wear heavy work gloves, hearing protection, and a dust mask. Remove loose clothing, jewelry, and tie back long hair before operating any grinder.
How to Remove a Lawn Mower Blade Safely
The removal phase is where most injuries happen. A mower blade is a spinning piece of metal attached to an engine that can start unexpectedly. Follow these steps in order. Readers comparing setup options can review our technical analysis on z890 vs x870e motherboard.
Step 1: Disconnect the Spark Plug
Always pull the spark plug wire off the spark plug before you go anywhere near the blade. This is the single most important safety step. OSHA small-engine safety guidance and every mower owner’s manual emphasize that the engine can fire and rotate the blade if the plug is connected — even when the key is off. On electric mowers, remove the battery or unplug the unit.
Step 2: Tip the Mower Correctly
For a push mower, drain the fuel or run it dry if possible, then tip the mower with the carburetor and air filter side facing up. OEM guidance from Honda, Toro, and Husqvarna warns that tipping the mower with the carburetor down allows oil to flood the air filter and fuel to leak into the intake. On most mowers, the air filter is on the side; tip the mower so that side is on top. For complementary field maintenance guidelines, examine our breakdown of marshall stanmore iii vs harman kardon onyx studio 8.
Step 3: Loosen the Blade Bolt
Most rotary mower blades are held by a single bolt in the center. Viewed from underneath the mower, the bolt is typically right-hand threaded — turn it counterclockwise to loosen. However, some mowers use a reverse-thread bolt that loosens clockwise. Check your owner’s manual before applying force. If the bolt is stuck, spray penetrating oil on the threads, wait 10–15 minutes, and use a breaker bar. Wedge a block of wood between the blade and the deck housing to prevent the blade from spinning while you turn the bolt.
Step 4: Remove and Clean the Blade
Once the bolt is out, slide the blade off the spindle. Note the orientation — which side faces up and which edge leads — before you remove it. Scrub the blade with a wire brush to remove caked grass, dirt, and rust. A clean blade is easier to grip and lets you see the true condition of the cutting edge. Dry it thoroughly before sharpening. To evaluate matched hardware tolerances, consult our detailed overview of dyson v8 cyclone vs bissell featherweight stick.
Riding Mower Blade Removal
Riding mowers follow the same basic procedure, but you must raise the deck to its highest position, engage the parking brake, and chock the wheels. Use jack stands if you need to get under the deck — never rely on the hydraulic lift alone. The blade bolts on riding mowers are often larger and torqued tighter; a breaker bar is usually required. Removing all blades at once allows you to sharpen them together and balance the deck evenly.
How to Sharpen a Lawn Mower Blade with an Angle Grinder
The angle grinder is the most popular tool for this job because it is fast, inexpensive, and easy to control. Here is the full process. When planning workspace deployment, consider the engineering criteria outlined in our bissell crosswave hydrosteam vs shark stainforce guide.
Step 1: Secure the Blade in a Vise
Clamp the blade in a bench vise with the cutting edge facing up and slightly outward. Use soft jaws or wood blocks to avoid scratching the blade and to protect the vise. The blade must be rock-solid — any movement during grinding can cause the grinder to kick or gouge the metal.
Step 2: Mark the Cutting Edge
Run a marker along the existing bevel (the angled edge that does the cutting). This creates a visual guide: as you grind, the marker disappears, so you can see exactly where you have worked and where you still need to go.
Step 3: Set the Correct 20–30° Bevel Angle
Manufacturer service manuals and turf extension publications specify a sharpening angle of 20–30 degrees for standard rotary mower blades. Match the existing bevel — do not try to create a new angle. If the old bevel is worn or hard to read, aim for about 25 degrees. Hold the grinder disc flat against the bevel so the entire cutting edge contacts the abrasive.
Step 4: Grind Heel to Toe in Smooth Passes
Turn on the grinder and let it reach full speed before touching the blade. Move the grinder from the heel (the end near the mounting hole) toward the toe (the outer tip) in one smooth, continuous pass. Lift the grinder off the blade between passes — never rock it back and forth. Use light pressure; let the abrasive do the work. A typical dull blade needs 3–5 passes to expose clean, sharp metal. Stop frequently and check your progress against the marker line.
Step 5: Manage Heat to Prevent Warping
Friction generates heat, and overheated steel can warp or lose its temper (soften). If the blade turns blue or is too hot to touch, stop and let it cool. You can dip the blade in a bucket of water to speed cooling, but dry it completely before continuing. Short, light passes generate far less heat than heavy, grinding pressure.
Step 6: Remove Nicks and Burrs
If the blade has small nicks, grind them out with a coarser disc first, then switch to a finer flap disc for the final edge. After sharpening, run a file or the grinder very lightly along the back side of the edge to remove the burr — a wire-like lip of metal that forms on the underside. Only the top bevel needs sharpening; do not grind the flat underside of the blade, as this changes the blade geometry and weakens the edge.
How to Sharpen a Lawn Mower Blade with a Bench Grinder
A bench grinder is a stationary alternative that many homeowners already own. It works well but requires a slightly different technique.
Bench Grinder Setup
Use a 60–80 grit grinding wheel for sharpening. Adjust the tool rest so it sits just a few millimeters from the wheel — a gap wider than the blade thickness can pull the blade in or cause it to catch. Set the tool rest to the desired angle (20–30°) or hold the blade freehand against the wheel face, matching the existing bevel.
Grinding Technique on a Bench Grinder
- Hold the blade firmly with both hands, keeping your fingers clear of the wheel.
- Move the blade side to side across the face of the wheel, not in one spot — this prevents grooves and uneven wear on the wheel.
- Keep the blade moving to avoid heat buildup. Dip it in water frequently.
- Grind only the top bevel, moving from heel to toe, and check the marker line often.
- Do not press hard; let the wheel do the cutting.
Angle Grinder vs. Bench Grinder: Which Is Better?
| Factor | Angle Grinder | Bench Grinder |
|---|---|---|
| Speed | Fast; ideal for touch-ups | Faster for heavy metal removal |
| Control | Excellent — you control the angle by hand | Good, but freehand angle control is harder |
| Heat risk | Lower with light passes | Higher; wheel spins fast and generates heat quickly |
| Cost | $40–80 for a basic unit | $60–150 for a bench grinder |
| Best for | Most home users | Users who already own one or sharpen frequently |
How to Balance a Lawn Mower Blade After Sharpening
Balancing is the step most DIYers skip — and the one that causes the most damage when skipped. An unbalanced blade creates vibration that wears out spindle bearings, loosens bolts, and fatigues the deck. Lawn mower OEMs and repair technicians universally recommend checking balance every time you sharpen.
Why Balance Matters
When one end of the blade is heavier than the other, the blade spins off-center. At 3,000+ RPM, even a small imbalance produces enough centrifugal force to shake the mower, stress the crankshaft, and produce an uneven cut.
How to Check Balance
- Use a blade balancer: A cone-style balancer costs $10–20. Place the blade on the cone so the center hole rests on it. If the blade stays horizontal, it is balanced.
- DIY method: Drive a nail or screw into a wall at a slight upward angle, or clamp a bolt horizontally in a vise. Hang the blade by its center hole. The heavy side will drop downward.
How to Correct an Unbalanced Blade
If one side drops, that side is heavier. Grind a little more metal from the heavy side — specifically from the back edge (the non-cutting side) to preserve the cutting edge. Remove a small amount, re-check, and repeat until the blade sits level. Most blades need only a few light passes to balance.
How to Reinstall the Blade and Test the Mower
Blade Orientation
Before reinstalling, confirm the blade orientation. Most blades have “this side up” or a part number stamped on top. The cutting edges should face up toward the deck when the mower is right-side up. If you install the blade upside down, the mower will not cut and you will likely damage the blade and deck.
Tighten to Torque Spec
Hand-tightening is not enough. Most mower blade bolts require 40–70 ft-lbs of torque; check your owner’s manual for the exact figure. Use a torque wrench to avoid under-tightening (blade can slip or fly off) or over-tightening (strips threads or cracks the blade). Reinstall any washers or spacers in the order you removed them.
Reconnect and Test
Reattach the spark plug wire or battery. Before starting, rotate the blade by hand to confirm it spins freely and does not hit the deck. Start the mower and listen for excessive vibration. Mow a small patch of grass, then inspect the cut: clean, even tips confirm the sharpening worked. If the mower vibrates noticeably, stop and re-check the blade balance and bolt torque.
Everything You Need to Know: How To Sharpen A Lawn Mower Blade With A Grinder FAQ
How often should I sharpen my lawn mower blade?
Most manufacturers recommend sharpening every 20–25 hours of use, or about once per season for a typical home lawn. If you mow weekly during the growing season, that means roughly every 4–6 weeks. Check the blade visually each month — if the edge catches your fingernail, it is still sharp; if it feels smooth or rounded, it is time to grind.
Can I sharpen a mower blade with a hand file instead of a grinder?
Yes. A 10-inch flat file or a specialized mower blade file can sharpen a mildly dull blade, and it eliminates the risk of overheating. Clamp the blade in a vise and push the file along the existing 20–30° bevel in one direction, from heel to toe. Filing takes longer — 10–15 minutes per blade — but it is a good option for beginners or for light touch-ups between grinder sessions.
What angle should I hold the grinder at when sharpening a mower blade?
Hold the grinder so the disc matches the existing bevel, which is typically 20–30 degrees. If the bevel is worn away, aim for about 25 degrees. Grinding at too steep an angle creates a weak, brittle edge; grinding too shallow leaves the blade dull. Match the factory bevel whenever possible.
How do I know if my mower blade is balanced?
Place the blade on a cone-style balancer or hang it from a nail by the center hole. If one side drops, that side is heavier. Grind a small amount of metal from the heavy side’s back edge, then re-check. The blade is balanced when it stays perfectly horizontal and does not rotate on its own.
For more hands-on benchmarks and buying recommendations, consult our guides on residential zero-turn lawn mower guide, as well as heavy-duty chainsaw buyer guide.
Mechanical safety standards, operational tolerances, and protective gear guidelines align with benchmark specifications established by the American National Standards Institute (ANSI).









