Quick Answer: How to Sharpen Lawn Mower Blades
Disconnect the spark plug, tip the mower to expose the blade, remove it with a wrench, and secure it in a vise. File or grind the cutting edge at the original bevel angle (typically 30–45°), stroking in one direction toward the edge. Balance the blade on a nail or blade balancer before reinstalling and torquing the bolt to spec. The full process takes 20–30 minutes.
Why Sharpening Your Lawn Mower Blade Matters
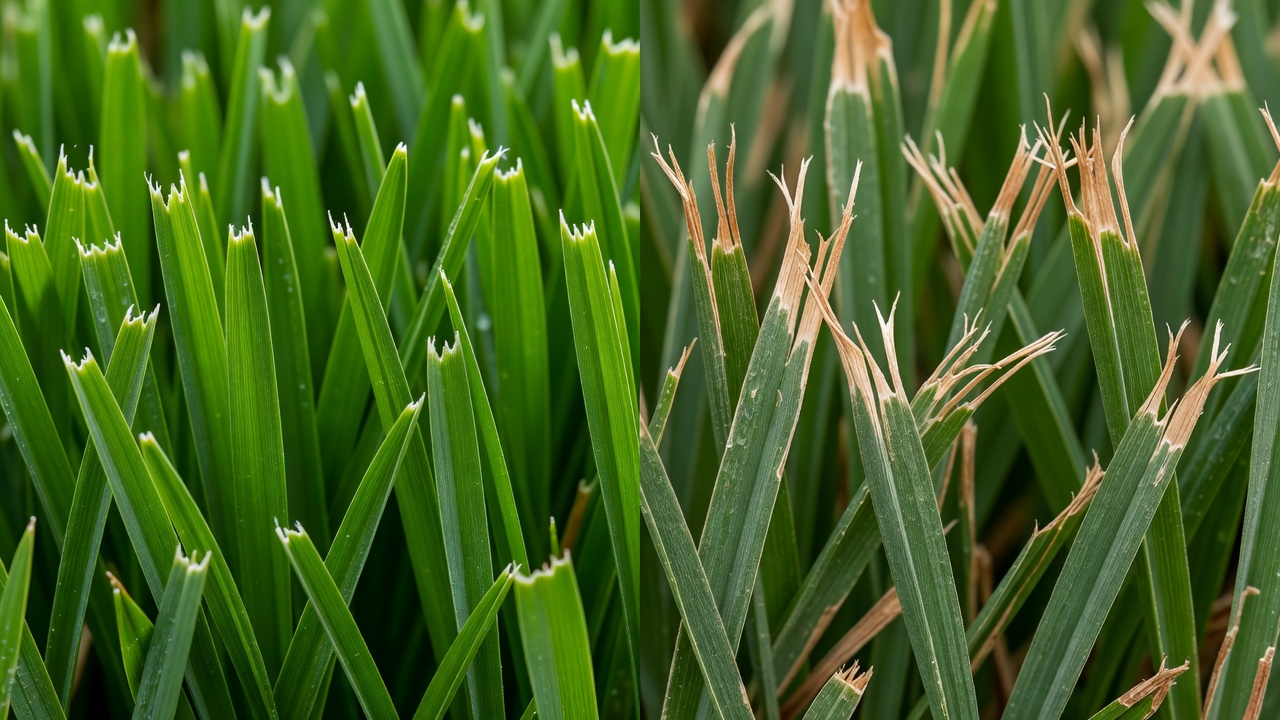
A dull mower blade does not cut grass — it tears it. That distinction has measurable consequences for your lawn’s health and your mower’s longevity.
Torn grass tips turn brown within 24–48 hours, giving the lawn a scorched appearance even after a fresh cut. More critically, ragged cuts create open wounds in the grass blade that are entry points for fungal disease. According to University of Missouri Extension, clean cuts from sharp blades allow grass to heal quickly, while torn tissue from dull blades increases susceptibility to disease pathogens.
Beyond turf health, a dull blade forces the engine to work harder to push through uncut stems. That additional load increases fuel consumption on gas mowers and shortens motor life on electric and battery models.
How Often Should You Sharpen Lawn Mower Blades?
The general industry guideline is every 20–25 hours of use, or at minimum once per mowing season. Briggs & Stratton recommends sharpening at the start of each season and inspecting after any impact with rocks, roots, or debris. Mowing conditions matter: sandy soils and gravel-edged properties dull a blade faster than loam-heavy turf.
Signs Your Blade Is Dull
- Grass tips appear ragged or brown after mowing
- The mower requires more passes over the same area
- You can see uneven cutting height across a single pass
- The cutting edge feels smooth or rounded when you run a gloved finger across it
- Visible nicks or flat spots along the edge
Tools and Safety Gear You Need Before You Start
Gather everything before starting. Stopping mid-task with the blade removed creates unnecessary risk.
Tools Required
- Combination wrench or socket wrench — typically 5/8″ for push mowers; consult your owner’s manual for riding mowers
- Vise or bench clamp — to hold the blade stationary during sharpening
- Mill bastard file (10-inch) — the standard hand tool for sharpening mower blades; medium-cut teeth remove metal efficiently without excessive thinning
- Angle grinder with a grinding disc — faster than a file; appropriate for heavily nicked blades
- Blade balancer or a 10-inch nail — essential for checking balance after sharpening
- Wire brush or steel wool — to remove grass, rust, and debris before sharpening
- Penetrating oil (e.g., WD-40) — for loosening a seized blade bolt
- Torque wrench — recommended for reinstallation to reach the correct foot-pound specification
- Marker or paint pen — to mark blade orientation before removal
Safety Gear Required
- Heavy leather or cut-resistant gloves — mower blades have sufficient mass to cause serious lacerations even when stationary
- Safety glasses or a face shield — mandatory when using an angle grinder; metal fragments travel at high velocity
- Hearing protection — recommended during grinder use
- Closed-toe shoes — steel-toed boots are preferred
File vs. Angle Grinder: Which Is Better?
A mill bastard file gives more control, produces less heat (heat warps the blade’s temper), and is safer for beginners. An angle grinder removes metal faster and handles deep nicks more efficiently, but requires steady hand technique to maintain the correct angle. For most homeowners sharpening once per season, a file is the more forgiving choice. For heavily damaged blades or frequent sharpening, a grinder saves significant time.
How to Remove a Lawn Mower Blade Safely
Blade removal is where the most serious injuries occur. Follow each step in order — do not skip the spark plug disconnect.
Push Mower Blade Removal
- Disconnect the spark plug wire. Pull the rubber boot off the spark plug and tuck it away from the plug so the engine cannot fire accidentally while your hands are near the blade. This is non-negotiable — blade contact with an accidentally started engine causes severe injury.
- Drain or stabilize the fuel. If tipping the mower, either drain the fuel tank or ensure it is nearly empty to prevent carburetor flooding. Alternatively, use a mower with the air filter side facing up when tipping to avoid oil contamination.
- Mark the blade’s downward-facing side with a marker before removal. Reinstalling a blade upside down is a common and damaging mistake — an inverted blade does not cut and can stress the engine.
- Tip the mower onto its side with the air filter facing up. Place it on a stable, flat surface — a driveway or concrete pad works best.
- Wedge the blade with a piece of scrap wood between the blade tip and the mower deck to prevent it from rotating while you loosen the bolt.
- Turn the bolt counterclockwise to remove it. Mower blade bolts use a standard right-hand thread (righty-tighty, lefty-loosey). Apply penetrating oil if the bolt is seized and wait 5–10 minutes before applying force.
- Slide the blade off the spindle, noting the order of any washers or retaining hardware.
Riding Mower Blade Removal
- Disengage the blade/PTO switch and turn off the engine. Remove the ignition key.
- Disconnect the spark plug wire(s) — riding mowers often have two or more cylinders, each with its own plug.
- Raise the deck to its highest position using the deck height lever.
- Use a floor jack or drive the mower onto ramps to access the underside of the deck. Never crawl under a mower supported only by a floor jack without jack stands.
- Follow steps 3–7 from the push mower process above. Riding mower blades typically use a 15/16″ or 1″ bolt — check the service manual for your specific model.
How to Sharpen a Lawn Mower Blade: File and Grinder Methods
Clean the blade with a wire brush before sharpening. Remove caked grass, rust, and soil so you can clearly see the existing bevel and any nicks. Secure the blade in a vise at a comfortable working height.
Identifying the Correct Bevel Angle
Most lawn mower blades are factory-ground to a bevel angle between 30° and 45°. Do not change this angle during sharpening — match the existing bevel visible on the blade. Steeper angles (closer to 45°) hold an edge longer but are more prone to chipping on rocky ground. Shallower angles (closer to 30°) produce a keener edge that dulls faster.
The goal is a blade edge that is roughly as sharp as a butter knife — not razor-sharp. An overly thin edge chips quickly under mowing impact. Oregon Products, a major blade manufacturer, describes the target sharpness as similar to a butter knife: enough to cut cleanly without the fragility of a fine edge.
Method 1: Sharpening With a Mill Bastard File
- Position the file flat against the existing bevel angle. Lock your wrist to maintain that angle throughout each stroke.
- Push the file in one direction only — from the thick spine of the blade toward the cutting edge, or along the edge heel to tip. Do not drag the file backward on the return stroke; lift and reset.
- Apply consistent, moderate pressure. Light passes with good contact outperform heavy-handed grinding.
- Count your strokes and apply the same number to both ends of the blade to maintain equal metal removal and preserve balance.
- After 10–15 strokes, check the edge. You should feel a slight burr (a thin ridge of raised metal) forming on the back side of the blade — this confirms metal is being removed correctly.
- Remove the burr with 2–3 light strokes on the flat (non-beveled) back of the blade.
- Repeat until the edge is uniformly bright and nicks are removed.
Method 2: Sharpening With an Angle Grinder
- Fit the grinder with a standard grinding disc (not a cutting disc). A flap disc produces a smoother finish with slightly less aggressive metal removal.
- Put on your face shield and hearing protection before starting.
- Hold the grinder at the existing bevel angle. Move the grinder along the blade edge in smooth, sweeping passes from heel to tip.
- Apply light, consistent pressure. Pressing too hard generates heat that can discolor (blue or straw color) and soften the blade’s metal temper — reducing its ability to hold an edge. If the blade discolors, dip it in water and allow it to cool before continuing.
- Make the same number of passes on each end of the blade.
- Check frequently: remove only as much metal as needed to restore the edge and eliminate nicks. Excessive grinding thins the blade toward replacement territory.
How to Balance a Lawn Mower Blade After Sharpening
Balancing is the step most DIYers skip — and it is one of the most mechanically consequential steps in the process.
An unbalanced blade creates vibration every time the spindle rotates. That vibration transmits force into the spindle bearings, blade adapter, deck, and engine mounts. According to Husqvarna’s mower maintenance documentation, operating with an unbalanced blade accelerates bearing wear and can lead to spindle housing damage over time — repairs that cost significantly more than a blade replacement.
How to Check Blade Balance
Nail method: Drive a nail horizontally into a wall stud or clamp it in a vise. Hang the blade by its center hole on the nail and release. If one end dips, that end is heavier. File a small amount of metal from the heavy end’s non-cutting surface (the back side, not the bevel) and retest.
Blade balancer method: A cone-style blade balancer (available for under $10 at hardware stores) provides a more stable and accurate reading than a nail. Place the balancer on a flat surface, set the blade on the cone through its center hole, and observe which side drops. The process for correcting imbalance is the same — remove small amounts from the heavy end’s back side.
A properly balanced blade rests horizontally without either end dropping when placed on the balancer or nail.
How to Reinstall the Blade and Test the Mower
- Verify blade orientation using the mark made during removal. The cutting edges must face the direction of rotation (forward into uncut grass). The stamped or angled wings — if present on a mulching blade — must face upward toward the deck.
- Slide the blade onto the spindle, replacing all washers and retaining hardware in the original order.
- Thread the bolt by hand first to confirm it is not cross-threaded.
- Torque the bolt to specification. Most residential push mowers specify 35–50 ft-lbs; riding mower specs range from 50–90 ft-lbs depending on engine displacement and deck design. Consult your owner’s manual — an under-torqued bolt allows the blade to shift during operation, which is dangerous. An over-torqued bolt can strip the spindle threads or crack the blade adapter.
- Reconnect the spark plug wire(s).
- Lower the mower back to its operating position and refill fuel if drained.
- Test cut on a small section of lawn. Listen for unusual vibration or rattling — both indicate a possible reinstallation issue. Inspect the cut grass tips: they should be clean and uniform, not torn or ragged.
When to Replace a Lawn Mower Blade Instead of Sharpening It
Sharpening restores a worn edge. It cannot fix structural damage. Inspect the blade critically before and after sharpening, and replace it if any of the following conditions are present.
Replacement Indicators
- Cracks or fractures anywhere on the blade — especially near the center hole or along the cutting edge. A cracked blade can fragment at operating RPM (typically 2,800–3,200 RPM on push mowers), turning blade pieces into high-velocity projectiles.
- Significant bends or warping — a bent blade cannot be straightened safely at home. Attempting to bend it back stresses the metal and may create hidden fracture points.
- Missing chunks or deep gouges that cannot be filed out without removing an excessive amount of metal from one end and creating permanent imbalance.
- Excessive thinning of the cutting edge — when the blade has been sharpened so many times that the bevel area is paper-thin. Most manufacturers specify a minimum blade thickness (typically around 0.100–0.120 inches at the cutting edge); check your model’s OEM documentation.
- Rust pitting through the blade body — surface rust is acceptable and removable; through-pitting compromises structural integrity.
How Long Do Lawn Mower Blades Last?
A quality OEM blade sharpened and maintained correctly typically lasts 3–5 seasons for a residential lawn. High-impact conditions — frequent rock contact, sandy soil, large mowing areas — shorten that lifespan. Replacement blades range from $15–$50 for most push mower models and $20–$80 for riding mower blades, making replacement an economical choice when a blade reaches its structural limits.
Frequently Asked Questions
Can you sharpen a lawn mower blade without removing it?
Blade sharpening attachments exist that claim to sharpen a blade in place using a drill. These tools are less effective because they cannot maintain a consistent bevel angle across the full blade length, and they prevent you from inspecting, cleaning, and balancing the blade properly. Removing the blade produces a safer and more consistent result.
Which direction do you turn the bolt to remove a mower blade?
Counterclockwise (lefty-loosey) for the vast majority of mowers, which use a standard right-hand thread. A small number of older mower models use a left-hand thread on the blade bolt — if your bolt will not budge turning counterclockwise and you have confirmed the wrench is on correctly, check your owner’s manual before applying additional force.
How do you know if a lawn mower blade is balanced?
Hang the blade by its center hole on a nail or cone balancer. If both ends remain horizontal, the blade is balanced. If one end drops, that side is heavier and requires light filing on its non-cutting surface (not the bevel) until horizontal balance is achieved. Even a slight imbalance is detectable with this method.
How sharp should a lawn mower blade be after sharpening?
Sharp enough to cut cleanly, not sharp enough to shave with. The industry-standard comparison is a butter knife — a defined, clean edge with enough thickness to resist chipping during normal mowing. A razor-sharp edge chips immediately on first contact with soil, gravel, or a tough stem. After sharpening, you should not be able to press your (gloved) thumb flat against the edge without feeling resistance, but you should not be able to cut yourself with light contact either.