

Quick Answer: Choosing the Best Lawn Mower Wont Start Diagnose Fix
A lawn mower that won’t start is almost always caused by one of six common issues: stale fuel, a fouled spark plug, a clogged air filter, a dirty carburetor, a problem with the primer bulb or choke, or a tripped safety interlock switch. By working through these causes in order, you can diagnose and fix the problem yourself in a…

Pros
- Large-size design named in product title
- Sharpening and balancing functions listed
- Listed as a new upgraded version

Pros
- Adjustable 15-to-45-degree range in title
- Sharpening and balancing functions listed

Pros
- Sharpener and balancer functions in title
- 15-to-45-degree adjustable setting listed
- Built for lawn mower blade maintenance
Pros
- Includes replacement gaskets and a 98079-55846 spark plug
- Matches Honda HRR216 and HRS216 lawn mower models
- Designed around the 16100-Z8B-901 carburetor specification
Cons
- Restricted to select Honda GCV160 mower applications
- Installation requires basic mechanical tools and skills
Quick-Fix Checklist: The 60-Second Pre-Diagnosis
Before diving into deeper troubleshooting, run through this quick checklist to rule out the simplest causes. Many no-start situations are resolved by checking these six items first.
- Is there fresh fuel in the tank? Old fuel is the most common cause of starting problems.
- Is the choke in the correct position? For a cold start, the choke should be closed (engaged). For a warm engine, it should be open.
- Have you pressed the primer bulb? Most engines require 3-5 firm presses to deliver fuel to the carburetor.
- Is the blade-brake or operator presence lever fully depressed? This safety lever must be held against the handle to start the engine.
- Is the oil level within the safe range? Many mowers have a low-oil shutoff switch that prevents starting if oil is too low.
- Is the spark plug wire firmly connected? A loose wire will prevent the spark plug from firing.
Why Stale Fuel Is the #1 Reason Gas Mowers Won’t Start
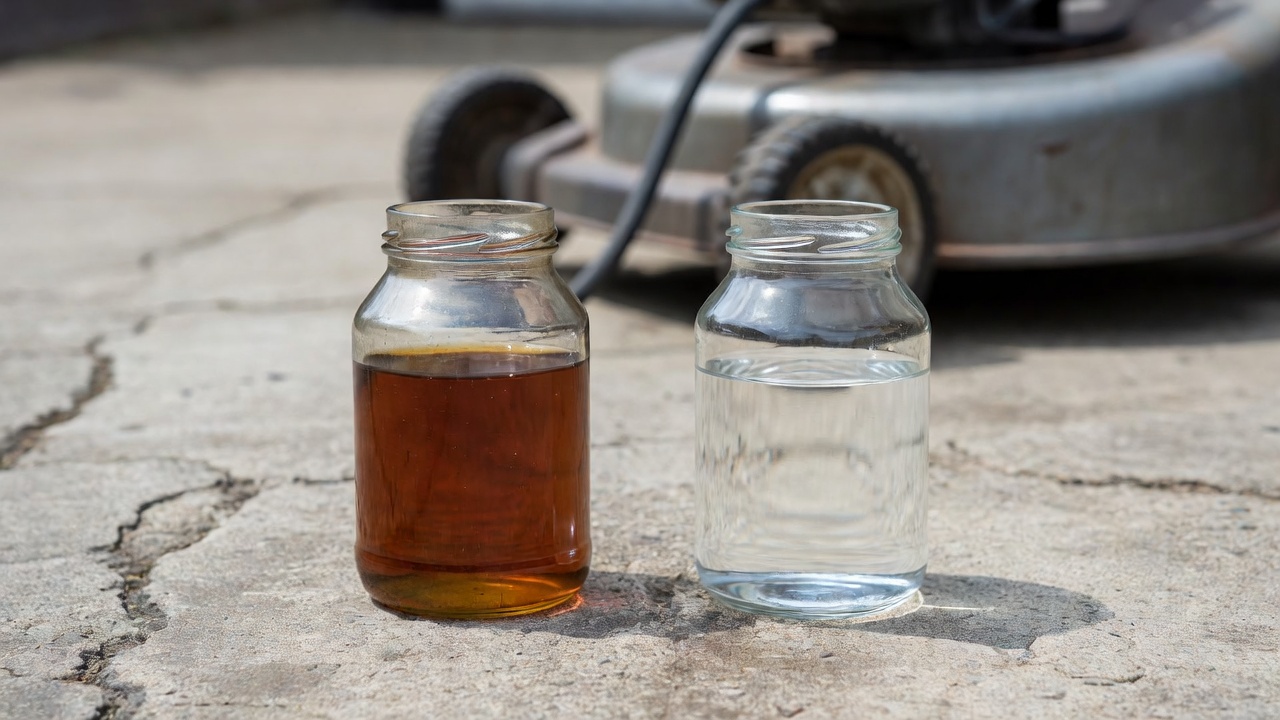
Fuel degradation is the most frequent culprit behind a lawn mower that refuses to start, especially after winter storage. Gasoline with ethanol can begin to break down and form varnish deposits in as little as 30 days, clogging the carburetor’s tiny jets and passages. This problem is particularly common in spring when mowers are first used after sitting idle.
Ethanol-blended fuel absorbs moisture from the air, which can cause the fuel to separate into layers in the tank. This phase separation creates a water-ethanol mixture at the bottom that won’t burn properly and can damage engine components over time. To compare alternative configurations, check our hands-on review of jbl partybox club 120 vs sony srs xv500.
How to fix it: Drain the old fuel from the tank completely. Refill with fresh 87-octane gasoline. For best results, use ethanol-free fuel if available in your area, or add a fuel stabilizer to fresh ethanol-blended fuel. Fuel stabilizer can help prevent degradation for extended periods, though the specific duration varies by product. To compare alternative configurations, check our hands-on review of jbl partybox club 120 vs sony srs xv500.
To drain fuel safely, disconnect the spark plug wire first, then use a siphon pump or carefully tilt the mower to drain into an approved fuel container. Never pour gasoline on the ground. Users looking for related component recommendations can explore our z890 vs x870e motherboard breakdown.
How to Check and Replace a Lawn Mower Spark Plug
A fouled or dead spark plug is the second most common cause of starting problems. The spark plug ignites the fuel-air mixture in the engine, and when it fails, the engine won’t fire.
Reading the spark plug condition: Users looking for related component recommendations can explore our z890 vs x870e motherboard breakdown.
- Carbon fouling: Black, dry deposits indicate a rich fuel mixture or weak spark.
- Oil fouling: Wet, oily deposits suggest oil is entering the combustion chamber.
- Cracked porcelain: Visible cracks in the white insulator mean the plug must be replaced.
- Normal: Light tan or gray deposits indicate proper combustion.
How to test for spark: Remove the spark plug and reconnect it to the spark plug wire. Hold the metal body of the plug against a grounded metal surface on the engine. Pull the starter cord and observe. A healthy plug will produce a visible blue spark across the electrode gap.
Spark plug gap: The gap between the electrodes must be set correctly for proper ignition. While specific gaps vary by engine model, most residential push mowers use a gap of approximately 0.030 inches. Always verify the correct specification for your engine before adjusting. Before finalizing equipment decisions, refer to our comprehensive marshall stanmore iii vs harman kardon onyx studio 8 comparison.
Replacement: Use a spark plug socket (commonly 5/8-inch or 13/16-inch, though you should verify for your specific engine) to remove the old plug. Thread the new plug in by hand first to avoid cross-threading, then tighten with the socket. Do not over-tighten.
Checking and Replacing a Clogged Air Filter
A clogged air filter restricts airflow to the engine, causing a rich fuel mixture that makes starting difficult and can cause the engine to run poorly. Air filters come in two main types: paper and foam. For broader ecosystem context, read through our operational guide on dyson v8 cyclone vs bissell featherweight stick.
Paper filters: These cannot be cleaned effectively and must be replaced when dirty. Hold the filter up to a light source—if you cannot see light through the media, it’s time for a replacement.
Foam filters: These can be washed with warm, soapy water, rinsed, and allowed to dry completely before re-oiling with clean engine oil. Squeeze out excess oil so the filter is damp but not dripping. For troubleshooting and reliability insights, consult our in-depth bissell crosswave hydrosteam vs shark stainforce report.
Air filters should be inspected regularly and replaced at least once per mowing season, or more frequently in dusty conditions. A clean air filter is essential for proper engine performance and fuel efficiency.
How to Clean a Lawn Mower Carburetor
The carburetor mixes fuel and air in the proper ratio for combustion. When its internal passages become clogged with varnish from old fuel, the engine may crank but won’t fire, or it may start briefly then immediately die.
Quick fix with carburetor cleaner: Remove the air filter and spray carburetor cleaner directly into the air intake. If the engine starts briefly, this confirms a carburetor problem. This is a temporary diagnostic step, not a permanent fix.
Bowl removal cleaning: For a more thorough cleaning, locate the carburetor bowl (the round metal cup at the bottom of the carburetor). Remove the bolt at the bottom of the bowl, which often serves as the main jet. Clean all passages with carburetor cleaner spray and a small wire or pin. Pay special attention to the tiny holes in the jet—these are where blockages most commonly occur.
When to replace instead of clean: If the carburetor is severely corroded, if the gaskets are damaged, or if cleaning doesn’t resolve the problem, a replacement carburetor may be more cost-effective. Aftermarket carburetors for common engines are often inexpensive and readily available.
Primer Bulb, Choke, and Pull-Cord Problems
These three components are common failure points that are often overlooked during troubleshooting.
Primer bulb: The primer bulb delivers a small amount of fuel directly to the carburetor to aid cold starting. Inspect the bulb for cracks or tears—if it’s damaged, it won’t build pressure and needs replacement. When pressing the primer, you should feel resistance and see fuel moving through the fuel line.
Choke operation: Incorrect choke use is a frequent beginner mistake. For a cold engine, the choke should be closed (engaged) to restrict airflow and create a richer fuel mixture. Once the engine starts and warms up, gradually open the choke. If you attempt to start a warm engine with the choke closed, you may flood the engine.
Recoil starter (pull cord): If the pull cord feels slack or doesn’t engage the engine, the recoil spring or starter mechanism may be broken. A cord that pulls but the engine doesn’t turn indicates a problem with the starter pawls. While recoil starter repair is possible, it may require removing the starter assembly from the engine.
Safety Interlock Switches: The Hidden No-Start Cause
Modern lawn mowers are equipped with multiple safety switches designed to prevent injury. When these switches fail or become misaligned, they can prevent the engine from starting with no obvious mechanical cause.
Common safety switches on push mowers:
- Blade-brake interlock: The bail lever you hold against the handle engages this switch. If the switch is faulty, the engine won’t start even with the lever depressed.
- Low-oil shutoff: Prevents starting if oil level is below the safe operating range.
Testing with a multimeter: Safety switches can be tested for continuity using a digital multimeter. Disconnect the switch, set the multimeter to continuity mode, and test whether the switch closes (shows continuity) when activated. A switch that doesn’t close when engaged needs replacement.
Important safety note: Safety interlock switches exist to protect you from serious injury. Never permanently bypass these switches. If a switch has failed, replace it with the correct OEM or equivalent part.
Riding Mower and Zero-Turn Mower Won’t Start: Additional Causes
Riding mowers and zero-turn mowers share the same basic troubleshooting steps as push mowers, but they have additional components that can cause starting problems.
Battery issues: Riding mowers use a 12-volt battery to power the starter motor. A weak or dead battery is a common cause of no-start conditions. Symptoms include slow cranking, clicking sounds when turning the key, or complete silence. Check battery terminals for corrosion and ensure connections are tight. A battery that won’t hold a charge after recharging likely needs replacement.
Starter solenoid: The solenoid is an electrical switch that connects the battery to the starter motor. A failed solenoid may produce a single click when turning the key but the engine won’t crank. Solenoid failure is relatively common and the part is typically inexpensive to replace.
Additional safety switches: Riding mowers have several additional safety interlocks:
- Seat switch: Prevents starting if the operator is not seated (on some models).
- Neutral/parking brake switch: The transmission must be in neutral and the parking brake engaged on many models.
- PTO switch: The power take-off (blade engagement) switch must be in the off position to start.
Zero-turn specific: Many zero-turn mowers require the lap bars to be in the neutral or park position before the engine will start.
Electric and Battery-Powered Lawn Mower Won’t Start
Electric mowers have different failure points than gas models but are generally simpler to troubleshoot.
Cordless electric mowers:
- Battery charge: Ensure the battery is fully charged. Some batteries have indicator lights showing charge level.
- Battery connection: Remove and reinsert the battery to ensure proper seating and connection.
- Safety key: Many cordless mowers use a removable safety key that must be inserted for the mower to operate.
- Thermal cutoff: If the motor overheats, a thermal protection circuit may shut down the mower. Allow the motor to cool for 15-30 minutes before attempting to restart.
Corded electric mowers:
- Power source: Verify the outlet is working by testing with another device.
- RCD/GFCI plug: Many corded mowers have a safety plug with a test/reset button. Press the reset button if it has tripped.
- Cord damage: Inspect the power cord for cuts, fraying, or damage that could prevent electrical connection.
When to Call a Technician or Replace the Mower
While many starting problems can be resolved at home, some situations warrant professional help or mower replacement.
Compression test: As a final diagnostic step, you can perform a compression test to evaluate engine health. A healthy small engine typically shows compression readings well above 90 PSI. Significantly lower readings suggest worn piston rings, valve problems, or other internal engine damage that requires professional repair.
Cost considerations: When repair costs approach or exceed 50% of the price of a new mower, replacement may be more economical. Consider the age and overall condition of the mower when making this decision.
Age and usage: Residential push mowers typically provide many years of service with proper maintenance. However, engines that have been poorly maintained or have high hours of operation may have accumulated wear that makes further investment unwise.
Safety concerns: If you’re uncomfortable working with fuel systems, electrical components, or engine internals, or if the problem involves potential safety hazards, consult a qualified small engine technician.
How to Prevent Starting Problems: Seasonal Maintenance Schedule
Prevention is always easier than repair. Following a regular maintenance schedule will minimize starting problems and extend the life of your mower.
End-of-season preparation: Before storing your mower for winter, you have two options: drain all fuel from the system, or add fuel stabilizer to a full tank and run the engine for a few minutes to circulate the treated fuel through the carburetor. Both approaches help prevent the varnish buildup that causes spring starting problems.
Regular maintenance intervals:
-
li>Oil change: Change the oil at least once per season or every 50 hours of operation, whichever comes first.
- Air filter: Inspect before each use and replace at least annually.
- Spark plug: Replace annually or as specified in your owner’s manual.
- Blade: Sharpen as needed and balance when sharpening.
- Cleaning: Remove grass clippings and debris from the mower deck after each use to prevent corrosion and maintain airflow.
Fuel management: Use fresh fuel and avoid letting gasoline sit in the tank for extended periods. If you won’t be mowing for several weeks, add fuel stabilizer or drain the tank. Ethanol-free fuel, where available, can reduce maintenance issues related to fuel degradation.
For more hands-on benchmarks and buying recommendations, consult our guides on heavy-duty chainsaw buyer guide, as well as high-CFM commercial leaf blower guide.
Mechanical safety standards, operational tolerances, and protective gear guidelines align with benchmark specifications established by the American National Standards Institute (ANSI).









