

Quick Answer: How Often Should Mower Blades Be Sharpened?
Sharpen rotary lawn mower blades by use and condition, not a fixed calendar date. For many home lawns, that means at least once in a typical mowing season, and again whenever the grass looks torn or frayed, the cutting edge is rounded or nicked, or the blade has hit rocks, roots, pavement, or sandy soil. Frequent mowing and abrasive conditions wear…

Pros
- Diamond-honed tungsten carbide construction ensures exceptional hardness and rapid sharpening results
- Reversible blades significantly extend overall lifespan of the sharpener
- Full finger guard and ambidextrous ergonomic handle prioritize user safety and comfort
- Broad compatibility covers the most common outdoor and garden cutting tools
- Dishwasher-safe and easy-clean design supports hassle-free long-term ownership
Cons
- Manual hand-operated design requires some physical effort unlike powered electric sharpeners
- Optimized mainly for single-edged blades and may not suit every double-edged or specialty knife
- Carbide inserts will eventually wear and need separate replacement after many years of heavy use
The AccuSharp Garden Tool Sharpener is a compact handheld unit built around diamond-honed tungsten carbide blades. Its sturdy yet lightweight construction and full-length protective guard create an immediate sense of reliability and safety. The ergonomic handle fits securely in either hand, giving both right and left-handed users confident control from the first stroke.
Performance focuses on real-world garden maintenance. A few firm passes restore lawnmower blades, pruners, limb loppers, hoes, shovels and scythes to razor-sharp condition. The double-beveled carbide edges cut metal efficiently, and because the blades reverse, most users enjoy 5 to 10 years of service before replacement. Cleaning is simple with soap and water or a dishwasher cycle, keeping the tool ready for frequent outdoor use.
Drawbacks remain modest yet worth noting. The sharpener works best on single-edged tools and may require practice on unusually thick or shaped blades. Being fully manual, it demands a bit more effort than electric alternatives, and the carbide inserts, while long-lasting, are consumable over time.
For homeowners and gardeners who want an affordable, safe and effective way to keep cutting tools sharp without professional services, the AccuSharp Garden Tool Sharpener delivers clear value. Its combination of durability, versatility and protective design makes it a practical addition to any tool shed.

Pros
- Accurate balancing reduces blade wobble and engine wear effectively
- Works with nearly all standard lawnmower blade shapes for true universality
- Durable zinc die-cast construction ensures long-term rust resistance
- Intuitive design makes it easy for beginners and DIY users to operate
- Supports better cutting efficiency after blade sharpening sessions
Cons
- Lacks advanced precision indicators so users must rely on visual leveling judgment
- May not fit highly specialized or non-standard irregular blade designs perfectly
- Basic single-tool package includes no carrying case or extra accessories
The SporGain Lawn Mower Blade Balancer is a compact universal tool built from premium zinc die-cast metal for balancing lawnmower blades after sharpening. Its solid rust-resistant construction gives an immediate impression of durability suited for garage storage or occasional outdoor exposure, making it a practical accessory for standard lawn care routines.
In performance, the tool excels at simple balance checks by letting users place nearly any round, square, or common blade shape on it to detect imbalances. This process helps reduce wobble, vibration, and engine strain while verifying bent blades, leading to smoother cuts and longer mower life based on its core design features. The intuitive layout supports quick adjustments without specialized skills.
Drawbacks include the absence of built-in precision markers, which means results depend on careful visual assessment, and potential fit issues with highly custom blades outside standard shapes. It also comes as a basic 1pk unit without extras like storage options.
Overall, this SporGain balancer delivers strong value for DIY homeowners and lawn maintenance enthusiasts who regularly sharpen blades and want an affordable, reliable way to maintain cutting performance. It is ideal for those seeking universal compatibility and lasting metal quality without needing professional-grade equipment.
How often mower blades need sharpening
There is no single date that fits every lawn and every rotary mower. A quiet suburban lot cut once a week in soft, stone-free turf is not the same job as a large, sandy yard that is mowed twice as often and hides irrigation heads, roots, and edging. Condition and use matter more than the month on the calendar.
For many homeowners, a practical cadence is at least one sharpening during an active mowing season, with extra service whenever the finish or the edge says the blade is no longer slicing. That is informal homeowner practice, not a universal specification. If your mower or blade maker publishes a maintenance interval, follow that document first. Shop talk sometimes mentions seasonal or hourly rules of thumb. Treat those as starting points, then decide from the lawn and the steel in front of you.
Hours of mowing and the number of cuts wear the edge more directly than the date, but most people do not log either one. You do not need a stopwatch. A long growing season with weekly mowing simply puts more grass, dust, and grit across the bevel than a short season or a lawn that is cut less often. If the grass still looks cleanly sliced and the cutting edge still has a defined bevel, you can wait. If the lawn looks chewed, do not wait for a spring or fall reminder.
When to sharpen now instead of later
Some events should move sharpening, or a full inspection, to the front of the line rather than the next seasonal service:
- The blade struck a rock, root, sidewalk, driveway edge, landscape timber, or irrigation part.
- The cutting lip is rounded, flattened, folded, or heavily nicked.
- Leaf tips look torn or frayed even though the cutting height and deck setup have not changed.
- The mower begins to vibrate in a new way after an impact. Stop and inspect. Vibration can mean a dull, bent, or unbalanced blade, not just a need for a light touch-up.
Push mowers and riding mowers follow the same logic even though their blades differ in size and mounting hardware. Typical home walk-behind and riding machines are rotary mowers: a spinning blade with a sharpened bevel does the cutting. A larger riding-mower blade has more steel, but abrasion and impacts still dull that edge. On multi-blade decks, mismatched wear from one blade to the next can leave a striped or uneven finish, so inspect every blade rather than assuming one good edge speaks for the whole deck.
Signs your blades are already too dull
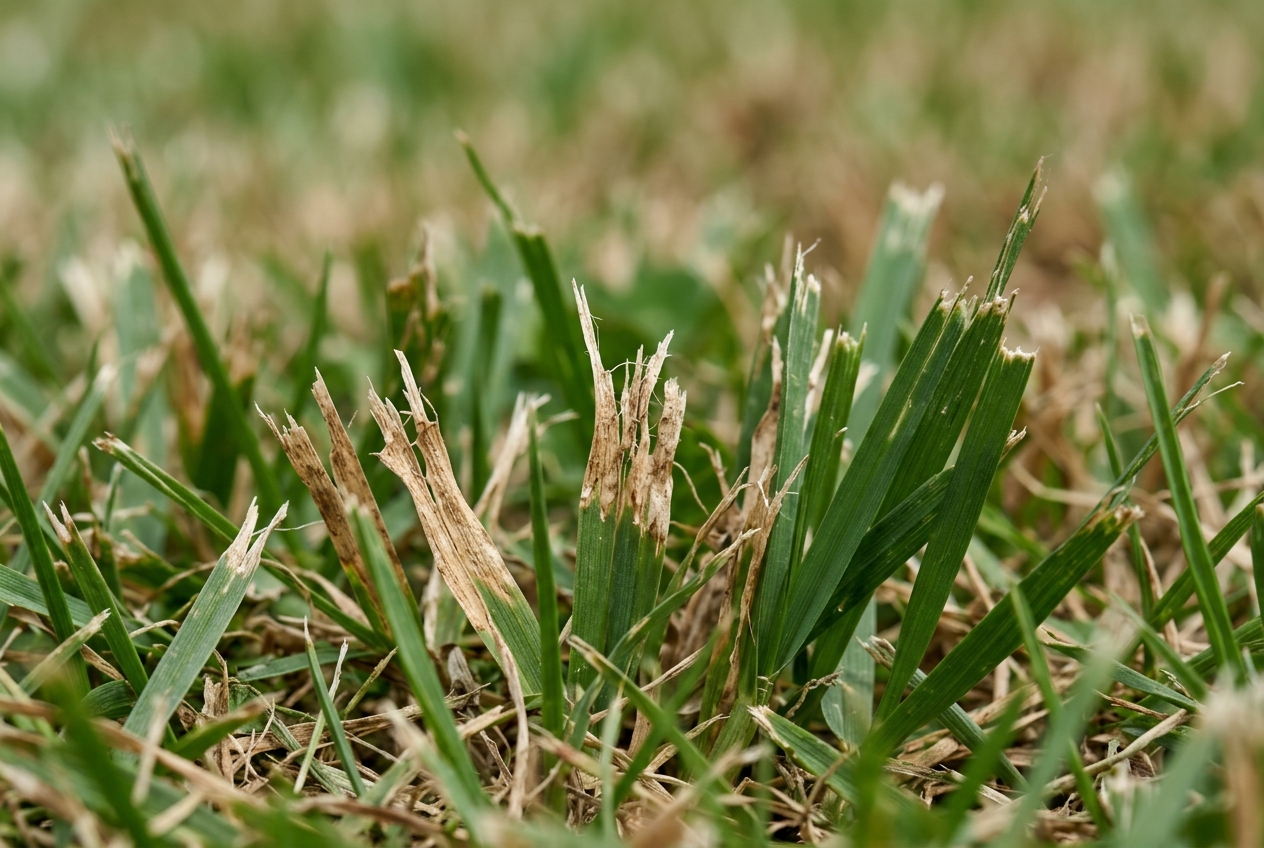
A sharp rotary blade slices grass. A dull or damaged blade is more likely to tear or shred the leaf tips. You can often judge the edge from the finished cut before you ever tip the mower or pull a wrench.
What a clean cut looks like
After a pass with a useful edge, cut ends look relatively even rather than shredded. Clippings tend to be more uniform. The lawn looks finished instead of stringy. Individual blades of grass should look cut, not chewed. That does not mean every lawn will look like a putting green, species, moisture, and height all affect appearance, but the leaf tips should not look ragged if the only change was that you mowed.
Lawn symptoms that point to a dull edge
Torn, frayed, or shredded tips are the most useful field sign. Those damaged ends often turn tan or brown within a day or two as the torn tissue dries out. The lawn can look stressed or off-color even when you did not lower the deck. Thick turf may leave stringy ribbons. You may also see an uneven or chewed finish, uncut strips in otherwise even ground, or grass that seems to lie over instead of standing with a clean cut.
Those symptoms are common with a dull or nicked blade, but they are not a diagnosis by themselves. A bent blade, low tire pressure on a rider, a clogged deck, wet heavy grass, cutting off too much height at once, or an unsuitable cutting height can also leave a poor finish. Use the lawn as the first clue, then confirm with the blade. For additional operational safety benchmarks, see our published testing notes on marshall stanmore iii vs harman kardon onyx studio 8.
What the edge itself should look like
A blade that still has useful sharpness usually shows a defined bevel rather than a rounded, flattened, or heavily nicked lip. The cutting edge should look like an edge, not a shiny bumper. Small nicks happen in ordinary yards; a saw-toothed or folded lip after a hard hit is another matter.
A blade can look shiny and still cut poorly. Soil, sand, and dust polish the metal. Shine is not the same thing as a keen bevel. Run a gloved finger carefully along the shape of the bevel if you need a better sense of it, but do not test sharpness on bare skin. Look for a crisp transition from the face of the blade to the cutting lip. If that transition has worn into a dull radius, the blade is tearing more than it is slicing. To compare alternative configurations, check our hands-on review of dyson v8 cyclone vs bissell featherweight stick.
What wears blades down faster
Every pass removes a little metal and rounds the edge a little more. Some yards simply act like sandpaper. Abrasive soil, sand, and airborne dust grind the bevel. Lawns built on sandy ground, recently tilled beds that throw grit onto the turf, dusty midsummer conditions, and properties that collect driveway gravel all shorten the useful life of an edge.
Hidden debris does the sudden damage. Sticks, rocks, roots that sit just above grade, irrigation heads, well caps, landscape edging, pavers, and the lip of a sidewalk can nick, roll, or bend a blade in one hit. After any solid strike, inspect before the next full mow. A single folded tip can tear a stripe of grass for the rest of the afternoon. Users looking for related component recommendations can explore our bissell crosswave hydrosteam vs shark stainforce breakdown.
Grass condition changes the load even when nothing hard is in the way. Very tall grass means more material in each pass and more work for the edge. Wet, heavy grass packs the deck, can smear instead of discharge cleanly, and makes an already dull blade more likely to tear. That is not a reason to skip mowing when the lawn needs it, but it is a reason to avoid letting the grass get extreme and to check the edge if the finish turns ragged after a wet week.
More frequent mowing generally means the edge wears sooner, because the blade simply spends more time in contact with grass, soil splash, and grit. Mulching and bagging both use that same spinning edge. Mulching keeps clippings under the deck longer so the blade contacts plant material more often; bagging still sends grass across the bevel on every pass. Neither mode has a wear rate you can treat as a proven number. Inspect the edge either way, and clean the deck so packed clippings do not hide nicks or add drag.
How you use the mower matters as well. Scalping high spots, riding over gravel paths, trimming tight against masonry, and mowing with the deck too low in thin turf all increase contact with soil and hard objects. Raising the deck a notch on rough ground and clearing sticks before you start will not keep a blade sharp forever, but it does reduce unscheduled damage.
Why dull blades matter for the lawn and the mower
A clean slice leaves a smaller wound on each leaf. A tear leaves a ragged tip that browns and makes the whole lawn look tired. That extra stress does not automatically cause a named turf disease, and a dull blade is not the only reason grass can brown after mowing. It is still an avoidable insult. Grass that is already dry, recently fertilized, or recovering from heat has less reserve for a shredded cut. Keeping the edge keen is one of the simpler ways to reduce that stress.
The mower feels the difference too. A sharp blade spends more of its energy cutting and less of it beating through the canopy. With a dull or damaged edge, the machine may sound or feel as if it is working harder, especially in thick or damp grass. The finish can look uneven or stringy. You may notice more leftover strips or a deck that seems to bog in conditions it used to handle. Those are practical signs, not a promise of a specific fuel-use increase or a guarantee of engine damage. Still, making the mower thrash through every pass is a poor way to treat both the turf and the machine.
Vibration is a separate stake. A blade that is bent from an impact, or left lopsided by uneven sharpening, can shake the spindle, deck, and fasteners. Persistent new vibration is a stop-and-inspect problem, not something to mow through until the next weekend.
Rotary blades versus reel mowers
This inspection logic is for typical homeowner rotary mowers, the walk-behind and riding machines whose horizontal blade spins under a deck. That is what most home lawns use.
Reel mowers work differently. A cylindrical reel and a bedknife meet in a scissor-like cut. They are not dressed with the same file-on-the-bench approach that many people use on a rotary blade, and they usually need specialized grinding or backlapping. Reel owners should not copy a rotary seasonal rule of thumb or assume that a hardware-store file will restore the cylinder and bedknife. If you have a reel mower, use the maker’s guidance or a shop that actually services reels. The rest of this article stays with rotary blades.
How to inspect a blade safely
Looking at a blade is simple. Getting to it safely is not optional. Follow the safety steps in your specific mower manual. The points below are general practice, not a substitute for that document, and they are not a full disassembly guide.
Isolate power before any inspection or removal, and wait until every moving part has stopped.
- On a gasoline mower, that usually means disconnecting the spark-plug wire and keeping it away from the plug so the engine cannot start if the blade is turned.
- On a battery mower, remove the battery or use the lockout the manufacturer specifies.
- On a corded electric mower, unplug it.
- Never put hands or tools under the deck of a mower that can still start.
Wear heavy gloves. Rotary blades stay sharp enough to cut skin even when they are too dull to cut grass well. Support the mower so it cannot tip, roll, or fall. Do not crawl under an unstable machine, and do not rely on a thin kickstand or a single block that can kick out. If the manual describes a recommended position for tipping a walk-behind mower, use that position so fuel and oil stay where they belong. If you are not sure how to support a rider or zero-turn safely, stop and get help rather than improvising jack points.
Once you can see the blade, look for more than dullness:
- Cracks, especially near the center hole, mounting shoulders, or along a bend.
- A blade that is no longer straight when you sight along it.
- Missing chunks, a folded tip, or a cutting edge worn far below the original shape.
- Loose, damaged, or missing hardware, including adapters, washers, and the center fastener.
A cracked, bent, or severely worn blade should be replaced, not sharpened. If hardware looks wrong, if the blade sits at an odd angle, or if the manual’s removal steps are unclear, consult the owner’s manual or a qualified shop instead of forcing parts.
Sharpen, balance, or replace
Inspection should end in a decision: dress the edge, correct balance after metal is removed, or install a new blade.
Sharpening is often enough when the blade is still straight and intact, the steel is not paper-thin, and the problem is ordinary dulling or small nicks. The goal is to restore an even bevel and a clean cutting lip while removing only as much metal as needed. You are not trying to create a knife-like razor that will fold the first time it meets a twig. A workmanlike rotary edge is a defined bevel that slices grass.
Uneven metal removal matters because a rotary blade is a spinning mass. Take too much off one end, one wing, or one side of a pair of cutting edges, and the blade can run out of balance. An unbalanced blade causes vibration that is hard on the spindle, deck, and fasteners, and it can leave a worse cut than a slightly dull but balanced blade. After any sharpening, check balance with a simple balancer or a careful comparison of the two ends before the blade goes back on the mower. Exact factory balance weights and remaining-thickness limits are maker-dependent; do not guess at a number. If you cannot get the blade to hang evenly without removing still more metal from an already thin area, replace it.
Replace instead of sharpening when you find cracks, bends, missing chunks, a severely worn or scooped profile, or damage at the mounting hole. Those are structural problems. Sharpening will not make a bent blade straight, and it will not make a cracked blade safe.
On a multi-blade deck, service every blade you inspect. Mismatched wear or a mix of a fresh blade and a rounded one can affect cut quality. That is not the same as a required paired-replacement rule for every brand. If one blade is damaged enough to replace and the others are still in good shape, use the cut quality and the maker’s guidance to decide. When in doubt, matching the set is the cleaner outcome.
DIY sharpening versus a shop
A careful homeowner with basic tools can restore a lightly dulled rotary blade. The high-level path is the same whether you use a file, a quality sharpening tool, or a shop: secure the blade, restore an even bevel on the cutting edge, take off only the metal you need, keep both ends consistent, check balance, and reinstall in the original orientation with hardware tightened as the manufacturer specifies.
A mower shop or blade service is the better choice when the blade is badly nicked, the shape is complicated, you lack a way to hold and balance the work, or vibration persists after a home touch-up. Ask the shop to check more than a shiny edge. Straightness, balance, cracks, and the condition of mounting hardware all matter. If you run a multi-blade deck, ask them to look at the full set.
No consumer file, bench grinder, or drill attachment automatically matches a factory grind. A bench grinder in particular can overheat the steel if you bear down and let the edge turn blue. Overheated metal can lose toughness and then dull or chip sooner. That risk is one reason many people prefer a shop for anything beyond a light dressing. If you grind at home, use a light touch, keep the steel cool, and stop if you cannot keep the bevel even.
After the blade is sharp
Reinstall the blade in its original orientation. Rotary blades are not always symmetric in function; the lift wings, mulching faces, and cutting edges have a direction. Hardware should go back in the order the manufacturer specifies. Tighten fasteners as the manual requires. Do not invent a torque figure or a washer stack if the book is not in front of you. If a fastener is damaged, replace it rather than hoping a rounded bolt will hold a spinning blade.
The first cut after sharpening is the confirmation step. Leaf tips should look cleaner. The finish should be more even. The mower should not introduce a new vibration. If the lawn still looks torn, recheck height, deck cleanliness, and whether another blade on a multi-blade deck was left dull. If the machine shakes, stop and recheck balance, straightness, and mounting instead of finishing the yard.
Fold ordinary inspection into ordinary mowing. Glance at the edge after you hit an object. During heavy-use weeks, a mid-season look under the deck is more useful than a reminder date on the calendar. Clean packed clippings so you can actually see the bevel. If new nicks, a crooked cut, or vibration appear, stop and deal with the blade. A sharp, balanced, undamaged rotary blade is what turns “how often should I sharpen?” into a short answer: as often as the cut and the edge say you should, and at least once in a typical home mowing season unless the blade is still clearly slicing.
Quick answers
Is once a season enough?
It is a reasonable baseline for many home lawns, not a rule that covers sandy soil, weekly heavy mowing, or a blade that has already hit something hard. Inspect the cut and the edge.
Can I just flip the blade instead of sharpening?
Only if the blade is designed with a second usable cutting edge and the maker says that orientation is correct. Many rotary blades are not meant to be flipped as a sharpening substitute. When the bevel is gone, restore it or replace the blade.
Does a riding mower need a different schedule than a push mower?
The logic is the same: use, impacts, and the look of the grass. Larger blades and multi-blade decks do not stay sharp just because they are bigger. They still need inspection, and every blade on the deck counts.
Related Maintenance and Operating Guides
To keep your equipment running at peak operating efficiency, explore our related technical walkthroughs and maintenance tutorials:
- Consult our detailed breakdown on heavy-duty chainsaw buyer guide.
Technical Standards and Compliance
Mechanical safety standards, operational tolerances, and protective gear guidelines align with benchmark specifications established by the American National Standards Institute (ANSI).









