

Quick Answer: How To Tell If Lawn Mower Blade Is Dull?
A lawn mower blade is likely dull if the grass looks torn, frayed, or brown-tipped after mowing instead of showing a clean, even cut. Confirm by shutting the mower down, isolating power so it cannot start, and checking the cutting edge: a dull blade looks rounded, shiny, nicked, or flattened rather than having a defined bevel. Also look for bending,…

Pros
- Large-size design named in product title
- Sharpening and balancing functions listed
- Listed as a new upgraded version

Pros
- Adjustable 15-to-45-degree range in title
- Sharpening and balancing functions listed
Pros
- Includes replacement gaskets and a 98079-55846 spark plug
- Matches Honda HRR216 and HRS216 lawn mower models
- Designed around the 16100-Z8B-901 carburetor specification
Cons
- Restricted to select Honda GCV160 mower applications
- Installation requires basic mechanical tools and skills
Signs in the Lawn That Point to a Dull Blade
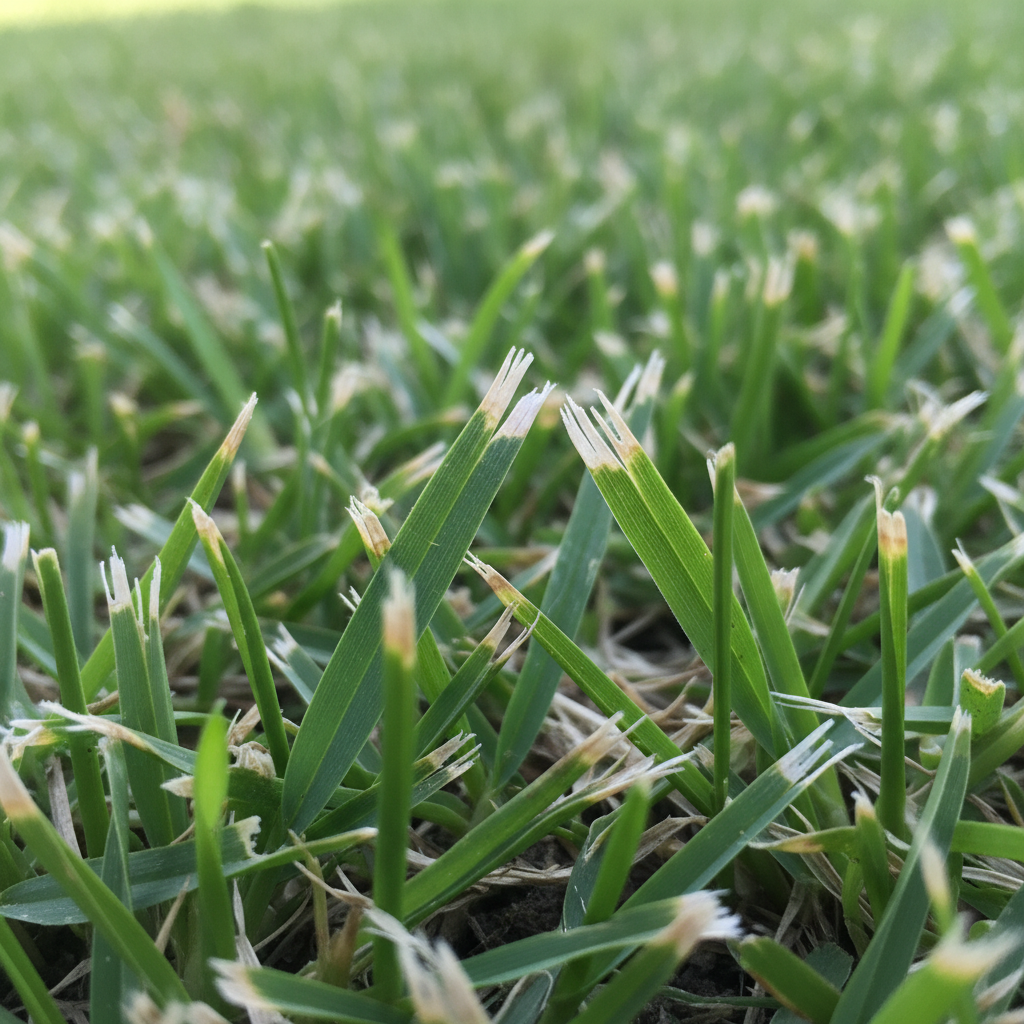
The easiest way to suspect a dull blade is to look at the lawn you just cut, not at the machine first. A sharp rotary mower blade slices each leaf. A dull blade is more likely to tear or shred it. That difference shows up in the leaf tips, the clippings, and the overall finish of the turf.
A clean cut looks relatively even across the end of each grass blade. The tip is a short, fairly straight line rather than a ragged fringe. From a few steps back, the surface should look consistent in color and texture, without a fuzzy haze or a chewed, stringy look. You will still see some variation from species to species and from sun to shade, but the cut itself should not look shredded.
Torn grass looks different. The leaf ends are ragged, fibrous, or split. Instead of a neat slice, the tissue is mashed or pulled. After mowing, those damaged tips often dry out and turn tan or brown. Brown tips are a common clue, not a diagnosis by themselves. Drought, disease, fertilizer burn, scalping, and mowing wet grass can produce similar discoloration. Use the torn or frayed shape of the leaf end, not color alone, as the stronger sign.
Look at the clippings as well. When the cutting edge is still slicing, clippings tend to look like short pieces of leaf. When the blade is tearing, the clippings can look shredded, stringy, or mashed. Under a mulching deck they may mat instead of dropping back as small fragments. In a bag they can look wetter and more fibrous than usual. From a side-discharge chute they may come out in clumps rather than a fairly even stream. None of those patterns proves the blade is dull on its own, but they support what you see on the standing grass.
A freshly mowed lawn with a serviceable blade should look reasonably even after a normal pass. Broad streaks of uncut or half-cut grass, a grayish or fuzzy cast, and leaf tips that look chewed rather than trimmed all point toward poor cutting. Treat those lawn symptoms as a reason to inspect the blade, not as final proof. Wet turf, a packed mower deck, uneven ground, and cutting off too much length at once can mimic some of the same appearance.
Other Clues While You Are Mowing
The lawn is the first evidence. How the mower behaves during a normal pass is the second. You do not need gauges or a mechanical teardown. You need to notice whether the machine is still cutting cleanly or merely beating the grass down.
After one typical pass, look behind the deck. Standing strips, uncut blades that spring back up, or a chewed band where the deck just traveled suggest the edge is no longer slicing. On a rotary walk-behind or riding mower, a sharp blade should leave a fairly uniform swath. Leftover tall stems in the middle of that swath, or grass that looks bruised rather than cut, are supportive clues.
Mulching, bagging, and side-discharge can all look worse when the blade is dull. A mulching blade relies on a sharp edge and the deck’s airflow to recut clippings. If those clippings stay long, wet-looking, or pasted to the turf, the blade may be tearing instead of chopping. Bagging may fill more slowly, or the bag may collect stringy material and more uncut pieces. Side-discharge may throw clumps or leave a windrow that looks shredded. Wet, overly long, or debris-clogged conditions can cause some of the same leftovers, so check the deck underside after you isolate the machine.
Extra passes are another hint. If you find yourself overlapping more than usual or going back over the same strip to get an acceptable finish, the blade may be tearing rather than cutting. Heavier-looking clippings that sit on top of the lawn instead of dropping in can point the same way. A clogged deck makes this worse: packed grass under the housing reduces lift and keeps the blade from presenting a clean edge to the turf.
Vibration and a suddenly uneven cut deserve a different interpretation. Extra shaking through the handle or seat, a thump once per revolution, or one side of the swath looking much worse than the other can mean a bent blade, a loose blade, or an unbalanced assembly. Those are not proof of simple dullness. Stop and inspect for damage before you treat the problem as an edge that only needs sharpening. The same caution applies if the cut height looks irregular after you have already checked the wheels or deck height.
What a Dull Blade Looks and Feels Like
Once the lawn and the mowing pass make you suspicious, confirm by looking at the cutting edge. On a typical rotary blade, a serviceable edge has a visible bevel and a defined cutting line. You should be able to see where the face of the blade tapers to a thin edge. That line does not have to look like a kitchen knife, but it should look like an edge, not a rounded bar.
Dullness changes that geometry. The bevel wears back. The thin line becomes rounded, flattened, polished, or rolled. Shine right on the very edge often means the bevel has worn blunt: the metal is rubbing and smearing grass instead of slicing it. A dull blade can still look metallic and “used.” The giveaway is the loss of a crisp corner where the bevel meets the grass.
Nicks, dents, and missing chips matter even if part of the edge still looks sharp. A stone, root, or landscape edging can leave a series of bites along the cutting line. Those gaps fold or tear whatever they hit. The result is an uncut or chewed look in spots, even when neighboring steel still has some bevel. You do not need a count of nicks to decide the edge is compromised. If the damage is obvious from a safe viewing distance, treat cut quality as reduced until the blade is serviced or replaced.
You can often judge obvious dullness without removing the blade. After the mower is fully stopped and isolated so it cannot start, tip or support the machine only as the owner’s manual allows and look at the edge from the side. A rounded, shiny, or flattened profile is usually visible. Removal is optional for a first look. It helps when grass and mud hide the bevel, when you need to see the far side of a mulching or high-lift blade, or when you want to inspect the mounting hole and the lifting sails more carefully.
Check both cutting ends. A typical rotary blade is double-ended. Many mulching blades and high-lift blades also have extra contours, wings, or secondary edges. Walk your eyes along each cutting edge, not just the corner that happens to face you. One end can be nicked from an impact while the other only looks worn. Wear on the lifting sail—the upturned section that helps move air and clippings—is not the same as a dull cutting edge, but severe erosion there is a wear issue, not a sharpening issue.
A cautious gloved check of “defined versus rounded” is enough. Wear sturdy gloves. Do not drag a bare finger along the edge. A nicked blade can cut as easily as a sharp one, and rust or packed grit can hide a burr. You are looking for shape, not proving sharpness by touch.
How to Inspect the Blade Safely
The inspection is simple. The hazard is not. A hidden blade can still be sharp or nicked. A deck can drop. A mower that looks “off” can still start if the ignition or battery circuit is live. Never spin, bump, or watch the blade with the engine running, and never reach under a deck that is not fully stopped and isolated.
Start with a full stop. Wait until the engine and the blade have completely stopped turning. Then isolate power so the machine cannot start while your hands are near the deck:
- On a gas walk-behind mower, disconnect the spark-plug boot so the plug cannot fire. Keep the boot away from the plug until you are finished.
- If the machine has a key, remove it and keep it with you.
- On a battery mower, or any mower with an electric start or removable pack, use battery isolation: remove the battery pack or disconnect the battery as the manual describes, and wait for residual motion to stop.
- On a riding mower, remove the key, set the parking brake, and isolate the battery if the manual calls for that before deck work.
Keep the machine from rolling, tipping, or dropping. Work on level ground. Chock wheels if the mower could roll. Follow the owner’s manual for tipping direction, jack points, and deck support. Do not invent a universal rule such as always tipping to one side; fuel, oil, and battery location vary by model, and the manual is the authority. If you raise a rider, support the machine on stands rated for the load. Do not work under a rider deck supported only by a hydraulic jack. A jack can settle or kick out. If you cannot support the deck securely, stop and have the inspection done where the machine can be lifted safely.
Looking under a safely supported deck is often enough to see whether the cutting edge is rounded, shiny, nicked, or still beveled. Blade removal helps when you cannot see both ends, when you need to check for a bent blade or a deformed center hole, or when packed clippings hide the steel. Removal is a service step, not a requirement for a first visual check. If you do remove the blade, follow the manual for hardware orientation and reassembly, and do not guess at fastener tightness from memory.
Wear sturdy gloves and eye protection. Packed grass can fling grit when you scrape the deck. The edge may still be sharp in places and jagged in others. Keep children and pets away. Do not leave a tipped walk-behind unattended. After the look, restore the spark-plug boot, battery, and key only when tools, hands, and supports are clear of the blade path.
The main hazards are accidental starting, cuts from a hidden or nicked edge, and a falling deck. If any part of that setup feels unstable, or if the manual’s support method is not something you can do securely, treat inspection as a shop job rather than forcing a look in the driveway.
Dull Versus Bent, Cracked, or Worn Out
Simple dullness is an edge problem. A bent blade, a cracked blade, or a worn blade is a structural problem. Sharpening does not fix a blade that is no longer straight, sound, or complete. Inspect the whole blade, not just one cutting corner. A blade can be dull and also damaged. Dullness never rules out a crack.
A merely blunt edge still looks basically straight along its length. The steel follows the original outline. What has changed is the bevel. A bent blade looks or behaves differently. One end may sit higher or lower than the other. The blade may look twisted when you sight along it. In use, a bend often shows up as vibration, a thump, or a cut that is uneven from one side of the deck to the other. Do not try to straighten a bent blade and keep using it. Straightening can hide a crack or leave the metal fatigued. Replacement, or inspection by a qualified shop, is the safer path.
Cracks, large missing chunks, and a badly eroded lifting sail mean the blade is out of service. Look along the cutting edges, at the transition into the sails, around bolt holes or the center hole, and anywhere the blade may have hit something hard. A crack can be a fine line before it is a break. Large chips change both balance and the way the edge meets the grass. A deformed center hole or elongated mounting area means the blade may not locate true on the spindle. Severe corrosion that has eaten into the edge or the body is wear, not a cosmetic stain. Any of those conditions should be framed as replace or have a qualified shop inspect, not as a DIY sharpening job.
A hard impact can leave the edge looking shiny and still be more than a dull-blade problem. Hitting a rock, stake, or sprinkler head may flatten and polish a short stretch of steel. That shine can look like ordinary wear. Next to it you may find a dent, a bend, or the start of a crack. If you know the mower struck something solid, inspect for deformation and cracks even when the rest of the bevel still looks defined.
Check both ends, both faces, the sails, and the mounting area every time. Wear is not always even. One end can be nicked while the other is only rounded. One sail can be thinner than the other. The center can be mushroomed or out of round. If anything about the blade’s shape, soundness, or mounting area looks wrong, do not treat it as an edge that only needs to be touched up.
Other Problems That Can Look Like a Dull Blade
Not every ragged lawn is a sharpening problem. Several common conditions mimic torn tips, shredded clippings, or an uneven finish. Ruling them out keeps you from pulling a blade that is still cutting reasonably well—or from missing a different issue that still needs attention.
Wet grass tears more easily, packs under the mower deck, and leaves mashed clippings that look like a dull-blade mess. A packed deck has the same effect even on dry days: clippings fill the housing, airflow drops, and the blade cannot lift and slice cleanly. Uneven ground and scalping produce brown or white patches that can be mistaken for brown tips from tearing. Cutting too much length at once, or skipping mows until the turf is very tall, also leaves a shredded look because the blade is trying to process more tissue than a single pass can cut cleanly.
Plant stress can be mistaken for dull-blade browning. Drought, heat, lawn disease, and fertilizer burn all discolor leaf tissue. The difference is in the cut end. Stress and disease often affect whole leaves, patches, or patterns that do not line up with the last mowing swath. Dull-blade damage is concentrated at the freshly cut tip and often appears right after mowing. That distinction is not perfect. When in doubt, inspect the blade and also look at uncut grass in the same area.
On multi-blade decks, one bad blade can create a striped or chewed pattern. The other blades may still be cutting cleanly, so the lawn looks banded: a decent strip next to a torn or uncut strip. Inspect every blade under that deck, not only the one that is easiest to see.
Reel mowers are a separate case. A reel mower cuts with a scissor action against a bedknife. Diagnosis involves the reel-to-bedknife relationship, not the rotary bevel described in this checklist. If you use a reel mower, do not apply this rotary-blade inspection as a complete guide. A reel that is out of adjustment can tear grass too, but the checks and the service steps are different, and they belong in the reel mower’s manual rather than in a rotary-blade walkthrough.
After You Confirm the Blade Is Dull
Once you have lawn symptoms plus a safely inspected edge, decide what the blade actually needs. Stay at a high level. The goal is to stop tearing the turf, not to turn the next hour into a grind-and-balance project in the driveway unless you already know how to do that work correctly.
If the blade is only dull—bevel worn rounded or flattened, no bend, no crack, no large missing metal, mounting area intact—the usual next decision is to sharpen it and then have the blade checked for balance by a competent person or shop. Sharpening without a balance check can create vibration that the original dull edge did not cause. If you are not set up to do that work, a shop can sharpen and inspect the same blade.
If the blade is damaged, replacement is the safer path. A bent, cracked, or worn-out blade is not a sharpening job. Use the part specified for that mower. The owner’s manual is the place to confirm blade style: mulching, bagging, high-lift, or another design the deck was built to use. Mixing an unapproved style can change lift, discharge, and clearance inside the deck. Do not keep a cracked or bent blade in service because the remaining edge still looks usable.
Avoid continuing to mow on a blade that is tearing the lawn if you have a practical alternative. Torn tips dry out, look brown, and add stress to grass that may already be dealing with heat or drought. A short delay while you sharpen or replace the blade is usually kinder to the turf than another weekend of shredding. If you must mow once more before service, raise the cutting height slightly and avoid wet grass so you remove less tissue and reduce packing under the deck. That is a stopgap, not a fix.
For the correct replacement type, start with the owner’s manual and the model number on the mower. Match the blade style and the deck size the manufacturer specifies. The manual is also where you will find model-specific warnings about tipping, deck support, and service. There is no universal calendar that tells every owner to sharpen or replace on a fixed schedule. How fast an edge dulls depends on soil, sand, debris, and how often the blade hits hard objects. Use the lawn’s appearance and the blade’s condition, not an invented interval, to decide when to look again.
If anything about isolation, support, or damage is beyond a careful visual check, stop and use a qualified technician. A dull rotary blade is a common, solvable problem. A falling deck, a live ignition circuit, or a cracked blade treated as “just dull” is how a simple inspection becomes an injury or a failed spindle. Confirm the signs, isolate the machine, look at the whole blade, and then sharpen only what is sound—or replace what is not.









