On a typical 4-stroke gasoline walk-behind mower, stop the engine, park it on level ground, find the engine oil fill cap or dipstick, check the current level, then add the oil named in the owner’s manual a little at a time and recheck so you do not overfill. Do not pour oil into the gas tank unless you have a 2-stroke engine that uses mixed fuel, and do not add oil to an electric or battery mower.
Confirm how your mower is lubricated
Before you open a bottle, confirm what kind of machine you have and what job you are actually doing. Adding oil to a crankcase is not the same as mixing oil into gasoline, and it is not the same as changing dirty oil. The right first step is identifying the engine, not guessing from the color of a cap.
Most common modern walk-behind gasoline lawn mowers use a 4-stroke engine. That engine has a separate crankcase that holds engine oil. You check that oil with a dipstick or a marked fill neck, and you add oil through an oil fill cap on the engine. The gasoline stays in its own tank. Those two openings are not interchangeable.
Some older or specialty mowers use a 2-stroke engine. A 2-stroke is usually lubricated by oil mixed into the fuel, not by a separate crankcase fill the way a typical 4-stroke is. If your mower is a 2-stroke, pouring bottled engine oil into a crankcase opening may not be the correct procedure at all. The owner’s manual, engine label, or fuel-cap instructions should say whether the engine needs mixed fuel. If you are not sure, stop and identify the engine before you pour anything.
Electric and battery mowers generally have no engine crankcase oil to add. They may have other service points, such as blade bolts or deck hardware, but they do not take a pour of motor oil the way a gasoline engine does. If the mower has no spark plug, no fuel tank, and no engine housing with an oil fill, you are not looking at an oil-top-off job.
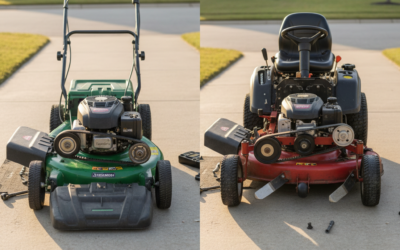
Riding mowers, zero-turn mowers, and some commercial walk-behinds still often use 4-stroke engines, so the idea is similar: check the crankcase oil on level ground and add only the specified oil. The fill location, dipstick style, and access path can be different. A rider may hide the dipstick under a hood, beside the engine, or near a seat deck. Treat those machines as the same family of task, not as copies of a small walk-behind layout.
Also decide whether you are topping off or changing the oil. Topping off means the oil already in the engine looks serviceable and the level is only a little low. An oil change means draining the used oil, replacing it with the specified fresh oil, and disposing of the old oil properly. Dark, gritty, milky, or fuel-smelling oil is a reason to think about a change, not a splash of extra oil on top of a problem.
- Look for a separate oil fill cap or dipstick on the engine if you have a typical 4-stroke walk-behind.
- Look for mixed-fuel instructions if you may have a 2-stroke.
- Skip engine oil entirely on electric and battery mowers.
- Expect a different fill location on many riding mowers, even when the oil-check idea is the same.
- Do not treat a top-off as a substitute for an oil change when the oil itself looks contaminated.
What you need before you add oil
The owner’s manual is the authority for oil type, viscosity, how that engine’s dipstick is read, and how much oil the crankcase is designed to hold. If the paper manual is missing, look at the engine label for the engine type and model numbers, then use the manufacturer’s support materials for that engine. Do not pick a grade because it is common on a store shelf or because it worked in a car.
Oil viscosity and service category are engine-specific and often climate-specific. A grade that is correct for one small engine can be wrong for another. Capacity is also engine-specific. There is no safe universal number of ounces that “most mowers” take, and emptying a standard bottle into a small crankcase is a common way to overfill.
Gather a few simple items so the job stays clean:
- The oil named in the manual or engine guidance for that mower.
- A clean funnel that fits the oil fill without forcing debris into the opening.
- Lint-free rags or paper towels for the dipstick and small drips.
- Gloves if you want to keep oil off your skin.
- A pan, tray, or cardboard under the fill area to catch spills.
- A flashlight if the fill and dipstick sit in a shadowed spot.
Use clean oil from a sealed container. A dusty funnel or a dirty pour spout can put grit into the crankcase. If the oil already in the engine looks milky, metallic, gritty, or strongly like gasoline, topping off is the wrong job. Plan an oil change according to the manual, or have a qualified small-engine shop do it.
Have a way to handle leftover oil and oily rags before you start. Used oil and soaked rags are messy, flammable in some conditions, and harmful if they reach soil or a storm drain. Follow the disposal rules where you live rather than pouring leftovers on the ground or into household trash as if they were ordinary waste.
Park the mower and find the oil fill
Stop the engine completely before you check or add oil. Never add oil with the engine running. A spinning blade, a hot muffler, and an open fill hole are a bad combination. If the mower just finished a long cut, give hot metal time to cool enough that you can work near the engine without burning your hands. Mufflers, engine shrouds, and spilled oil on a hot surface can all cause burns.
Park the mower on level ground. A slope tilts the oil in the crankcase, so the dipstick or fill-neck mark can look low or high when the true volume is fine. Set the parking brake if the machine has one. On a walk-behind, make sure it cannot roll. Disconnecting the spark-plug boot is a sensible extra precaution on many gasoline mowers because it reduces the chance of an accidental start while your hands are near the engine. Follow the manual for that step, because some machines have a specific way to disable the ignition.
Find the oil fill on the engine, not on the fuel tank. On many walk-behind 4-stroke engines the oil fill is a cap on the engine block or valve cover area. It is often labeled, textured differently from the fuel cap, or combined with a dipstick. The fuel cap sits on the gas tank and is a different opening. If you pour engine oil into the fuel tank of a 4-stroke, you have contaminated the fuel. If you pour gasoline into the crankcase, you have a more serious service problem.
Typical clues that you have the oil fill:
- The cap is on the engine casting, not on the plastic or metal fuel tank.
- The cap may say oil, or it may pull or twist out with a dipstick attached.
- The opening leads to a darker, oil-wetted cavity rather than a fuel tank interior.
Those clues are only typical. Engine brands place fills on different sides, at different heights, and sometimes behind a cover. Riding mowers and rear-engine riders can hide the same parts under a hood or beside a battery tray. If the opening is not obvious, use the engine diagram in the manual instead of choosing the most convenient cap.
Keep the mower as level as you can while you work. Tipping a walk-behind to reach the fill can dump oil through the breather or into places it does not belong. If you must tilt the machine later for blade work, that is a separate job and should follow the manual’s tilt direction so remaining oil and fuel stay in their intended spaces.
Check the current oil level first
Checking first prevents the two most common mistakes: adding oil when the level is already fine, and adding so much that the crankcase is overfilled. A low reading after a long storage period or a season of use can be normal. A low reading after you just added a large amount, or a sudden drop after one mowing session, deserves more attention.
If the engine just ran, oil is still clinging to internal parts. The manual for that engine is the authority on whether you should wait, and for how long, before you trust the reading. In general terms, let the oil settle so the dipstick or fill mark reflects oil in the sump, not oil still draining down from the top of the engine. Do not invent a kitchen-timer rule that applies to every model.
Reading a dipstick
Remove the dipstick, wipe it clean with a lint-free rag, then reinsert it the way the manufacturer specifies and remove it again to read the film of oil. You are looking for a level that sits in the safe range between the low and full marks, or within the hashed or holed area on that stick. If the oil already reaches the full mark or sits comfortably in the safe band, put the dipstick back and do not add oil.
How the dipstick goes back in matters, and it is not the same on every engine. Some dipsticks must be threaded in fully to get an accurate reading. Others are designed to rest on the hole without being screwed down. Using the wrong method can make a correct level look low, which then leads to overfilling. If the manual is not in hand, look closely at the cap: a long threaded shank often means it seats by being screwed in, while a push-in stick may only need to sit on the opening. When in doubt, identify the engine and confirm the method before you pour.
Reading a fill neck without a long dipstick
Some small engines use a shorter cap and a fill neck with a full mark, a seat, or a point at which oil should be visible. The idea is the same: the safe level is the marked range, not a completely packed cavity and not an empty hole. Add nothing if the oil is already at that mark.
While you have the cap off, look at the oil’s condition, not just its height:
- Clear to amber used oil that is only a little dark can still be normal for a top-off decision.
- Very black, gritty, or metallic oil is a reason to change the oil rather than keep adding more.
- Milky, foamy, or coffee-colored oil can mean water or fuel contamination and needs service, not a casual top-off.
- A strong gasoline smell in the crankcase oil is another reason to stop and get guidance for that engine.
If the level is already in the safe range, you are done with adding oil. Running a little low is a problem; inventing a need to “fill it up” when the stick already reads correctly is how overfilling starts.
Add oil slowly and recheck the level
Add oil only through the oil fill. Use a funnel if the opening is small, awkwardly placed, or easy to miss. Keep the bottle and funnel clean. Pour a small amount, wait a moment for the oil to run down, then check the level again. Repeat in small additions until the oil sits in the marked safe range. Stop there. Do not finish the bottle unless the manual’s capacity and your readings say the crankcase still needs that much.
Small walk-behind crankcases do not hold much oil. That is why “a little at a time” matters more here than it does on many cars. A few extra ounces can push a small engine past full. Overfilling can cause smoking, foaming, leaking past seals or the dipstick tube, fouled spark plugs, or other engine damage. The exact failure depends on the engine, but the practical rule is the same: the full mark is a limit, not a suggestion.
Do not mix oil into the gasoline of a 4-stroke walk-behind as a substitute for filling the crankcase. A 4-stroke needs oil in the crankcase and straight gasoline in the tank, unless the manufacturer has given a different, specific instruction for that machine. Conversely, do not assume a 2-stroke that uses fuel mix should get a random pour of 4-stroke crankcase oil into whatever opening looks handy.
Work slowly enough that you can still read the stick. If oil sloshes up the fill neck, wipe the area and wait for it to settle before you decide the engine is full. Recheck on level ground with the same dipstick method you used the first time. If you change the method between pours, the readings will not agree.
Stop adding oil when:
- The dipstick film sits in the safe range, not above the full mark.
- A marked fill neck shows oil at the intended level, not overflowing.
- You have not forced extra oil in “for good measure.”
If you realize you have already gone above full, do not try to burn the extra oil off by running the mower. Extra oil needs to be removed until the level is correct, using the method in the manual or with help from a qualified shop. Running an overfilled engine can throw oil into the air filter, exhaust, or combustion area.
Recap, clean up, and make sure the mower is ready
When the level is correct, reinstall the fill cap or dipstick securely. The cap keeps dirt out and oil in. A loose dipstick can leak, suck debris, or give you a false reading the next time you check. Tighten it the way it was designed to fasten: thread a threaded cap until it is snug, and seat a push-in cap fully. Do not crank a plastic cap so hard that you strip it.
Wipe oil off the engine, deck, handles, and floor. Fresh oil on a muffler can smoke the first time the engine heats up and can also hide a real leak. Oil on a garage floor or a mowing path is a slip hazard. Keep children and pets away from the work area until the mess is gone.
Handle leftover oil and oily rags with care. Let rags dry in a safe way if that is appropriate, and move used oil into a closed container for recycling or disposal according to local rules. Do not dump oil on soil, into a gutter, or down a household drain.
A brief start-up after a simple top-off can be useful if the area is clean and the cap is on. Start the mower in a well-ventilated outdoor space, let it idle briefly, and watch for leaks around the fill, unusual smoke, or warning sounds. Then shut the engine down. If you recheck the oil after that run, wait for the oil to settle again and use the same level-ground method. A little smoke from oil you already wiped off a hot shield can happen; continuous smoke, a wet trail of oil, or a sudden drop in level is a reason to stop and inspect rather than keep cutting.
This short check is not a complete diagnosis. It only tells you whether the cap is sealed, whether you left oil on a hot surface, and whether anything obvious is leaking. It does not replace the maintenance schedule in the manual.
If you do not know the oil type or how much to add
Guessing is how engines get the wrong viscosity, the wrong oil family, or a crankcase that is far too full. If you do not know what to use, identify the engine before you buy or pour oil.
Useful places to look, in order:
- The owner’s manual for the mower and, if it is separate, the engine manual.
- The engine label, usually on the blower housing or a flat area of the engine, for type, model, and sometimes code numbers.
- Any remaining tag near the oil fill that names a specification.
- The manufacturer’s official support information for that engine model, once you have the numbers in hand.
A used or unlabeled mower is not a reason to pour “whatever is in the garage.” Photograph the engine label, note the mower brand and deck size only as supporting clues, and match oil to the engine. If the label is painted over, rusted away, or missing, a small-engine shop can often identify the engine from its shape, starter, and remaining stampings. That is better than treating all walk-behind mowers as one product.
Capacity is just as easy to get wrong as type. Two engines that look similar can hold different amounts. The only safe way to fill an unknown crankcase is still to check the level and add small amounts of the oil specified for that identified engine. If you cannot identify the engine, do not invent a substitute that “always works.”
Topping off is the wrong job when:
- You do not know when the oil was last changed.
- The oil is sludgy, glittering, milky, or fuel-soaked.
- The mower has been stored for a long time with unknown oil in it.
- The level keeps falling, which can mean a leak or oil being burned.
In those cases, follow the oil-change procedure in the manual or have the work done by someone who services small engines. Adding fresh oil on top of contaminated oil leaves the contamination in place.
Safety issues and common mistakes
The hazards around this job are straightforward, and most of them come from rushing or using the wrong opening.
Wrong oil or the wrong place. Using an oil type or viscosity the engine was not designed for can affect lubrication, starting in cold weather, and how well the oil protects hot parts. Putting 2-stroke mix into a 4-stroke fuel tank when the 4-stroke does not call for mix, or pouring crankcase oil into a 2-stroke fuel system the wrong way, can damage the engine. Gasoline in the crankcase and oil in a 4-stroke fuel tank are both contamination problems that need proper service, not a home-mixed chemical flush.
Engine running or still dangerously hot. Never add oil while the engine is running. Keep hands, clothing, and the oil bottle away from the blade, belt, and screen. Wait until hot parts are cool enough to work near. A burn from a muffler is one of the most common injuries during quick “while I’m here” maintenance.
Overfilling. Extra oil can foam, leak, smoke, foul the plug, or harm seals. The dipstick’s full mark exists because the crankcase needs air space as well as oil. More is not kinder to the engine.
Running too low. Low oil can also damage an engine, which is why you check before you mow and why you add oil when the reading is actually low. Do not keep cutting after a low reading in the hope that the mower will “make it through the yard.”
Spills, slips, and the environment. Oil on a floor, deck, or sidewalk is slippery. Oil in soil, a storm drain, or a creek is pollution. Wipe spills as they happen and store bottles upright and capped.
Confusing this job with other service. Adding oil is not changing the oil. It is also not checking hydraulic fluid on a rider, greasing wheels, or filling the fuel tank. Other fluids have their own caps and specs. If a reservoir is unlabeled, stop and identify it.
Common process mistakes include checking on a slope, reading a dipstick with the wrong insert method, pouring into the fuel cap, using a dirty funnel, and assuming a car-engine oil habit applies unchanged to a small mower engine. Each of those is avoidable if you slow down and follow the engine’s own instructions.
Troubleshooting after you add oil
If something looks wrong after you pour, stop and sort out the cause instead of taking a longer test cut.
The mower smokes
Smoke after adding oil has more than one possible cause. Oil left on a hot muffler or shield can burn off as smoke. Overfilling can send oil where it is burned or blown out. A leak onto the exhaust can do the same. Treat those as possibilities, not as a single diagnosis. Wipe the exterior, confirm the level is not above full, and do not keep running the engine if smoke is heavy, continuous, or accompanied by a loss of power. A shop is the safer next step if the smoke does not have an obvious, already-corrected cause such as a smear you wiped off the muffler.
You overfilled the crankcase
If the dipstick reads above full, remove the extra oil until the level is in the safe range. Use the drain or extraction method given in the manual for that engine. There is no universal drain-plug walkthrough that fits every mower, and running the engine “until it burns off” is a bad fix. If you cannot drain or extract the extra oil cleanly, have a qualified technician bring the level down.
The dipstick still reads low after you added a lot of oil
A still-low reading after a large pour usually means the oil did not go where you think, the reading method is wrong, or oil is leaving the engine. Check these before you add even more:
- The mower is on level ground.
- You are inserting the dipstick the way that engine requires.
- You poured into the oil fill, not the fuel tank, air cleaner, or another opening.
- There is no puddle under the deck, no wet streak on the engine, and no soaked air filter.
- Enough time has passed after a hot run for oil to settle, if the manual calls for a wait.
A leak, a loose drain plug from a previous oil change, a cracked case, or oil being consumed can all keep the level down. Adding bottle after bottle without finding the oil is how people flood the fuel system or the lawn. Stop and inspect.
Oil or fuel went in the wrong opening
If you poured engine oil into the fuel tank of a 4-stroke, or gasoline into the crankcase, do not start the mower to “see if it runs it off.” Starting can spread the contamination through the carburetor, cylinder, or bearings. Do not invent a flushing recipe from household chemicals. Follow the manufacturer’s guidance or take the machine to a qualified small-engine service. Tell them exactly what was poured and roughly how much, because that changes how the fuel system or crankcase needs to be cleaned.
If you have a 2-stroke and you are unsure whether the fuel already in the tank is mixed correctly, do not correct it by guessing at a second pour of oil or gasoline. Identify the required mix from the manual or engine marking, then handle the tank contents according to that guidance or have the fuel drained and replaced properly.
A simple sequence you can reuse
Once you know you have a typical 4-stroke gasoline walk-behind, the repeatable routine is short:
- Confirm you are adding crankcase oil, not mixing 2-stroke fuel and not servicing an electric mower.
- Use only the oil specified for that engine in the owner’s manual or official engine guidance.
- Stop the engine, let hot parts cool, and park on level ground.
- Find the oil fill cap or dipstick on the engine, not the fuel cap.
- Wipe, reinsert, and read the dipstick the way that engine requires, or read the fill-neck mark.
- If the level is already in the safe range, add nothing.
- If it is low, add a little oil through the fill, wait, and recheck until the level is correct.
- Secure the cap, clean spills, and only then consider a brief outdoor start to look for leaks.
That sequence covers where the oil goes, how to check the level, how to add oil without overfilling, and what to verify first. The details that change from mower to mower are the oil specification, the dipstick seating method, the exact fill location, and whether you should be changing the oil instead of topping it off. Those details belong to the engine in front of you, not to a single rule for every lawn mower.