

Quick Answer: How to Replace a Lawn Mower Belt
To replace a lawn mower belt: (1) Disengage the PTO and disconnect the spark plug. (2) Lower the mower deck and relieve idler arm spring tension. (3) Remove belt keeper bolts, slip the worn belt off the pulleys, and route the replacement belt following your deck diagram.
Direct Answer: To replace a lawn mower belt, disconnect the spark plug wire, remove the deck or access panel, photograph the old belt’s routing path, slip the old belt off the pulleys, thread the new belt along the same path, re-engage the idler or tensioner pulley to hold it in place, reassemble the deck, and reconnect the spark plug wire before testing. Steps differ significantly between walk-behind and riding mowers, and between deck belts and drive belts, confirm which type you have before starting.

Pros
- Clear OEM part identification for easier matching.
- Specific compatibility listed for RZT-L42 and RZT-SX 42 mowers.
- Designed for 42 inch deck applications on compatible Cub Cadet zero-turns.
- Lightweight replacement part that is simple to manage during service.
Cons
- Compatibility is limited to the specific Cub Cadet models listed.
- No material, durability, or lifespan details are provided in the manufacturer listing.
- No customer review details are available to help assess long-term real-world performance.
Overview: CUB CADET 490-501-C025 is an OEM deck drive belt made for 42 inch decks on compatible Cub Cadet zero-turn mowers. The part is intended for RZT-L42 and RZT-SX 42 models, so it is aimed at owners who want a direct replacement rather than a universal belt.
Performance: As a deck drive belt, its job is to transfer power within the mower deck system. The main advantage here is fit specificity, since the listed OEM part number and model compatibility help reduce the risk of ordering the wrong belt.
Considerations: The available data does not include lifespan, material construction, or installation accessories. Compatibility is also narrow, so buyers should verify their mower model and deck setup before purchasing.
Verdict: This belt is a practical choice for Cub Cadet owners who need a replacement for a supported 42 inch zero-turn mower. It makes the most sense when you want an OEM part with clearly stated compatibility.

Pros
- Broad compatibility with many 48-inch deck lawn tractors.
- Aramid cord construction for improved strength and durability.
- Heat, oil, and wear resistance are useful for mower deck applications.
- Clear replacement part numbers make fitment easier to verify.
- Installation guidance is provided in the product details.
Cons
- Fitment must be checked carefully by size and model number before purchase.
- It is a replacement belt only, so no installation tools or extra hardware are included.
- The long compatibility list may require extra verification time for buyers.
Overview & Design: The BlueStars 532197242 is a replacement mower deck belt made for select Husqvarna, Craftsman, AYP, Poulan, and other compatible lawn tractors with 48-inch mower decks. It uses chloroprene rubber and an Aramid cord structure, which gives it a durable, purpose-built feel for deck drive applications.
Performance & Key Features: With an outer length of 138.75 inches and a width of 0.65 inches, this belt is sized for specific mower deck use rather than general purpose replacement. The Aramid fiber cord and covered belt design are meant to support stronger wear resistance, heat resistance, and smoother power transmission during mowing.
Drawbacks & Considerations: The main limitation is fitment risk. Buyers need to verify the part number, belt dimensions, and mower model carefully before ordering. Since it is a replacement component, it does not include additional hardware, and installation may still require basic mechanical steps such as removing belt covers and releasing deck tension.
Verdict: This belt is best suited for owners who need a direct replacement for a compatible 48-inch mower deck and want a durable option with Aramid cord reinforcement. It offers strong value when the fit is confirmed, especially for users focused on reliable seasonal mower maintenance.

Pros
- Uses aramid-reinforced construction for better durability than standard rubber-only belts.
- Covers a broad list of compatible John Deere 42-inch mower models.
- Matches the common GX20072 and GY20570 replacement references.
- Lightweight and straightforward to install for routine belt replacement.
Cons
- Compatibility is model-specific, so buyers still need to verify their exact John Deere tractor and deck setup.
- No customer review details are provided in the manufacturer listing, so real-world fit feedback is limited here.
- This is a replacement belt only, with no additional installation hardware or accessories included.
Overview & Design: The Tecreddy GX20072 mower deck belt is a replacement part for compatible John Deere 42-inch riding mowers and 100 Series tractors. It is made with aramid and neoprene, which gives it a more durable, heavy-duty profile than basic belt materials.
Performance & Key Features: This belt is designed to replace GX20072 and GY20570 part numbers and measures about 1/2 inch wide by 103.7 inches long. Its heat-resistant, abrasion-resistant, and non-conductive construction makes it suitable for regular lawn mowing conditions and routine deck drive use.
Drawbacks & Considerations: The main limitation is the need to confirm compatibility before ordering, since John Deere tractors can vary by model and deck configuration. The product data also does not include customer review details, so there is little public feedback available in the source information.
Verdict: This is a practical choice for John Deere owners who need a compatible 42-inch deck belt and want an aramid-reinforced replacement part. It is best suited for users who value a direct-fit maintenance part and are comfortable verifying fitment against their mower model.

Pros
- Accurate OEM size match of 33-1/4 inches by 3/8 inch for secure fit
- Extensive list of compatible Toro models including 20xxx and 21xxx series
- Direct replacement design simplifies installation for DIY users
- Suitable for Toro Recycler and related lawn mower drive systems
Cons
- Aftermarket construction from Tormurbutl may offer different longevity than genuine Toro belts
- Restricted to only the specifically listed Toro models for proper fitment
- No included accessories or detailed installation guidance based on available data
The Tormurbutl 115-4669 is a replacement lawn mower drive belt created as a compatible alternative to the original Toro 115-4669 part. It features a standard V-belt design with a length of 33-1/4 inches and width of 3/8 inch, delivering a focused solution for restoring drive capability on supported residential mowers.
Performance centers on accurate sizing that enables efficient power delivery in real-world use on models such as the Toro 20332, 20333, 20334, 20338, and many others including Recycler 22 variants. The belt engages properly for self-propelled functions when matched to the listed equipment, supporting consistent mowing operations based on its specified dimensions.
Key considerations include its third-party origin, which means material resilience and wear characteristics could differ from factory Toro components. Users should also confirm their exact mower model against the full compatibility roster to prevent incorrect purchases.
This product delivers solid value for Toro owners seeking a correctly dimensioned drive belt for the supported series, especially those maintaining Recycler models at home who prioritize fit over brand-original sourcing.
Push Mower vs. Riding Mower: Which Belt Replacement Process Applies to You?
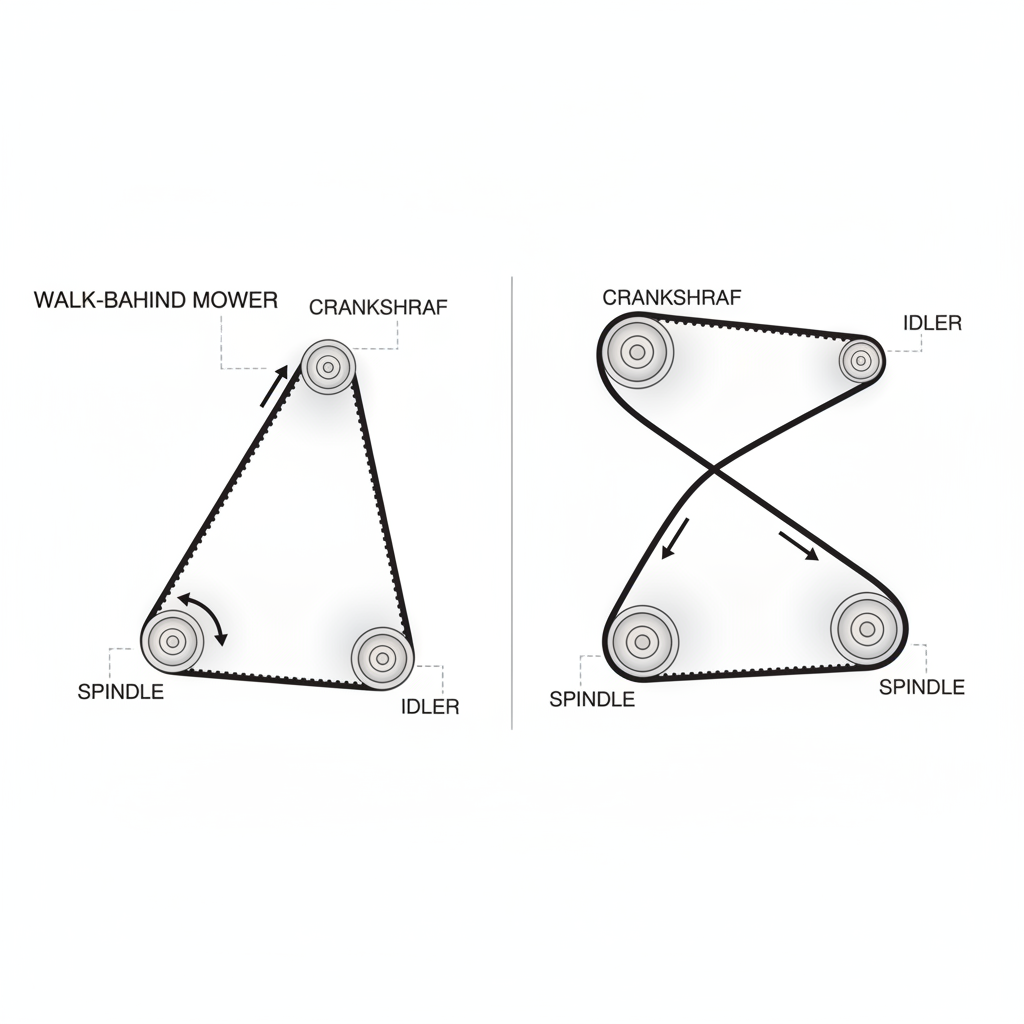
Identifying your mower type and belt type before picking up a wrench prevents incorrect disassembly and reduces injury risk. The two variables that determine your procedure are mower platform (walk-behind push mower vs. riding mower) and belt function (deck/blade belt vs. drive belt).
The Two Belt Types Explained
- Deck belt (blade belt): Runs from the engine crankshaft pulley to the blade spindle pulleys beneath the cutting deck. This is the most commonly replaced belt. When it fails, blades stop spinning but the mower may still move.
- Drive belt (ground-drive belt): Transfers power from the engine to the transmission or rear wheels. When it fails, the mower loses self-propulsion but blades may still spin. Found on self-propelled walk-behind mowers and riding mowers.
Symptoms of a Worn or Broken Lawn Mower Belt
- Blades not engaging or spinning unevenly
- Mower loses self-propulsion on flat ground
- Visible cracking, fraying, glazing, or stretching on the belt surface
- Squealing, slipping, or burning rubber smell during operation
- Belt has completely snapped, mower stops cutting entirely
Both belt types can be replaced at home without a mechanic provided you follow the correct procedure for your specific mower model. Riding mower deck belt replacement is more involved due to multiple pulleys and deck removal, but remains a practical DIY task with basic tools.
Tools and Replacement Parts You Need Before You Start
Gathering everything before disassembly prevents leaving the mower in pieces while sourcing missing parts.
Required Tools
- Socket set (3/8-inch drive, metric and standard)
- Combination wrenches (3/8 to 3/4 inch)
- Flathead and Phillips screwdrivers
- Needle-nose pliers (for retaining clips and spring hooks)
- Block of wood or mower deck lift tool (riding mowers)
- Flashlight or work light
- Smartphone or camera (photograph belt routing before removal)
- Torque wrench (if re-torquing spindle or deck bolts to OEM spec)
Required Safety Gear
- Heavy-duty work gloves (blade edges remain sharp even when stationary)
- Safety glasses
- Closed-toe shoes or work boots
Finding the Correct Replacement Belt
Use your mower’s model number, printed on a deck plate, frame sticker, or engine shroud, to look up the OEM part number in your owner’s manual or the manufacturer’s parts lookup tool online. Match the belt’s width, length (outside circumference), and cross-section profile exactly. A belt that is even slightly too long will slip; one too short will overtension pulleys and fail prematurely.
Aftermarket belts are widely used and broadly acceptable for residential mowers. For commercial or high-hour applications, OEM belts sourced directly from the manufacturer (e.g., Husqvarna, John Deere, Toro, Briggs & Stratton) are the safer choice since they are manufactured to the tolerances specified in the original design. Verify the aftermarket belt’s specifications match the OEM part number dimensions before installing.
Safety Precautions: What to Do Before Touching the Belt
These steps are non-negotiable. Skipping any of them creates mechanical or ignition hazards.
- Disconnect the spark plug wire. Pull the rubber boot off the spark plug tip and move it away from the plug. This eliminates the possibility of accidental engine ignition if a blade or pulley rotates during the repair. Reconnect only after full reassembly.
- Engage the parking brake (riding mowers). Set the parking brake and chock the rear wheels with blocks before working under or around the deck.
- Manage fuel before tilting (walk-behind mowers). If you need to tip the mower on its side to access the deck belt, tilt it so the air filter and carburetor face upward. This prevents fuel and oil from entering the carburetor or air filter. For extended work, drain the fuel tank beforehand to eliminate spill risk entirely. Consult your mower’s manual for the manufacturer’s recommended tipping orientation, this varies by engine configuration.
- Let the engine cool completely. Exhaust components and the engine block retain heat that causes burns on contact.
- Work on a flat, stable surface. Concrete or compacted gravel prevents unexpected mower movement. Avoid slopes.
- Wear gloves throughout. Blade edges do not need to be spinning to cause lacerations.
How to Replace the Belt on a Walk-Behind Push Mower (Step-by-Step)
This procedure covers deck belt replacement on a standard walk-behind mower. Drive belt replacement on a self-propelled model follows a similar logic but targets the rear-wheel drive assembly, consult your model’s service diagram for routing.
Step 1, Photograph the Existing Belt Routing
Before removing anything, take multiple photos of the belt path around every pulley from different angles. These photos are your routing reference during reinstallation and prevent the most common DIY error: incorrect belt threading.
Step 2, Disconnect the Spark Plug Wire
Confirm the wire is disconnected as described in the safety section above.
Step 3, Access the Belt
On most walk-behind mowers, the deck belt is accessible by tilting the mower (air filter side up) or by removing the deck’s lower cover or belt guard. Remove any retaining bolts or clips securing the guard using a socket or screwdriver. Set hardware aside in a container , small clips are easily lost on concrete. Readers comparing setup options can review our technical analysis on marshall stanmore iii vs harman kardon onyx studio 8.
Step 4, Release the Idler Pulley
Locate the idler pulley, the spring-loaded pulley that applies tension to the belt. Using pliers or a wrench, relieve spring tension by moving the idler pulley arm away from the belt. Slide the belt off the idler pulley first. This is the easiest point of disengagement on most mowers.
Step 5, Remove the Old Belt
With tension released, slip the belt off the remaining pulleys , typically the blade spindle pulley and the crankshaft drive pulley. Note any notches, guides, or keepers the belt passes through. Remove the belt fully and inspect all pulleys for wear, wobble, or bearing damage. A worn pulley will destroy a new belt quickly , replace damaged pulleys before installing the new belt. For complementary field maintenance guidelines, examine our breakdown of dyson v8 cyclone vs bissell featherweight stick.
Step 6, Route the New Belt
Thread the new belt along the identical path shown in your photos and in the routing diagram printed on the mower deck (many manufacturers stamp or sticker this diagram on the top of the deck). Route the belt around the blade spindle pulley and crankshaft pulley first, leaving the idler pulley for last.
Step 7, Re-Engage the Idler Pulley
Press the idler arm to relieve spring tension, seat the belt on the idler pulley, then slowly release the arm. The spring should pull the idler against the belt and hold it under consistent tension. The belt should feel taut but not rigid , it should deflect slightly (approximately 1/2 inch) under firm thumb pressure at the midpoint of the longest run. For precise tension specifications, refer to your OEM service manual, as values vary by model. To evaluate matched hardware tolerances, consult our detailed overview of bissell crosswave hydrosteam vs shark stainforce.
Step 8, Reinstall the Belt Guard and Deck Cover
Reattach all guards and covers. Reinstall every bolt and clip removed, guards prevent belt ejection and debris contact during operation.
Step 9, Reconnect the Spark Plug Wire and Test
Push the spark plug boot firmly onto the plug. Start the mower on a flat surface. Engage the blade control and listen for smooth, consistent blade engagement with no squealing, slipping, or vibration. Check that the belt remains seated on all pulleys during the first few minutes of operation.
How to Replace the Deck Belt on a Riding Lawn Mower (Step-by-Step)
Riding mower deck belts involve more pulleys, a removable cutting deck, and a PTO (power take-off) engagement system. The ground-drive belt, a separate belt connecting the engine to the transmission, requires a different access path and is not covered in this procedure. Check your model’s service manual if the ground-drive belt is the failed component.
Step 1, Engage Parking Brake and Disconnect the Spark Plug Wire
Set the parking brake, move the blade engagement lever to the disengaged position, and disconnect the spark plug wire(s).
Step 2, Lower and Remove the Cutting Deck
Lower the deck to its lowest cutting height position. Disconnect the blade engagement rod or PTO cable from the deck, this is typically a spring-loaded hook or clevis pin. Disconnect any lift linkage rods or chains connecting the deck to the mower frame. On most models, the deck slides out to one side on hanger brackets once the linkages are detached. Have a second person assist with the weight on larger decks, or use a floor jack with a wooden block to support the deck during removal.
Step 3, Photograph Belt Routing on the Deck
With the deck removed and on a flat surface, photograph the full belt path around all pulleys before removing anything. Riding mower decks commonly have three or more pulleys, a central idler, blade spindle pulleys on each end, and a main drive input pulley. Incorrect routing after reassembly is the leading cause of belt failure on first engagement.
Step 4, Release Belt Tension and Remove the Old Belt
Locate the idler pulley and its tension spring. Using pliers, unhook the spring or move the idler arm to release tension. Slip the belt off the idler pulley, then remove it from the remaining pulleys. Inspect all pulleys, spindle bearings, and belt guides for wear or damage before proceeding.
Step 5, Route the New Belt
Using your photographs and the routing diagram on the deck housing, thread the new belt around the blade spindle pulleys and drive input pulley first, then route it around the idler pulley last. Ensure the belt sits inside all belt keepers and guides, small metal tabs that prevent the belt from jumping off pulleys under load. A belt routed outside a keeper will eject within minutes of operation.
Step 6, Re-Engage the Idler and Verify Seating
Hook the idler spring back into place and allow the idler arm to tension the belt. Manually rotate each blade spindle pulley by hand to confirm the belt tracks correctly and remains seated on all pulleys through a full rotation.
Step 7, Reinstall the Deck
Slide the deck back under the mower on its hanger brackets. Reconnect all lift linkage rods or chains, then reconnect the blade engagement rod or PTO cable. Verify all retaining pins are fully seated and secured.
Step 8, Reconnect the Spark Plug Wire and Test
Reconnect the spark plug wire(s). Start the mower, raise the deck to operating height, and engage the PTO or blade engagement lever. Listen for smooth blade engagement. Disengage and re-engage several times to confirm consistent belt operation. Inspect the belt path visually after the first few minutes if safe to do so.
Common Mistakes and Troubleshooting After Belt Replacement
| Symptom | Most Likely Cause | Fix |
|---|---|---|
| Belt slips off immediately after engagement | Belt routed outside a belt keeper or guide | Re-route belt so it passes inside all keepers; check keeper tabs are not bent flat |
| Belt squeals on startup | Belt is glazed, incorrect size, or insufficient tension | Confirm belt dimensions match OEM spec; verify idler spring is fully hooked and applying tension |
| Belt smokes or smells of burning rubber | Belt slipping under load due to wrong routing or a seized pulley | Immediately disengage and shut off, inspect each pulley for free rotation; replace any seized pulley bearing |
| New belt breaks within first few hours | Worn pulley edge cutting into belt, or belt too short creating overtension | Inspect pulley edges for burrs or sharp wear grooves; confirm belt length matches OEM part number exactly |
| Blades spin slowly or unevenly | Belt routed incorrectly around spindle pulleys, or belt is too long and slipping | Remove belt and re-route following deck diagram; verify belt length |
| Belt vibrates excessively | Worn or bent blade, or a spindle bearing failing | Inspect and replace bent or unbalanced blades; test each spindle for wobble and replace worn bearings |
When to stop and see a professional: If a pulley spindle housing is cracked, a deck frame is bent, or the belt continues to fail after two correct installations, take the mower to a certified small engine technician. Underlying structural or bearing damage requires machining or press-fit tools not typically available for DIY repair.
How Often Should a Lawn Mower Belt Be Replaced?
Lawn mower belt service life depends on usage intensity, belt quality, pulley condition, and operating environment. As a general range cited in manufacturer maintenance documentation, deck belts on residential mowers commonly last between 3 to 5 years or approximately 100 to 200 hours of operation under normal residential use, though this varies by brand, model, and conditions. High-frequency mowing, tall or wet grass, and worn pulleys all accelerate belt wear significantly. Verify the specific service interval for your model in the OEM maintenance schedule.
Early Warning Signs to Inspect During Routine Maintenance
- Surface cracking or checking along the belt’s outer edge or inner V-groove
- Glazed, shiny appearance on the belt’s contact surfaces (indicates slipping and heat buildup)
- Fraying or raveling at the belt edges
- Visible stretching, belt appears loose even when the idler is fully tensioned
- Any flat spots or deformation in the belt’s cross-section
Replace the Idler and Tensioner Pulleys at the Same Time?
Inspecting the idler pulley and tensioner pulley bearings every time the belt is removed is good practice. If either pulley wobbles, grinds, or does not spin freely by hand, replace it during the same service. A worn pulley bearing will destroy a new belt within one or two seasons, and the combined cost of parts is lower than making the same repair twice. Blade spindle bearings deserve the same inspection, worn spindle bearings cause blade wobble that stresses the belt abnormally.
Common Questions on How To Replace A Belt On A Lawn Mower Answered
What is the difference between a deck belt and a drive belt on a lawn mower?
The deck belt (also called the blade belt) connects the engine to the blade spindle pulleys beneath the cutting deck and makes the blades spin. The drive belt (ground-drive belt) connects the engine to the transmission or rear wheels and provides self-propulsion. They are separate components with separate routing paths and part numbers, replacing the wrong belt will not fix the reported symptom.
Do I need to drain the fuel before replacing a mower belt?
On walk-behind mowers where you need to tilt the machine to access the belt, draining the fuel beforehand eliminates spillage risk. If you tilt the mower with fuel in the tank, orient it so the air filter and carburetor face upward, fuel flows away from these components rather than flooding them. Check your specific model’s manual for the correct tipping direction, as engine configuration varies. On riding mowers where the deck is removed without tilting the machine, fuel drainage is generally not required.
Will an aftermarket belt work as well as an OEM belt?
For standard residential mowing, quality aftermarket belts that match the OEM belt’s exact dimensions (width, outer circumference, cross-section) are a practical alternative. Confirm the aftermarket part specs against the OEM part number before purchasing. For commercial mowers or high-hour applications, OEM belts are the more reliable choice, as they are manufactured to the tolerances validated by the original engine and deck design.
Why does my new mower belt keep coming off the pulleys?
The most common cause is incorrect routing, the belt is outside a belt keeper tab rather than routed through it. Inspect every keeper bracket along the belt path to confirm the belt passes inside, not over or beside, each one. Other causes include a bent or missing keeper tab, a seized idler pulley that fails to maintain tension, a belt that is too long, or a bent deck frame that has shifted pulley alignment. Address each possibility in order before running the mower again.
Related Maintenance and Operating Guides
To keep your equipment running at peak operating efficiency, explore our related technical walkthroughs and maintenance tutorials:
- Consult our detailed breakdown on replace a Briggs and Stratton pull cord.
- Consult our detailed breakdown on clean a Briggs and Stratton carburetor.
- Consult our detailed breakdown on racing lawn mower build guide.
- Consult our detailed breakdown on biological goat grazing methods.
- Consult our detailed breakdown on best ride-on lawn mowers.
Technical Standards and Safety Guidelines
Equipment design tolerances, operational vibration thresholds, and protective gear guidelines comply with published safety standards from the American National Standards Institute (ANSI) under ANSI B71.1 and B175 safety specifications for outdoor machinery.









