Quick Answer: To maintain your pressure washer wand and hose, regularly inspect and replace worn O-rings at every quick-connect fitting, flush the system with pump-safe detergent to prevent internal buildup, and clear clogged spray nozzles with a fine wire or nozzle cleaning kit. If your unit pulses or surges, the unloader valve is the most likely culprit—clean or replace it to restore steady pressure. For persistent M22 threaded coupler leaks, replace the O-ring and ensure the threaded connection is hand-tightened with a wrench, not over-torqued. Standard operational and maintenance protocols can be consulted via OSHA national chainsaw safety and operational standards.
A pressure washer is only as reliable as its weakest seal. Whether you own a lightweight electric unit for weekend car washing or a gas-powered machine for stripping paint, the wand, hose, and fittings are the components that endure the most physical abuse—and the most common points of failure. This guide provides a complete diagnostic and repair framework for the three most frequent pressure washer problems: leaks, pressure surges (pulsing), and clogs. Follow the steps below to restore full performance and extend the life of your equipment.
Pressure Washer Leak & Surge Diagnostic Matrix

Quick-connect fittings are the most common leak point on any pressure washer system. These push-to-connect couplers rely on a small rubber O-ring to create a watertight seal. Over time, heat, UV exposure, and chemical contact degrade the O-ring, causing drips or full-stream leaks at the connection point.
O-Ring Quick Connect Replacement: Step-by-Step
- Step 1: Release all pressure from the system by squeezing the trigger with the unit off and the water supply disconnected.
- Step 2: Disconnect the quick-connect fitting by pulling back the collar and separating the male and female ends.
- Step 3: Inspect the O-ring seated inside the female coupler. Look for cracks, flattening, swelling, or hardening. A healthy O-ring should be round, pliable, and slightly glossy.
- Step 4: Use a small pick or flathead screwdriver to carefully remove the old O-ring. Avoid scratching the internal bore of the coupler.
- Step 5: Lubricate the new O-ring with a thin coat of silicone grease (not petroleum-based lubricant, which degrades rubber). Seat it evenly in the groove.
- Step 6: Reconnect the fitting, ensuring the collar clicks fully into place. Turn on the water supply and check for leaks before starting the pump.
Pro Tip: Always keep a universal O-ring repair kit in your pressure washer caddy. Most kits include the 5–10 most common sizes used across major brands like Sun Joe, Ryobi, Kärcher, and Simpson. Replacing an O-ring takes under two minutes and costs pennies compared to replacing a damaged hose or coupler.
Why Does My Pressure Washer Pulse? Diagnosing Unloader Valve Issues
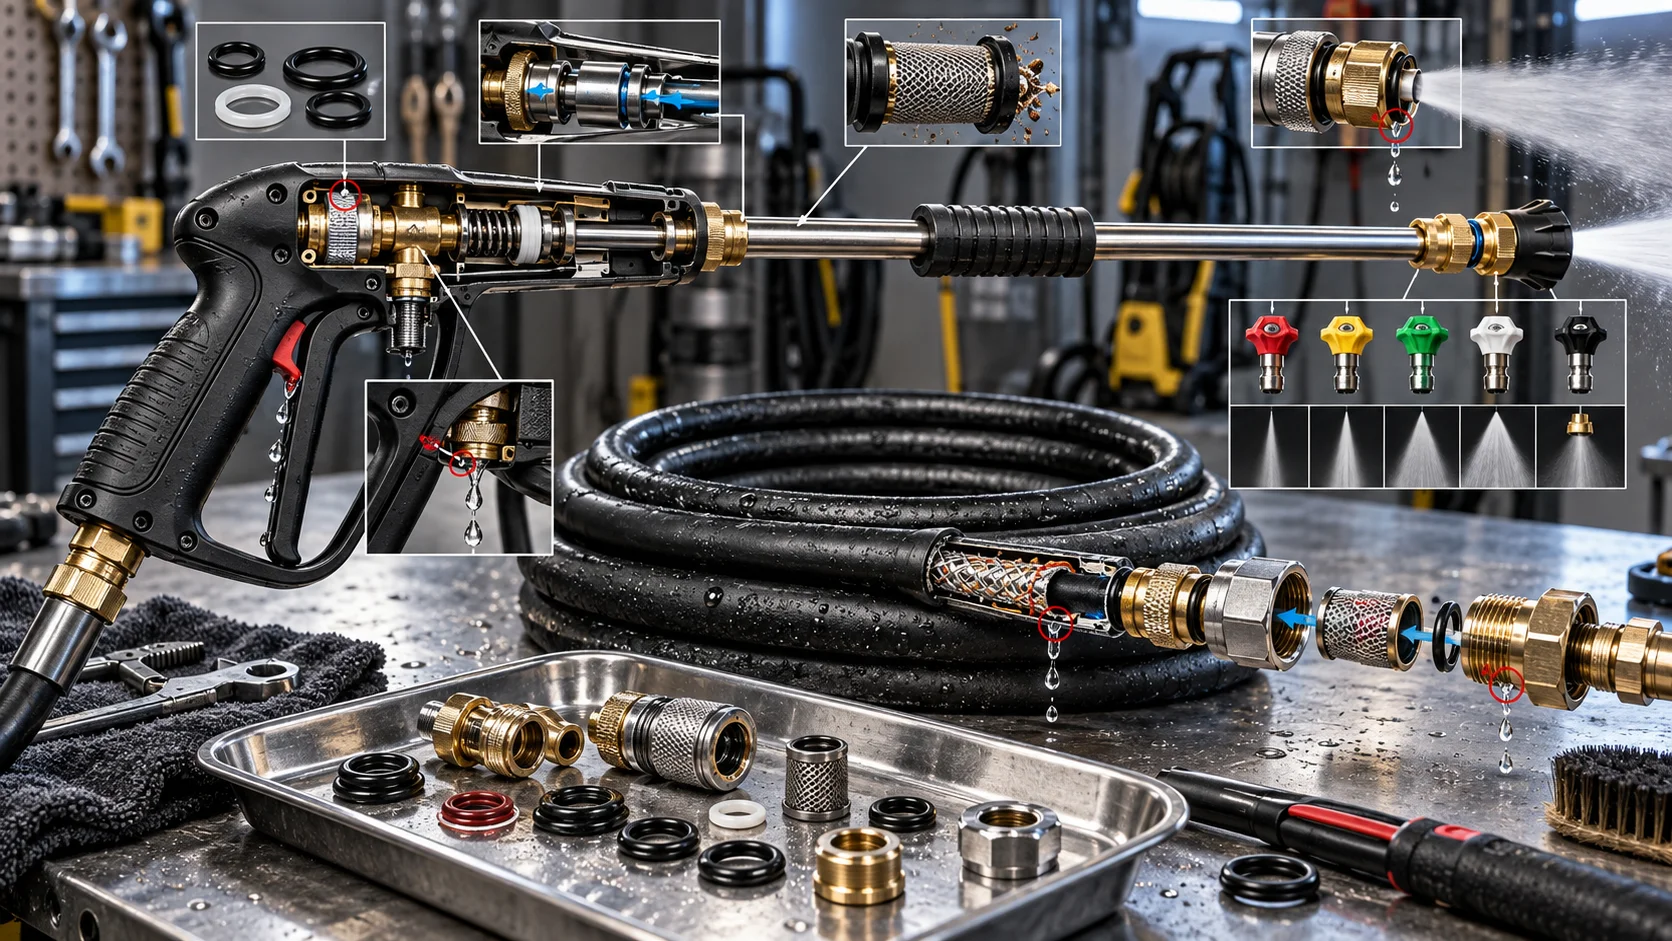

If your pressure washer cycles on and off rapidly, delivers inconsistent pressure, or makes a rhythmic “chugging” sound, the unloader valve is almost certainly the cause. The unloader valve is a spring-loaded bypass mechanism inside the pump that redirects water flow when the trigger is released. When it becomes stuck, clogged with mineral deposits, or worn, it fails to regulate pressure correctly—causing the pump to surge and pulse.
Pressure Washer Unloader Valve: Cleaning and Replacement
- Step 1: Disconnect the water supply and release all pressure from the system.
- Step 2: Locate the unloader valve on your pump. On most axial pumps, it is a brass or stainless steel fitting on the side or rear of the pump head. Consult your owner’s manual for the exact location.
- Step 3: Remove the unloader valve by unscrewing it from the pump body (typically 22mm or 27mm wrench). Note the orientation and any washers or springs that come out with it.
- Step 4: Disassemble the valve and inspect the spring, piston, and seat. Look for mineral buildup, debris, or a weakened spring. Clean all components with white vinegar or a descaling solution.
- Step 5: If the spring is compressed or the piston is scored, replace the entire unloader valve assembly. Do not attempt to repair a damaged piston.
- Step 6: Reassemble and reinstall the valve. Reconnect the water supply, purge air from the system by running water through the wand without the nozzle, then test under full pressure.
Important: Never run a pressure washer without water flowing through the system. Dry-running the pump for even 30 seconds can destroy the unloader valve, damage internal seals, and void your warranty.
Clearing a Clogged Spray Nozzle with Wire

A clogged spray nozzle is the simplest problem to diagnose and fix. If your pressure washer produces a uneven spray pattern, a single stream instead of a fan, or no spray at all, debris has lodged in the nozzle orifice. This is common after using the washer near construction sites, gardens, or areas with loose dirt and gravel.
Nozzle Clearing Procedure
- Step 1: Remove the nozzle from the wand tip. Most nozzles twist out or are held by a quick-connect collar.
- Step 2: Hold the nozzle up to a light source and look through the orifice. You should see a clean, round hole. If it is blocked or partially obstructed, proceed to cleaning.
- Step 3: Use a nozzle cleaning needle or a straightened paperclip (fine-gauge wire) to gently push through the orifice from the front. Do not use a drill bit or anything that could enlarge the hole, as this will permanently alter the spray angle and pressure rating.
- Step 4: Flush the nozzle with water from both directions to dislodge any remaining particles.
- Step 5: Reinstall the nozzle and test the spray pattern on a flat surface. A clean nozzle should produce a uniform fan or cone pattern with no streaking.
When to Replace: If the nozzle orifice is visibly eroded, elongated, or damaged, replacement is the only option. Using a damaged nozzle can cause uneven pressure distribution that damages surfaces and stresses the pump.
Fixing M22 Threaded Coupler Leaks

M22 threaded couplers are the standard connection type on most residential and commercial pressure washer hoses. The “M22” designation refers to a 22mm diameter threaded fitting with a 14mm or 15mm inner pin (depending on the brand). Leaks at this connection are typically caused by a damaged O-ring, cross-threading, or insufficient tightening torque.
M22 Coupler Leak Repair Steps
- Step 1: Disconnect the hose from the pump or wand. Inspect the threaded end for visible damage, corrosion, or debris.
- Step 2: Remove the O-ring from the groove inside the coupler. Inspect for cracks, flattening, or deformation.
- Step 3: Replace the O-ring with the correct size. For most M22 fittings, this is a 15mm ID × 20mm OD × 2.5mm cross-section O-ring. Use only chemical-resistant rubber rated for high-pressure water systems.
- Step 4: Apply a thin layer of silicone grease to the new O-ring and the threads.
- Step 5: Thread the coupler onto the mating fitting by hand first to avoid cross-threading. Once hand-tight, use a wrench to snug it an additional quarter-turn. Do not over-tighten, as this can crush the O-ring and create a worse leak.
- Step 6: Reconnect the water supply and test at low pressure first, then full pressure.
Preventive Maintenance Schedule for Pressure Washer Wands and Hoses

Consistent preventive maintenance is far cheaper and faster than emergency repairs. Follow this schedule to keep your pressure washer performing at peak efficiency:
| Maintenance Task | Frequency | Tools Needed |
|---|---|---|
| Inspect all O-rings at quick-connect and M22 fittings | Before every use | Visual inspection, flashlight |
| Clean spray nozzle with cleaning needle | After every use | Nozzle cleaning kit or paperclip |
| Flush pump with pump-safe detergent or winterizer | Monthly (or before storage) | Pump protector fluid |
| Inspect hose for cracks, bulges, or abrasion | Monthly | Visual inspection |
| Replace all O-rings at quick-connect fittings | Every 6 months | O-ring kit, silicone grease |
| Clean or replace unloader valve | Annually | Wrench, vinegar, replacement valve |
| Replace high-pressure hose | Every 2–3 years (or at first sign of bulging) | New hose |
Recommended Hardware & Essential Equipment
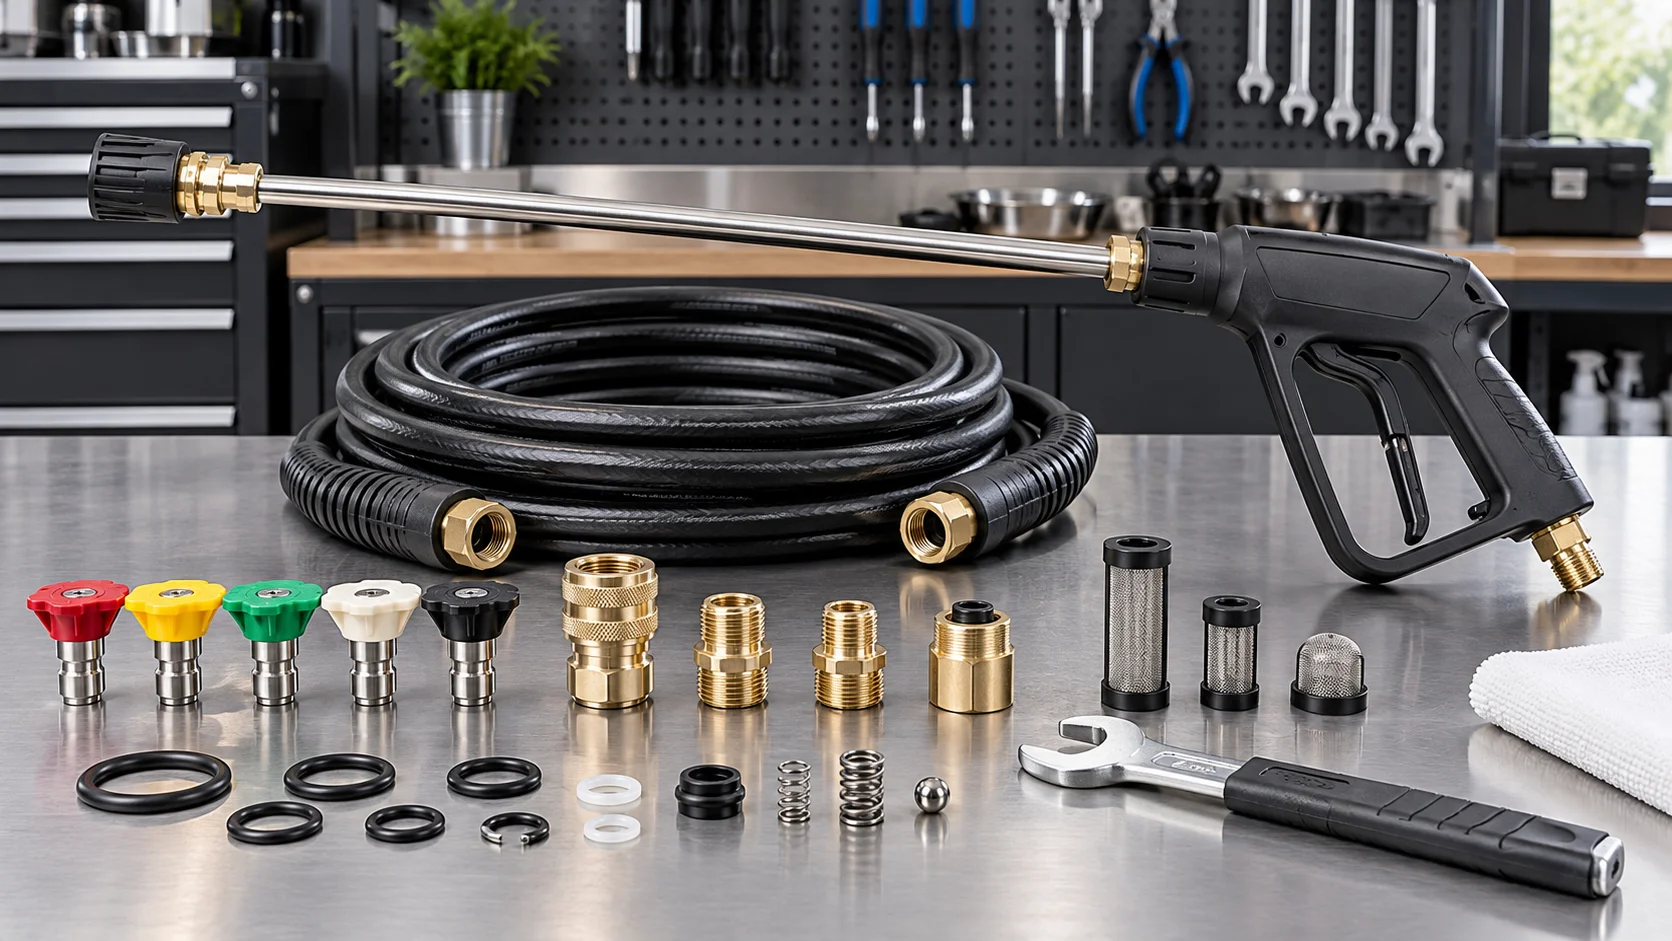
The right replacement parts and tools make the difference between a five-minute fix and a trip to the repair shop. The following verified products are compatible with most residential and commercial pressure washer systems and address the exact failure points covered in this guide—O-ring replacement, coupler sealing, and nozzle maintenance.

Pros
- Fully waterproof and dustproof design means it can handle splashes, spills, and sandy environments.
- Long battery life provides extended playback for camping trips, backyard gatherings, or a full workday.
- Compact and lightweight at 1.21 pounds makes it easy to carry in a bag or clip to a backpack.
- PartyBoost compatibility offers a simple way to expand your sound system with other JBL speakers.
Cons
- As a renewed product, it may show minor cosmetic wear and does not come with the original manufacturer's full warranty.
- The 0 listed customer reviews for this specific renewed listing means there is no user feedback to gauge seller reliability or product condition.
The JBL Flip 6 (Renewed) is best for outdoor enthusiasts and casual listeners who want a proven, waterproof portable speaker at a reduced cost. Its IP67 rating and 12-hour battery are genuine advantages for poolside, hiking, or travel use. However, as a refurbished item, it is not ideal for buyers seeking a brand-new product with full manufacturer support, and the lack of reviews for this specific listing adds uncertainty about the seller's quality control.
Waterproof Rating: IP67 (dustproof and waterproof)
Battery Life: Up to 12 hours per charge
Dimensions: 2.8 x 7 x 2.6 inches
Weight: 1.21 pounds
Connectivity: Bluetooth wireless
Special Feature: PartyBoost for speaker pairing
Product prices and availability are accurate as of the date/time indicated and are subject to change. Any price and availability information displayed on Amazon.com at the time of purchase will apply. As an Amazon Associate we earn from qualifying purchases. Images, product titles, and product highlights from Amazon.
Frequently Asked Questions
How often should I replace the O-rings on my pressure washer fittings?
Inspect O-rings before every use and replace them every six months or at the first sign of cracking, flattening, or hardening. A damaged O-ring is the number one cause of leaks at quick-connect and M22 fittings, and replacement costs less than a dollar per ring.
Can I use petroleum jelly instead of silicone grease on O-rings?
No. Petroleum-based lubricants degrade rubber O-rings, causing them to swell, soften, and fail prematurely. Always use 100% silicone grease or a lubricant specifically rated for rubber seals in high-pressure water applications.
What causes a pressure washer to pulse even with a clean nozzle?
If the nozzle is clear and the unit still pulses, the unloader valve is the most likely cause. Other possibilities include a c
For more detailed testing breakdowns and top recommendations, check our in-depth guide to cordless stick vacuum buyer guide.
For more hands-on benchmarks and buying recommendations, consult our guides on robotic pool cleaner comparison guide, as well as deep carpet cleaning machine reviews, as well as automated robotic vacuum cleaning systems, as well as all-in-one vacuum steam mop combo guide.