Quick Answer: How to Break a Mower Tire Bead
To break a bead on a lawn mower tire: (1) Remove the valve core to release all air. (2) Apply soapy water around the tire rim edge. (3) Place a heavy C-clamp or floor jack base against the tire sidewall near the rim bead, tightening down until the bead pops loose.
Small tubeless lawn mower tires frequently suffer punctures from thorns, hidden wire, or bead leaks caused by rim corrosion. Because lawn mower wheels feature small 6-to-12-inch rim diameters and stiff rubber sidewalls, breaking the stubborn rubber bead away from the steel rim flange is notoriously difficult for DIY mechanics without specialized shop machinery.
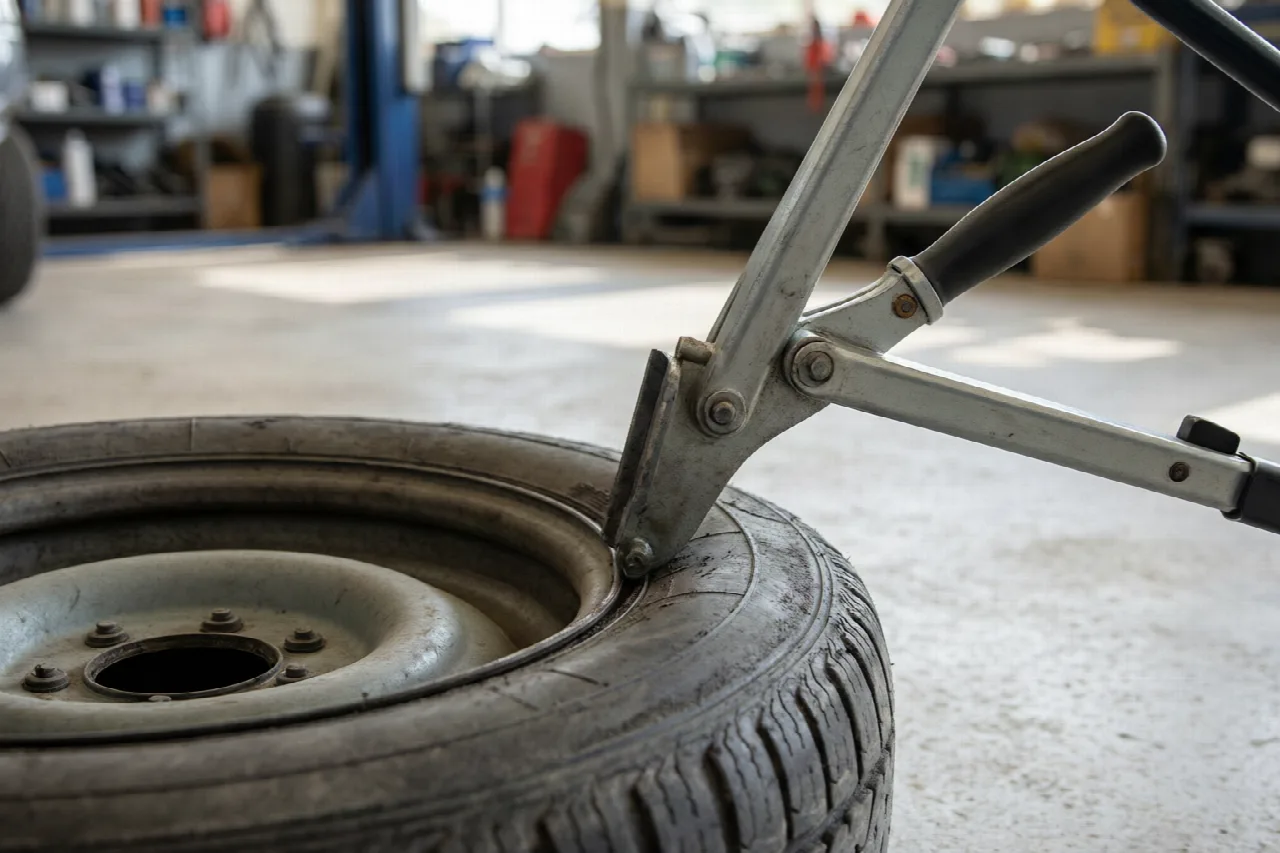
To break the bead on a lawn mower tire, first completely remove the valve core to exhaust all internal air pressure. Lubricate the bead rim seam with soapy water, then compress the tire sidewall immediately adjacent to the rim lip using a heavy-duty 8-inch C-clamp, a manual bead breaker tool, or a 2×4 wooden lever pressed under a vehicle’s tire weight until the rubber pops free.
Preparation: Deflation and Soapy Lubrication
Before applying mechanical force to break the bead, proper wheel preparation is essential to prevent damaged rims and personal injury:
Remove the Valve Core: Simply depressing the valve stem pin does not allow air to escape rapidly enough when the tire is compressed. Use a four-way valve tool or the notched end of a metal valve cap to unscrew and remove the inner valve core completely, ensuring zero residual pressure remains inside the tire cavity.
Apply Penetrating Soapy Lubricant: Over seasons of mowing damp grass, moisture and dirt form a tenacious bond between the rubber tire bead and the painted steel rim. Mix liquid dish soap with warm water in a spray bottle or brush it generously into the crevice between the tire sidewall and the rim flange. Let the soapy mixture penetrate for five minutes to reduce friction before breaking the bead.
Method 1: Heavy-Duty C-Clamp or Bar Clamp
For DIY homeowners without dedicated tire machinery, a heavy-duty 8-to-10-inch forged steel C-clamp represents the most reliable, accessible tool for breaking small mower beads:
Position the fixed anvil of the C-clamp against the back edge of the steel wheel rim. Place the threaded swivel pad of the clamp directly against the rubber tire sidewall, positioned as close to the rim lip as possible without catching the metal flange. Tighten the clamp handle with steady, firm pressure.
As the clamp tightens, it pinches the stiff sidewall downward. If the bead resists, tighten the clamp firmly, place a small wooden block against the sidewall near the clamp pad, and strike the block with a dead-blow mallet. The combination of sustained clamp tension and shock vibration will cause the bead to pop inward off the rim seat.
Method 2: The 2×4 Board and Vehicle Ramp Lever
When dealing with sun-baked, hardened mower tires that resist hand clamps, leveraging the weight of a car or truck tire using a wooden plank creates immense leverage:
Lay the deflated mower wheel flat on a piece of cardboard on level concrete. Position the beveled end of an 8-foot 2×4 or 2×6 wooden board on the tire sidewall, right against the edge of the steel rim. Place the opposite end of the board on the ground directly in front of your car or truck tire.
Drive your vehicle forward slowly so the car tire rolls onto the board, pressing the wooden plank down onto the mower tire sidewall. The distributed downward vehicle weight collapses the stiff rubber and pops the bead off the inner rim lip cleanly without scratching wheel paint. Property owners managing large acreage tractors like gas riding lawn mowers or comparing tractor models through Toro riding lawn mowers find this lever technique invaluable for stubborn rear drive tires.
Methods to Strictly Avoid: Safety Warnings
Never attempt to break a tire bead using sharp screwdrivers, cold chisels, or pry bars hammered directly into the rim seam. Sharp metal tools gouge aluminum rims, bend stamped steel flanges, and slice the internal steel bead cords, ruining the tire and preventing it from ever holding air again.
Furthermore, never attempt the dangerous ‘starting fluid’ or ether explosion method to seat or break beads on small lawn mower tires. The small internal air volume of lawn mower tires creates extreme explosive combustion pressure that can blow the wheel apart, causing catastrophic injuries. For equipment purchased through seasonal sales like riding lawn mowers on clearance, adhering to safe mechanical bead tools prevents damage to fresh machinery.
Recommended Gear
Handle tire repairs safely and efficiently with manual portable tire bead breakers, heavy-duty C-clamps, and tubeless tire repair plug kits.

Pros
- Broad compatibility covering rim sizes from 4 to 16.5 inches
- Integrated manual bead breaker separates beads without shop air
- Reinforced rectangular steel base enhances operational stability
- Adjustable locking collar secures wheels during service
Cons
- Heavy 66-pound unit is cumbersome to transport or store
- Full manual operation requires significant physical effort

Pros
- Accommodates light-vehicle tire sizes from 8 to 16 inches
- Forged Q235B steel construction with rust-resistant powder coat
- Dual-purpose handle handles both bead separation and mounting
- Pre-drilled X-base allows secure anchoring to workshop floors
Cons
- Not compatible with commercial vehicle tires
- Requires manual effort and floor mounting for stable operation

Pros
- Fits 8- to 16-inch tires for cars, SUVs, and ATVs
- Made of durable steel construction
- Thickened, rounded parts help protect tires and hubs
- Three pre-drilled base holes for adjustable mounting
Cons
- Requires bolting down to ensure full working stability
- Manual operation demands physical effort
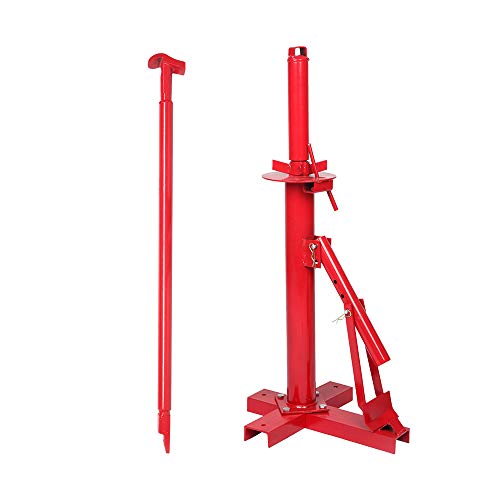
Pros
- Handles tire sizes ranging from 8 to 16 inches
- Three-hole adjustable bead breaker positions
- Includes a locking collar to hold wheels in place
- Durable steel frame with powder-coated finish
Cons
- Requires securing to the ground or a pallet to prevent movement
- Assembly required before use

Pros
- Interchangeable clamp and rubber-padded jaws protect delicate rims
- Breaks beads on vehicles without needing to dismount the wheel
- Forged from heat-treated steel for reliable impact resistance
- Portable ~11.9-pound design fits in vehicle toolboxes or trunks
Cons
- Wrench or air ratchet required for operation is not included
- Full tire demounting still requires separate tire spoons

Pros
- Breaks beads without removing wheels from the vehicle
- Rubber pad on front paw helps protect wheel hubs
- Heavy-duty steel build with thickened front paw
- Compact and portable for garage, farm, or field storage
Cons
- Not compatible with impact wrenches
- Manual wrenching required to operate the drive screw
Frequently Asked Questions
Why are lawn mower tire beads so hard to break?
Small rim diameters (6 to 12 inches) offer minimal sidewall flex, and prolonged exposure to moisture causes rubber beads to rust and adhere tightly to painted steel rim flanges.
Can you break a tire bead with a vise?
Yes. If you have a large 6-inch bench vise, position the wheel rim against one vise jaw and the tire sidewall against the other jaw, tightening the vise until the bead pops off the rim seat.
Do you have to remove the tire from the lawn mower?
Yes, always remove the wheel assembly from the mower axle before breaking beads. Attempting to break beads while mounted on the axle can bend steering spindles and damage transaxle bearings.
What is the best lubricant for breaking and mounting tire beads?
A 50/50 mixture of liquid dish soap and warm water, or commercial tire mounting paste (tire snot), provides excellent lubricity without degrading rubber compound chemistry.
How do you reseat the bead after replacing an inner tube?
Lubricate both beads with soapy water, wrap a ratchet strap around the center circumference of the tire tread, tighten the strap to flare the sidewalls outward, and inflate with compressed air.
Related Maintenance and Operating Guides
To keep your equipment running at peak operating efficiency, explore our related technical walkthroughs and maintenance tutorials:
- Consult our detailed breakdown on replace a Briggs and Stratton pull cord.
- Consult our detailed breakdown on clean a Briggs and Stratton carburetor.
- Consult our detailed breakdown on racing lawn mower build guide.
- Consult our detailed breakdown on biological goat grazing methods.
- Consult our detailed breakdown on best ride-on lawn mowers.
Technical Standards and Safety Guidelines
For general background on voluntary safety standards, see the American National Standards Institute (ANSI).