Direct Answer: How to Change Weed Eater String
To change weed eater string, turn off the trimmer and disconnect the spark plug or remove the battery so the tool cannot start accidentally. Identify your head type first: bump-feed heads hold the line on a spool that releases more line when you tap the head on the ground, while fixed heads use short pre-cut lengths anchored into a disk. For a bump-feed head, remove the spool, cut a fresh length of the correct gauge, insert one end into the anchor hole, and wind the line in the direction shown by the arrow. For a fixed head, insert pre-cut line pieces into the matching slots, align the tips with the eyelets, and snap the head back together. Always check your owner’s manual because “Weed Eater” is both a brand name and a generic term for many different trimmer designs.
Identify Your Trimmer Head Type First
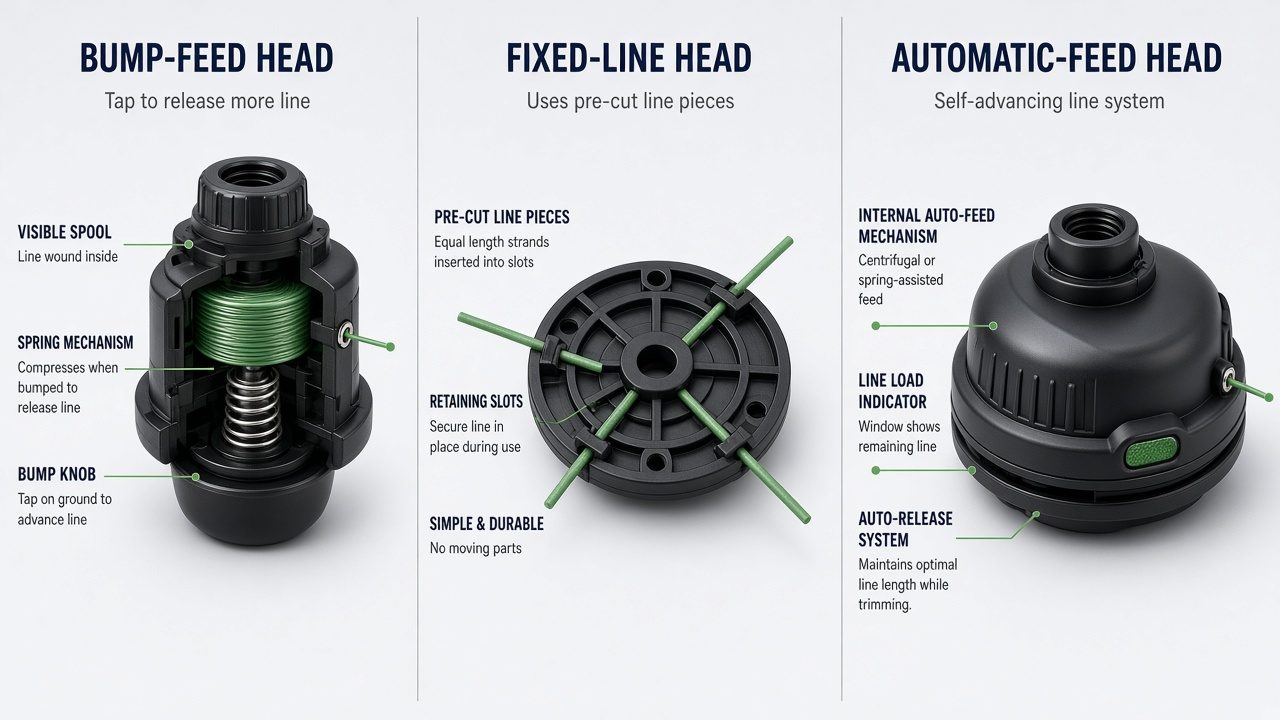
Before you buy line or take anything apart, you need to know which kind of trimmer head you have. The loading procedure is completely different for each type, and forcing the wrong method can damage the head or cause the line to jam.
Bump-Feed Heads
Bump-feed heads are the most common on consumer string trimmers. The line is stored on a spool inside the head. When the line gets short, you tap the bottom of the head on the ground while the trimmer is running, and a small amount of new line is released. The spool usually has a spring-loaded mechanism, and the head may have two tabs or a cap that you press or unscrew to access the spool.
Fixed-Line Heads
Fixed-line heads do not use a spool. Instead, they hold two or more pre-cut pieces of line in a plastic or metal disk. When the line wears down, you remove the head, pull out the old pieces, and insert fresh pre-cut lengths. There is no bump-feed mechanism, so the line cannot be extended while you are trimming.
Automatic-Feed Heads
Automatic-feed heads release line continuously or on a timer without any tapping. They use a spool similar to a bump-feed head, but the release mechanism is driven by centrifugal force or a ratchet. The loading procedure is usually the same as a bump-feed head: remove the spool, wind the line in the arrow direction, and feed the ends through the eyelets. Check the manual for any special notes about tension or locking the spool before reassembly.
To identify your head type, look for a visible spool, a tap knob on the bottom, or the words “bump feed” or “automatic feed” molded into the plastic. The model number is usually printed on the trimmer housing or under the head. Search that number online or in the owner’s manual to confirm the head style and the recommended line gauge.
Safety Preparation Before You Start
Changing trimmer line is a simple job, but it becomes dangerous if the engine starts while your hands are inside the head. Always prepare the tool properly before you touch any part of the cutting assembly.
- Turn off the engine or motor. If you have a gas trimmer, set the switch to “off” and let the engine cool completely.
- Disconnect the spark plug. Pull the spark plug boot off the plug and move it away from the terminal. This prevents accidental starting even if the switch is faulty.
- Remove the battery. For electric and battery-powered trimmers, take the battery pack out of the tool entirely.
- Wait for the head to stop spinning. The trimmer head can coast for several seconds after you release the trigger.
- Wear gloves and eye protection. Trimmer line can have sharp edges, and the head may contain a stiff spring that can pop out during disassembly.
- Work on a clean, flat surface. A workbench or a clean patch of ground keeps small parts like springs, washers, and tabs from rolling away.
If the trimmer was used recently, the head and the engine housing can be hot. Wait at least 10 to 15 minutes before handling the head. Never attempt to change line while the trimmer is running or plugged in.
Step-by-Step Guide for Bump-Feed Heads
This is the universal procedure for most spool-style bump-feed heads. The exact method of opening the head varies by brand, but the core steps are the same.
Step 1: Remove the Spool or Open the Head
Look at the bottom of the head. Some heads have two tabs on the side that you press together while pulling the cap off. Others have a cap that unscrews counterclockwise. Some newer heads have a locking ring or a small arrow that shows where to align the cap before pulling. If the head will not open, check the manual for a hidden release button or a slot for a flathead screwdriver.
Step 2: Remove the Old Line
Take the spool out of the head. Pull off or unwind any remaining line. Check the spool for a printed line gauge recommendation, such as .065, .080, or .095 inches. Also inspect the spool for cracks, a broken spring, or a worn anchor slot. If the spool is damaged, replace it rather than reusing it.
Step 3: Cut the New Line to Length
Cut a single continuous length of new trimmer line. A good starting point is about 20 to 25 feet for a standard spool, but the exact capacity depends on the spool size. If the spool has a marked line capacity, follow that. It is better to cut slightly less than the full capacity, because overfilling makes the line bind inside the head.
Step 4: Insert One End into the Anchor Hole
Find the small anchor hole or slot on the spool. Insert one end of the line into the hole and pull it through until a few inches stick out on the other side. This anchors the line so it does not slip while you wind.
Step 5: Wind in the Direction of the Arrow
Look for an arrow printed on the spool, the cap, or the inside of the head. Wind the line in that exact direction. Wind tightly and evenly, keeping the coils in the channel and avoiding overlap. Leave the last 4 to 6 inches of line unwound. This free end is what you will feed through the eyelet.
Step 6: Feed the Ends Through the Eyelets
Depending on the head design, you will either feed the free end through the eyelet on the side of the head or hook it into a notch on the spool. If the head has two eyelets and the spool holds one continuous line, the line will have two free ends. Feed each end through its matching eyelet. If the head uses two separate lines, repeat the winding process for the second line on the other side of the spool.
Step 7: Reassemble and Test
Align the spool with the spring or drive dog inside the head, then press the cap back on or screw it down until it clicks. Pull both line ends gently to confirm they are seated. Do not pull hard enough to unwind the spool. Reconnect the spark plug or battery, start the trimmer, and tap the head on the ground to confirm that the bump feed releases line correctly.
Step-by-Step Guide for Fixed and Manual-Wind Heads
Fixed-line heads are simpler but require precise alignment. The line pieces must be long enough to reach the cutting diameter but short enough to fit inside the head when it is closed.
Step 1: Remove the Head
Fixed heads often screw onto the trimmer shaft. Hold the shaft steady and turn the head counterclockwise, or use the wrench that came with the trimmer. Some fixed heads have a locking pin that you press through a hole in the shaft to keep it from turning.
Step 2: Remove the Old Line
Pull the old line pieces out of the slots or holes in the disk. If a piece is broken off inside the head, use needle-nose pliers to remove the fragment. Check the disk for cracks or worn eyelets.
Step 3: Cut Fresh Line Pieces
Cut two or more pieces of line to the length specified in the manual. A common rule is to use pieces that are about 8 to 12 inches long, but the correct length depends on the head diameter. When in doubt, cut the pieces slightly longer than the distance from the center of the head to the outer edge, then trim after testing.
Step 4: Insert Each Piece into the Matching Slot
Insert one end of each piece into the anchor hole or slot on the disk. Push it through until it comes out through the eyelet on the outer edge. The line tip should stick out just far enough to be visible. Align the second piece in the opposite slot so the head is balanced.
Step 5: Snap the Head Back Together
Place the cover over the disk and press until it clicks. Rotate the disk by hand to make sure the line tips do not catch on the housing. If a tip is too long, remove the cover and trim it slightly. Reinstall the head on the trimmer shaft and tighten it securely.
You can reuse old line in a fixed head if it is still long enough and not cracked, but fresh line cuts more efficiently. Nylon line degrades with UV exposure and heat, so old line becomes brittle and breaks sooner.
Choosing the Right String Gauge, Length, and Material
Using the wrong trimmer line is the most common cause of poor cutting and frequent breakage. The two most important factors are gauge and shape.
What Does Line Gauge Mean?
Gauge is the diameter of the line, measured in inches. Thicker line is stronger and cuts heavier weeds, but it requires a more powerful engine and a head designed for that size. Thinner line is lighter and works well on small electric trimmers, but it breaks easily in thick growth.
| Gauge | Typical Use | Notes |
|---|---|---|
| .065 inch | Small electric and battery trimmers | Light duty, good for grass and light weeds |
| .080 inch | Mid-size gas trimmers | Most common consumer size, good all-around |
| .095 inch | Large gas trimmers and brush cutters | Heavy duty, for thick weeds and overgrowth |
Check your owner’s manual or the printing on the spool for the recommended gauge. If the markings are worn off, start with .080 inch for a standard gas trimmer or .065 inch for a small electric trimmer, then test. Using line that is too thick can cause the line to jam, the head to overheat, or the engine to strain. Using line that is too thin will cut poorly and break frequently.
Round vs. Twisted vs. Star-Shaped Line
- Round line is the most common and the most forgiving. It cuts well on grass and is less likely to jam in the head.
- Twisted or serrated line has edges that grip weeds and cut faster, but it can be noisier and may wear the head eyelets faster.
- Star or multi-sided line offers aggressive cutting for thick brush, but it is more expensive and can be brittle in cold weather.
For most homeowners, a quality round or lightly twisted line in the correct gauge is the best choice. Match the material to the job: standard nylon is fine for grass, while reinforced line with carbon or other fibers lasts longer on abrasive surfaces like concrete and fences.
How Long Should the Line Stick Out?
When you finish loading, the line should extend roughly 5 to 7 inches beyond the head, depending on the model. The manual usually states the recommended cutting diameter. If the line is too long, the engine bogs down and the head vibrates. If it is too short, the trimmer does not cut effectively and you will tap the bump feed constantly.
Troubleshooting Common String Replacement Problems
If your new line does not feed correctly, the problem is almost always one of the following issues.
The Line Jams Inside the Head
Jamming is usually caused by overfilling the spool, winding in the wrong direction, or crossing the line over itself. Remove the spool, unwind the line, and rewind it evenly in the direction of the arrow. If the line is too thick for the head, it will bind between the spool and the housing; switch to the recommended gauge.
The Line Unwinds All at Once When You Tap the Bump Feed
This happens when the line was not anchored properly in the spool hole, or when the spool was not seated against the spring correctly. Open the head, confirm that the line end is locked in the anchor slot, and make sure the spool clicks into place before you put the cap on. Also check that the spring is not missing or broken.
The Line Breaks Immediately After Starting
Immediate breakage usually means the line is too thin for the job, the line is old and brittle, or the eyelets have sharp burrs from wear. Replace the line with a fresh piece of the recommended gauge, and inspect the eyelets. If the edges are rough, smooth them with fine sandpaper or replace the head.
The Arrow Markings Are Worn Off
If you cannot see the winding direction arrow, look for a similar arrow on the cap, the spool hub, or the underside of the head. On most heads, the line winds in the same direction that the head rotates when the trimmer is running. If you are unsure, wind the line in the direction that tightens it against the anchor hole when you pull the free end. A quick test on a small piece of scrap line can also reveal the correct direction without wasting a full spool.
The Line Does Not Feed at All
If the bump feed does not release line after tapping, the spool may be wound too tightly, the spring may be worn, or the line ends may be stuck inside the eyelets. Pull the line ends gently to free them, then tap the head a few times. If nothing happens, disassemble the head and check the spring and the drive dog for damage.
Frequently Asked Questions
Do I need to disconnect the spark plug or remove the battery before changing weed eater string?
Yes. Always disconnect the spark plug on a gas trimmer or remove the battery on an electric trimmer before touching the head. This prevents the engine from starting accidentally if the switch is bumped or the throttle is engaged. It is the single most important safety step in the entire process.
Which way do I wind the line onto the spool?
Wind the line in the direction indicated by the arrow printed on the spool, the cap, or the inside of the head. This direction is usually the same as the rotation of the head during operation. Winding the wrong way causes the line to unwind, jam, or break as soon as the trimmer starts.
How much new trimmer line should I cut for a bump-feed spool?
Cut a single continuous length of about 20 to 25 feet for a standard spool, or follow the capacity marked on the spool. Leave 4 to 6 inches unwound at the end so you can feed the line through the eyelet. Overfilling the spool is a common cause of jamming.
Can I use any brand of trimmer line in my weed eater?
Yes, trimmer line is generally interchangeable as long as the gauge matches your head and the material is compatible with your cutting needs. The brand does not need to match the trimmer brand. Always check the owner’s manual for the recommended diameter, and avoid using line that is thicker than the head is designed to accept.
Direct Answer: Step-by-Step Summary
Here is the quickest safe way to change weed eater string on a bump-feed head:
- Turn off the trimmer and disconnect the spark plug or remove the battery.
- Press the tabs or unscrew the cap to open the head, and remove the old spool.
- Remove old line, then cut a fresh length of the correct gauge.
- Insert one end into the anchor hole and wind tightly in the arrow direction, leaving 4 to 6 inches free.
- Feed the free ends through the eyelets, reassemble the head, and reconnect the power source.
- Test by pulling the line gently, then start the trimmer and tap the head to confirm the feed works.
For a fixed head, the same safety steps apply, but you will insert pre-cut line pieces into the slots, align the tips with the eyelets, and snap the head shut. Not all weed eater models follow the exact same procedure, so always consult your owner’s manual. If the spool is cracked, the spring is broken, or the eyelets are badly worn, replace the entire head instead of just the line. With the correct gauge, proper winding direction, and a clean assembly, your string trimmer will cut cleanly and reliably all season.