

Direct Answer: How to Edge a Lawn with a Weed Wacker
To edge a lawn with a weed wacker, hold the trimmer head parallel to the ground at a 90-degree angle to the edge line, positioning the outer tip of the cutting head to do the work. Move at a steady, controlled pace along the border, keeping the trimmer head at or slightly below the turf level. Maintain proper stance with the trimmer close to your body, wear eye protection and closed-toe shoes, and be aware that debris ejects perpendicular to the cutting direction at high speed.
Understanding Lawn Edging vs. General Trimming
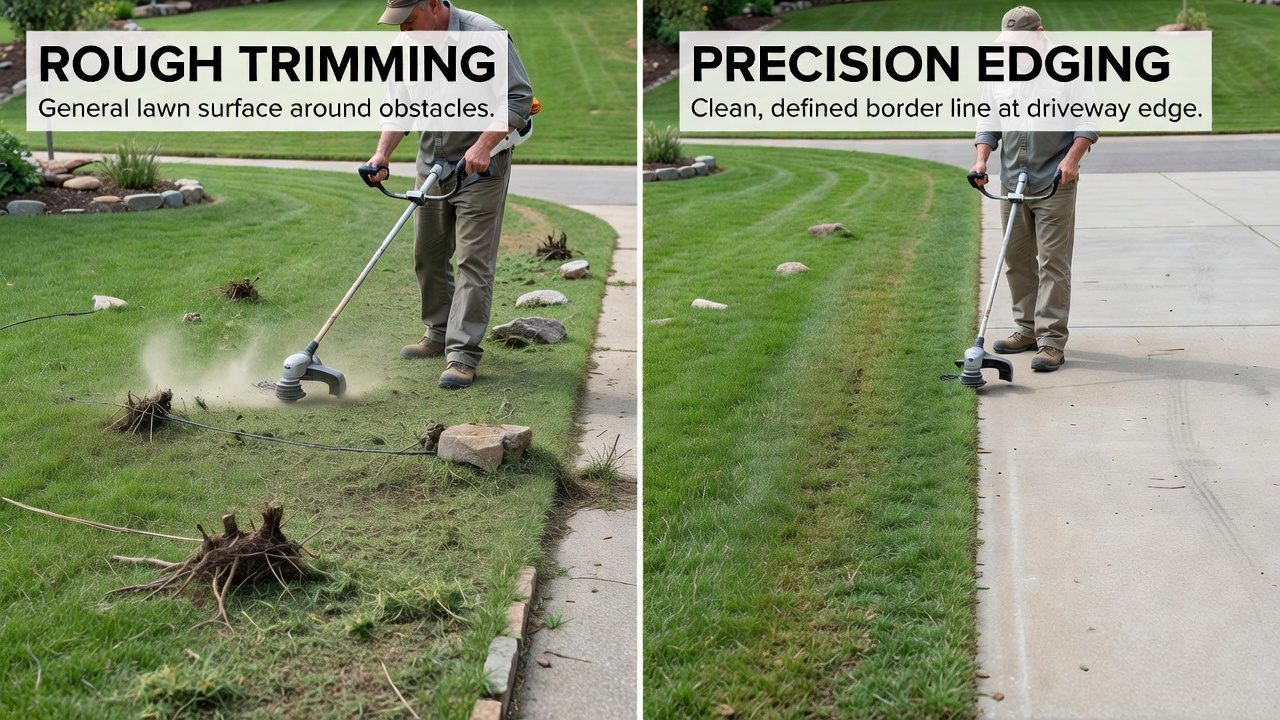
Lawn edging and routine string trimming serve different purposes. Trimming removes overgrown grass and weeds across the entire lawn surface or around obstacles like trees and fence posts. Edging creates a clean, defined border, a vertical cut that separates the lawn from hardscape surfaces (driveways, sidewalks, patios) or garden beds.
Edging gives a lawn a finished, manicured appearance and prevents grass from creeping into flower beds and onto pavement. Without regular edging, lawn borders become fuzzy and ill-defined. Most homeowners edge their lawns every 2 to 4 weeks during the growing season, typically after mowing. Some prefer to edge before mowing so clippings fall back onto the lawn rather than the pavement.
Types of Weed Wackers and How Technique Varies
Three main types of weed wackers are used for edging:
- String trimmers (electric or battery-powered): Lightweight, quieter, and ideal for residential edging. Battery models offer cord-free convenience; corded models provide unlimited runtime but require an extension cord.
- Gas-powered trimmers: More powerful and better for thick grass or weeds, but heavier and louder. Gas models handle tougher edging jobs but demand more physical control.
- Dedicated edgers: Specialized tools with a vertical spinning wheel that cut downward. These create the sharpest edge but are a separate purchase.
The basic edging technique remains consistent across all weed wacker types: hold the head parallel to the ground, maintain a 90-degree angle to the edge line, and move at a controlled pace. However, heavier gas-powered models require more upper-body stability, while lightweight battery trimmers allow for longer, more precise movements without fatigue.
Positioning and Angle: The Foundation of Clean Edges
Trimmer head angle: The cutting head must be parallel to the ground and perpendicular to the edge line you’re cutting. If the head tilts or angles upward, you’ll scalp the grass (cut it too short) or miss sections entirely. If the head angles downward, you may dig into soil.
Body stance: Stand with your feet shoulder-width apart, perpendicular to the edge line. Hold the trimmer with both hands, keeping it close to your body for stability and control. Your dominant arm should guide the trimmer along the line while your other arm provides support. Keep your shoulders relaxed to reduce fatigue.
Cutting depth: Position the trimmer head so the outer tip of the string or blade just barely touches the ground or is 1/4 inch below the turf surface. This creates a clean cut without scalping. If you’re edging alongside a driveway or sidewalk, the trimmer head should be at or slightly below the pavement level to eliminate any overhang of grass. Users looking for related component recommendations can explore our z890 vs x870e motherboard breakdown.
Which part of the trimmer head cuts: For string trimmers, the outer tips of the spinning string do the cutting. Position the trimmer so the outer 2 to 3 inches of string contact the edge line. Do not use the side of the string head; this creates an uneven, jagged edge.
Step-by-Step Edging Technique
Edging Along Driveways and Sidewalks
- Start at one end of the driveway or sidewalk.
- Position the trimmer head so it spans the grass-to-pavement boundary, with the outer tip of the string at or slightly below the pavement level.
- Hold the trimmer at a 90-degree angle to the edge, keeping the head parallel to the ground.
- Move forward at a steady walk, allowing the trimmer to cut as you go. Do not rush or move in jerky motions.
- Maintain a straight line by focusing on a point ahead of you rather than looking down at the cutting area.
- Overlap each pass slightly (about 1 inch) to ensure no grass is missed.
- At the end of the driveway, turn the trimmer 180 degrees and edge the return pass, again maintaining the 90-degree angle and steady pace.
Edging Garden Beds and Landscaping Borders
- Identify the desired edge line between the lawn and the garden bed.
- Position yourself so the trimmer head is perpendicular to this line, with the outer tip about 1/2 inch into the lawn side of the boundary.
- Make a shallow first pass to establish the line. Do not attempt to cut deep in one pass; multiple passes create a cleaner edge.
- For subsequent passes, move the trimmer slightly inward and repeat until you’ve created a defined, vertical edge.
- If the garden bed soil is higher than the lawn, angle the trimmer head slightly so it cuts the lawn closer to the soil line without gouging into soil.
Handling Fence Lines and Corners
- For fence lines, edge parallel to the fence, keeping the trimmer head at a 90-degree angle to the fence line.
- At corners and transitions, slow your pace and make careful, deliberate movements. Sharp turns often result in uneven edges.
- For tight corners where the trimmer cannot reach, use the tip of the string by angling the trimmer slightly. Never force the trimmer into confined spaces.
- Consider edging around obstacles (trees, mailbox posts) last, after establishing the primary edges, so you can focus on precision in tight areas.
Speed Control and Movement Pattern
Walking pace: Maintain a slow, steady walk, roughly 1 to 1.5 feet per second. This speed allows the cutting head to remove grass cleanly without scalping or leaving patches. If you move too slowly, you may over-cut or create a ragged edge; too fast, and you’ll leave grass behind. Before finalizing equipment decisions, refer to our comprehensive marshall stanmore iii vs harman kardon onyx studio 8 comparison.
Overlap pattern: Each pass should overlap the previous one by 1 to 2 inches. This ensures complete coverage and a uniform edge. Mark a visual reference point on the pavement or lawn to help maintain consistent overlap.
Handling curves: When edging along curved borders (e.g., a curved garden bed), reduce your walking speed and make smaller, more deliberate passes. Follow the curve naturally rather than trying to force a straight line. Multiple shorter passes create a cleaner curved edge than one long pass. For broader ecosystem context, read through our operational guide on dyson v8 cyclone vs bissell featherweight stick.
Direction and sun: Edge in a direction that keeps the sun to your side rather than in your eyes. This improves visibility and reduces eye strain. If possible, edge in the late afternoon when the sun is lower and less intense.
Safety Considerations and Protective Equipment
- Eye protection: Safety glasses or a face shield are non-negotiable. Debris, including grass clippings, small stones, and dirt, is ejected at high speed.
- Closed-toe shoes: Wear sturdy shoes with closed heels and toes. Sandals or open-toed shoes leave your feet vulnerable to flying debris.
- Long pants: Protect your legs from flying debris and string/blade contact.
- Hearing protection: If using a gas-powered trimmer, wear earplugs or earmuffs, as prolonged exposure to noise can cause hearing damage.
- Work gloves: Optional but recommended to improve grip and protect hands from debris.
Debris ejection: String trimmers and gas-powered weed wackers eject debris perpendicular to the direction of the cutting head rotation. When edging a driveway with the trimmer head vertical (or nearly vertical), debris shoots toward the driveway and away from the lawn. Position yourself so debris ejects away from your body and face. Never allow bystanders to stand within 10 feet of the edging area.
Maintenance and preparation: Before edging, inspect your lawn for obstacles (rocks, sticks, glass) that could damage the trimmer or cause debris to become projectiles. Clear these hazards first. Check that the trimmer string or blade is in good condition; worn string or dull blades require more power and increase fatigue.
Proper stance to avoid injury: Keep both feet planted firmly on the ground and maintain a stable stance. Do not reach or stretch awkwardly, as this increases the risk of losing control. Take breaks to avoid fatigue, which compromises control and increases the likelihood of accidents.
Common Mistakes to Avoid
- Tilting the trimmer head: Even a slight tilt creates an uneven edge. Maintain parallel-to-ground positioning throughout.
- Moving too quickly: Speed leads to missed patches and scalping. Slow, steady movement produces better results.
- Using the wrong part of the string head: The side of the head creates a ragged edge. Use the outer tips.
- Skipping safety gear: Edging produces fast-moving debris. Protect yourself every time.
- Attempting to edge when grass is wet: Wet grass clumps and clogs the trimmer, reducing cutting efficiency. Edge when grass is dry.
- Cutting too deep on first pass: Build the edge gradually with multiple shallow passes rather than one aggressive pass.
When to Edge and Maintenance Schedule
Edge your lawn every 2 to 4 weeks during the growing season (spring through fall). More frequent edging in summer, when grass grows faster, maintains sharper borders. Less frequent edging in spring and fall may suffice. In winter, lawn edging is rarely necessary unless you live in a mild climate with year-round growth.
Maintain your weed wacker for consistent edging performance: replace trimmer string when worn (indicated by shorter string length or reduced cutting power), keep the air filter clean, and store the trimmer in a dry location. For gas models, drain fuel before long storage to prevent clogging.
Everything You Need to Know: Edge A Lawn With A Weed Wacker FAQ
Can you use a regular string trimmer to edge, or do you need a dedicated edger?
A regular string trimmer can edge effectively if held at the correct angle (parallel to the ground and perpendicular to the edge line). Dedicated edgers, which have a vertical spinning wheel, create sharper, more defined edges with less effort, but they’re an additional tool investment. For most residential lawns, a quality string trimmer handles both trimming and edging well.
How do you get a straight edge along a driveway?
Maintain a consistent walking pace and focus on a point ahead rather than looking down. Use the pavement line as a visual guide. For the first edging of the season or to reset an uneven edge, you may use a long straightedge or chalk line as a reference, though this is time-consuming. Multiple passes over several weeks gradually create a straighter, more defined edge than trying to perfect it in one attempt.
What’s the difference between edging before or after mowing?
Edging before mowing causes clippings to fall back onto the lawn, where they can decompose and provide nutrients. Edging after mowing means clippings fall onto the pavement, requiring cleanup. Many homeowners prefer to edge first for this reason, though the timing is largely a matter of personal preference and convenience.
Is it safe to edge near flower beds with delicate plants?
Yes, but use caution. Reduce your trimmer speed and maintain precise control. Keep the cutting head slightly on the lawn side of the bed edge to avoid cutting into plants or soil. For very delicate plantings, hand-trim with pruning shears along that border rather than using a motorized trimmer.
Edging Technique and Safety
Edging with a string trimmer means holding the head at an angle close to pavement, which can send stones or debris outward. Keep bystanders and pets well back, and wear eye and leg protection. A broader overview of yard equipment safety is available from American National Standards Institute (ANSI).









