

Quick Answer: How To Install Lawn Mower Blades?
To install lawn mower blades safely and correctly, first disconnect the power source, remove the spark plug wire on gas mowers or the battery on electric models, and tip the mower with the air filter and carburetor facing up. Mark the blade’s orientation before removal, then loosen the center bolt with a socket wrench or breaker bar, holding the blade steady with…

Pros
- 4WD hub motors, rated by the maker for slopes up to 38.7° (80%)
- 360° 3D LiDAR with binocular AI vision for obstacle detection
- Wire-free setup with virtual boundaries managed in the Dreame app
- Dual 15.8-inch cutting discs; maker rates Rush mode at 8,611 sq ft/hour
- Cutting height adjustable from 1 to 4 inches in the app
Cons
- Speed, slope, and obstacle figures are manufacturer-stated, not independently verified
- At about 26.4 lb and 38.7 in long, storage and handling take space

Pros
- Auto-retracting blades swing back after rock or stump impact
- Sealed motor housing listed to resist splashes, mud, and debris
- 55cm deck offers wide coverage per pass
- Remote control of start/stop, steering, blades, and height
Cons
- 330-pound weight may limit transport and handling
- Performance and durability claims are manufacturer-stated only

Pros
- 53-inch cutting width for covering large areas in fewer passes
- 18 heat-treated 40Cr alloy steel hammers, per manufacturer specs
- Adjustable rear roller for setting cutting height on uneven ground
- Front safety flaps used in place of traditional chain curtains
- Standard Category 1 3-point hitch with 540 RPM PTO shaft
Cons
- Durability and debris-shielding claims are manufacturer-stated only
- No customer reviews are available yet to confirm real-world results

Pros
- RTK Cloud positioning, described as centimeter-level, no local antenna
- Vision AI auto-maps the yard and follows boundary types
- App control for multiple zones, custom paths, and no-go areas
- Four mowing patterns, switchable in the app
- Cut-to-edge border cutting claimed to reduce leftover grass
Cons
- Accuracy, obstacle, and shade claims are manufacturer-stated
- No customer reviews or independent test results are listed
Understanding Lawn Mower Blades: The Basics
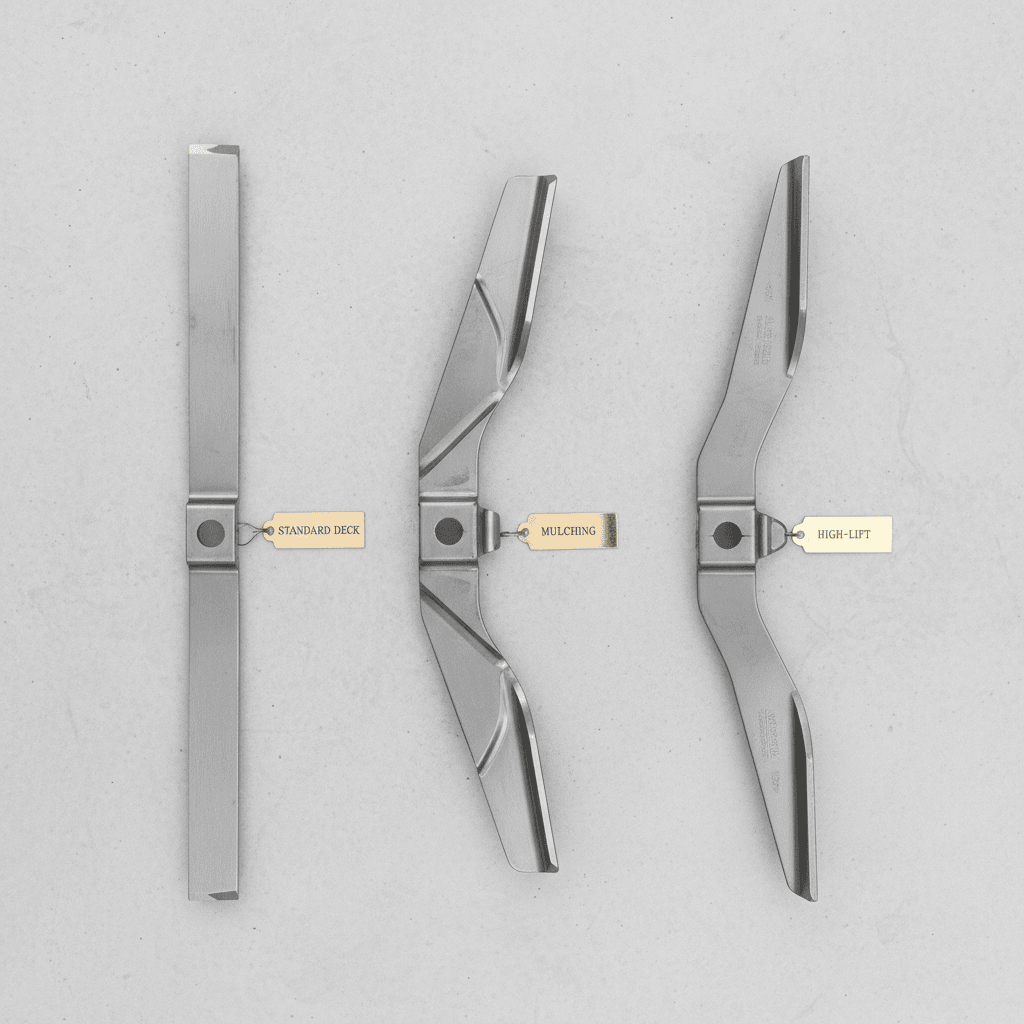
Before diving into the installation process, it’s important to understand what you’re working with. Lawn mower blades are the cutting components attached to the underside of your mower’s deck. They spin at high speeds to cut grass, and their condition directly impacts cut quality, mower performance, and safety.
What types of lawn mower blades exist and how do they differ?
Most residential mowers use one of three blade types: standard (or deck) blades for basic side-discharge or bagging, mulching blades with extra curves to recirculate grass clippings, and high-lift blades designed to create more airflow for bagging. The installation process is fundamentally the same for all types, but always consult your owner’s manual for model-specific instructions.
When should I replace or re-install a lawn mower blade?
Replace or sharpen blades when you notice uneven cuts, ragged grass tips, or increased vibration. A good rule of thumb is to inspect blades after every 25 hours of use. If you’re re-installing a sharpened blade, the process is identical to installing a new one, just ensure the blade is properly balanced.
How does the installation process differ for different mower types?
While the core steps are universal, specifics vary. For push mowers, you’ll typically tip the mower on its side. For riding or zero-turn mowers, you may need to raise the mower on a lift or use jack stands, and the blade bolt may require higher torque. Electric mowers require battery removal, while gas mowers need the spark plug wire disconnected. Always prioritize the safety steps outlined in your manual.
Key Factors to Consider Before You Begin
Proper preparation is critical for both safety and a successful installation. Skipping these steps can lead to injury, damage to your mower, or improper blade function. To compare alternative configurations, check our hands-on review of z890 vs x870e motherboard.
What safety precautions must I take before working on a lawn mower?
Safety is paramount. Always disconnect the power source completely. For gas mowers, remove the spark plug wire and secure it away from the plug. For electric or battery-powered mowers, remove the battery. Wear heavy-duty gloves to protect your hands from sharp edges. Work on a flat, stable surface and ensure the mower cannot roll unexpectedly.
What tools do I need to install or replace a lawn mower blade?
You’ll typically need a socket wrench or breaker bar (often 15/16″ or 1″ for the center bolt), a block of wood to immobilize the blade, a torque wrench for proper tightening, and a blade balancer if you’re re-installing a sharpened blade. A wire brush to clean the mounting area is also helpful. Users looking for related component recommendations can explore our marshall stanmore iii vs harman kardon onyx studio 8 breakdown.
Why is blade orientation important and how do I know which side faces down?
Blade orientation is critical. The side with the cutting edge (the sharp, angled side) must face the grass when the mower is upright. When the mower is tipped for installation, this means the cutting edge faces upward, toward the mower deck. Installing a blade upside down will result in poor cutting performance and can damage the mower.
How should I secure the mower while I work under the deck?
For push mowers, tip the mower onto its side, ensuring the air filter and carburetor (on gas models) are facing up to prevent oil or fuel leakage. Use a stable surface and consider placing a block under the handle to prevent it from tipping back. For riding mowers, use proper jack stands rated for the mower’s weight, never rely on a jack alone. Before finalizing equipment decisions, refer to our comprehensive dyson v8 cyclone vs bissell featherweight stick comparison.
Step-by-Step Guide to Installing Lawn Mower Blades
Follow these steps in order for a safe and correct installation. Take your time and double-check each step.
Step 1: Prepare the Mower
Disconnect the power source as described above. For push mowers, carefully tip the mower onto its side, with the air filter and carburetor facing up. Place a block of wood between the blade and the mower deck to prevent the blade from turning. For broader ecosystem context, read through our operational guide on bissell crosswave hydrosteam vs shark stainforce.
Step 2: Remove the Old Blade
Using a socket wrench or breaker bar, turn the center bolt counter-clockwise to loosen it. You may need significant force, especially if the bolt is tight or slightly rusted. Once loose, remove the bolt, any washers, and the old blade. Note the blade’s orientation and the order of any washers or spacers.
Step 3: Clean the Mounting Area
Use a wire brush to clean any grass, debris, or rust from the mounting post and the area around it. This ensures the new blade sits flat and makes proper contact.
Step 4: Install the New Blade
Place the new blade onto the mounting post with the cutting edge facing upward (toward the deck) when the mower is tipped. Align it with the same position as the old blade. Replace any washers or spacers in the correct order, then hand-tighten the center bolt.
Step 5: Torque the Center Bolt
Using a torque wrench, tighten the center bolt to the manufacturer’s specification. For most standard push mowers, this is between 30 and 50 foot-pounds (ft-lbs). Do not over-tighten, as this can strip the bolt or damage the mounting post. Refer to your owner’s manual for the exact specification for your model.
Step 6: Final Checks
Remove the wood block. Lower the mower back to its normal position. Reconnect the power source (reattach the spark plug wire or battery). Before starting the mower, rotate the blade by hand to ensure it spins freely without hitting the deck or any obstructions. Check that the blade is secure.
Common Mistakes and How to Avoid Them
Avoiding these common errors will save you time, prevent damage, and ensure a safe cut.
What happens if I install the blade upside down?
An upside-down blade will not cut grass effectively. It will tear rather than cut, leading to brown, ragged grass tips. It also creates poor airflow, which can reduce bagging or mulching performance and may cause excessive vibration.
How do I avoid stripping the bolt or over-tightening it?
Use the correct size socket and apply steady, even pressure. A breaker bar can provide the necessary leverage without the risk of over-tightening that comes with an impact wrench. Always use a torque wrench for final tightening to ensure you meet the manufacturer’s specification.
Why might a new blade still vibrate, and how do I check blade balance?
Vibration after installing a new blade usually indicates an imbalance. Even new blades can be slightly off. Use a blade balancer to check. If it’s unbalanced, you can carefully file a small amount of metal from the heavier end until it balances. Never grind the cutting edge to balance a blade.
What should I do if the blade is difficult to remove due to rust or debris?
Apply a penetrating oil like PB Blaster to the bolt and let it sit for 15-30 minutes. You can also try gently tapping the bolt head with a hammer to help break the rust seal. Avoid using excessive force with an impact wrench, as this can shear the bolt.
Common Questions on How To Install Lawn Mower Blades Answered
Which side of the lawn mower blade should face down?
The side with the cutting edge (the sharp, angled side) should face down toward the grass when the mower is in its normal, upright position. When the mower is tipped for installation, this means the cutting edge faces upward, toward the mower deck.
Do I need to replace the center bolt and washer when installing a new blade?
It’s not always necessary, but it’s good practice. Inspect the old bolt and washer for wear, stretching, or damage. If the bolt is worn or the washer is damaged, replace them with OEM parts to ensure a secure fit and proper torque.
Can I install the same blade after sharpening instead of buying a new one?
Yes, absolutely. The installation process is identical. However, after sharpening, it’s critical to check the blade’s balance using a blade balancer. An unbalanced blade will cause vibration that can damage the mower’s engine or deck bearings.
Is it safe to use an impact wrench on the blade bolt?
While an impact wrench can make removal easier, it’s not recommended for tightening. It’s very easy to over-tighten the bolt with an impact wrench, which can strip the threads or damage the mounting post. Use a torque wrench for final tightening to ensure the correct specification is met.
Related Maintenance and Operating Guides
To keep your equipment running at peak operating efficiency, explore our related technical walkthroughs and maintenance tutorials:
- Consult our detailed breakdown on residential zero-turn lawn mower guide.
Lawn Mower Blade Installation Reading
New blades must face the correct way, and the bolts should be tightened to the manufacturer’s torque before the mower goes back to work. Readers who want a broader view of safety around lawn equipment can see American National Standards Institute (ANSI).









