

Direct Answer: How to Install a Pull Cord on a Lawn Mower
To install a pull cord on a lawn mower, remove the recoil starter housing by unbolting it from the engine, then extract the old cord and spring mechanism. Thread the new cord through the pulley system, wrap it around the spring-loaded spool, and secure it with a proper knot. Reassemble the housing and test the cord tension before using the mower. Most installations take 30-45 minutes and require basic hand tools like screwdrivers and pliers.

Pros
- Durable nylon rope material is built for repeated use.
- Long 50 ft length offers flexibility for different engine sizes.
- Includes 2 handles, so the kit is more complete than rope-only replacements.
- Broad compatibility makes it practical for many small-engine tools.
Cons
- Users need to confirm the required rope diameter before ordering to avoid fit issues.
- Cut-to-fit design means installation and trimming are required by the buyer.
- Compatibility is broad but not tied to a specific model list, so exact fit is not guaranteed for every engine.
Overview: The YARDMARIS 50 ft Recoil Start Rope is a nylon pull cord replacement made for small engines and outdoor power equipment. It is positioned as a practical repair part for users who need a durable starter rope with a straightforward cut-to-fit design.
Performance and features: The 3.0 mm nylon rope is built for strength, flexibility, and wear resistance, which should help it hold up under repeated starting pulls. The 50 ft length gives plenty of material for trimming to size, and the two ABS handles add a complete, ready-to-install feel for common repair jobs.
Drawbacks and considerations: The main limitation is fit. Buyers need to confirm the required diameter before ordering, since a mismatched rope may not work properly. Because it is a universal-style replacement, the listing does not provide a precise model-by-model fit guide.
Verdict: This is a solid option for anyone replacing a worn recoil cord on compatible small engines. It should offer the most value to users who want a long, versatile starter rope kit and are comfortable measuring and cutting the rope to the correct length.

Pros
- Includes both starter rope and multiple handles in one kit
- Braided polyester rope is built for repeated use and tensile strength
- Cut-to-length design adds installation flexibility
- Works across several common small-engine applications
Cons
- Compatibility depends on matching the 3.0 mm rope size and handle style to your engine
- The rope is not pre-cut, so installation requires measuring and trimming
- No detailed model fitment list is provided, so buyers must verify fit before purchase
Overview: The Klfte B0D4ZPWP1W is a pull cord rope replacement kit for small engines, lawn mowers, generators, chainsaws, and string trimmers. It includes 40 ft of 3.0 mm starter rope and four black starter handles, making it a practical option when an original cord wears out or snaps.
Performance: The rope is made from 16-strand braided polyester, which is intended to provide good shock absorption and tensile strength during repeated pulls. Because the cord can be cut to length, it offers useful flexibility for different starter assemblies and repair needs.
Drawbacks: This is a universal replacement kit rather than a model-specific assembly, so fit depends on verifying rope diameter and handle compatibility. It also requires manual measuring, cutting, and installation, which may be inconvenient for users who want a fully preassembled solution.
Verdict: For DIY users who need a straightforward recoil starter repair kit, this product offers solid practical value and broad small-engine use. It is best for buyers who have confirmed the correct rope size and want a simple replacement with extra handles included.
Pros
- Includes both rope and multiple handles for a complete repair kit.
- Continuous 10-meter rope offers flexible, cut-to-fit installation.
- 3.0 mm size is a common option for many small-engine starter systems.
- Universal compatibility expands use across multiple outdoor power tools.
Cons
- Compatibility still depends on measuring your existing cord or checking the equipment manual.
- Only one rope diameter is included in this listing, so it may not fit engines that need a different size.
- No exact pre-cut length is provided, so installation requires cutting and fitting the cord yourself.
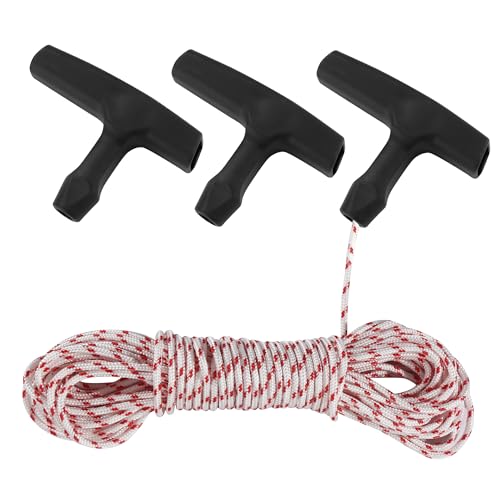
Overview: The Qtcial B0D31SHNM5 is a universal recoil starter rope replacement kit designed for small-engine equipment. It includes a 10-meter continuous polyester cord and 3 starter handles, giving buyers a practical all-in-one repair option for common pull-start machines.
Performance and Features: The 3.0 mm rope size is suited to many lawn mowers and similar outdoor tools, while the long continuous coil can be cut to the exact length needed. The polyester construction is intended to handle repeated pulling force, and the included handles add convenience for a cleaner, more complete replacement.
- 10 meters of rope for custom sizing
- 3 included starter handles
- Designed for recoil-start equipment
- Compatible with many major small-engine brands
Drawbacks and Considerations: The main limitation is that fit is not universal in every case, so checking the required diameter before purchase is important. Since the rope is sold as a continuous coil, users must measure, cut, and install it themselves.
Verdict: This kit offers strong value for owners who need a flexible pull-cord replacement for lawn mowers, trimmers, chainsaws, or brush cutters. It is best for shoppers who want a durable rope with multiple handles and are comfortable confirming the correct size before installation.

Pros
- Long 10 m length supports several repairs or spare cuts.
- Compatible with many small-engine recoil starter applications.
- Durable braided construction is intended for repeated use.
Cons
- Handle and starter assembly are not included, so this is not a complete replacement kit.
- 3mm diameter may not fit every recoil starter, so size verification is necessary before buying.
- The listing provides no detailed fit guide, so compatibility depends on measuring your old cord and reel opening.
Overview: The LETAYAR 3mm x 10m White Recoil Starter Rope is a rope-only replacement designed for small-engine pull start repairs. It is intended for users who need to refresh a worn or broken starter cord without replacing the entire recoil assembly.
Performance & Key Features: The braided high-tensile fiber construction is meant to handle repeated pulling and outdoor use. With 10 meters of cord, it offers enough material for multiple repairs or custom-length installs, and the 3mm diameter works with many larger hand-pull starter reels.
- Compatible with lawn mowers, chainsaws, trimmers, generators, edgers, blowers, and pressure washers
- Rope-only format for replacing just the worn cord
- Easy to cut to size for different repair needs
Drawbacks & Considerations: This product does not include a handle or starter assembly, so buyers need existing hardware or separate parts. It is also important to compare the old rope diameter and starter reel hole before ordering, since 3mm will not suit every machine.
Verdict: This is a practical choice for DIY small-engine repairs when you only need a replacement recoil cord. It offers good length and broad application potential, but the best results will come from verifying compatibility first.
Pros
- High tensile strength rope is built for durability and repeated recoil starts.
- Cut-to-length design increases compatibility with different small engine applications.
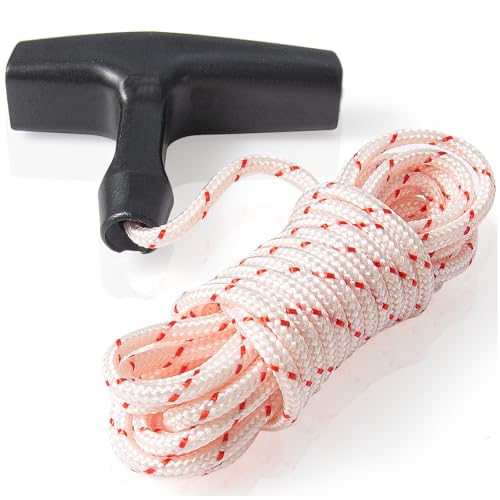
- Handle is included, adding value for a complete starter cord refresh.
- Broad compatibility claims cover many popular engine brands and outdoor power tools.
Cons
- Compatibility is not universal, so the 3.5mm diameter and starter setup must match your equipment.
- The cord must be cut to fit, which adds a small amount of setup work before installation.
- No exact installation hardware or tool-specific parts are listed beyond the rope and handle.
Overview: The URANNBRIKS B0FL849GMS is a replacement pull cord kit for small engines, including lawn mowers, generators, weed eaters, chainsaws, and pressure washers. It uses a 10 ft, 3.5mm rope with a 16-strand braid and includes a 3-finger handle for a more comfortable grip.
Performance and features: The main appeal is durability. The rope is rated for high tensile strength, which should help it stand up to repeated recoil starts better than weaker cords. Because the rope is cut to fit, it gives users flexibility for different starter housings and equipment types.
Drawbacks and considerations: This is a generic replacement part, so fit depends on your engine’s rope diameter, starter design, and required length. It also requires cutting and installation, so it is not a plug-and-play part for every user. The kit includes the rope and handle, but no extra hardware is listed.
Verdict: This is a practical choice for DIY users and homeowners who need a durable, budget-friendly pull cord replacement for common small engines. It is best for buyers who want a simple repair kit and are comfortable matching specifications before installation.
Safety Precautions Before Starting
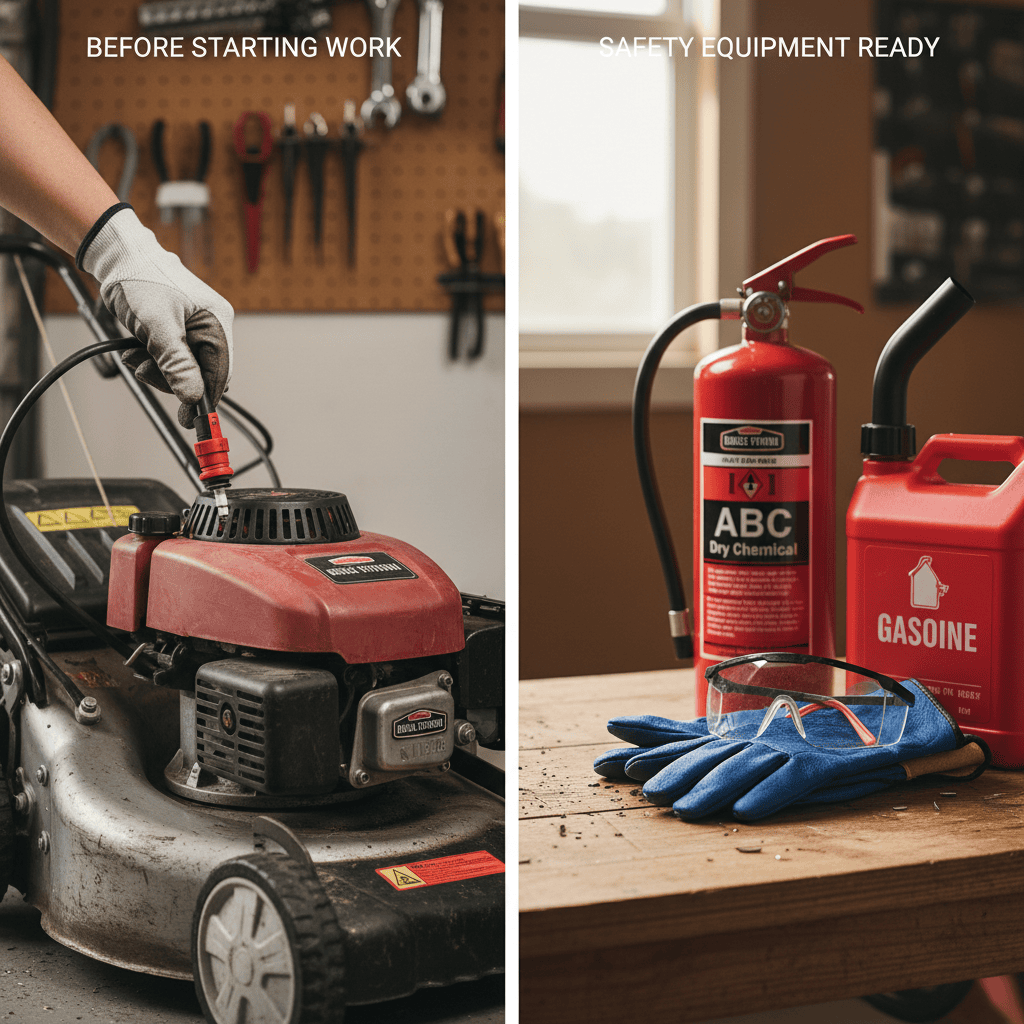
Before you begin working on your lawn mower’s recoil starter system, establishing a safe working environment is critical. The recoil spring mechanism is under tension and can cause injury if mishandled.
- Disconnect the spark plug wire: Remove the wire from the spark plug to prevent accidental engine ignition while you work on the mower.
- Drain the fuel tank: If possible, empty the fuel tank or work in a well-ventilated area away from ignition sources to minimize fire risk.
- Secure the mower: Place the mower on a flat, stable surface and engage any available parking brakes or wheel locks.
- Wear protective gear: Use work gloves and safety glasses to protect against sharp edges and spring tension release.
- Release spring tension carefully: The recoil spring is compressed and can snap suddenly. Work slowly and deliberately when removing the housing.
Understanding Your Lawn Mower’s Recoil Starter System
The recoil starter assembly consists of several interconnected components that work together to start your engine. Understanding how these parts function will help you install the pull cord correctly.
Key Components of the Recoil Starter
- Recoil spring: A tightly coiled metal spring that stores energy and pulls the cord back after you release it.
- Pulley or spool: The wheel around which the cord wraps. It rotates when you pull the cord, engaging the engine’s starter mechanism.
- Starter housing: The plastic or metal enclosure that contains the spring and pulley system.
- Cord grip or handle: The knob or handle at the end of the cord that you grip to pull.
- Engagement mechanism: The internal ratchet or pawl system that transfers the pulley’s rotation to the engine’s crankshaft.
When you pull the cord, the pulley rotates, which winds up the recoil spring. The engagement mechanism simultaneously turns the engine’s crankshaft to start it. When you release the cord, the spring unwinds and pulls the cord back into the housing automatically.
Tools and Materials You’ll Need
Gathering the correct tools and materials before you begin ensures a smooth installation process and reduces the chance of damaging components.
Essential Tools
- Socket set or adjustable wrench
- Screwdriver set (both Phillips and flathead)
- Pliers or needle-nose pliers
- Work gloves
- Safety glasses
- Container for small bolts and springs (to prevent loss)
Materials Required
- Replacement pull cord: Use 3.5mm to 4mm diameter nylon rope, typically available at hardware stores or online retailers. The cord should be rated for outdoor equipment use and resistant to UV damage.
- Cord grip (optional): If the original handle is damaged, purchase a replacement grip that fits your mower model.
- Lubricant: A light machine oil or silicone spray to lubricate the pulley system during reassembly.
Step-by-Step Installation Process
Step 1: Remove the Recoil Starter Housing
Locate the recoil starter assembly on your mower’s engine. It is typically mounted on top or to the side of the engine block. Using your socket set or wrench, carefully unbolt the housing from the engine. Most lawn mowers have 2-4 bolts securing the starter. Place these bolts in a container so you don’t lose them. Gently lift the housing away from the engine, being cautious not to disturb the recoil spring.
Step 2: Remove the Old Pull Cord
Once the housing is removed, you’ll see the pulley with the old cord wrapped around it. If the cord is still intact, carefully unwrap it from the pulley. If the cord is broken, you may need to remove the cord grip first by unthreading the knot or cutting away the damaged cord. Some models have the cord tied directly to the spool; others use a cord grip attachment. Examine how the old cord is secured so you can replicate the attachment with the new cord.
Step 3: Inspect the Recoil Spring and Pulley
Before installing the new cord, examine the recoil spring and pulley for damage. The spring should be intact with no visible cracks or breaks. The pulley should rotate freely without grinding or catching. If the spring appears damaged or the pulley is cracked, the cord installation alone won’t solve the problem, and you may need to replace the entire starter assembly.
Step 4: Thread the New Cord Through the Housing
Locate the hole in the starter housing where the cord exits. This hole typically has a small grommet or eyelet to protect the cord from fraying. Feed one end of the new cord through this hole, leaving approximately 6-8 inches of cord outside the housing. This excess will be used to create the handle attachment. When planning workspace deployment, consider the engineering criteria outlined in our marshall stanmore iii vs harman kardon onyx studio 8 guide.
Step 5: Wrap the Cord Around the Pulley
Pull the cord taut and begin wrapping it around the pulley in the same direction as the old cord was wrapped. Most lawn mower pulleys wind the cord clockwise, but verify the direction by examining the pulley’s design. Wrap the cord 2-3 times around the pulley, ensuring each wrap is tight and evenly spaced. The cord should not overlap itself or bunch up on the pulley.
Step 6: Secure the Cord to the Recoil Spring Mechanism
At the end of the cord (the end wrapped around the pulley), you must attach it to the recoil spring spool. Most mowers use one of two methods: For additional operational safety benchmarks, see our published testing notes on dyson v8 cyclone vs bissell featherweight stick.
- Knot method: Tie a secure knot (such as a figure-eight knot or double overhand knot) at the end of the cord and insert it into the slot or hole on the spool. The knot should be large enough that it cannot pull through the slot.
- Clamp method: Some models use a small clamp or screw to secure the cord. Insert the cord into the clamp and tighten the screw firmly to prevent slipping.
Ensure the attachment is absolutely secure, as a loose connection will cause the cord to slip and fail to retract properly.
Step 7: Attach the Cord Grip or Handle
At the other end of the cord (the end extending outside the housing), attach the cord grip. If you’re reusing the original grip, thread the cord through the grip and tie a knot to secure it. If installing a new grip, follow the manufacturer’s instructions for your specific grip model. The knot should be large enough to prevent the cord from slipping through the grip opening. Trim any excess cord beyond the knot. To compare alternative configurations, check our hands-on review of bissell crosswave hydrosteam vs shark stainforce.
Step 8: Reassemble the Starter Housing
Carefully position the recoil starter housing back onto the engine, ensuring the cord exits through the designated hole and the housing sits flush against the engine block. Align the bolt holes and insert the bolts, tightening them in a cross pattern (alternating opposite bolts) to ensure even pressure. Do not overtighten, as this can crack the plastic housing. Tighten until snug, then give each bolt a quarter-turn additional.
Securing and Testing the New Pull Cord
Verify Cord Tension and Retraction
Pull the cord slowly and deliberately to ensure it extends smoothly without catching or binding. The cord should pull out with moderate resistance, not too tight and not too loose. Release the cord and observe how quickly it retracts into the housing. A properly installed cord should snap back into the housing within 1-2 seconds. If the cord retracts slowly or incompletely, the recoil spring may not have enough tension, or the cord may be wrapped incorrectly around the pulley.
Check for Proper Spring Tension
The recoil spring should provide steady resistance as you pull the cord. If you feel the cord becoming easier to pull as you extend it, the spring may be losing tension or the cord may be slipping on the pulley. If the cord is extremely difficult to pull, the spring may be over-tensioned, which can cause premature cord wear or injury. Proper tension should feel like a smooth, consistent resistance throughout the pull.
Perform a Dry Test
Before starting the engine, perform several practice pulls with the spark plug wire still disconnected. Pull the cord 5-10 times to ensure smooth operation and consistent retraction. Listen for any unusual sounds such as grinding, clicking, or scraping, which may indicate misalignment or damage. Once you’re satisfied with the cord’s performance, reconnect the spark plug wire and attempt to start the mower according to the manufacturer’s instructions.
Common Installation Mistakes to Avoid
- Wrapping the cord in the wrong direction: If the cord is wrapped counterclockwise when it should be clockwise (or vice versa), it will not retract properly. Always verify the wrapping direction before securing the cord.
- Insufficient cord wraps: If you don’t wrap the cord enough times around the pulley, it may slip or not engage the starter mechanism. Aim for 2-3 complete wraps.
- Loose knot attachment: A knot that’s too small or poorly tied will slip through the spool slot, causing the cord to fail. Use a large, secure knot and verify it cannot pass through the opening.
- Overtightening the housing bolts: Plastic housings can crack if bolts are overtightened. Tighten until snug, then stop; do not force bolts.
- Ignoring spring damage: If the recoil spring is cracked or broken, installing a new cord will not solve the problem. The spring must be functional for the cord to work properly.
- Failing to lubricate the pulley: A dry pulley can cause the cord to fray or wear prematurely. Apply a light coat of machine oil to the pulley before reassembly.
When to Seek Professional Help
While pull cord installation is a manageable DIY task for most homeowners, certain situations warrant professional service:
- Damaged recoil spring: If the spring is cracked, broken, or has lost tension, the entire starter assembly may need replacement. This requires more advanced disassembly and is best handled by a professional.
- Worn or damaged pulley: A cracked or severely worn pulley cannot be repaired and requires replacement as part of the starter assembly.
- Stripped bolt holes: If the housing bolt holes are stripped and won’t hold bolts securely, the housing may need replacement or professional repair.
- Unfamiliar mower model: Some specialty or commercial mower models have unique starter designs. If you’re uncertain about your mower’s configuration, consult a professional or the manufacturer’s service manual.
- Repeated cord failure: If the cord continues to fail shortly after installation, an underlying issue with the starter mechanism may exist. A professional can diagnose and address the root cause.
Frequently Asked Questions About How To Install A Pull Cord On A Lawn Mower
How often should I replace my lawn mower‘s pull cord?
Pull cords typically last 3-5 years with regular use, depending on climate, storage conditions, and frequency of use. UV exposure and temperature fluctuations can degrade nylon rope over time. If your cord becomes frayed, difficult to pull, or fails to retract properly, it’s time for replacement. Some homeowners replace cords annually if they use their mowers frequently or store them outdoors.
Can I use any type of rope for my lawn mower pull cord?
No. Use only 3.5mm to 4mm diameter nylon rope specifically rated for outdoor equipment. Standard cotton rope or thin string will fray quickly and fail. Nylon rope is UV-resistant and durable in outdoor conditions. Avoid using rope that is too thick, as it may not wrap properly around the pulley or fit through the housing opening.
What should I do if the cord gets stuck during installation?
If the cord becomes stuck or binds during threading, stop immediately and do not force it. Remove the cord and inspect the pulley and housing for obstructions, cracks, or misalignment. Ensure the pulley rotates freely by hand. If the pulley is damaged or the housing is cracked, professional repair is necessary. If the pulley appears intact, carefully rethread the cord, ensuring it doesn’t twist or bunch as it wraps around the pulley.
Is it normal for the recoil spring to make noise after cord installation?
A slight clicking or snapping sound when the cord retracts is normal, as the spring mechanism engages. However, grinding, scraping, or rattling sounds indicate a problem. These noises may suggest the cord is catching on the housing, the pulley is damaged, or the spring is not functioning properly. Disassemble the housing and inspect all components for damage or misalignment.
Related Maintenance and Operating Guides
To keep your equipment running at peak operating efficiency, explore our related technical walkthroughs and maintenance tutorials:
- Consult our detailed breakdown on heavy-duty chainsaw buyer guide.
Technical Standards and Compliance
Mechanical safety standards, operational tolerances, and protective gear guidelines align with benchmark specifications established by the American National Standards Institute (ANSI).









