

Direct Answer: How to Load a String Trimmer
To load a string trimmer, first disconnect the power source and let the trimmer head cool. Remove the spool or cartridge by twisting or pressing the release button. Wind new trimmer line (typically 0.080–0.130 inches in diameter) onto the spool in the direction indicated by arrows, leaving 4–6 inches of line extending from each slot. Reinsert the spool, thread the line ends through the eyelets or guides, and reattach the head. For automatic-feed models, simply insert a pre-wound cartridge. For cordless trimmers, charge the battery separately before use.


Understanding Your Trimmer Type
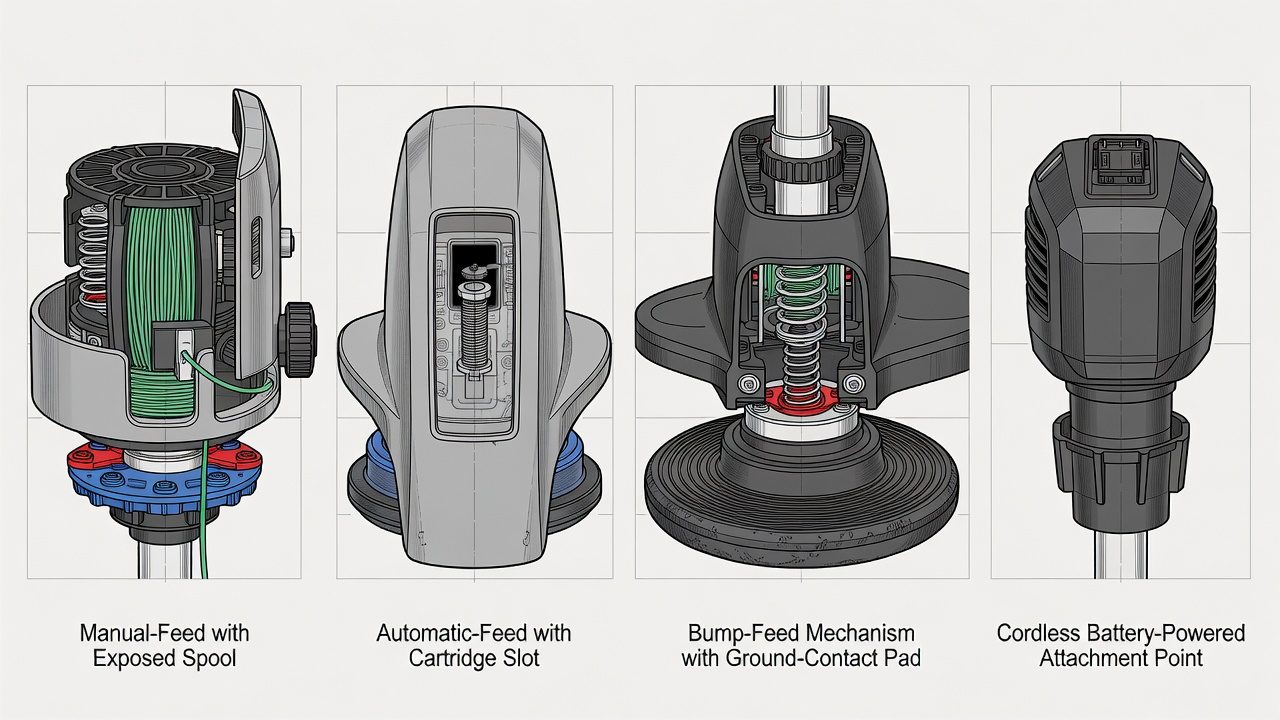
Before you start loading, identify which type of trimmer you own. Different designs require different loading methods, and using the wrong technique can result in tangling, poor line feeding, or damage to the trimmer head.
- Manual-Feed Trimmers: You pull the line manually during operation to release more length as it wears. These require winding line onto a spool inside the head.
- Automatic-Feed Trimmers: The trimmer automatically extends line as it detects wear. These typically use pre-wound cartridges that drop into place.
- Bump-Feed Trimmers: You tap the trimmer head against the ground to release line. These also use spools and require manual winding.
- Power Source Variations: Corded electric, cordless battery-powered, and gas-powered trimmers all use the same line-loading process, though cordless models require separate battery charging.
Check your trimmer’s manual or look for a diagram printed on the trimmer head itself to confirm which type you have. The loading mechanism design varies significantly between brands, so manufacturer-specific instructions are valuable. When planning workspace deployment, consider the engineering criteria outlined in our jbl partybox club 120 vs sony srs xv500 guide.
Safety Precautions Before Loading
Proper safety practices protect you from injury and prevent damage to the trimmer: When planning workspace deployment, consider the engineering criteria outlined in our jbl partybox club 120 vs sony srs xv500 guide.
- Disconnect the Power Source: For corded trimmers, unplug from the outlet. For cordless models, remove the battery completely. For gas-powered trimmers, ensure the engine is off and cool, then disconnect the spark plug wire. This prevents accidental startup while your hands are near the spinning head.
- Allow the Head to Cool: Trimmer heads can become extremely hot during use. Wait at least 15–20 minutes after operating before handling. Hot metal can cause burns, and some trimmer heads may warp if you attempt to disassemble them while hot.
- Wear Protective Gear: Use work gloves to protect your hands from sharp trimmer line edges and hot components. Safety glasses are recommended to keep plastic debris out of your eyes if the spool or cartridge disassembles unexpectedly.
- Work on a Stable Surface: Place the trimmer on a flat, clean workbench or table. This prevents it from rolling or tipping during the loading process.
Preparing Your Trimmer for Reloading
Before winding new line, you must access and clear the trimmer head of old line.
- Locate the Release Mechanism: Most trimmer heads have a button, tab, or twist knob that holds the spool or cartridge in place. Look on the top or bottom of the head. Some models require rotating counterclockwise to open; others have a red or black button you press.
- Remove the Spool or Cartridge: Gently pull the spool or cartridge straight out once the mechanism is released. If it resists, wiggle it slightly side-to-side while pulling. Avoid forcing it, as internal tabs can break.
- Remove Old Trimmer Line: Unwind any remaining old line from the spool. Dispose of it in the trash. Inspect the spool for cracks, damage, or debris. If the spool is cracked or worn, replace it with a manufacturer-approved replacement.
- Locate Directional Arrows: Examine the spool closely for arrows printed or molded into it. These arrows indicate the correct winding direction. Winding in the wrong direction will prevent the line from feeding properly. If you cannot see arrows, consult your trimmer’s manual.
Loading Trimmer Line for Manual-Feed and Bump-Feed Trimmers
Manual-feed and bump-feed trimmers require you to wind new line onto the spool. This is the most common loading method. For additional operational safety benchmarks, see our published testing notes on z890 vs x870e motherboard.
Step 1: Determine the Correct Line Diameter and Length
Trimmer line diameter ranges from 0.065 to 0.130 inches, depending on your trimmer model. Check your manual or the trimmer head for the recommended diameter. Using the wrong diameter can cause feeding issues or reduce cutting efficiency. Most residential trimmers use 0.080 or 0.095 inch line.
Cut a length of line that matches your trimmer’s specification. Typical lengths are 15–25 feet per spool, though smaller heads may use less. If you’re unsure, purchase pre-cut line from the manufacturer or a garden center, which eliminates guesswork. To compare alternative configurations, check our hands-on review of marshall stanmore iii vs harman kardon onyx studio 8.
Step 2: Wind the Line onto the Spool
Hold the spool in one hand with the arrows facing you. Insert one end of the trimmer line into one of the two slots on the spool edge. Following the direction of the arrows, wind the line tightly around the spool. Keep tension even—not so loose that it falls off, but not so tight that it cuts into the plastic or becomes difficult to unwind later.
Wind the line until you have approximately 4–6 inches remaining unspooled. This remaining length will thread through the eyelets and be ready for cutting. Do not overfill the spool; the line should sit just below the edge and not bulge outward. Users looking for related component recommendations can explore our dyson v8 cyclone vs bissell featherweight stick breakdown.
Step 3: Secure the Line in the Slots
Once wound, thread the line end into one of the small notches or slots near the spool’s edge. These slots are designed to hold the line in place so it doesn’t unwind prematurely. Some spools have two slots (one for each line end) while others have a single slot. Refer to your manual if unclear.
Step 4: Reinsert the Spool into the Head
Align the spool with the trimmer head opening and slide it back in gently. Push until you hear a click or feel the spool seat into place. Confirm it’s fully inserted—a partially inserted spool will not rotate properly and the line will not feed. Before finalizing equipment decisions, refer to our comprehensive bissell crosswave hydrosteam vs shark stainforce comparison.
Step 5: Thread the Line Through the Eyelets
Most trimmer heads have one or two small eyelets (metal or plastic holes) on the cutting head above the spool. Pull both line ends upward and thread each through its corresponding eyelet. These eyelets guide the line outward during operation. If your trimmer has only one eyelet, thread one line end through it and let the other hang freely—it will be used after the first line wears down.
Step 6: Reattach and Secure the Head
Snap or twist the head cover back into place. Ensure it’s fully seated and locked. If the head doesn’t close properly, the line may catch inside and tangle. Gently rotate the head by hand—it should spin freely without resistance or grinding sounds.
Loading Pre-Wound Cartridges for Automatic-Feed Trimmers
Automatic-feed trimmers simplify the loading process by using disposable cartridges that come pre-wound with line.
- Purchase the Correct Cartridge: Automatic-feed cartridges are brand and model-specific. Using the wrong cartridge may not fit or feed properly. Check your trimmer’s manual or the cartridge packaging to confirm compatibility.
- Remove the Empty Cartridge: Press or twist the release button to remove the spent cartridge. Some cartridges lift straight out; others require a quarter-turn counterclockwise.
- Insert the New Cartridge: Align the new cartridge with the opening in the trimmer head and push or twist it into place until it clicks or seats fully. Confirm the line ends are visible and extending slightly from the head.
- Close the Head: Snap or twist the head cover closed. The trimmer is now loaded and ready to use.
Automatic-feed cartridges are more expensive per replacement than bulk trimmer line, but they eliminate winding and offer consistent line quality. They’re ideal for users who prefer convenience over cost savings.
Charging Batteries for Cordless Trimmers
Cordless trimmers require a separate step: charging the battery. This is independent of line loading but essential for operation.
- Insert the battery into the dedicated charger (not the trimmer itself during charging) and plug into a standard outlet.
- Charging time typically ranges from 30 minutes to 2 hours, depending on battery capacity and charger type.
- Never leave a battery on the charger for more than 24 hours, as overcharging can reduce battery lifespan.
- Store batteries in a cool, dry place. Extreme heat or cold reduces performance and longevity.
Common Loading Mistakes and Troubleshooting
Line Won’t Feed or Feed Properly
Cause: Line is wound in the wrong direction, wound too loosely, or not seated correctly in the eyelets.
Solution: Remove the spool, unwind the line completely, and rewind following the directional arrows carefully. Ensure the wound line is snug but not over-tightened. Thread both ends through the eyelets and confirm they’re fully seated.
Line Tangles or Jams Inside the Head
Cause: Line was wound too loosely and sagged during rotation, or the spool wasn’t fully seated in the head.
Solution: Disassemble the head again, remove all line, clean out any debris, and reload with even tension. Ensure the spool is fully inserted and clicks into place.
Spool Won’t Fit Back into the Head
Cause: Line is wound too thickly (overfilled), or the spool or head is damaged.
Solution: Partially unwind some line to reduce bulk. If the spool or head appears cracked or bent, replace the damaged component. Contact the manufacturer for replacement parts if needed.
Line Extends Unevenly from the Head
Cause: One side has more line than the other, often due to improper winding or line slipping during use.
Solution: Reload the line ensuring both ends extend equally (4–6 inches each). Manually adjust the line length if needed by gently pulling the shorter end through the eyelet to match the longer side.
Trimmer Head Won’t Spin After Loading
Cause: The spool is rubbing against the head, or internal components are damaged.
Solution: Remove the spool and hand-spin it. If it rotates freely outside the head but not inside, remove the head and clean the interior of debris or damaged plastic tabs. Reinsert and test again.
Testing and Final Checks
Before using your trimmer, verify that it’s loaded correctly:
- Visually Inspect: Confirm that line extends evenly from both sides of the head by approximately the same amount. Both ends should be taut and visible.
- Hand-Spin the Head: Gently rotate the trimmer head with your hand. It should spin freely with no grinding, clicking, or resistance. Any noise indicates a problem that should be resolved before operation.
- Check for Proper Seating: Ensure the head cover is fully closed and latched. Rattling or loose components suggest improper assembly.
- Test at Low Speed (if Applicable): For electric or gas trimmers, start at the lowest speed setting and run briefly (5–10 seconds) in an open area away from people or objects. Listen for unusual sounds and confirm the line feeds or extends normally. Stop immediately if anything seems wrong.
Everything You Need to Know: How To Load A String Trimmer FAQ
What Is the Standard Trimmer Line Diameter?
Most residential string trimmers use 0.080 or 0.095 inch diameter line. Professional or heavy-duty models may use 0.105 to 0.130 inch line for thicker vegetation. Always check your trimmer’s manual or the head label for the correct diameter. Using incorrect diameter can prevent proper feeding, reduce cutting efficiency, or damage the trimmer.
How Much Trimmer Line Should I Cut for One Reload?
A typical reload requires 15–25 feet of line, depending on spool size. Pre-cut line sold in bulk is usually marked in lengths of 20–30 feet, which covers one or two reloads. If uncertain, purchase pre-wound cartridges (for automatic-feed models) or pre-cut spools from the manufacturer, which eliminates guesswork and ensures the correct length.
Can I Use Any Brand of Trimmer Line in My Trimmer?
Universal trimmer line of the correct diameter (0.080, 0.095, 0.105, or 0.130 inch) works in most trimmers, regardless of brand. However, automatic-feed cartridges are brand-specific and not interchangeable. For manual-feed or bump-feed trimmers, purchasing bulk line from any major garden equipment retailer is safe and cost-effective. Always confirm the diameter before purchasing.
How Often Should I Replace Trimmer Line?
Trimmer line degrades with use and weather exposure. Replace it whenever it becomes noticeably shorter, frayed, or brittle. For regular residential use (1–2 hours weekly), expect to reload every 4–6 weeks during the growing season. Heavy use may require more frequent reloads. Store unused trimmer line in a cool, dry place to extend its lifespan.
For more detailed testing breakdowns and top recommendations, check our in-depth guide to residential zero-turn lawn mower guide.
For more hands-on benchmarks and buying recommendations, consult our guides on heavy-duty chainsaw buyer guide, as well as durable ride-on lawn tractor guide, as well as automated robotic lawn mower guide.
Mechanical safety standards, operational tolerances, and protective gear guidelines align with benchmark specifications established by the American National Standards Institute (ANSI).









