

Quick Answer: How To Mow A Lawn With Stripes?
Lawn striping creates a professional, athletic-field appearance by using light and shadow to display alternating lines of contrasting color across your yard. The effect is purely optical, the stripes aren’t actually different grass or colors, but rather the result of how light reflects off grass bent in opposite directions. Learning to create clean stripes requires the right equipment, proper technique, and…
Pros
- Wide compatibility with major gas and battery mower brands in the 20-22 inch range
- Fillable design delivers substantial weight for ballpark-quality stripe definition
- Adjustable mounting system accommodates varied handlebar heights widths and spacing
- Durable steel construction with quality components for reliable long-term use
- Simple installation and no-power operation make it accessible for most homeowners
Cons
- Requires user to fill roller with dry sand for optimal weighted performance
- Limited strictly to 20-22 inch push and walk-behind mowers only
- Needs periodic cleaning and light greasing for continued smooth function
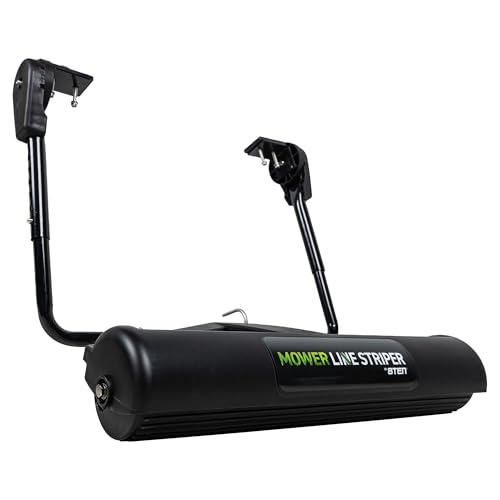
The 8TEN Lawn Striper Kit is a specialized accessory built for residential push and walk-behind mowers in the 20-22 inch deck size. Its heavy-duty mild steel frame paired with a fillable polypropylene roller creates an immediate impression of solid construction meant for repeated lawn care sessions. Stainless steel mounting hardware, copper bushings, and glass-filled polypropylene gears further support a premium feel in everyday residential use.
In performance the kit relies on its fillable roller that starts at 7.7 lbs empty and reaches 20.5-23.5 lbs when loaded with dry sand. This weight produces deep crisp ballpark-style stripes while the height and angle adjustments allow precise control over ground contact and stripe intensity. The U-bolt handlebar mount secures firmly across compatible mowers from Toro Honda EGO Cub Cadet Troy-Bilt Craftsman Husqvarna John Deere and many others thanks to generous fit ranges for handlebar dimensions. Manual operation keeps the system simple and free of any power dependency.
Potential drawbacks center on the need to add sand for full effectiveness and the restriction to only 20-22 inch mowers with specific handlebar measurements. Users must also clean the unit after use and apply light lithium grease periodically to maintain smooth function. These considerations are inherent to the design rather than flaws but may require extra preparation compared to fully sealed alternatives.
Overall the 8TEN Lawn Striper Kit delivers excellent value for homeowners who own compatible push mowers and want professional looking turf stripes without investing in commercial equipment. Those seeking simple durable enhancement for residential lawns will find it a practical and effective upgrade.
Pros
- All-metal steel construction offers better rust and wear resistance than plastic alternatives
- Compatible with a wide range of common push mower handlebar sizes shapes and diameters
- Simple assembly and removable design make it beginner-friendly and easy to store
- Creates clear even stripes by gently bending grass blades without causing damage
- Flexible frame allows smooth turning and reversing for custom patterns
Cons
- Sand is not included and fine dry sand must be sourced separately for the roller
- Limited to mowers with handlebars between 15-1/2 and 23 inches wide and 15-30mm diameter
- Optimal performance requires filling the roller which adds initial setup weight and effort
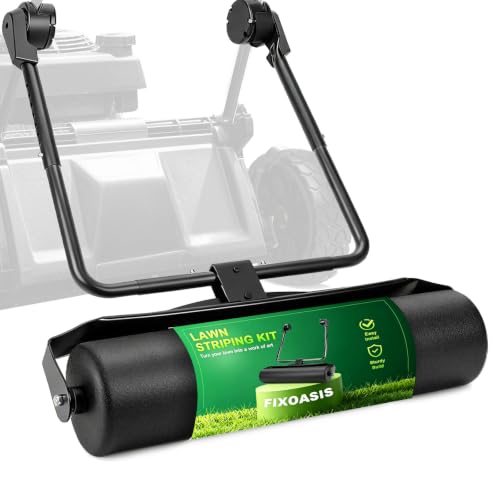
The FixOasis Universal Lawn Striping Kit is an all-metal steel attachment built for most push and walk-behind mowers. Its heavy-duty frame and upgraded clamps with rubber pads create a sturdy first impression of durability suited to outdoor conditions and uneven terrain.
This kit delivers professional sports-field stripes by evenly bending grass blades with a roller that holds up to 22 lbs of sand for smooth low-effort rolling. It fits handlebars from 15-1/2 to 23 inches wide and 15mm to 30mm diameter across round flat and square types. Installation takes 10-15 minutes and the flexible design supports easy turning reversing and custom patterns while the straight tube detaches for convenient storage.
Key considerations include the need to supply fine dry sand separately since none is provided. Compatibility is restricted to the specified handlebar ranges so users must verify their mower measurements first. The design prioritizes long-term use after a single sand fill but requires that initial preparation step.
This lawn striping kit provides strong value for homeowners with compatible push or walk-behind mowers who want crisp professional stripes and a durable metal solution backed by a 3 year warranty. It suits those seeking simple setup and neighborhood-standing results without complex tools.

Pros
- Fits most 15-20 inch spaced gas and electric push mowers with firm premium connectors
- Large easy-fill port and funnel simplify adding sand for consistent roller weight
- Stainless steel construction resists rust and corrosion for durable smooth operation
- Fully adjustable bracket and detachable parts enable versatile mounting and easy storage
- Creates professional-grade stripes independently of mower basket systems
Cons
- Compatible only with push walk-behind mowers of specific 15-20 inch spacing and handle sizes, excluding riders
- Requires user to supply and fill dry sand which adds setup time and overall weight
- Manual installation of brackets needed even though all accessories are included
The C CLINK Lawn Striping Kit is a universal DIY roller attachment built for push walk-behind mowers. Its heavy-duty stainless steel construction, adjustable bracket, and premium connectors that grip 20-25mm handle tubes create a solid first impression of durable, no-nonsense design focused on reliable lawn striping.
In performance the 5.1-inch fillable roller accepts 28.6-30.8 lbs of dry sand through a 1.4-inch port aided by the included funnel. This weight applies steady pressure that flattens grass evenly for sharp professional stripes. The leak-proof silicone plug, anti-rust metal bracket, and flexible steel hooks deliver smooth rolling and fluent steering on lawns, gardens, and small-to-medium green spaces for both gas and electric mowers.
Key considerations include the limited fit range of 15-20 inch widths and 14-16.5 inch heights, so it will not suit every mower. Users must also source and pour sand themselves, adding a small amount of setup effort, and the kit works only on push models rather than riding mowers.
Overall the C CLINK Lawn Striping Kit is a strong choice for homeowners who want baseball-style stripes without complex systems. Those with compatible push mowers will gain the most value from its simple adjustability, durable build, and easy storage.

Pros
- Heavy-duty carbon steel roller with powder-coated finish for long-term outdoor durability
- Adjustable brackets provide secure fit for most walk-behind mowers with 17 to 21 inch handlebar spacing
- Large fill port funnel and sealing cap make sand loading simple and mess-free
- Includes all hardware for quick installation and stable aligned striping performance
- Oversized 5.4 inch roller capacity of up to 28 lbs sand creates effective professional stripes
Cons
- Limited to walk-behind mowers with handlebar spacing between 17 and 21 inches so not fully universal
- Requires filling with dry sand which may need occasional topping up to maintain weight and performance
- Initial assembly and mounting required before first use even though hardware is included
The Blosail Lawn Striping Kit is a practical accessory for walk-behind lawn mowers that creates professional stripes through its heavy-duty carbon steel roller. Built with a durable powder-coated finish and oversized design the unit offers solid construction that feels reliable for regular backyard maintenance and immediate curb appeal improvements.
Performance centers on the 5.4 inch steel roller that holds up to 28 lbs of dry sand to gently bend grass blades in alternating directions. The adjustable brackets fit handlebars from 17 to 21 inches including many Toro models while the large fill port funnel and sealing cap simplify sand loading and prevent leaks. Secure mounting ensures the roller stays aligned for smooth consistent striping during every pass.
Considerations include the restricted handlebar spacing range which may exclude some mower models and the need to add dry sand which can settle and require refills over time. Installation though straightforward still demands some setup with the provided hardware.
This kit delivers strong value for homeowners with compatible walk-behind mowers who want easy professional lawn stripes without specialized equipment. It is recommended for those focused on enhancing yard appearance through simple durable striping solutions.
Understand How Lawn Stripes Work
Lawn stripes are an illusion created by the direction grass is bent. When you mow in one direction, the roller on your mower bends the grass forward. When you mow in the opposite direction, the grass bends backward. This directional bending creates a visual difference: grass bending toward you appears darker because you’re looking down into the bent blades and seeing less reflected light, while grass bending away from you appears lighter because the blade surfaces catch and reflect more light toward your eye.
The stripe effect is most visible when you view the lawn from certain angles. Standing at one end of the lawn and looking across the mowed lines gives the best view of the contrast. The effect is strongest in the morning or evening when sunlight is lower and more angled, as this increases the contrast between light and shadow on the bent grass.
Several factors affect how pronounced the stripes appear. Grass type matters, dense, upright varieties like perennial ryegrass and fescue hold stripes more visibly than sparse or naturally spreading grasses. Grass health also plays a role; well-maintained, lush lawns show sharper stripes than thin or stressed grass. The length of the grass influences stripe visibility as well; slightly longer grass (around 3 to 4 inches) holds the bent position better than very short grass, which springs back quickly and loses the stripe definition.
Choose the Right Equipment
Creating lawn stripes requires either a mower with a built-in roller or an aftermarket striping kit. The most common approach is using a mower equipped with a rear roller, a cylindrical attachment that runs behind the mower deck and bends the grass as you pass. Walk-behind push mowers and riding mowers both come with roller options. Some manufacturers build rollers directly into their mower design, while others offer bolt-on roller kits that attach to existing mowers.
The roller works by pressing the grass down in the direction you’re mowing. As the grass springs back after you pass, it remains bent in that direction for a period of time, creating the visible stripe. Without a roller or striping kit, a standard mower alone cannot create defined stripes because the grass is cut but not bent in a consistent direction.
Walk-behind mowers with roller attachments are affordable and effective for smaller lawns. Riding mowers with rollers offer faster coverage for larger properties but require more storage space and handling skill. Some users create DIY roller solutions by attaching weighted drums or other devices to the rear of their mower, though commercial rollers are engineered for optimal grass contact and even pressure distribution.
When selecting equipment, verify that your mower can accommodate a roller attachment or purchase a mower model that includes one. Check the manufacturer’s specifications to ensure compatibility and proper installation.
Prepare the Lawn for Striping
Lawn condition directly affects stripe quality. Mow when the grass is dry; wet grass tends to clump, doesn’t bend as cleanly, and can create uneven stripes. Morning is an ideal time to mow after dew has dried but before the afternoon heat stresses the grass. When planning workspace deployment, consider the engineering criteria outlined in our marshall stanmore iii vs harman kardon onyx studio 8 guide.
Grass height is critical for visible striping. For most lawn stripes to be visible, grass should be at least 2.5 to 3 inches tall, with 3 to 4 inches being optimal for many grass types. Very short grass springs back too quickly and loses the bent-grass effect. Set your mower blade to cut at the higher end of the recommended range for your grass type rather than scalping the lawn short.
Before your first stripe pass, inspect the lawn for debris, rocks, or obstacles that could interfere with straight lines or damage the mower. Mark any permanent features, trees, garden beds, sidewalk edges, that will serve as reference points for keeping your lines straight. A clear, well-maintained lawn creates cleaner, more predictable stripes. For additional operational safety benchmarks, see our published testing notes on dyson v8 cyclone vs bissell featherweight stick.
Mow in Straight, Alternating Lines

Begin at one edge of the lawn and mow a straight line from one side to the other, engaging the roller as you go. This establishes your first stripe. The key to straight lines is picking a distant reference point, a tree, fence post, or driveway edge, and keeping your eyes focused on that point throughout the pass. Many people find that walking or driving in a slight arc occurs naturally; focusing on a fixed endpoint keeps the line true.
When you reach the end of the lawn, turn the mower around completely so it faces the opposite direction. Mow the next line parallel to the first line, but in the opposite direction. This second pass bends the grass the opposite way, creating the contrast that makes the stripe visible. The space between each pass should be the width of your mower deck; this ensures no unmowed strips between lines and creates evenly spaced, parallel stripes. To compare alternative configurations, check our hands-on review of bissell crosswave hydrosteam vs shark stainforce.
Continue this pattern across the entire lawn, always alternating direction with each pass. Consistency is essential, uneven spacing or varying mower speed can make stripes appear misaligned or wavy. Move at a steady pace and try to maintain equal distance between each line.
For lawns with irregular shapes, start with the straightest, longest section of the lawn to establish a clear pattern, then adapt to any curved or narrower areas as needed. Some stripers choose to mow a perimeter line around the entire lawn first, then fill in the interior with parallel lines, which can help frame the stripes visually.
Maintain and Vary Your Stripes
Lawn stripes remain visible for several days, gradually fading as grass straightens back to its natural upright position. The stripe effect lasts longer in cool, wet conditions (when grass is slower to recover) and shorter in hot, dry conditions (when grass springs back faster).
To keep the striping effect looking sharp between mowing cycles, avoid walking heavily across the stripes in directions that disturb the bent grass pattern. Light foot traffic in the direction of the stripe is less disruptive than crossing the stripes perpendicularly.
When you mow again, consider changing your stripe direction. Instead of mowing the same direction as the previous mowing, rotate 90 degrees or choose a diagonal pattern. Alternating stripe direction with each mowing session prevents the grass from becoming permanently bent or flattened in one direction, which can weaken the grass and create wear patterns on the lawn. Varying the stripe direction also creates visual interest, each mowing session can feature a new pattern, from simple parallel lines to checkerboard or diagonal designs.
Regular lawn maintenance, watering appropriately, fertilizing as needed, addressing weeds and bare patches, supports overall grass health and makes stripes more visible and defined. A healthy, well-fed lawn with consistent moisture holds stripe patterns better and recovers faster than stressed or poorly maintained grass.
Related Maintenance and Operating Guides
To keep your equipment running at peak operating efficiency, explore our related technical walkthroughs and maintenance tutorials:
- Consult our detailed breakdown on residential zero-turn lawn mower guide.
- Consult our detailed breakdown on heavy-duty chainsaw buyer guide.
Technical Standards and Compliance
Mechanical safety standards, operational tolerances, and protective gear guidelines align with benchmark specifications established by the American National Standards Institute (ANSI).









