Direct Answer: To put string on a weed eater, locate and remove the cutting head, take out the old string from the spool, measure and cut new trimmer line to the correct length (typically 15–20 feet), wind it tightly onto the spool following the directional arrow, and reinstall the spool into the cutting head. The exact process varies depending on whether your trimmer uses a single-line or dual-line spool and whether it has automatic or manual feed.
Understanding Your Weed Eater’s Spool System
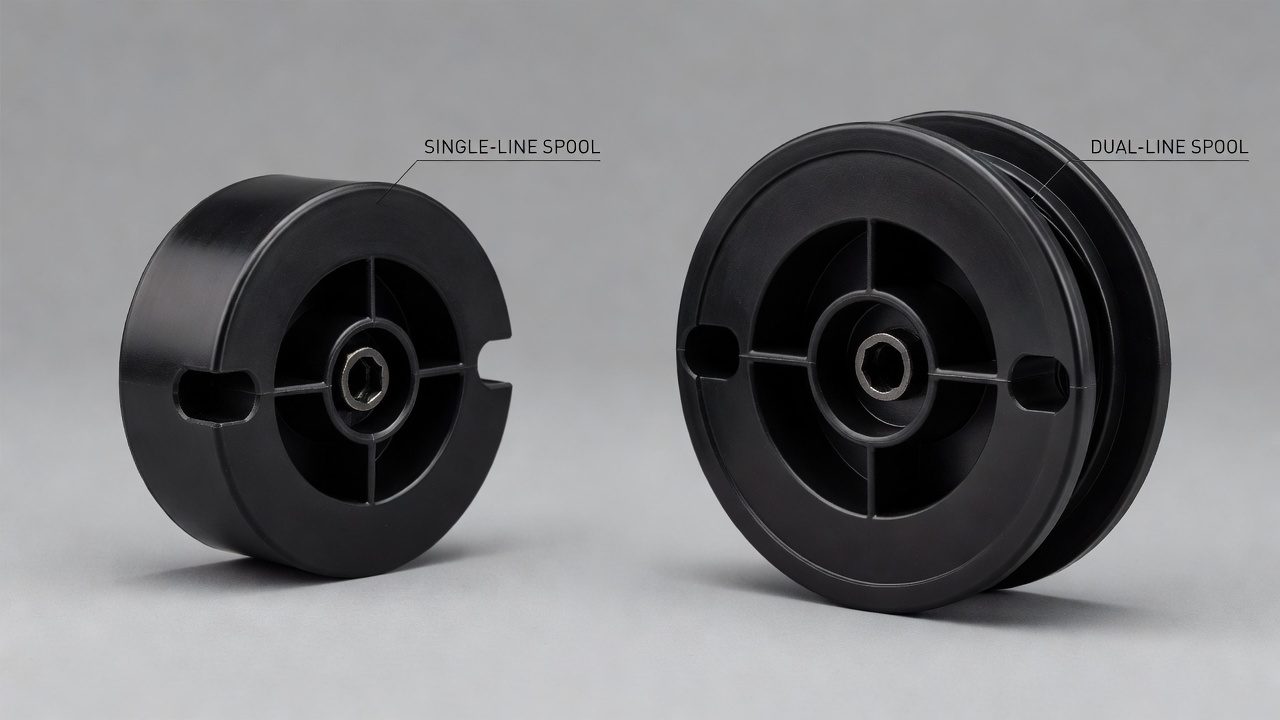
Before you begin loading string, you need to understand what type of spool system your trimmer uses. Most residential weed eaters fall into one of two categories: single-line and dual-line spools. Single-line spools hold one length of trimmer line and are simpler to load but require more frequent reloading. Dual-line spools hold two lengths of line wound in opposite directions, offering longer cutting time between refills.
Your trimmer also uses either an automatic or manual feed system. Automatic feed systems release new line when the cutting head touches the ground, making operation more convenient but sometimes leading to line waste. Manual feed systems require you to bump the cutting head against the ground to advance the line, giving you more control over line consumption.
Take a moment to consult your trimmer’s manual or locate any directional markings on the spool itself. These will indicate which way the string should wind and what gauge (thickness) of line your model requires. Common gauges range from 0.065 inches to 0.155 inches in diameter.
Gathering Materials and Selecting the Right String
Choosing the correct trimmer line is critical for proper operation. Using line that’s too thin may break frequently or fail to cut effectively. Line that’s too thick can strain your trimmer’s motor or fail to advance through the cutting head.
Check your trimmer’s manual for the recommended string gauge and type. Most manufacturers specify this clearly. You’ll typically find these common gauges:
- 0.065 to 0.080 inches: Light-duty, residential use on grass
- 0.095 to 0.105 inches: Medium-duty for mixed grass and light brush
- 0.130 to 0.155 inches: Heavy-duty for thick brush and dense vegetation
Trimmer line comes in several materials. Standard nylon is the most common and affordable. Serrated or notched line cuts more aggressively but wears faster. Twisted or spiral line offers better durability and cutting power.
Purchase pre-wound spools if available for your model—they simplify the process significantly. Otherwise, buy bulk trimmer line by the pound or in larger spools and cut it yourself. Most residential trimmers require 15–20 feet of line per loading, but check your manual for the exact length.
You’ll need basic tools: usually just a screwdriver (Phillips or flat-head, depending on your model) and possibly a small wrench to remove the cutting head. Some trimmer heads can be removed by hand after unscrewing a retaining nut.
Removing the Spool and Old String
Safety comes first. Disconnect the spark plug wire on gas trimmers or remove the battery on cordless models to prevent accidental starting. Allow the trimmer to cool if you’ve been using it.
Locate the cutting head (also called the trimmer head). On most trimmers, it’s at the end of the shaft opposite the handle. Look for a large circular cover or access panel. Some heads have a single retaining bolt in the center; others have multiple fasteners around the perimeter.
Remove fasteners using the appropriate screwdriver or wrench. If the center bolt has a directional arrow molded into it, note which way it points—this indicates the rotation direction and determines your winding direction later.
Carefully pry off the access cover or bumper. You’ll now see the spool, which is a plastic or metal bobbin that holds the string. The spool may be removable or fixed in place. If removable, lift it straight out. If fixed, you’ll wind string directly onto it.
Pull out all the old, worn string from the spool. Clean any debris, grass, or dirt from inside the spool housing. Wipe the spool surface clean so new line winds evenly.
Measuring, Cutting, and Winding New String
Cut a single length of trimmer line to the manufacturer’s recommended length. For most residential trimmers, this is 15–20 feet, but verify this in your manual. A good rule of thumb: if in doubt, err on the side of slightly longer—you can adjust on the next reload.
Locate the guide slot or notch on the spool. This is where the string begins. It’s usually a small groove or indentation on the spool’s edge. Insert one end of the trimmer line into this slot and hold it firmly.
Winding direction matters. Look for a directional arrow printed or molded on the spool. Wind the string in the direction the arrow points. If there’s no arrow, check your manual or the cutting head cover. For dual-line spools, each line winds in the opposite direction from the other. This opposite rotation prevents the lines from tangling.
Wind the string tightly and evenly onto the spool, keeping tension consistent. Overlapping lines should lay flat against each other without bunching or folding. Work methodically back and forth across the spool’s width.
As you near the end of the line, leave about 4–6 inches free. This remaining length will feed into the cutting head’s eye or exit port, allowing the string to extend outward for cutting.
Most spools have small notches or eyelets on their perimeter. Once you’ve wound all but the last 6 inches of string, feed this final section through one of these notches or eyelets. This holds the string in place and prevents it from unwinding during installation.
Reinstalling the Spool and Testing
If your spool is removable, carefully insert it back into the cutting head housing, ensuring it’s properly seated and aligned. The spool should fit snugly without excessive play.
Thread the free end of the string through the cutting head’s exit eye or port. This opening is usually on the side or bottom of the head and is where the string emerges for cutting. Ensure the string is threaded correctly and not pinched or bent.
Reattach the cutting head cover or bumper. Reinstall all fasteners in a crisscross pattern (similar to tightening a wheel on a car) to ensure even pressure. Don’t over-tighten—snug is sufficient.
Reconnect the spark plug wire or battery. Hold the trimmer firmly and start it (or trigger it if cordless). Let it run briefly at low speed. The string should rotate smoothly without wobbling or hitting the guard.
Check that the string extends to the proper length. Most trimmers feature a cutting line or edge on the guard that automatically trims excess string to the correct length. If the string appears too long or too short, you may need to reload.
Troubleshooting Common String Loading Problems
String won’t unwind or feed: The most common cause is string wound too tightly or wound in the wrong direction. Remove the spool and rewind, ensuring you’re following the directional arrow and maintaining medium tension—tight enough to keep the line organized, loose enough that it feeds smoothly.
String tangles or knots during winding: This usually means the line was twisted as it wound onto the spool. Unwind it completely and start over, keeping the line straight and untangled as you feed it onto the spool.
Spool doesn’t spin smoothly: The spool may be bent or damaged, or there may be debris inside the housing. Remove the spool, inspect it for cracks or warping, and clean the housing thoroughly. If the spool is damaged, it will need replacing.
String keeps breaking or fraying: You may be using the wrong gauge for your trimmer model. Confirm the recommended gauge in your manual and switch to the correct thickness. Additionally, hitting hard objects (rocks, wood, metal) frequently will break any line, so try to avoid cutting near these surfaces.
Automatic feed isn’t advancing line: If your trimmer has automatic feed and the line isn’t advancing when you bump the head, the spool or feed mechanism may be jammed. Remove the head and check for tangled line or debris blocking the spool’s rotation. Clean thoroughly and reload if necessary.
Frequently Asked Questions
How do I know how much string to cut?
Check your trimmer’s manual for the exact recommended length. Most residential trimmers use 15–20 feet of line per loading. A good visual reference: if you cut a length roughly equal to the distance from your hand to about 5–6 feet up your arm, that’s approximately 15–18 feet. Err slightly long rather than short, as you can always use a shorter length on the next reload.
What if I wind the string in the wrong direction?
The trimmer simply won’t cut effectively or the string may not advance. Remove the spool and rewind in the opposite direction. The directional arrow on the spool is your guide—always follow it. If there’s no arrow, consult your manual or contact the manufacturer.
Can I use any type of trimmer line, or does it have to match my trimmer brand?
You must match the gauge (thickness) to your trimmer model, but the brand of line doesn’t have to match the trimmer brand. Many aftermarket lines work perfectly well as long as they’re the correct gauge. Generic line is often significantly cheaper than brand-name equivalents and performs just as well. Always verify the gauge before purchasing.
How often should I reload my trimmer with string?
This depends on usage. Light residential users might reload every 2–4 weeks during mowing season. Regular users may reload every few days. You’ll know it’s time when the line gets noticeably shorter or stops cutting effectively. Some people preventatively reload at the start of each mowing session to avoid running out mid-yard.