As an Amazon Associate we earn from qualifying purchases. When you buy through our links, we may earn a commission at no extra cost to you. Prices and availability are subject to change on Amazon. Affiliate disclosure ›
How to Change Lawn Mower Spark Plug
Learn how to replace your lawn mower spark plug in 10-20 minutes with this complete guide. Covers safety precautions, tools needed, proper gapping, installation, and troubleshooting for push and riding mowers.
How to Change a Lawn Mower Spark Plug: Quick Answer
Disconnect the spark plug wire and let the engine cool for 5 to 10 minutes. Use a spark plug socket and ratchet to remove the old plug, check and adjust the gap on the new plug to 0.025 to 0.040 inches, thread it by hand, then torque to 15 to 25 ft-lbs. Reconnect the wire firmly until you hear a click. The entire process takes 10 to 20 minutes for most push mowers.
The Flagship Score evaluates build engineering, verified performance signals, and long-term owner satisfaction.
Updated: Oct 5, 2026
Last update on Oct 5, 2026. Product prices and availability are accurate as of that date/time and are subject to change. Any price and availability information displayed on Amazon.com at the time of purchase will apply. Affiliate links / Images, product titles, and product highlights from Amazon.
Champion Copper Plus RCJ7Y is an OE-type small engine spark plug sold in a carton of 4, built with a copper core center electrode for controlled heat range, corrosion resistance, and dependable performance. It is aimed at lawn and outdoor power equipment owners who need routine replacement plugs.
Pros & Cons
Pros
Copper core design supports reliable heat control
Corrosion resistance can help improve durability in storage and outdoor use
OE-type replacement format simplifies choosing a compatible service part
Carton of 4 adds convenience for multi-equipment owners
Cons
Fitment must be verified against the engine manual because detailed compatibility data is not provided here
Copper plugs typically do not offer the extended service life of premium iridium or platinum options
Product details are limited, so users may need to confirm gap and exact application before buying
Detailed Review
Overview: The Champion Copper Plus RCJ7Y is an OE-type small engine spark plug sold in a carton of four. It is built for users who want a straightforward replacement part for routine maintenance on compatible outdoor power equipment.
Performance: Its copper core center electrode is designed to help control heat range, which supports dependable ignition performance and consistent operation. The plug also includes corrosion-inhibiting construction and is made to meet ISO and SAE standards.
Considerations: Compatibility should be confirmed before purchase because detailed fitment information is not provided in the listing. As a copper spark plug, it is a practical maintenance choice, but users seeking the longest possible service interval may prefer premium alternative materials.
Verdict: This is a sensible option for owners of compatible small engines who want a proven replacement plug from a recognizable brand. It offers the most value for routine service, especially when multiple replacements are needed.
The Flagship Score evaluates build engineering, verified performance signals, and long-term owner satisfaction.
Updated: Oct 3, 2026
Last update on Oct 3, 2026. Product prices and availability are accurate as of that date/time and are subject to change. Any price and availability information displayed on Amazon.com at the time of purchase will apply. Affiliate links / Images, product titles, and product highlights from Amazon.
The NGK BPM8Y is a genuine NGK V-Power spark plug sold in a 2-pack with individual boxing. It is a direct replacement option for drivers who want OEM-style parts and should verify vehicle fitment before ordering.
Pros & Cons
Pros
Authentic NGK-branded spark plugs, not a generic substitute.
Sold as a direct replacement part for compatible applications.
Individual boxed packaging included.
Compact 2-pack is convenient for targeted repairs or maintenance.
Cons
Fitment must be verified carefully, since compatibility depends on the vehicle application.
Only a 2-pack is included, so larger service jobs may require multiple purchases.
No detailed dimensional or performance specifications are provided in the raw product data.
Detailed Review
Overview & Design: The NGK BPM8Y Spark Plugs are genuine NGK parts sold in an individual boxed 2-pack. The product is positioned as a direct replacement auto part, which makes it a straightforward option for drivers looking for an OEM-style spark plug from a trusted brand.
Performance & Key Features: As a V-Power spark plug, this model is intended for compatible vehicles that call for the BPM8Y specification. The main advantages are authenticity, direct-fit replacement intent, and included original packaging and hardware, which can simplify service and part handling.
Drawbacks & Considerations: Compatibility is the most important factor here, so vehicle fitment should be confirmed before purchase. The package includes only two plugs, which may not be enough for larger tune-up jobs, and the listing does not provide extended technical specifications in the raw data.
Verdict: This is a practical choice for buyers who need a genuine NGK BPM8Y spark plug in a small, direct-replacement format. It should appeal most to owners and repair shoppers who value brand authenticity and want to verify fitment before ordering.
The Flagship Score evaluates build engineering, verified performance signals, and long-term owner satisfaction.
Updated: Oct 3, 2026
Last update on Oct 3, 2026. Product prices and availability are accurate as of that date/time and are subject to change. Any price and availability information displayed on Amazon.com at the time of purchase will apply. Affiliate links / Images, product titles, and product highlights from Amazon.
The Champion OEM Spark Plugs pack of 2 is a direct replacement set for Kohler engines using part numbers 12 132 02, 1213202, and 12 132 02-S, delivering reliable ignition for small engine owners performing routine maintenance.
Pros & Cons
Pros
Includes a convenient pack of two spark plugs for value and backup use
Serves as authentic OEM replacement for specified Kohler part numbers
Champion brand delivers dependable ignition components for small engines
Clear compatibility guidance helps users confirm proper fit before install
Cons
Requires verification of exact OEM part number plus unit model, spec, type/code, and serial for correct fit
Detailed specifications are only available via product images rather than text listings
Contains only the two spark plugs with no extra tools or accessories included
Detailed Review
The Champion OEM Spark Plugs arrive as a pack of two units built as direct replacements for Kohler engines matching part numbers 12 132 02, 1213202, and 12 132 02-S. The design focuses on straightforward OEM quality, giving users a solid first impression of reliable construction suited to small engine applications.
These plugs support essential ignition performance through their Champion branding and multi-part number compatibility. The included pair allows quick swaps during maintenance, while the recommendation to cross-check model, spec, type/code, and serial numbers ensures the plugs deliver consistent starting and operation once correctly installed.
Drawbacks center on the need for careful compatibility confirmation because the part may cover multiple OEM numbers, plus the fact that full specs appear only in images. No tools or extra hardware come with the set, so users must source any additional items separately.
This product offers clear value for owners of matching Kohler equipment who need authentic Champion replacements. It suits DIY mechanics and routine small engine service where exact OEM fit is the top priority.
When to Replace Your Lawn Mower Spark Plug
Knowing when to replace your spark plug helps prevent mid-season breakdowns and keeps your mower running efficiently. Most lawn mower spark plugs should be replaced annually or every 50 to 100 operating hours, whichever comes first. If you use your mower frequently during the growing season, you may need replacement more often.
Signs Your Spark Plug Needs Replacement
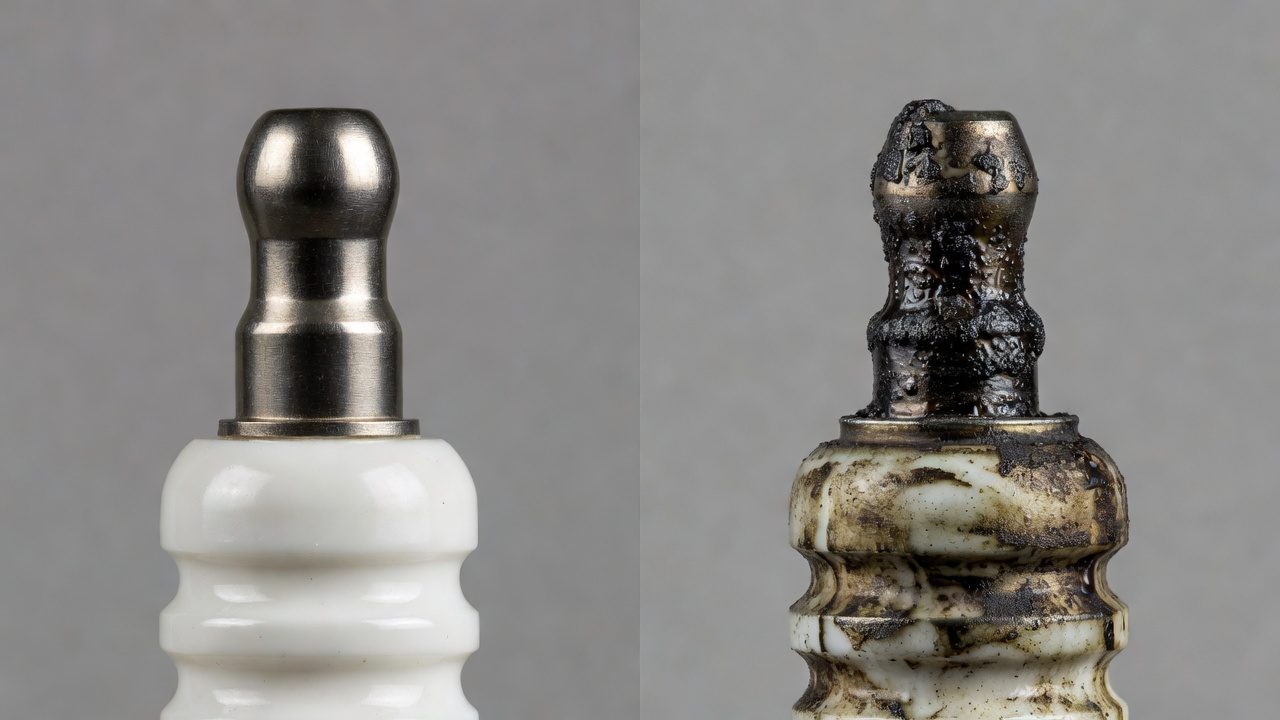
Fouled plug: The plug appears black, wet, or oily when removed, a sign of incomplete combustion
Engine won’t start: The mower struggles to turn over or won’t start at all
Rough idle: The engine runs unevenly or shuts off during operation
Increased fuel consumption: You’re refueling more frequently than usual
Visible wear or damage: The electrode is corroded, pitted, or the ceramic insulator is cracked
In most cases, spark plugs cannot be effectively cleaned and reused. Replacement is the practical solution. If a plug is fouled shortly after installation, the issue often lies elsewhere, such as a clogged air filter, improper fuel mix (for 2-stroke engines), or carburetor problems. For troubleshooting and reliability insights, consult our in-depth jbl partybox club 120 vs sony srs xv500 report. For complementary hardware performance, examine our breakdown on riding lawn mower.
Safety Precautions Before Starting
Taking time to prepare safely prevents injury and protects your mower from accidental damage.
Essential Safety Steps
Disconnect the spark plug wire: This is your primary safety step. Removing the wire from the spark plug prevents accidental engine ignition while you work. Grasp the wire boot (not the wire itself) and pull straight away from the plug
Allow the engine to cool: Let the engine sit for 5 to 10 minutes after shut-down. The spark plug and surrounding metal can reach 100°F or higher and cause burns
Work on level ground: Place the mower on a flat surface to prevent it from rolling or shifting
Empty the fuel tank or position safely: If you’re working on a mower with a tilting deck or need significant access, drain fuel or work with the tank positioned safely to avoid spills
Wear gloves and eye protection: Latex or nitrile gloves protect against oil and debris; safety glasses shield your eyes if metal fragments fall
Never work on the mower with the engine running or hot. Never bypass the spark plug wire disconnection as a shortcut, this is the most effective way to disable the ignition system.
Tools and Materials You’ll Need
Gathering supplies before you start makes the job faster and prevents frustration. Most spark plug replacements require only basic tools.
Required Tools and Supplies
Spark plug socket: Usually 5/8 inch or 13/16 inch (most push mowers use 5/8 inch). The socket has a rubber insert to grip the ceramic insulator without damaging it
Ratchet wrench: A 3/8-inch-drive ratchet fits most spark plug sockets
Socket extension (optional): Helpful if the spark plug is recessed and difficult to reach
Replacement spark plug: Check your mower’s manual or the engine manufacturer’s specifications. Common types include Champion RCJ7Y, NGK BPM7Y, or Briggs & Stratton 5063. Avoid buying generic plugs; use the manufacturer-recommended type
Spark plug gap tool: A simple feeler gauge (often included with new plugs) or a dedicated gap tool ensures proper spacing between the electrode and ground strap
Anti-seize compound (optional): Applying a small amount to the threads prevents future stuck plugs, especially in older mowers
If you’re unsure of your mower’s spark plug size or type, check the operator’s manual or the engine block itself, most engines have a label with specifications.
Step-by-Step Removal and Installation
This is the core of the job. Follow each step in order to ensure a successful replacement.
Step 1: Locate and Access the Spark Plug
On push mowers, the spark plug is usually mounted on the top or side of the engine block. On riding mowers, it may be under the hood or partially obscured by fuel lines. Refer to your mower’s manual for the exact location. If necessary, remove any covers, shields, or hoses that block access. Take a photo with your phone before moving anything so you can reassemble correctly.
Step 2: Remove the Old Spark Plug
Insert the spark plug socket onto the ceramic portion of the plug (not the metal shell)
Attach the ratchet to the socket
Turn counterclockwise slowly. If the plug resists, stop and apply a penetrating oil (like WD-40) around the base and wait 10 minutes before trying again
Once loose, continue unscrewing by hand to avoid damaging the threads
Remove the plug and inspect it for fouling, carbon buildup, or physical damage
Step 3: Check and Adjust the New Spark Plug Gap
The gap, the distance between the center electrode and the ground strap, must be set correctly for proper ignition. Most lawn mower plugs require a gap of 0.025 to 0.040 inches. Check your mower’s manual for the exact specification.
Remove the new plug from its package
Insert the gap tool between the electrodes. If you don’t have a gap tool, a feeler gauge or business card (approximately 0.004 inches thick) can give a rough visual reference
If the gap is too wide, tap the ground strap gently downward with the gap tool to close it
If the gap is too tight, carefully bend the ground strap outward
Verify the gap one more time before installation
Step 4: Install the New Spark Plug
Thread the new plug by hand into the cylinder head. This prevents cross-threading, which damages the threads and creates a leak path for combustion gases
Once hand-tight, attach the spark plug socket and ratchet
Torque the plug to the manufacturer’s specification, typically 15 to 25 ft-lbs. If you don’t have a torque wrench, tighten firmly but do not over-tighten, snug is the goal
Remove the socket and ratchet
Step 5: Reconnect the Spark Plug Wire
Grasp the wire boot (the rubber connector) and align it with the tip of the new plug
Push firmly onto the plug until you hear or feel a click. The connection should be snug and not pull off easily
If the wire boot is cracked or the connection feels loose, the wire may need replacement (a separate task)
Step 6: Test the Mower
Reassemble any covers or components you removed. Start the mower and let it run for a few minutes. The engine should start smoothly and idle without hesitation. If the mower doesn’t start or runs roughly, stop the engine and recheck the spark plug gap and wire connection.
Key Differences for Push Mowers vs. Riding Mowers
While the basic process is the same, access and layout differ by mower type. To evaluate matched hardware tolerances, consult our detailed overview of dyson v8 cyclone vs bissell featherweight stick.
Push Mowers
Push mower spark plugs are typically easy to reach. The plug sits on top or the side of the engine with minimal obstruction. The process takes 10 to 15 minutes. Most use a single spark plug (4-stroke engines) and standard tools.
Riding Mowers and Zero-Turn Mowers
Riding mowers may have one or two spark plugs, depending on the engine size (larger engines have two). Access often requires removing a deck cover or accessing under the hood. The process may take 15, 25 minutes due to additional disassembly. Take photos before removing covers to simplify reassembly. If your riding mower has two plugs, replace both at the same time, they typically age together. When planning workspace deployment, consider the engineering criteria outlined in our bissell crosswave hydrosteam vs shark stainforce guide.
2-Stroke vs. 4-Stroke Engines
Most lawn mowers use 4-stroke engines, but some older models or specialty mowers (like some string trimmers or older push mowers) have 2-stroke engines. The spark plug replacement process is identical, but 2-stroke engines require fuel mixed with oil, which can cause faster plug fouling. If you have a 2-stroke mower and plugs foul quickly, ensure you’re using the correct fuel-to-oil ratio (usually 50:1 or 40:1, depending on the manufacturer).
Troubleshooting Common Issues
The Old Plug Won’t Unscrew
If the plug is stuck, apply penetrating oil (WD-40 or similar) around the base of the plug where it meets the cylinder head. Let it soak for 10 to 15 minutes, then try again with steady, gentle pressure. Do not force it, forcing can snap the ceramic insulator or damage the threads. If it remains stuck after soaking, you may need a professional technician.
You’re Unsure About the Spark Plug Gap
If you don’t have a gap tool, most auto parts stores will gap the plug for free when you purchase it. Alternatively, bring your mower’s manual to the store and ask the staff to confirm the correct gap and specification.
The Engine Won’t Start After Replacement
Check three things: (1) Is the wire firmly connected to the new plug? Push it on again with a firm, deliberate motion. (2) Is the gap correct? Remove the plug and verify with a gap tool. (3) Is the wire itself damaged? Look for cracks in the rubber boot or a loose connection at the coil end. If the wire is damaged, it needs replacement.
The Engine Runs but Idles Roughly
If the engine starts but runs unevenly or hesitates, recheck the spark plug gap. An incorrect gap is the most common cause of rough idle after plug replacement. Verify the gap matches the manufacturer’s specification and adjust if needed.
Maintenance Tips to Extend Spark Plug Life
Prevent Fouling
Clean or replace the air filter regularly: A clogged air filter forces the engine to run rich (too much fuel), which fouls the spark plug. Check the filter before each mowing season and replace it if it’s visibly dirty or restricted
Use fresh fuel: Old, stale fuel can cause fouling. Store fuel in a sealed container and use fuel stabilizer if the mower will sit for more than 30 days. Drain or run the tank empty before off-season storage
Check the fuel mix on 2-stroke engines: If you have a 2-stroke mower, use the exact fuel-to-oil ratio specified by the manufacturer. Incorrect ratios cause fouling or engine damage
Change the Oil Regularly
Dirty engine oil contributes to spark plug fouling and reduces engine life. Change the oil at the beginning of the mowing season and every 50 operating hours thereafter (or as specified in your manual). Clean oil helps the engine run cooler and more efficiently, extending spark plug life.
Schedule Maintenance Together
When you replace the spark plug, also inspect and clean or replace the air filter. These components work together, a clogged filter forces the engine to compensate and can foul a new plug quickly. Replacing them during the same service keeps your mower in peak condition.
Frequently Asked Questions About How To Change Lawn Mower Spark Plug
How often should I replace my lawn mower spark plug?
Replace spark plugs annually or every 50 to 100 operating hours, whichever comes first. If you use your mower heavily (multiple times weekly), aim for the lower end of that range. For light seasonal use, annual replacement is typically sufficient. Check your mower’s manual for the manufacturer’s specific recommendation.
Can I use any spark plug, or does it have to match my mower’s specification?
Always use the spark plug specified by your mower’s manufacturer or engine builder. Different plugs have different heat ranges, electrode designs, and thread sizes. Using the wrong plug can cause starting problems, poor performance, or engine damage. Check your manual or contact the manufacturer if you’re unsure.
What’s the difference between a fouled spark plug and one that’s simply dirty?
A fouled plug is covered in wet, oily carbon buildup that prevents proper spark. It cannot be cleaned and reused, it must be replaced. A plug that’s simply dirty (light carbon coating) may recover performance if the underlying cause (like a clogged air filter) is corrected, but replacement is the practical solution in most cases.
Do I need a torque wrench to install the spark plug properly?
A torque wrench is ideal but not essential for most lawn mowers. If you don’t have one, hand-tighten the plug until snug, then add a quarter turn with the ratchet. The goal is firm engagement without over-tightening, which can damage the threads. If you install many spark plugs or want precision, a simple torque wrench costs $20 to 40 and is worth the investment.
Related Maintenance and Operating Guides
To keep your equipment running at peak operating efficiency, explore our related technical walkthroughs and maintenance tutorials:
Mechanical safety standards, operational tolerances, and protective gear guidelines align with benchmark specifications established by the American National Standards Institute (ANSI).