

Quick Answer: How To Remove Riding Lawn Mower Blade?
Lock out the riding lawn mower so it cannot start, support it so the deck cannot drop and the machine cannot tip, then hold the blade still and loosen the fastener that clamps it to the spindle. Most residential riders use one center bolt per blade, but access method, washer stack, and thread direction vary. Confirm those details in the…

Pros
- Large-size design named in product title
- Sharpening and balancing functions listed
- Listed as a new upgraded version

Pros
- Adjustable 15-to-45-degree range in title
- Sharpening and balancing functions listed
Pros
- Includes replacement gaskets and a 98079-55846 spark plug
- Matches Honda HRR216 and HRS216 lawn mower models
- Designed around the 16100-Z8B-901 carburetor specification
Cons
- Restricted to select Honda GCV160 mower applications
- Installation requires basic mechanical tools and skills
What removing a riding-mower blade actually involves
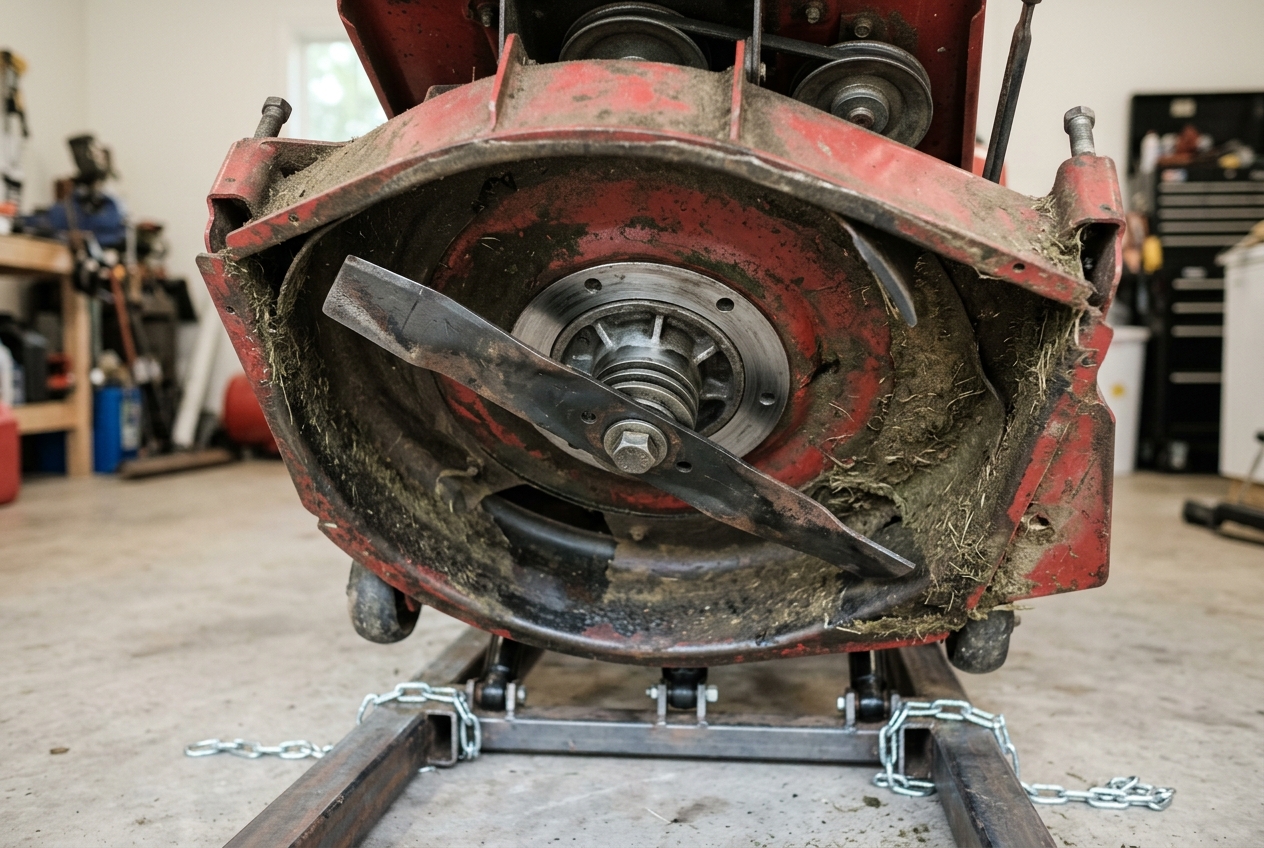
People take a blade off a riding lawn mower to inspect it, sharpen it, replace it, or clear wrapped debris from the spindle. The job is not complicated in concept, but it happens on a heavy machine with a sharp cutting edge, stored energy in belts and springs, and an engine that can start if lockout is skipped. Treat the owner’s manual as the controlling document for lift points, fastener type, and thread direction. A generic sequence can get you oriented. It cannot replace model-specific hardware or support instructions.
On a typical residential rider, each mower blade is clamped to a spindle that hangs under the mower deck. The spindle is the rotating hub driven by the belt when the PTO or blade-engagement control is on. A blade bolt usually passes through the blade’s center hole and into the spindle. Washers, a star washer, a cup, or a blade adapter may sit in a stack between the bolt head and the blade, or between the blade and the spindle. Those pieces are not decorative. They locate the blade, spread clamp load, and sometimes keep the assembly from walking loose. Keep every piece with the spindle it came from.
What is usually the same from one residential rider to another is the safety logic: disable start and blade drive, make the machine unable to roll or drop, hold the blade so the spindle cannot freewheel, then loosen the retaining fastener. What is not the same is almost everything tactile. Some decks can be reached from below with the mower still on its wheels or slightly raised. Others need the deck lowered, a chute or belt cover removed, or the deck taken off entirely. Some machines use one blade; many use two or three. Some bolts turn the direction you expect. A few are reverse-threaded. Some spindles use a single center bolt; a minority use another retaining style. If your hardware does not match a generic description, stop guessing and open the manual or a service guide written for that model.
The goal of removal is a clean, documented takeoff so the blade can be judged, serviced, or swapped and put back in the same orientation with the same washer order. Removal is not the time to straighten a bent blade by eye, mix hardware from two spindles, or decide that a rounded bolt “just needs more force.” Those decisions belong after you can see the parts in good light—and some of them belong to a shop.
Lock out the mower before anyone reaches under the deck
A riding mower can start, lurch, or throw a blade if the ignition, PTO, or a safety interlock is not locked out. “Off” and “neutral” on the dash are not lockout. They are control positions. Anyone working under the deck needs the machine unable to crank, fire, or engage the blades even if a control is bumped or a short develops.
Park on level, firm ground. A slope makes the machine want to roll and makes jacks or stands lean. Soft soil lets a stand sink after you are already underneath. Set the parking brake. Disengage the PTO or blade-engagement control. Return the throttle to the idle or stop position the manual describes. Take the ignition key out and keep it in your pocket, not on the seat. If the machine has a removable battery isolator or the manual tells you to disconnect the battery, isolate the battery as instructed, usually negative cable first when disconnecting. Do not disable safety interlocks to make the job “easier.” Those switches exist because people reach under decks.
Disconnect the spark-plug lead so a stray rotation cannot fire the engine. If there is more than one plug, treat every lead. Fold the boot back where it cannot slap the terminal. On many riders this is the single most important electrical step after the key comes out, because a plug wire left connected can still produce a spark if the crankshaft is turned. Isolate the battery as well when the manual calls for it, when you will be near wiring, or when you do not want the starter solenoid in the circuit at all. Wait out a hot engine, muffler, and deck. Exhaust parts and the underside of a deck that just cut grass can burn skin. Fuel, oil, and dry clippings add fire risk if anything later involves heat—which this job should not.
Fuel hazards are mostly about not creating them. Do not drain a tank unless the manual requires it for a related service. Do not tip the machine so far that gasoline can reach the air cleaner or spill onto the ground and your clothes. If the mower must be raised, keep the tilt modest and the fuel cap secure. Work outdoors or in a space with real ventilation, not a closed garage full of gas vapor.
Lockout stays in place until the blade is off, inspection is done, any reinstall is complete, supports and tools are clear, and the machine is fully down. Reconnecting a spark-plug lead or battery “just to check something” while you are still under the deck is how accidental starts happen.
Raise, block, and reach the underside of the deck
Many residential riders can be serviced from below with the deck still attached, especially if the cutting height is set high, a discharge chute is removed, or there is already enough clearance to reach the blade bolt. That is convenient. It is not a rule. Low decks, baggers, mulch plugs, side skirts, and packed grass can block the bolt head. Some designs are faster and safer if you lower the deck onto blocks or remove it so you are not lying under a hanging assembly. Only the owner’s manual can say which lift points are approved and whether deck removal is expected for blade service.
If you raise the machine, raise it only as far as you need to work with your hands and a socket, not as high as the lift will go. After any jack or ramp lift, support the mower on rated jack stands or solid blocking made for vehicle support, on firm ground, under structure the manual or a competent service reference treats as a support point. Chock wheels that stay on the ground so the machine cannot roll off the stands. A hydraulic jack, bumper jack, scissor jack, or the deck hangers alone are lifting or hanging devices. They are not a safe place to put your head and chest. Do not crawl under a mower held only by a jack, a loader, or a shop crane without stands. Do not use hollow masonry blocks as the only support; they can crack without warning.
Ramps help if you prefer to drive or push the front or rear up a short, stable pair of ramps rated for the machine’s weight. Keep the path straight, the ramps butted against a curb or stop if the design allows, and the parking brake set once the mower is up. Watch overhead clearance for a ROPS bar, canopy, or bagger. If the mower starts to feel light on one corner, you have raised it too far or supported it in the wrong place—lower it and rethink the setup.
Give yourself light and an exit. A flashlight or headlamp matters more than extra height. Keep bystanders and children away. If grass clippings, mud, or a stuck chute are in the way, clean them off after lockout, not by reaching in with the engine running. If reaching the bolt still requires you to lie in a cramped pocket under an unstable corner, stop and change the access method. Dropping or removing the deck is slower than forcing a bad position. It is also how people avoid crush injuries.
Tools and supplies you will typically need
You do not need a specialty shop to remove most residential blades, but you do need tools that fit and protection that assumes the edge is still sharp. Wear sturdy gloves and eye protection. A dull-looking blade will still cut. Grease, sap, and rust throw debris when a bolt finally breaks free. Closed-toe shoes and long pants are reasonable when you are next to a deck lip and a falling steel blade.
For the fastener, use a socket that fully seats on the bolt head, on a breaker bar or a long-handled ratchet that gives control. An impact driver is not required and can be a liability if the blade is not held, the socket is a sloppy fit, or the spindle housing is already tired. Have a six-point socket available if the head is soft or slightly rounded; twelve-point tools slip more easily. Do not guess a “standard” size from the internet. Measure or test-fit until the socket is snug.
You also need a way to keep the blade from turning: a wood block that can be wedged carefully between the blade and the deck, or a purpose-made blade holder if you have one that fits without chewing the cutting edge. A second person can steady a block, but they should not hold the blade by the edge with bare hands or put body weight on the steel. A flashlight, a marker or paint pen, a parts tray or labeled bags, and a scraper or brush for packed grass complete a typical kit. If a bolt looks rusted in place, a penetrating oil and time are more useful than a longer cheater pipe. Keep solvents off belts, plastic pulleys, and painted surfaces you do not intend to strip. Have rags ready so oil does not drip onto the floor and become a slip hazard.
Marking and bagging are tools, not afterthoughts. A multi-blade deck will happily accept the wrong blade on the wrong spindle if you mix the piles. A washer stack that goes back in the wrong order can leave the blade loose or off-center. Photograph the assembly before you disturb it if that helps you more than a sketch.
Keep the blade and spindle from spinning
The spindle is designed to turn. When you load the blade bolt, the whole assembly often spins instead of the fastener breaking free. That is normal. It is also why people get cut: they grab the blade, the bolt jumps, and the edge moves. Hold the blade with a method that keeps your hands out of the cutting path if the fastener suddenly lets go.
A common method is to set a scrap of lumber against the deck so the blade’s flat or a non-cutting surface bears on the wood when you turn the bolt. Another is a commercial blade holder that clamps or hooks in a way that does not rely on your fingers. Treat both as options, not as factory-approved for every brand. Never jam a block against a thin deck skirt in a way that can bend the lip. Never put a wedge on the sharpened edge if you can avoid it; you can nick the blade or launch the block. Do not stick a screwdriver or punch into a random hole in the spindle unless the manual shows that as a holding method. Do not stand on the blade or lean your torso across it.
Position your body beside the deck, not in line with the blade tip. If the bolt breaks free all at once, the blade can rotate a few inches with surprising speed. Keep the socket fully seated so it cannot slip off and skin a knuckle. If you use an impact tool at all, the blade still needs to be controlled first; an uncontrolled impact can batter the spindle bearings or walk the mower on its stands. When the fastener is tight from years of vibration and rust, expect a sudden release and keep the blade from dropping onto your chest or the floor when it comes off.
Typical blade fasteners and why some bolts feel “backward”
Many residential riding mowers clamp each blade with one center bolt threaded into the spindle. That pattern is common. It is not universal. Count the blades, look at each hub, and match what you see to the parts diagram in the owner’s manual. You may find a thick washer, a star or lock washer, a concave cup, a blade adapter, or a combination. Those pieces often have a face that must point a certain way. Lay them out in order as they come off.
Some people assume every mower blade bolt is reverse-threaded because walk-behind mowers sometimes use left-hand thread so rotation tightens the nut. On riding-mower spindles, thread direction varies by brand, deck, and even by which side of a multi-blade deck you are on. Some bolts are standard right-hand thread. Some are left-hand or reverse thread. You cannot tell by folklore. You tell by the manual, by markings on the bolt or spindle, and by careful observation: if moderate force in one direction only tightens the stack, stop and try the other direction before you round the head or twist the spindle.
Confirm direction before you apply heavy force. Clean the head so you can see slots, stamps, or a “L” style mark if one exists. Look at how the washer stack is compressed. If the hardware does not match a generic article—two bolts, a nut on a stud, a toothed flange, a different adapter—do not invent a procedure. Use the manual or a dealer. Forcing a reverse-thread bolt the wrong way, or treating a standard bolt as reverse, is a reliable way to wreck a spindle that costs far more than a blade.
Step-by-step: take the blade off
Work in this order so lockout and support are never an afterthought.
- Park on firm, level ground. Set the parking brake, disengage the PTO or blade control, remove the key, disconnect the spark-plug lead, and isolate the battery if the manual calls for it or if you will be near the electrical system.
- Let hot parts cool. Clear bystanders. Set cutting height high if that improves access without changing how the deck hangs unsafely.
- Raise the mower only if needed, then support it on rated stands or solid blocking. Chock wheels that remain on the ground. Do not get under a jack-only lift.
- Clean packed grass from the bolt head and the area around the spindle so the socket seats and you can see the washer stack.
- Mark blade orientation before anything moves. Note which face sits toward the deck, which end points where on a multi-blade deck, and which way the sail (the lifted fin that moves air) faces. A paint mark on the blade and a matching mark on the spindle housing prevent a backwards reinstall.
- Hold the blade with a block or holder so the spindle cannot spin. Keep hands off the cutting edge and out of the path the tip will take if the bolt jumps.
- Fit a snug socket and break the bolt free in the direction that is correct for that machine. Do not assume counterclockwise. Use steady force. Stop if the head starts to round or the spindle housing flexes in a way that looks like cracking.
- Support the blade with one gloved hand or a second block as the bolt’s last threads let go so the blade cannot fall on you. Multi-blade decks can have staggered blades; watch the neighboring edge.
- Remove the washer stack in order. Bag or tray each spindle’s hardware separately. If two blades come off, do not toss the bolts into one coffee can.
- Set the blade down with the cutting edge away from walkways. Look at the spindle face for wrapped string, a damaged key or adapter, or missing pieces before you walk away.
If the fastener is not a simple removable bolt, or if anything looks damaged, stop. Some spindles use a different retaining style. Forcing a generic sequence onto the wrong hardware is how housings get broken. On a multi-blade deck, repeat the same disciplined process at each spindle rather than loosening every bolt first and hoping the parts stay sorted.
What to check on the blade, bolt, and spindle
Once the blade is off, inspect it in good light before you decide to sharpen, reuse, or replace it. Look for bends along the length or at the tips, cracks at the center hole or in the sail, missing chunks, heavy gouges, and a mounting hole that has become egg-shaped or wallowed. A blade that is bent, cracked, or badly worn should be replaced rather than hammered straight as a guess. Straightening a heat-treated blade can hide a crack and throw the spindle out of balance. Sharpness alone does not make a blade safe. A polished edge on a banana-shaped airfoil is still a bad part.
Check the bolt for a rounded head, stretched or damaged threads, and a shoulder or flange that is no longer flat. Check washers and star washers for distortion, cracks, or a missing tooth pattern. Check the spindle threads and the mounting face for rust scale, mashed threads, a cracked housing, or a grooved surface that will not clamp evenly. If the adapter or spindle shaft is mushroomed, the new blade will not sit true.
On a multi-blade deck, mixing blades or hardware from different spindles matters. Blades may be left- and right-hand, or they may be the same stamping installed in a specific rotation. Bolts may have different thread directions. Washers may be unique to one side. If you cannot prove which pile belongs where, do not invent a mix. Compare to the parts diagram or take the pieces to a dealer. Clean-and-reuse is reasonable when the blade is straight, uncracked, and within whatever wear guidance the manufacturer publishes, and when the bolt and washers still clamp flat. Replace the set—or at least the damaged members of it—when any of those conditions fail. Do not rely on unofficial thickness or length numbers from a forum.
If the bolt is seized, rounded, or the spindle turns with it
A stuck blade bolt is common on machines that live outdoors. Start gently. Confirm you are turning the correct direction. Clean the head so the socket is not riding on rust. Use a six-point socket that fully seats. Apply penetrating oil to the threads if you can reach them, then give it time rather than immediately doubling the lever. A better-fitting tool and patience fix more bolts than a pipe on a ratchet.
If the whole spindle rotates with the bolt, your holding method is slipping or the blade is not bearing on the block. Reset the wood or holder so it cannot walk. Do not have a helper grab the blade by the edge. If the pulley above the deck is accessible and the manual allows holding the spindle from that side, that can stop rotation without loading the cutting edge—only do this if you can do it without defeating guards in an unsafe way and without putting fingers in a belt path.
Stop and use a dealer or repair shop if the head rounds, the spindle housing starts to crack or oval, the bolt will not move after careful attempts, or you would need heat, welding, or grinding to continue. Open flame near fuel, plastic, dry grass, and a battery is a fire and explosion hazard. A cheater bar long enough to lift the mower off its stands is a crush hazard. Destructive extraction can ruin a spindle that is still serviceable if a shop uses the right puller or extractor. Rounded heads and seized threads are a good reason to pay for help, not a reason to invent a garage machine shop on a gas-and-battery machine.
Before you reinstall a blade or restart the mower
Reinstall is model-specific. The original cutting face and sail orientation must go back the way they came off, or the deck will not lift grass correctly and the blade may not clear neighboring blades. A backwards blade can also be more likely to loosen or to strike the deck. Hardware that is stretched, rounded, incomplete, or cracked should not be reused. A missing star washer or cup is not optional “close enough.”
Final tightness is a manual and specification issue, not “as tight as possible.” Over-tightening can stretch a bolt, crush a washer, or damage spindle threads. Under-tightening lets the blade shift and wallow the hole. Use the torque and any thread-locker guidance in the service information for that mower if you reinstall. If you do not have that information, do not invent a number from a different brand. Either obtain the spec or have the fastener seated by someone who has it.
Before you lower the machine, clear tools, blocks, rags, and people from under the deck. Reconnect nothing yet. Lower the mower onto its wheels, remove stands and ramps, and restore any chute, belt cover, or mulch plug you removed. Only then reconnect the battery if it was isolated (typically positive last when reconnecting, following the manual) and the spark-plug lead. Keep the key out until you have walked around the machine once.
On the ground, with everyone clear of the discharge and the deck, you can restore the key and do the ordinary pre-start checks the manual lists: debris off the engine, guards in place, PTO off, and a test that the blades do not engage until you ask. Do not test-run blades in the air or with the machine still elevated. Do not stand in line with the deck while you first engage the PTO. If anything sounds like a loose blade—rattle, scrape, wobble—shut down, lock out again, and recheck hardware before you cut grass.
Removing a riding-mower blade is a lockout and support problem first and a wrench problem second. The owner’s manual overrides any generic sequence for lift points, fastener type, and thread direction. If the bolt, spindle, or deck does not behave like a straightforward single-bolt job, treating that as a stop sign is the safe path.









