

Direct Answer: How to Replace Grass Trimmer String
To replace grass trimmer string, disconnect power from your trimmer, remove the trimmer head cap or guard, take out the old string from the spool, and wind new string onto the spool following the directional arrows embossed on it. Thread the string ends through the eyelets on the trimmer head, reassemble the cap, and test the feed mechanism before use. The exact procedure varies slightly depending on whether you have a bump-feed, automatic, or manual wind system.

Pros
- Six-pack bundle listed in the product title
- Square profile line named in the product title
- Commercial 5 lb size listed for heavier use
Cons
- Trimmer compatibility is not verified in supplied data

Pros
- Six-pack bundle listed in the product title
- Star profile line named in the product title
- Commercial 5 lb size listed for heavier use
Cons
- Line length and trimmer fit are not stated in supplied data

Pros
- Title lists 1280 feet of line length
- Square profile named in the product title
- Lists a 5 lb line rating
- Title describes it as commercial-style line

Pros
- Title lists .095-inch square nylon line
- Lists 1280 feet of line length
- Manufacturer states fit with most string trimmers
- Lists a 5 lb line rating
Understanding Your Trimmer Type Before You Start
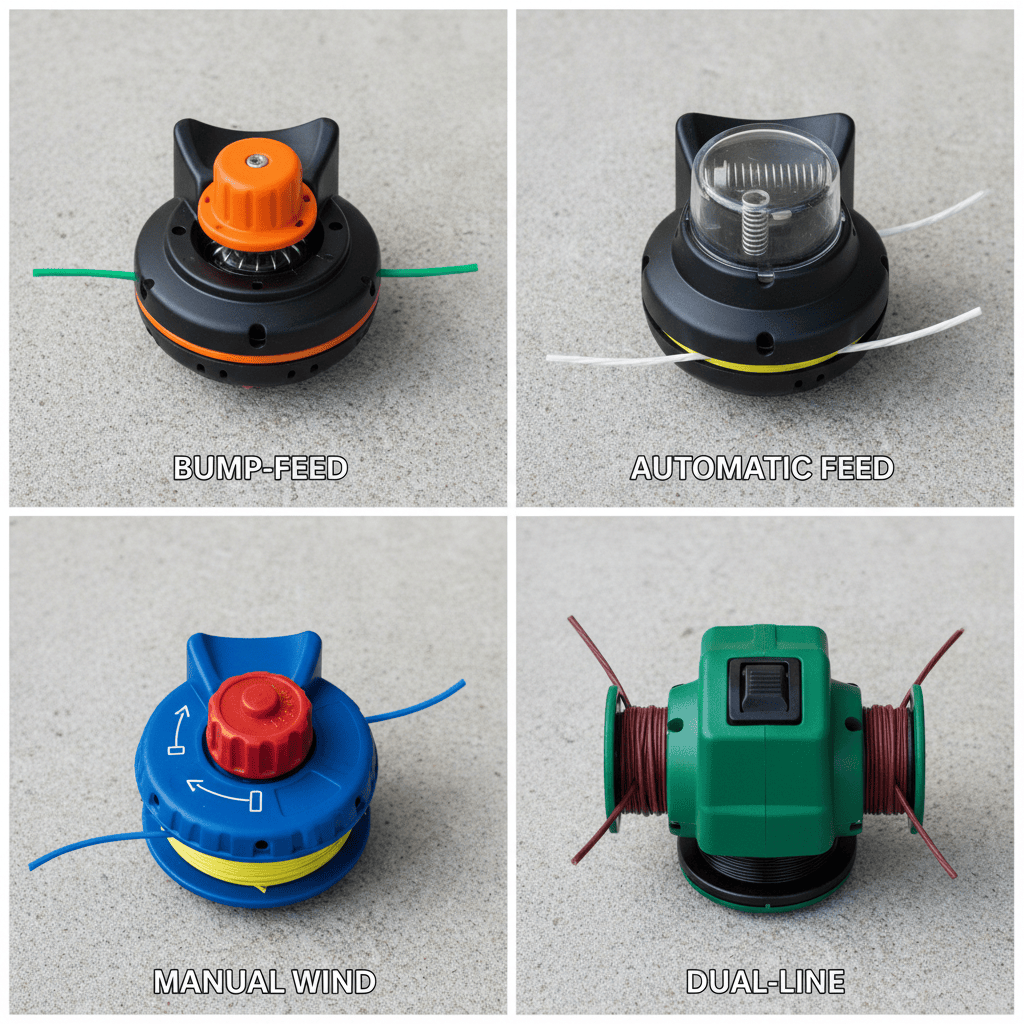
Not all trimmers work the same way. Before you begin replacing string, identify which type of trimmer you have, as the replacement process differs significantly:
- Bump-Feed Trimmers: These are the most common residential models. When the cutting line wears down, you tap the trimmer head on the ground to feed more string automatically. Replacement typically involves removing the spool and rewinding string manually.
- Automatic Feed Trimmers: These advance new string continuously as the old line wears. Replacement is similar to bump-feed but may require loading string differently to engage the automatic mechanism.
- Manual Wind Trimmers: Less common, these require you to manually turn a knob or dial to feed string as needed. Replacement involves unwinding and rewinding string on a fixed spool.
- Dual-Line vs. Single-Line: Dual-line trimmers have two cutting strings and use more line per replacement. Single-line systems are simpler but less efficient on thick weeds.
Check your trimmer’s manual or look for labels on the trimmer head to confirm which system you have. This determines how much string you’ll need and the loading technique. For additional operational safety benchmarks, see our published testing notes on jbl partybox club 120 vs sony srs xv500.
Safety Precautions Before Starting
Working safely prevents injury and equipment damage: For additional operational safety benchmarks, see our published testing notes on jbl partybox club 120 vs sony srs xv500.
- Disconnect Power: For electric trimmers, unplug the unit from the outlet. For cordless models, remove the battery. For gas trimmers, disconnect the spark plug wire to prevent accidental starting.
- Allow Equipment to Cool: If you’ve recently used the trimmer, wait 10-15 minutes before handling the head to avoid burns.
- Inspect the Trimmer Head: Look for cracks, damage, or warping before replacing string. A damaged head may need replacement rather than restringinging.
- Work on a Flat Surface: Place your trimmer on a stable, flat work surface with good lighting to avoid losing small parts.
- Gather Your Tools: Have your replacement string, a flathead screwdriver, and your trimmer manual nearby. Most jobs require no tools beyond what comes with the trimmer.
Disassembling the Trimmer Head
The trimmer head cap must be removed to access the spool where string is stored. The method depends on your trimmer model:
For Screw-On Caps (Most Common)
- Locate the cap on top of the trimmer head—it’s usually plastic or metal with a diameter of 2-4 inches.
- Turn the cap counterclockwise by hand or with a flathead screwdriver until it releases. Some caps have small arrows indicating the direction.
- Lift the cap straight up to reveal the spool inside.
- Set the cap and any washers or springs aside in a safe location where they won’t roll away.
For Snap-On or Push-Lock Caps
- Look for small tabs or release buttons on the sides of the cap.
- Press or pry these tabs gently with a flathead screwdriver while pulling the cap upward.
- The cap should pop off without excessive force. If it’s stuck, apply gentle pressure around all edges rather than twisting.
Examining the Spool
Once the cap is off, you’ll see the spool—a plastic or metal wheel with grooves for winding string. Examine it for damage, debris, or old string that needs clearing. If you see excessive dirt or grass buildup, use a soft brush or compressed air to clean the grooves before loading new string. To compare alternative configurations, check our hands-on review of z890 vs x870e motherboard.
Removing Old String and Preparing the Spool
Clear the old or broken string completely before loading new line:
- Remove Remaining String: Pull out any old string wrapped on the spool. If string is stuck, gently pick it away with your fingernail or a small tool.
- Check for Damage: Inspect the spool for cracks or wear. If you see significant damage, the spool may need replacement (typically $15-40 depending on the brand).
- Clear the Center Hole: The spool usually has a hole in the center where it attaches to the trimmer head. Ensure this hole is clear of debris and old string fragments.
- Locate Directional Arrows: Before proceeding, find the arrows molded or printed on the spool. These indicate the winding direction—this is critical for proper string feeding.
For dual-line trimmers with two separate spool compartments, repeat this process for both sides. Users looking for related component recommendations can explore our marshall stanmore iii vs harman kardon onyx studio 8 breakdown.
Winding New String onto the Spool
This is the most critical step. Improper winding causes feeding problems and is the most common reason for replacement failures.
Step-by-Step Winding Process
- Measure the Right Amount: Most trimmer heads require 15-30 feet of string, depending on spool size. Your trimmer manual will specify the exact length. If you don’t have it, measure by wrapping string around your extended hand 6-8 times—this typically equals the right amount.
- Find the Anchor Slot: Locate the small notch or slot at the edge of the spool where you’ll insert the string end to start winding. This is usually marked or obvious on inspection.
- Insert the String End: Place one end of the new string into the anchor slot. Ensure it’s seated firmly so it won’t slip during winding.
- Wind in the Correct Direction: Follow the arrows on the spool precisely. Wind the string tightly and evenly, keeping tension as you go. Loose winding causes feeding problems. Most trimmers wind counterclockwise, but verify with your spool markings.
- Wrap Tightly Around the Spool: Continue winding until you have about 4-6 inches of string remaining (don’t wind the entire length onto the spool). Leave this length unwound for the threading step.
- Secure the Wound String: Look for a small slot or notch on the spool rim where you can hook the wound string to keep it from unraveling. Insert the unwound end into this slot to hold the wound portion in place.
For Dual-Line Trimmers
If your trimmer has two cutting lines, you’ll repeat this process on the second spool compartment. Load both spools identically, winding in the same direction with similar tension. Both lines should feed evenly to ensure balanced cutting. Before finalizing equipment decisions, refer to our comprehensive dyson v8 cyclone vs bissell featherweight stick comparison.
Threading the String Through the Eyelets
After winding, the string ends must be positioned to extend out of the trimmer head as cutting lines:
- Locate the Eyelets: These are small holes on the outer edge of the trimmer head, typically 2-4 depending on your trimmer type. They’re where the string exits to do the cutting.
- Thread Each End: Remove the string end from the holding slot on the spool. Feed each end through an eyelet on opposite sides of the trimmer head. The string should pass through smoothly.
- Extend the Correct Length: Most trimmers work best with 4-8 inches of string extending beyond each eyelet as the active cutting line. This length may be adjustable based on what you’re trimming, but stay within the trimmer head guard for safety.
- Verify the Feed Path: Trace the path from the spool through the eyelets. The string should be straight and untwisted.
Reassembling the Trimmer Head
Now that the string is loaded, close up the trimmer head: For broader ecosystem context, read through our operational guide on bissell crosswave hydrosteam vs shark stainforce.
- Check Alignment: Before reinstalling the cap, verify the spool sits flat and centered in the trimmer head. Misalignment prevents proper string feeding.
- Reattach Any Springs or Washers: If your trimmer uses springs or metal washers under the cap, reinstall them in the same order they came off. These are essential for proper feeding in automatic systems.
- Replace the Cap: For screw-on caps, align the cap with the head and turn clockwise until snug. Don’t over-tighten—hand-tight is usually correct. For snap-on caps, align and press down firmly until you feel the tabs engage.
- Reconnect Power: Plug in electric trimmers or reinsert the battery on cordless models. For gas trimmers, reconnect the spark plug wire.
Testing and Initial Use
Before full-power operation, verify everything works correctly:
- Test the Feed: Hold the trimmer with the head pointing downward away from your body. Gently tap the trimmer head on the ground if you have a bump-feed model. The string should advance smoothly.
- Check String Length: The string should extend evenly on both sides (for dual-line models). If one side is longer, you can manually pull the shorter end to extend it, or trim the longer side with scissors.
- Spin the Head Slowly: If safe, hand-spin the trimmer head to ensure the string doesn’t wobble or strike the guard. It should rotate freely without hitting anything.
- Start at Low Speed: Begin using your trimmer at a lower speed setting to ensure stable operation before moving to full power.
Troubleshooting Common Issues
String Won’t Feed Properly
Problem: You tap or activate the feed but string doesn’t advance.
Causes and Solutions:
- Wound too loosely—the string slips instead of feeding. Rewind tightly with consistent tension.
- String isn’t seated in the anchor slot—remove the cap and ensure the string end is firmly in place.
- Debris blocking the feed path—clean the spool and trimmer head with compressed air.
- Automatic feed spring damaged—this requires replacing the spool assembly, typically $20-50.
String Breaks Frequently
Problem: New string breaks shortly after starting.
Causes and Solutions:
- String diameter too thin for your trimmer—verify you’re using the correct gauge (typically 0.065″-0.110″ for residential trimmers).
- Trimmer head guard bent or damaged—a bent guard can catch and break string. Inspect and replace if needed.
- String wound in wrong direction—rewind following the directional arrows precisely.
- Old string fragments stuck in the head—completely clear the spool and trimmer head before reloading.
String Tangles or Doesn’t Feed Evenly
Problem: String bunches up or one side feeds faster than the other.
Causes and Solutions:
- Uneven winding tension—rewind with consistent, firm pressure throughout.
- Spool not seated properly—remove the cap and reposition the spool so it sits flat.
- String crossed during winding—this causes tangling. Rewind carefully, keeping the string parallel to itself.
- Eyelets damaged or misaligned—inspect the holes where string exits. A bent eyelet can cause uneven feeding or tangling.
Choosing the Right Replacement String
Not all trimmer strings are the same. Selecting the correct string prevents feeding issues and premature breakage:
String Diameter
Grass trimmer string typically ranges from 0.065 inches to 0.110 inches in diameter. Thicker string cuts more effectively on tough weeds but requires more power and uses string faster. Thinner string works fine for regular lawn maintenance but may break on thick growth. Check your trimmer manual or the trimmer head label for the recommended diameter. Using the wrong size can cause feeding problems and poor cutting performance.
String Material
Most residential trimmer string is made from nylon with different hardness ratings. Standard nylon works for general lawn trimming, while reinforced or twisted nylon offers better durability on thick weeds. Some premium strings have center cores for added strength. Basic nylon is sufficient for most homeowners and costs $5-15 for a replacement spool.
Finding Compatible String
Verify compatibility before purchasing:
- Check your trimmer’s brand and model number (usually on a label on the trimmer body).
- Look up the recommended string specifications in your manual or on the manufacturer’s website.
- Many aftermarket strings work across brands, but confirm the diameter and spool type match your trimmer.
- Pre-wound spools are convenient but more expensive than bulk string you wind yourself ($15-25 vs. $5-10).
Brand-Specific Considerations
Major brands like Ryobi, Echo, Black+Decker, Husqvarna, and STIHL all use standard string diameters, but spool designs vary. Ryobi bump-feed trimmers typically use 0.080″ string, Echo models often use 0.095″, and Black+Decker frequently uses 0.065″. Always match both the diameter and spool type to avoid compatibility issues.
Maintenance Tips to Extend String Life
You can reduce how often you replace string with proper use:
- Avoid Hard Objects: Keep your trimmer away from rocks, concrete, and metal edges where string strikes hard surfaces and breaks.
- Use Correct Cutting Technique: Hold the trimmer head parallel to the ground and let the tip of the string do the cutting. Don’t force the trimmer into thick growth.
- Trim at the Right Height: Cut grass when it’s relatively dry, if possible. Wet grass clogs the trimmer head and causes premature string wear.
- Keep the Head Clean: After use, remove grass clippings and debris from the trimmer head. Buildup causes feeding problems and string breakage.
- Store Properly: Keep your trimmer in a cool, dry place. Nylon string degrades in direct sunlight and extreme heat, making it brittle and prone to breaking.
Buyer FAQs: How To Replace Grass Trimmer String Solved
How often should I replace grass trimmer string?
Replacement frequency depends on how often and how aggressively you trim. For typical residential use (weekly or bi-weekly), you might replace string every 2-4 weeks during the growing season. Heavy commercial use or trimming thick weeds can require replacement weekly. You’ll know it’s time when the string is visibly worn, breaking frequently, or not cutting cleanly.
Can I use any string diameter in my trimmer?
No. Using the wrong diameter causes feeding problems and poor performance. Thicker string than recommended may not feed properly or could strain the trimmer motor. Thinner string breaks easily and cuts inefficiently. Always use the diameter specified in your trimmer manual or on the trimmer head label. If unsure, contact the manufacturer or check their website for your specific model.
Why does my trimmer string keep breaking?
Breaking string is typically caused by: wrong string diameter, winding in the wrong direction, debris in the trimmer head, a bent guard, or striking hard objects during use. Start by verifying you’re using the correct string type and diameter, ensure the string is wound following directional arrows, and inspect the trimmer head for damage. Check that the trimmer guard isn’t bent and restricting string movement.
What’s the difference between bump-feed and automatic feed trimmers?
Bump-feed trimmers require you to manually tap the trimmer head on the ground to advance new string as it wears. Automatic feed systems advance string continuously without tapping. Replacement is similar for both, but automatic systems may have spring mechanisms that affect how string is loaded. Check your manual to confirm which system you have, as loading string incorrectly can prevent automatic feed from working.
For more hands-on benchmarks and buying recommendations, consult our guides on residential zero-turn lawn mower guide, as well as durable ride-on lawn tractor guide, as well as automated robotic lawn mower guide.
Mechanical safety standards, operational tolerances, and protective gear guidelines align with benchmark specifications established by the American National Standards Institute (ANSI).









