

Quick Answer: How to Replace Weed Eater Head
Before touching any part of your weed eater, safety must come first. Power disconnection is non-negotiable, whether you own a corded, cordless, or gas-powered model. For corded trimmers, unplug from the outlet. For cordless units, remove the battery completely from the trimmer body. For gas models, ensure the engine is off and has cooled for at least 10 to 15 minutes, as the engine head can reach high temperatures during operation.

Pros
- Adapter kit lists 5 nuts and 6 bolts
- Includes 12 feet of .095-inch trimmer line
- Tap-and-go feature extends line when tapped
- Two-color design marks the center for loading
Cons
- Universal fit claims depend on your shaft and thread
- Listing asks buyers to confirm shaft model first
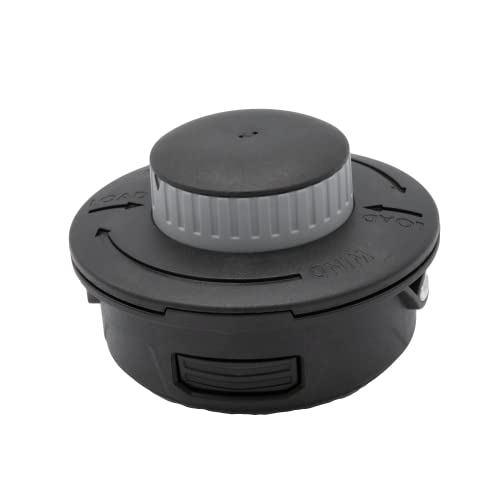
Pros
- Bump feed advances line with a simple tap
- Reload line without disassembling the entire head
- Listed for up to 16 feet of trimmer line
- Lists compatibility with Echo, Stihl, Redmax and Ryobi
Cons
- Compatibility is partial: select cordless models only
- Spec data is limited; no customer reviews or test results

Pros
- Includes 13-piece hardware adapter kit
- Includes 12 pre-cut 1-foot trimmer lines
- Listed for lines 2.0 to 3.0 mm in diameter
- Reinforced nylon and fiberglass construction per listing
Cons
- Confirm thread direction and size before purchase
- Compatibility claims are broad; verify your trimmer model

Pros
- Includes 12 pieces of 11-inch, .095-inch triangle line, per listing
- Glass-filled nylon body and 304 stainless steel hardware, per listing
- Listed as compatible with left and right rotating trimmers
- Multiple adapter options listed by shaft type
Cons
- Correct adapter must match your trimmer shaft
- Broad brand compatibility is a manufacturer claim

Pros
- Pre-cut line strips avoid spooling line
- 4-line design for 0.080 to 0.095 inch line
- Listed fits for Craftsman, Hart, Makita and Ryobi cordless models
- Includes hardware and adapter if needed for installation
Cons
- Compatibility depends on exact model; verify before ordering
- Performance claims are manufacturer-stated; no reviews provided
Wear safety glasses to protect against debris or parts that might spring loose during removal. Work gloves are recommended, especially if your hands are sensitive to plastic edges or metal components. If you’re working outdoors, choose a well-lit, flat work surface away from foot traffic.
Never attempt head replacement while the trimmer is plugged in, powered on, or still warm. A sudden start or accidental activation can cause serious injury. If your trimmer has a safety switch or guard, ensure it is in the locked or off position.
Understanding Your Weed Eater Head Type
Weed eater heads come in three main varieties, and knowing which type you have will guide your replacement process:
- Fixed Spool Head: This head has pre-wound string that cannot be replaced. When the string runs out, you replace the entire head. This is the simplest design and the most common on budget-friendly trimmers.
- Bump Feed Head: The head holds a spool of string, and you advance new string by tapping the head on the ground. Replacement involves removing the spool and installing a new head, or simply rewinding string on the existing spool if that’s an option for your model.
- Auto-Feed Head: This head automatically advances string as it wears. Replacement is identical to bump feed in terms of physical installation, but the mechanism is different.
To identify your head type, look at the top of your trimmer. A fixed spool head is a solid plastic unit with no visible spool inside. A bump feed or auto-feed head will have a visible spool or housing beneath the head cover. Check your trimmer’s manual or look for labels on the head itself, most manufacturers mark the head type clearly.
Tools and Materials You’ll Need
Head replacement requires minimal equipment. Gather these items before you start:
- Adjustable wrench or socket set: Most retaining bolts are 8mm, 10mm, or 12mm. A wrench works, but a socket wrench is faster.
- Replacement head: This must match your trimmer model and brand. Check your manual or the trimmer housing for the model number. Replacement heads are often model-specific and not interchangeable across brands.
- Work gloves (optional): Latex or cotton gloves prevent minor cuts from plastic or metal edges.
- Flathead or Phillips screwdriver (sometimes): Some heads have a central screw or clip instead of a bolt. Check your trimmer to be sure.
- Rag or cloth: Useful for wiping the trimmer shaft clean before installing the new head.
Verify you have the correct replacement head before starting. Installing the wrong head can result in wobbling, poor cutting performance, or damage to the trimmer shaft. Most manufacturers print a part number on the head or in the owner’s manual.
Step-by-Step Removal of the Old Head
Step 1: Power Down and Cool
Disconnect your trimmer from power. Unplug corded models or remove the battery from cordless units completely. For gas trimmers, turn off the engine, wait 15 minutes, and touch the engine head gently, if it’s still hot, wait longer. Never rush this step. Users looking for related component recommendations can explore our marshall stanmore iii vs harman kardon onyx studio 8 breakdown.
Step 2: Locate the Retaining Bolt or Clip
Flip the trimmer upside down or position it so you can see the bottom of the head clearly. Most heads are held in place by a single bolt or clip at the center. This is usually located on the underside of the head where it connects to the shaft. Some models have a bolt on top; check your manual if you’re unsure. On a few models, the head is held by a snap clip instead of a bolt. Before finalizing equipment decisions, refer to our comprehensive dyson v8 cyclone vs bissell featherweight stick comparison.
Step 3: Remove the Retaining Bolt or Clip
Using your wrench or socket, carefully turn the bolt counterclockwise. Do not force it, if resistance is high, apply a penetrating oil (like WD-40) and wait 5 minutes. Once loose, unscrew by hand until you can remove it completely. Keep this bolt in a safe place; you’ll reuse it with the new head. If your trimmer has a snap clip, simply pry it gently with a flathead screwdriver and slide it off the shaft. For broader ecosystem context, read through our operational guide on bissell crosswave hydrosteam vs shark stainforce.
Step 4: Unscrew the Old Head
Most heads thread onto the shaft. Grasp the head firmly and turn it counterclockwise by hand. If it’s stuck, use a rag to improve your grip and apply steady pressure. Do not use a wrench to turn the head itself, this can damage the plastic. Once hand-loose, continue unscrewing until the head separates completely from the shaft.
Step 5: Clean the Shaft
Before installing the new head, wipe the trimmer shaft clean with a dry rag. Remove any grass clippings, dirt, or debris. A clean shaft ensures the new head threads smoothly and seats properly.
Installing the New Weed Eater Head
Step 6: Thread the New Head Onto the Shaft
Align the new head with the trimmer shaft and begin threading it clockwise by hand. The head should turn smoothly; if you meet resistance, stop and check that the threads are aligned. Do not force a misaligned head, this damages the threading on both the shaft and head. Continue threading until the head is snug against the shaft shoulder. Do not over-tighten by hand; the retaining bolt will secure it further.
Step 7: Install the Retaining Bolt or Clip
If your trimmer uses a bolt, position it into the central hole on the underside of the head and thread it clockwise. Tighten it firmly with your wrench, but do not over-tighten, a firm hand-tight plus a quarter turn with a wrench is typically sufficient. Over-tightening can crack the head or strip the bolt threads. For snap clip systems, slide or snap the clip back into place until you hear or feel it lock.
Step 8: Verify Installation
Gently wiggle the head from side to side. It should not move or wobble. The head should sit flush against the trimmer body with no gaps. If you feel movement, the retaining bolt may need another quarter turn, or the head may be slightly misthreaded. Disconnect power again and re-tighten if needed.
Common Installation Mistakes and Troubleshooting
Issue: The Head Won’t Thread Onto the Shaft
This usually means the threads are misaligned or debris is on the shaft. Remove the head, inspect both the shaft threads and the head’s internal threads for dirt or damage. Wipe the shaft clean again. If threads look damaged (stripped, bent, or chipped), you may need a new shaft, which requires professional service.
Issue: The New Head Wobbles or Is Loose
The retaining bolt is not tight enough. Power down, locate the bolt, and tighten it another half turn with your wrench. Test again. If wobbling persists, remove the head, clean the shaft thoroughly, reinstall, and tighten the bolt again. Persistent looseness suggests a worn shaft or damaged head threads, which requires replacement.
Issue: The Retaining Bolt Won’t Tighten
The bolt may be stripped or the head threads may be damaged. Remove the bolt, inspect it for damage or bent threads, and replace it if necessary. If a new bolt still won’t tighten, the head or shaft has damaged threads and requires replacement.
Issue: The Head Turns Smoothly but Feels Stuck at One Point
A burr or debris is blocking smooth threading. Remove the head, inspect the shaft for a raised edge or dirt, and file or wipe it smooth. Reinstall and thread slowly to identify any resistance.
Testing Your Replacement Head
Once the new head is installed and the bolt is secure, reconnect power (plug in, reattach battery, or restart engine). Hold the trimmer steady and activate it briefly at low speed, listening and feeling for vibration. The head should spin smoothly without wobbling or unusual noise. If you detect vibration, power down immediately and check the bolt tightness and head alignment.
Before returning to full trimming, test on a small patch of grass or weeds. This confirms the head spins correctly and cuts as expected. If the head wobbles during use, stop, power down, and check the bolt again.
Buyer FAQs: How To Replace Weed Eater Head Solved
How often do you need to replace a weed eater head?
This depends on the head type and usage. Fixed spool heads typically last one full season of regular use before the string is exhausted, requiring head replacement. Bump feed and auto-feed heads can last several seasons if you refill the string spool, but the head mechanism itself may eventually wear out and require replacement after 2 to 3 years of frequent use. If you use your trimmer occasionally, a head may last longer.
Can you replace a weed eater head with a different brand?
Generally, no. Replacement heads are designed for specific trimmer models and brands. The shaft diameter, thread pitch, and bolt pattern vary between manufacturers. Installing a mismatched head can cause wobbling, poor cutting performance, or damage to the shaft. Always purchase a replacement head that matches your trimmer’s brand and model number.
Why is my new weed eater head wobbling after installation?
A wobbling head usually indicates the retaining bolt is not tight enough or the head is not fully threaded onto the shaft. Power down, check that the bolt is firmly tightened, and verify the head sits flush against the trimmer body. If wobbling continues after re-tightening, remove the head and inspect the shaft and head threads for damage or debris.
Do you need special tools to replace a weed eater head?
No. Most head replacements require only a basic adjustable wrench or socket set in common sizes (8mm, 10mm, or 12mm). Some trimmers may need a flathead screwdriver for a clip-style retaining mechanism. Specialty tools are rarely necessary; if your trimmer requires an uncommon tool, check the manual or contact the manufacturer.









