Direct Answer: How to Restring a Weed Eater
To restring a weed eater, first disconnect the spark plug or remove the battery for safety. Remove the trimmer head and take out the empty spool. For bump-feed and auto-feed heads, cut 10–25 feet of the correct-diameter line, find the directional arrows on the spool, and wind the line tightly in the direction shown. Thread the ends through the eyelets, reassemble the head, and test. For fixed-line heads, simply cut the proper gauge line to length and insert it into the slots. Always check your owner’s manual for the exact line diameter (e.g., 0.065″, 0.080″, or 0.095″).
Understanding the Task: What Does ‘Restringing’ Involve?
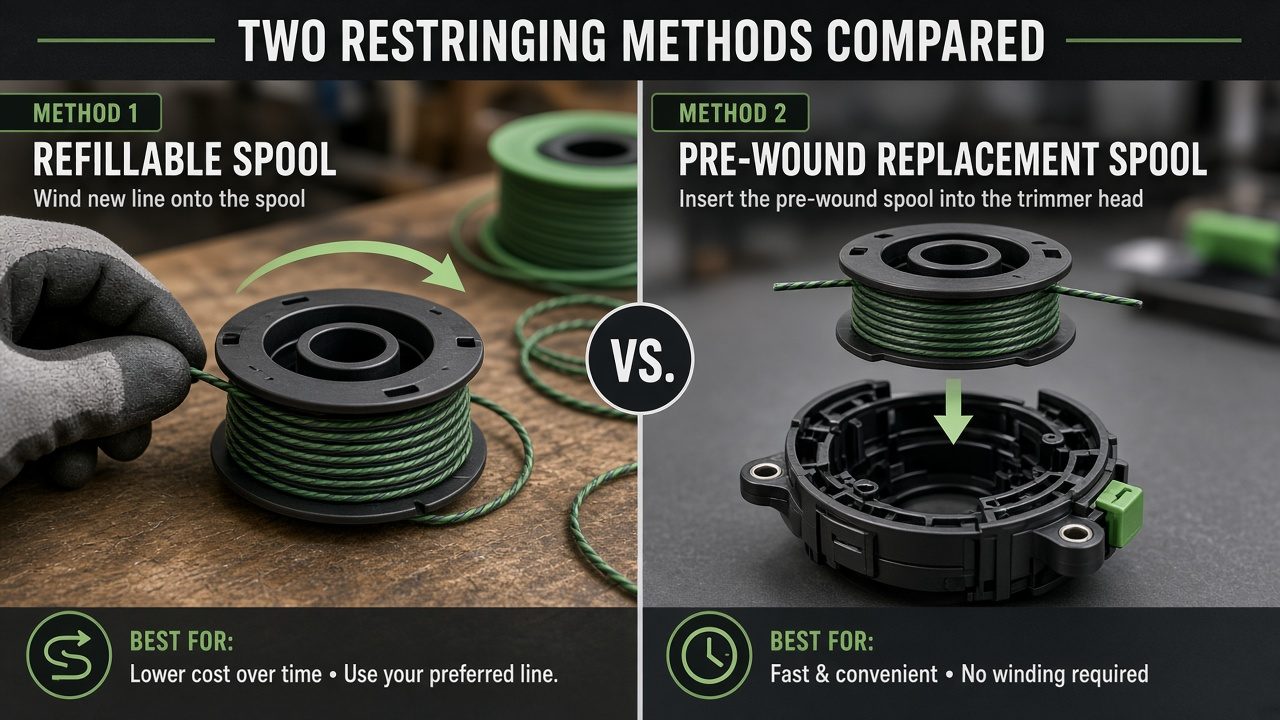
Before you begin, it’s important to understand that “restringing” can mean two different things. The first is winding fresh line onto a refillable spool that you keep in the trimmer head. The second is installing a pre-wound replacement spool that comes ready to use from the manufacturer. These are very different tasks. Pre-wound spools simply drop into the head and require no winding, while refillable spools demand careful attention to direction and tension.
Another key factor is line diameter. Using the wrong gauge is one of the most common mistakes. If the line is too thick, it won’t feed properly and can jam the head. If it’s too thin, it will break frequently and cut poorly. The correct diameter is model-specific and is always listed in your owner’s manual. Common sizes include 0.065″, 0.080″, and 0.095″. Never guess—check the manual or the old spool’s label before buying replacement line.
Universal First Steps: Safety and Preparation
Regardless of your trimmer’s head type, these preparatory steps apply to every job.
Safety Precautions
- Disconnect power: Remove the spark plug wire on gas models, or take out the battery on cordless units. This prevents accidental starting.
- Wear gloves: Trimmer line can be sharp, and the head may have debris or grass packed around it.
- Work on a clean surface: A flat workbench or driveway makes it easier to see small parts and prevents losing springs or washers.
Removing the Trimmer Head or Spool
The removal method depends on your model. Most modern trimmers have a tap-and-lock or twist-lock system:
- Twist-lock heads: Press the two tabs on the side of the head and twist the cap counterclockwise to release it. The spool will lift out.
- Center-bolt heads: Insert a screwdriver or hex key into the hole on the side of the head to lock the shaft, then turn the center bolt counterclockwise with a wrench.
- Push-tab heads: Push the small tabs inward and pull the cap straight off. The spool is usually visible underneath.
Once the head is open, remove any remaining line and clean out grass clippings or debris with a brush. Inspect the spool for cracks or wear; if damaged, replace it rather than reusing it.
How to Restring a Bump-Feed Head
The bump-feed head is the most common type. You tap the head on the ground while running to release more line. Here’s how to restring it correctly.
Step 1: Measure and Cut the Line
Cut a single length of line between 10 and 25 feet, depending on your spool’s capacity. Most standard spools hold roughly 20 feet. If you’re unsure, start with 15 feet—it’s easier to wind a shorter length than to untangle an overfilled spool. Use sharp scissors or a knife for a clean cut.
Step 2: Find the Directional Arrows
Look at the top or bottom of the spool. You’ll see arrows indicating the winding direction. This is critical: winding the wrong way is the #1 cause of line that won’t feed. The arrows point the direction the line must wrap so that it exits the eyelets correctly when the head spins.
Step 3: Wind the Line
Insert the middle of the line into the small notch or hole in the center of the spool. Hold the two ends together and begin winding in the direction of the arrows. Keep the line tight and even, laying each wrap neatly next to the previous one. Avoid crossing or overlapping the line, as this causes tangles and jams. Leave about 6 inches of line unwound at the end of each side.
Step 4: Thread the Eyelets
Once the spool is wound, locate the two eyelets (string exit holes) on the spool housing. Insert each free end of the line through its corresponding eyelet, pulling until the line is snug against the spool. If your head has a single eyelet, feed both ends through the same hole.
Step 5: Reassemble and Test
Place the spool back into the head, aligning any tabs or grooves. Snap the cap back on, ensuring the line ends protrude from the eyelets. Reconnect the battery or spark plug, then start the trimmer. Give the head a few seconds to spin; the line should extend to cutting length automatically. Tap the head on the ground to confirm the bump-feed mechanism releases line properly.
How to Restring an Auto-Feed Head
Auto-feed heads release line automatically without tapping. The loading process is similar to a bump-feed head, but there are key differences.
How the Loading Process Differs
With an auto-feed head, you still wind line onto a spool, but the spool often has a single line instead of two ends. The line is wound in one continuous direction, and a centrifugal clutch mechanism advances it as the trimmer runs.
Step-by-Step for Auto-Feed
- Remove the head using the same methods described above.
- Check for a pre-wound spool: Many auto-feed models come with a pre-wound spool that you simply drop in. If so, skip winding entirely.
- If refillable: Cut 15–20 feet of line. Insert one end into the anchor hole on the spool, then wind in the direction shown by the arrows. Keep tension firm and wraps even.
- Thread the line through the single eyelet on the head, leaving 4–6 inches exposed.
- Reassemble and test. The line should advance automatically when you start the engine; if it doesn’t, the spool may be wound in the wrong direction.
The most common mistake with auto-feed heads is overfilling the spool. If the line is packed too tightly, the centrifugal mechanism can’t release it. Leave a small gap at the end of the winding.
How to Restring a Fixed-Line Head
Fixed-line heads are the simplest design. They don’t use a spool at all—instead, you insert pre-cut lengths of line into slots on the head. These are common on lightweight electric trimmers.
How to Measure and Cut Line
Check your manual for the recommended line length, typically 6 to 10 inches per side. Cut two identical pieces of the correct diameter. Use a sharp blade for a clean, square cut; angled or frayed ends can cause poor feeding.
How the Line Is Secured
Each slot on the head has a small retaining notch or clip. Insert one end of the line into the slot and push it until it clicks or snaps into place. Repeat for the second slot on the opposite side. Ensure both lines are the same length so the head stays balanced during operation. To replace, simply pull the old line out and insert the new one. No tools are required.
Troubleshooting Common Problems After Restringing
Even with careful winding, issues can arise. Here are the most frequent problems and their solutions.
Why Won’t the New Line Feed Out When I Bump the Head?
- Wrong winding direction: The #1 cause. Rewind the spool following the arrows exactly.
- Line too long: Overfilled spools jam. Remove a few feet and rewind.
- Debris in the head: Grass or dirt can block the eyelets. Clean the head thoroughly.
- Broken spring or ratchet: If the mechanism is damaged, the head may need replacement.
What Causes the Line to Tangle or Weld Together on the Spool?
Tangling usually results from loose or uneven winding. If the line crosses itself, it will bind. “Welding” occurs when the line melts together from friction—this happens when the head is run at high speed with the line packed too tightly. Rewind carefully, keep tension firm, and avoid overfilling. Also, ensure you’re using the correct line diameter; oversized line generates excess heat.
Why Does the New Line Break So Easily?
- Wrong diameter: Too-thin line snaps under load. Verify the gauge.
- Line is old or dry: Nylon line degrades over time. Use fresh line.
- Hitting hard objects: Striking concrete, rocks, or fences will break any line. Keep the trimmer away from hard surfaces.
- Worn eyelets: Sharp edges on the eyelets can cut the line. Inspect and smooth any burrs.
Frequently Asked Questions
How much line do I need to restring a weed eater?
Most standard bump-feed and auto-feed spools hold between 10 and 25 feet of line. A typical 20-foot length is sufficient for most models. Check your spool’s capacity in the owner’s manual; overfilling causes jams. For fixed-line heads, you only need two short pieces of 6–10 inches each.
Do I need to wind the line in a specific direction?
Yes. The spool has directional arrows that indicate the correct winding direction. Winding the wrong way is the most common cause of line that won’t feed. Always follow the arrows exactly and keep the line tight and even.
Can I use any brand of trimmer line?
Yes, trimmer line is largely interchangeable across brands, provided you use the correct diameter for your model. The diameter is specified in your owner’s manual. Using a different brand of the same gauge is fine. However, always match the recommended size—too thick or too thin will cause problems.
How often should I restring my weed eater?
It depends on usage and what you’re cutting. Trimming against hard surfaces like concrete or brick wears line quickly. On average, you may need to restring every few uses for heavy jobs, or less frequently for light grass trimming. The line should be replaced when it becomes shorter than about 4 inches, as it cuts less efficiently.