

Quick Answer: How to Sharpen a Blade with a File
Secure the blade in a vise or against a stable surface, select a mill bastard file matched to your blade type, and push the file across the edge in smooth forward strokes from heel to tip at the blade’s existing bevel angle — typically 20–30° for knives and ~45° for axes. Repeat until a burr forms on the opposite side, flip the blade and remove the burr with light strokes, then test sharpness on paper or your thumbnail. Filing is the field-ready alternative to a whetstone: no water, no bench, no electricity required.

Pros
- Large-size design named in product title
- Sharpening and balancing functions listed
- Listed as a new upgraded version

Pros
- Adjustable 15-to-45-degree range in title
- Sharpening and balancing functions listed

Pros
- Sharpener and balancer functions in title
- 15-to-45-degree adjustable setting listed
- Built for lawn mower blade maintenance
Pros
- Includes replacement gaskets and a 98079-55846 spark plug
- Matches Honda HRR216 and HRS216 lawn mower models
- Designed around the 16100-Z8B-901 carburetor specification
Cons
- Restricted to select Honda GCV160 mower applications
- Installation requires basic mechanical tools and skills
What Type of File Do You Need to Sharpen a Blade?
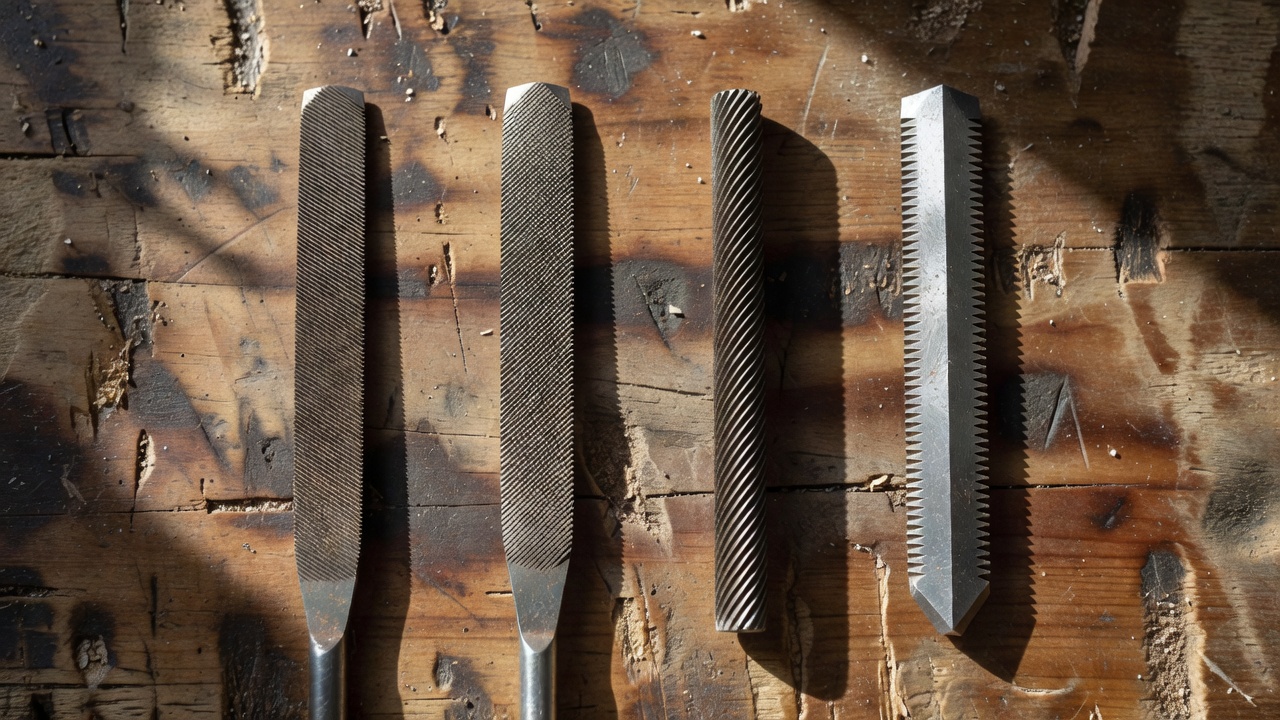
File selection is the most common beginner failure point. The wrong file either removes metal too aggressively, leaves a ragged edge, or makes no progress at all on a hardened blade. Match file type and coarseness to the blade’s profile and current condition before picking up a tool.
File Types by Blade Profile
- Mill bastard file (flat, single-cut): The standard choice for general blade sharpening — knives, axes, machetes, and garden tools. The single-cut tooth pattern removes metal in a controlled, consistent direction and leaves a cleaner edge than a double-cut file. A 10–12 in mill bastard file handles most tasks.
- Flat double-cut file: Faster metal removal on severely damaged or nicked edges. Coarser scratch pattern means a follow-up with a second-cut or smooth file is required to refine the edge before finishing.
- Round (rattail) file: Used on concave edges — serrated blades, curved gut-hook knives, or the inside radius of pruning shears. Not suitable for straight or convex edges.
- Triangular (three-square) file: Fits into tight V-grooves on saw blades and some serrated edges. Rarely the first choice for standard blade sharpening.
File Coarseness: Matching Cut to Condition
| Condition | Recommended Cut | Notes |
|---|---|---|
| Nicked, chipped, or heavily dulled edge | Bastard-cut (coarse) | Removes metal fast to re-establish the bevel; follow with second-cut |
| Routine maintenance — dull but undamaged | Second-cut (medium) | Good balance of speed and edge refinement for regular upkeep |
| Final edge refinement or touch-up | Smooth-cut (fine) | Refines and polishes the edge after coarser work; optional finishing step |
Can any metal file sharpen a blade? Technically, any file harder than the blade steel will abrade it — but a worn, loaded, or low-quality file produces an inconsistent edge and slips under pressure. Use a clean file with sharp teeth. If the file skates across hardened steel without biting, the blade’s Rockwell hardness exceeds the file’s cutting capacity; a diamond file or professional grinding is required instead. For troubleshooting and reliability insights, consult our in-depth jbl partybox club 120 vs sony srs xv500 report.
How to Sharpen a Knife with a File
This is the highest-volume use case and the clearest application of file sharpening technique. The goal is a repeatable, consistent stroke that re-establishes the original bevel and raises a burr — a thin wire of folded metal — as confirmation that you have worked the edge fully. For troubleshooting and reliability insights, consult our in-depth jbl partybox club 120 vs sony srs xv500 report.
What You Need
- 10–12 in mill bastard file (single-cut)
- Vise, bench clamp, or damp cloth to stabilize the blade
- Work gloves
- File card brush for cleaning between sessions
- Light machine oil or honing oil (finishing step)
Step-by-Step: Knife Sharpening with a File
- Secure the blade. Clamp the knife in a vise with the edge facing up, or lay it flat on a workbench with the spine braced against a stop. The blade must not move during strokes — any flex or shift breaks angle consistency and rounds the edge.
- Identify the existing bevel angle. Sight along the edge to locate the bevel — the angled flat ground toward the cutting edge. For most Western kitchen knives and general-purpose knives, this is 20–25°; for thinner Japanese-style blades, closer to 15–17°. A simple guide: at 20°, the spine sits roughly one thumb-width above the file when the file is laid on the bevel. Match this angle on every stroke — angle consistency matters more than stroke count.
- Position the file at the heel. Place the file’s toe (tip) at the knife’s heel (the widest point near the handle). Grip the handle with your dominant hand and lay two fingers of the opposite hand lightly on the file’s face to guide pressure.
- Execute the push stroke. Push the file forward — toward the knife’s tip — in a smooth, arcing motion that follows the blade’s curve, while simultaneously drawing the file toward the edge. One stroke should cover the full length of the blade from heel to tip. Apply moderate, even pressure on the forward stroke only; lift the file off the edge on the return. Filing in both directions (back-and-forth) produces a duller, more ragged edge than consistent push strokes.
- Maintain the angle every stroke. This is the single most critical variable. Even a 5° shift per stroke accumulates quickly and rounds the shoulder of the bevel, producing a blade that feels sharp but loses its edge within minutes of use. If you struggle with freehand angle holding, use a folded matchbook or a commercial angle guide as a reference.
- Check for a burr. After 6–10 strokes on one side, run your thumb pad lightly across — not along — the opposite face of the edge. A burr feels like a faint, rough wire or lip. Its presence confirms the file has worked all the way to the apex of the edge. No burr after 15+ strokes means the angle is off or the file is worn.
- Flip and deburr. Turn the knife over and repeat the same push-stroke sequence on the second side, using the same angle, until a burr forms on the first side. Alternate sides with decreasing stroke counts — 6 strokes, then 4, then 2, then 1 per side — to work the burr back and forth until it detaches.
- Test the edge. Paper test: slice a sheet of printer paper from the top edge — a sharp knife cuts cleanly with no tearing. Thumbnail test: rest the edge lightly on your thumbnail at 45°; a sharp edge catches without sliding. A dull edge glides across the nail. If the edge fails the test, return to step 3 with lighter pressure for refinement strokes.
- Optional finishing pass. A few light strokes with a smooth-cut file or a leather strop removes the last micro-burr and aligns the edge apex. Apply a thin film of oil to the blade after sharpening to inhibit rust.
How to Sharpen an Axe or Hatchet with a File
Axe geometry differs from a knife in two important ways: the bevel angle is wider (~45°) and the edge is typically convex rather than flat-ground. These differences change the file type, stroke motion, and angle reference. Readers comparing setup options can review our technical analysis on z890 vs x870e motherboard.
Key Differences from Knife Sharpening
- Angle: Axes and hatchets are sharpened at approximately 40–45° per side — a much more obtuse angle that supports the impact forces of chopping. Filing at a knife angle (20–25°) produces an edge too thin for axe use that will chip or roll on first contact with wood.
- Edge geometry: Most quality axes have a convex (appleseed) edge — the bevel curves outward rather than meeting at a flat angle. Maintain this convex profile by applying slightly more pressure at the shoulder of the bevel and rolling the file subtly through the stroke rather than holding a fixed flat angle.
- File choice: A 10–12 in mill bastard file or double-cut bastard for heavily damaged edges. The wider, heavier blade of an axe requires a larger file to cover the bevel in fewer strokes.
Step-by-Step: Axe Sharpening with a File
- Secure the axe head. Clamp the handle horizontally in a vise with the bit (cutting edge) accessible, or sit with the axe head resting across your thigh on a leather apron, edge facing away from your body. Never hold the axe head freehand while filing.
- File the bevel. Place the file flat on the existing bevel and push from the cheek (flat face) down toward the edge in smooth, arc-following strokes. Work from one corner of the bit to the other in sections if the edge is wider than the file’s length.
- Check for burr and flip. Same burr-check method as a knife — thumb pad across the opposite face. Alternate sides until the burr works free.
- Stroke count expectation: A well-maintained axe needs 10–20 strokes per side. A neglected, heavily dulled axe may need 40–60 strokes before a burr appears — that is normal and not a sign of technique error.
- Finish with a whetstone or honing puck if available, to remove the final burr and polish the apex. Not mandatory in the field, but it extends edge life.
How to Sharpen a Lawn Mower Blade with a File
Lawn mower blade sharpening involves the same basic filing technique but carries unique safety requirements and a post-sharpening balance check that the knife and axe sections do not require.
Safety First: Disconnect the Spark Plug
Before touching the blade, disconnect the spark plug wire and tuck it away from the plug terminal. This prevents accidental engine start while your hands are near the blade — a non-negotiable step regardless of how quickly you plan to work. Readers comparing setup options can review our technical analysis on z890 vs x870e motherboard.
Step-by-Step: Lawn Mower Blade Sharpening
- Remove the blade. Tip the mower onto its side (carburetor side up to prevent fuel/oil contamination), block the blade with a piece of wood, and remove the center bolt with a socket wrench. Mark the blade’s downward-facing side with chalk or paint so it reinstalls in the correct orientation.
- Clamp in a vise. Secure the blade horizontally in a bench vise with one cutting edge accessible. Do not hold the blade by hand while filing.
- Identify and match the original bevel. Mower blades are typically factory-ground at 30–45°. Sight the existing bevel and match it with your file angle — do not try to re-grind the blade at a different angle, as this alters cutting performance and balance.
- File with a mill bastard. Push the file along the bevel from the inner edge toward the tip in smooth strokes, following the existing angle. Mower blades are softer steel than knives, so material removal is faster — use lighter pressure and check progress every 5–6 strokes.
- Repeat on both ends. A standard mower blade has two cutting edges (one on each end). Apply the same number of strokes and the same pressure to both sides to maintain balance.
- Check blade balance. An unbalanced blade causes the mower deck to vibrate, accelerating wear on the crankshaft bearings and spindle. Hang the blade horizontally on a nail through the center hole: if one end dips, that end is heavier — remove more material from its cutting edge until the blade hangs level. Blade balancers (cone-shaped tools that replace the nail) are inexpensive and give a more precise reading.
- Reinstall and reconnect. Reattach the blade with the marked side facing down, torque the bolt to manufacturer spec, and reconnect the spark plug wire.
Common Mistakes to Avoid When Sharpening a Blade with a File
Inconsistent Angle Across Strokes
The single most common cause of a blade that feels sharp off the file but dulls immediately in use. Each degree of angle variation per stroke creates a micro-convex shoulder that deflects under cutting pressure instead of biting into material. If freehand angle holding is difficult, mark the bevel with a marker before filing — the file removes the ink only where it contacts the bevel, revealing exactly where the angle is high or low.
Filing in Both Directions
Back-and-forth strokes (draw stroke on the return) fold the metal at the edge apex back and forth, creating a weak, jagged wire edge that feels sharp briefly but collapses quickly. Push strokes only. Lift the file on the return. For complementary field maintenance guidelines, examine our breakdown of marshall stanmore iii vs harman kardon onyx studio 8.
Skipping the Deburring Step
A burr that remains attached to the edge feels sharp on the thumb test but folds over or breaks off at first contact with the material being cut, leaving a dull edge. Complete the alternating deburr sequence — reducing stroke count per side — until the burr detaches cleanly.
Using a Worn or Loaded File
A file loaded with metal filings (called pinning) skips and glazes across the blade surface without cutting. It also scratches rather than abrading, leaving a ragged edge. Clean the file with a file card brush every 10–15 strokes during heavy sharpening work. A file that skips even after cleaning is worn and needs replacement — a worn file is not just ineffective, it is a safety hazard because it is more likely to slip under pressure. To evaluate matched hardware tolerances, consult our detailed overview of dyson v8 cyclone vs bissell featherweight stick.
Over-Filing a Thin or Hollow-Ground Blade
Thin kitchen knives and hollow-ground blades have very little metal at the apex. Aggressive filing with a bastard-cut file can remove the shoulder of the bevel entirely, collapsing the edge geometry. Use a second-cut or smooth file on thin blades and reduce stroke pressure proportionally.
No Blade Stabilization
Holding a blade in the air or against an unstable surface introduces movement on every stroke, breaking angle consistency and increasing the risk of the file or blade slipping into the hand. Always use a vise, clamp, or a fixed surface stop. When planning workspace deployment, consider the engineering criteria outlined in our bissell crosswave hydrosteam vs shark stainforce guide.
How to Maintain Your File and Blade After Sharpening
Clean the File
Metal filings pack into the file’s teeth after sharpening — a condition called pinning. Use a file card brush (a flat brush with fine wire bristles on one face and stiff nylon on the other) to scrub across the file’s teeth in the direction of the cut. The wire bristles dislodge packed filings; the nylon face removes finer debris. Do this after every sharpening session and every 10–15 strokes during heavy work. Never tap a file against a hard surface to clean it — this chips the teeth.
A well-maintained mill bastard file sharpened on blades of moderate hardness (Rockwell C50–58) typically lasts through 20–30 sharpening sessions before the teeth wear smooth. When a file no longer bites into the blade surface within the first two strokes, replace it.
Oil the Blade After Sharpening
Filing removes the blade’s surface finish and exposes bare steel that oxidizes quickly, especially at the thin apex where there is least material. Apply a thin film of mineral oil, food-safe camellia oil (on kitchen knives), or light machine oil (on tools) to the entire blade surface immediately after sharpening. Wipe away excess — a film, not a coat.
Store Blades to Protect the Edge
- Knives: Magnetic wall strips, individual blade guards, or a wooden knife block. Drawer storage without guards lets blades contact each other and dulls the edge within weeks.
- Axes and hatchets: Leather or Kydex edge guards over the bit during storage and transport. Hanging storage is preferred over blade-down in a box.
- Lawn mower blades: Hang on a wall bracket or store flat. Ensure they are dry before storage to prevent rust.
Store the File Separately
Files stored loose in a toolbox contact other metal tools and chip their teeth. Store files individually in sleeves, hang them on a pegboard, or use a dedicated file rack. Never store a file touching another file.
Frequently Asked Questions About How To Sharpen A Blade With A File
What angle should I hold the file when sharpening a knife?
Match the existing bevel angle — typically 20–25° for most Western knives and general-purpose blades, and 15–17° for thinner Asian-style knives. A practical reference: at 20°, the spine of the knife sits roughly the height of one stacked thumb above the file surface when the file rests flat on the bevel. Matching the existing angle is more important than hitting a precise number — re-grinding a blade to a new angle with a file takes significantly more strokes and risks altering the blade’s geometry.
Why is my blade still dull after filing it?
Three causes account for most failures: (1) inconsistent angle — each stroke lands at a different pitch, rounding the bevel shoulder rather than sharpening the apex; (2) no burr formed — filing stopped before reaching the apex, meaning the actual edge was never touched; (3) worn or loaded file — the file skated across the surface without abrading. Restart with a clean file, mark the bevel with a marker to verify angle contact, and continue until a burr is confirmed by feel on the opposite face.
Can you ruin a blade by filing it incorrectly?
Yes, in two main ways: over-filing removes too much material from the apex and collapses the edge geometry, requiring a full re-grind to correct; and filing at the wrong angle consistently creates a secondary bevel that makes the edge look sharp under magnification but behave dull in use. Both are correctable with more work, but prevention — consistent angle, light pressure, burr-check discipline — is far less labor-intensive than remediation.
Do I need to disconnect the spark plug before sharpening a lawn mower blade?
Yes — always. Disconnecting the spark plug wire before removing or touching the mower blade prevents any possibility of the engine firing while your hands are near the blade. Even with the ignition off, vibration or accidental engagement of a blade-brake system can move the blade. This step takes five seconds and eliminates a serious injury risk. It is the standard recommendation from mower manufacturers and cooperative extension safety guidelines.
For more detailed testing breakdowns and top recommendations, check our in-depth guide to cordless stick vacuum buyer guide.
For more hands-on benchmarks and buying recommendations, consult our guides on robotic pool cleaner comparison guide, as well as deep carpet cleaning machine reviews, as well as automated robotic vacuum cleaning systems, as well as all-in-one vacuum steam mop combo guide.
Mechanical safety standards, operational tolerances, and protective gear guidelines align with benchmark specifications established by the American National Standards Institute (ANSI).









