

Direct Answer: How to Sharpen Blades
Blade sharpening involves using abrasive surfaces to restore a sharp edge. The most common methods are whetstones (manual, versatile, best for learning), honing steels (realign edges between sharpenings, not true sharpening), and electric sharpeners (fast, consistent, less skill required). Kitchen knives typically use 15 to 20° angles, while utility and hunting blades use 20 to 25°. Start with medium grit (1000 to 3000) for dull blades, finish with fine grit (6000+) for polish. Success depends on maintaining consistent angle, using proper technique, and matching the method to your blade type and skill level.

Pros
- Diamond-honed tungsten carbide construction ensures exceptional hardness and rapid sharpening results
- Reversible blades significantly extend overall lifespan of the sharpener
- Full finger guard and ambidextrous ergonomic handle prioritize user safety and comfort
- Broad compatibility covers the most common outdoor and garden cutting tools
- Dishwasher-safe and easy-clean design supports hassle-free long-term ownership
Cons
- Manual hand-operated design requires some physical effort unlike powered electric sharpeners
- Optimized mainly for single-edged blades and may not suit every double-edged or specialty knife
- Carbide inserts will eventually wear and need separate replacement after many years of heavy use
The AccuSharp Garden Tool Sharpener is a compact handheld unit built around diamond-honed tungsten carbide blades. Its sturdy yet lightweight construction and full-length protective guard create an immediate sense of reliability and safety. The ergonomic handle fits securely in either hand, giving both right and left-handed users confident control from the first stroke.
Performance focuses on real-world garden maintenance. A few firm passes restore lawnmower blades, pruners, limb loppers, hoes, shovels and scythes to razor-sharp condition. The double-beveled carbide edges cut metal efficiently, and because the blades reverse, most users enjoy 5 to 10 years of service before replacement. Cleaning is simple with soap and water or a dishwasher cycle, keeping the tool ready for frequent outdoor use.
Drawbacks remain modest yet worth noting. The sharpener works best on single-edged tools and may require practice on unusually thick or shaped blades. Being fully manual, it demands a bit more effort than electric alternatives, and the carbide inserts, while long-lasting, are consumable over time.
For homeowners and gardeners who want an affordable, safe and effective way to keep cutting tools sharp without professional services, the AccuSharp Garden Tool Sharpener delivers clear value. Its combination of durability, versatility and protective design makes it a practical addition to any tool shed.

Pros
- Accurate balancing reduces blade wobble and engine wear effectively
- Works with nearly all standard lawnmower blade shapes for true universality
- Durable zinc die-cast construction ensures long-term rust resistance
- Intuitive design makes it easy for beginners and DIY users to operate
- Supports better cutting efficiency after blade sharpening sessions
Cons
- Lacks advanced precision indicators so users must rely on visual leveling judgment
- May not fit highly specialized or non-standard irregular blade designs perfectly
- Basic single-tool package includes no carrying case or extra accessories
The SporGain Lawn Mower Blade Balancer is a compact universal tool built from premium zinc die-cast metal for balancing lawnmower blades after sharpening. Its solid rust-resistant construction gives an immediate impression of durability suited for garage storage or occasional outdoor exposure, making it a practical accessory for standard lawn care routines.
In performance, the tool excels at simple balance checks by letting users place nearly any round, square, or common blade shape on it to detect imbalances. This process helps reduce wobble, vibration, and engine strain while verifying bent blades, leading to smoother cuts and longer mower life based on its core design features. The intuitive layout supports quick adjustments without specialized skills.
Drawbacks include the absence of built-in precision markers, which means results depend on careful visual assessment, and potential fit issues with highly custom blades outside standard shapes. It also comes as a basic 1pk unit without extras like storage options.
Overall, this SporGain balancer delivers strong value for DIY homeowners and lawn maintenance enthusiasts who regularly sharpen blades and want an affordable, reliable way to maintain cutting performance. It is ideal for those seeking universal compatibility and lasting metal quality without needing professional-grade equipment.

Pros
- Heavy-duty zinc alloy build for long-term use.
- Universal fit for many common blade shapes.
- Simple design is easy to use after sharpening.
- Compact size is convenient for storage and transport.
Cons
- It is a single-purpose tool and does not sharpen blades.
- Compatibility is broad, but the product data does not list exact mower model support.
- No instructions or extra accessories are mentioned in the manufacturer listing.
Overview and design. The Silcpall Lawn Mower Blade Balancer is a compact universal tool made from zinc alloy. Its round, simple shape is designed to hold mower blades at the center for quick balance checks after sharpening.
Performance and key features. In use, the balancer is meant to help you spot uneven blades before they cause vibration, poor cut quality, or extra wear on the mower. The universal design is intended to work with most common blade shapes, including round and square styles.
Drawbacks and considerations. This is a single-purpose accessory, so it will not sharpen blades or provide model-specific mounting guidance. Compatibility is broad, but users should still confirm their blade sits securely on the center slot before relying on it.
Verdict. For homeowners, DIY users, and anyone who sharpens mower blades at home, this is a practical maintenance tool that can make blade balancing faster and more consistent. It is best suited to buyers who want a simple, durable balancer rather than a multi-function kit.
Understanding Blade Sharpening vs. Honing
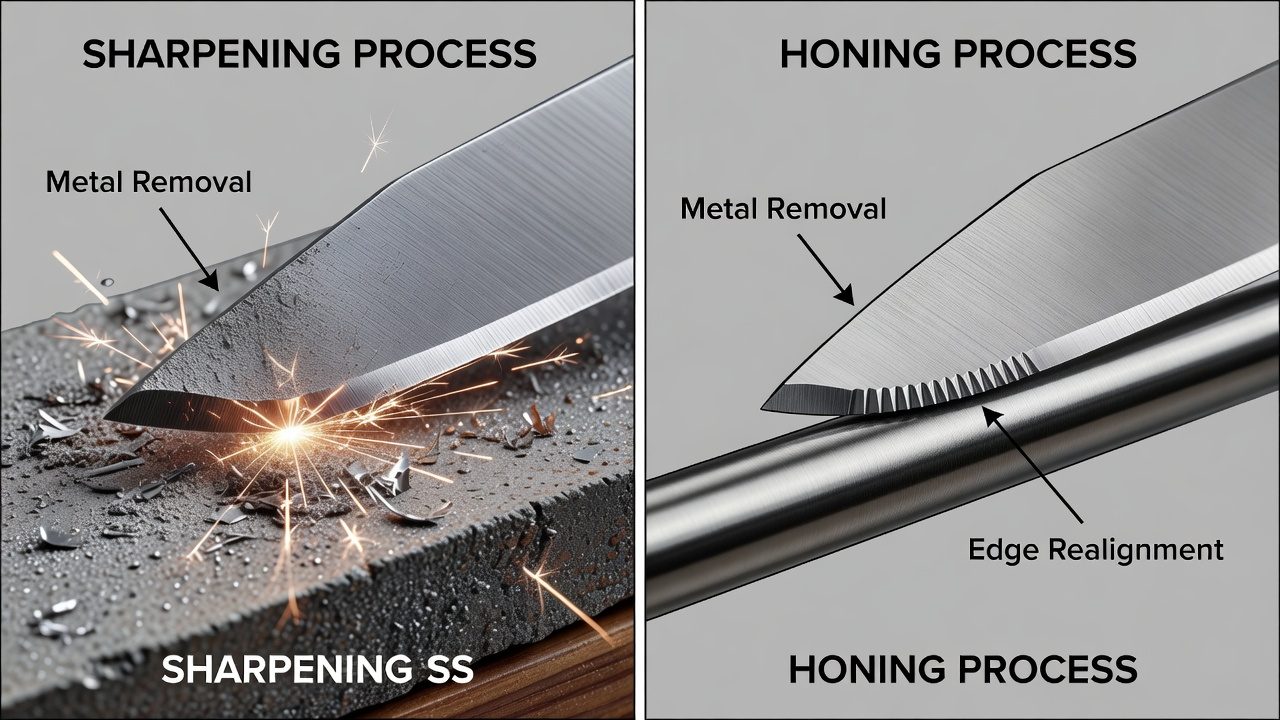
The terms “sharpening” and “honing” are often used interchangeably, but they serve different purposes. Sharpening removes metal from the blade to create a new, sharp edge. It uses abrasive surfaces and is necessary when a blade becomes dull from regular use. Honing realigns the microscopic teeth along the blade’s edge without removing significant metal. A honing steel straightens these teeth back into alignment, extending the time between sharpenings.
Most home cooks and knife users should hone their kitchen knives weekly or every few uses, and sharpen them every 2 to 4 months, depending on usage. Professional chefs may sharpen monthly. Hunting knives and utility blades sharpen less frequently if used occasionally, but may need attention every few months with regular use.
Sharpening Methods: Whetstones, Honing Steels & Electric Sharpeners
Whetstones (Manual Sharpening)
Whetstones are the gold standard for blade sharpening and offer the most control. They consist of an abrasive stone bonded to a base, and come in two main types:
- Water stones: Softer and cut faster, requiring frequent flattening. They work well for beginners and produce excellent results.
- Oil stones: Harder and longer-lasting, but slower cutting. They require oil for lubrication and less frequent maintenance.
Advantages: Low cost, precise control, versatile for all blade types, no electricity required, and the learning curve develops proper technique. Limitations: Require practice to maintain consistent angle, take longer than electric sharpeners, and require setup (soaking water stones, flattening).
Honing Steels
A honing steel is a rod (typically ceramic or steel) used to straighten the microscopic edge of a blade. It does not sharpen, it maintains sharpness between sharpenings. Use a honing steel weekly on regularly used knives by drawing the blade spine-down along the steel at the same angle you would use for sharpening.
When to use: Between sharpenings to extend blade life. If your knife is dull despite honing, it needs true sharpening on a whetstone or electric sharpener.
Electric Sharpeners
Electric sharpeners use rotating wheels or belts to sharpen blades quickly and consistently. Most have preset angles (typically 15 to 20°), removing guesswork for beginners.
Advantages: Fast, consistent results, minimal skill required, and effective for kitchen knives. Limitations: May remove more metal than necessary, less versatile for specialty blades (serrated, hunting knives), can overheat delicate blades, and offers less control over the sharpening process. To compare alternative configurations, check our hands-on review of marshall stanmore iii vs harman kardon onyx studio 8.
Stropping
Stropping is the final maintenance step using a leather strop to polish and align the blade edge. It removes microscopic particles left from sharpening and extends edge life. Stropping is often paired with honing steels for routine maintenance but is not a substitute for true sharpening.
How to Sharpen a Kitchen Knife on a Whetstone
Whetstone sharpening is the most accessible method for home users. Follow these steps: Users looking for related component recommendations can explore our dyson v8 cyclone vs bissell featherweight stick breakdown.
Setup
- Soak your water stone in water for 10 to 15 minutes (oil stones do not require soaking).
- Place the stone on a stable, non-slip surface or use a stone holder.
- Gather your knife and a towel to dry the blade.
Technique
- Find your angle: Hold the knife so the spine and edge form a 15 to 20° angle with the stone surface. Rest the knife’s spine and edge on the stone lightly.
- Use an X-stroke: Draw the knife forward and toward you along the stone, maintaining the angle. Move from the heel to the tip. Lift the knife, reset, and repeat. Perform 10 to 15 strokes per side.
- Create a burr: Continue until a “burr” (a small metal ridge) forms on the opposite side of the blade. This signals you’ve reached the blade’s core.
- Switch sides: Flip the knife and sharpen the other side with the same technique, matching the number of strokes, until a burr forms on the original side.
- Finish: Make 2 to 3 final passes on each side with light pressure to remove the burr.
How to Know When Your Blade Is Sharp
Test sharpness by performing the “paper test”: Try to slice through paper cleanly. A sharp blade cuts without crushing or tearing. Alternatively, test on a tomato, a sharp knife slices through skin easily, while a dull knife crushes the flesh.
Sharpening Different Blade Types
Kitchen Knives
Standard kitchen knives use 15, 20° angles. Most home sharpening works best with whetstones starting at 1000, 3000 grit for dull blades, progressing to 6000+ grit for finishing. Before finalizing equipment decisions, refer to our comprehensive bissell crosswave hydrosteam vs shark stainforce comparison.
Hunting and Utility Blades
Hunting knives and outdoor utility blades typically use 20 to 25° angles to improve durability and edge retention during rugged use. Sharpen with medium grit (1000 to 4000) and finish with fine grit (6000+) if desired, though hunters often stop at medium grit for a more durable edge.
Straight Razors
Straight razors require very low angles (8 to 12°) and fine-grit whetstones (8000+) or higher. Many straight razor users rely on stropping between sharpenings and seek professional sharpening annually, as improper technique can damage a valuable blade.
Serrated Blades
Serrated blades (bread knives, some steak knives) have individual teeth that must be sharpened separately. This requires a honing rod or ceramic rod that fits between the serrations. Many home users find professional sharpening more practical for serrated blades.
Saw Blades
Saw blades (hand saws, circular saw blades) require specialized sharpening equipment and are best handled by professionals. Improper sharpening can affect blade tension and alignment.
Scissors
Scissors are difficult to sharpen at home due to their symmetrical geometry and pivot point. Professional sharpening is recommended for quality scissors.
Blade Material Considerations
- Stainless steel: Most common, relatively easy to sharpen on whetstones or electric sharpeners.
- Carbon steel: Softer and sharper than stainless, sharpens easily but requires more frequent maintenance. More prone to rust.
- Ceramic blades: Extremely hard and hold sharp edges longer, but require ceramic or diamond sharpening surfaces. Difficult to sharpen at home, professional sharpening is recommended.
- Damascus steel: Layered steel requiring careful technique to avoid damaging the pattern. Best suited to professional sharpening.
Grit Levels Explained: Coarse, Medium & Fine
Grit refers to the size of abrasive particles in the stone. Lower numbers indicate larger particles (coarser), while higher numbers indicate smaller particles (finer).
| Grit Range | Classification | Best Use |
|---|---|---|
| 1000 to 3000 | Coarse to Medium | Very dull blades, repairs, reshaping edge |
| 4000 to 6000 | Medium to Fine | Regular sharpening, most home kitchen use |
| 8000 to 12000+ | Fine to Extra-Fine | Finishing polish, high-end or professional blades |
Grit progression: For best results, start with a coarser grit to quickly sharpen a dull blade, then progress to finer grits for a polished finish. For routine maintenance on already-sharp knives, skip directly to medium or fine grit.
For beginners: A single 1000 to 3000 grit stone works well for learning and general sharpening. As you develop skill, add a 6000+ grit stone for finishing.
Safety Considerations When Sharpening Blades
- Finger placement: Keep fingers behind and away from the blade edge. Never place fingers in front of the blade’s path.
- Secure the stone: Use a stone holder or damp towel to prevent slipping.
- Wet stones and slippery surfaces: Water stones and oil stones are slippery when wet. Work on a stable surface and dry your hands frequently.
- Blade control: Use steady, controlled strokes. Avoid sudden jerks or rapid movements that could cause slips.
- Dull blades are dangerous: A dull blade requires more pressure, increasing slip risk. If you feel the blade resisting, use a coarser grit or seek professional help.
- Test sharpness carefully: Test the edge on paper or vegetables, not on your skin or thumb.
- Store safely: Keep sharp blades in a knife block, on a magnetic strip, or in a sheath to prevent accidental cuts.
When to Seek Professional Blade Sharpening
Consider professional sharpening if:
- Your blade is extremely dull or damaged and you’re unsure whether home sharpening will restore it.
- You have specialty blades (serrated, ceramic, Damascus, or high-end knives) where mistakes are costly.
- Your blade requires a very specific angle or specialized sharpening (e.g., straight razors, hunting knives with unique geometries).
- You lack confidence in your sharpening technique and prefer consistent, reliable results.
- You want your blades professionally maintained regularly (every 6 to 12 months for high-end kitchen knives).
Cost and frequency: Professional sharpening typically costs $5-$15 per blade, depending on blade type and local services. Most users sharpen high-end or frequently used blades professionally every 6 to 12 months and maintain them at home with honing steels and stropping.
Frequently Asked Questions About How To Sharpen Blades
What is the difference between sharpening and honing?
Sharpening removes metal to create a new edge using abrasive surfaces (whetstones, electric sharpeners). Honing realigns the microscopic teeth of an existing edge using a honing steel, extending sharpness between sharpenings. Honing does not remove significant metal and is a maintenance step, not true sharpening.
What angle should I use when sharpening a kitchen knife?
Most kitchen knives use 15 to 20° angles. To find your angle, place the knife spine and edge on a whetstone so they form a V-shape. Start at 20° if unsure, it’s easier for beginners to maintain. Lower angles (15°) produce sharper edges but are more fragile. Higher angles (25°) create more durable edges.
How often should I sharpen versus hone my kitchen knives?
Hone weekly with a honing steel if your knife is used regularly. True sharpening is needed every 2 to 4 months for home cooks, depending on usage frequency and blade quality. Professional chefs sharpen monthly. If you notice your knife crushing tomatoes or requiring excessive pressure, it’s time to sharpen.
Can I sharpen all blade types on the same whetstone?
Yes, for most common blades (kitchen, hunting, utility knives). However, specialty blades like straight razors, ceramics, and very high-end knives benefit from professional sharpening or specialized stones. Serrated blades require a different technique with a honing rod sized to fit between serrations.
Related Maintenance and Operating Guides
To keep your equipment running at peak operating efficiency, explore our related technical walkthroughs and maintenance tutorials:
- Consult our detailed breakdown on cordless stick vacuum buyer guide.
- Consult our detailed breakdown on robotic pool cleaner comparison guide.
Technical Standards and Compliance
Mechanical safety standards, operational tolerances, and protective gear guidelines align with benchmark specifications established by the American National Standards Institute (ANSI).









