You can sharpen a mower blade at home without professional equipment or a shop visit. The process takes 30–45 minutes once you gather the right tools. Disconnect the spark plug wire first, safely tip or lift the mower, remove the blade bolt (often reverse-threaded), clamp the blade, and restore the cutting edge using a mill bastard file, drill-powered sharpener attachment, or angle grinder—each ranked by accessibility and control. The key is maintaining the existing 30-degree bevel angle, sharpening each wing equally, and balancing the blade on a nail or cone balancer before reinstalling. Torque the arbor bolt to your mower’s specification (typically 35–50 ft-lb for walk-behind models) and you’re done. Repeat every 20–25 hours of mowing time or at the start of each season.
What Does a Dull Mower Blade Actually Do to Your Lawn?
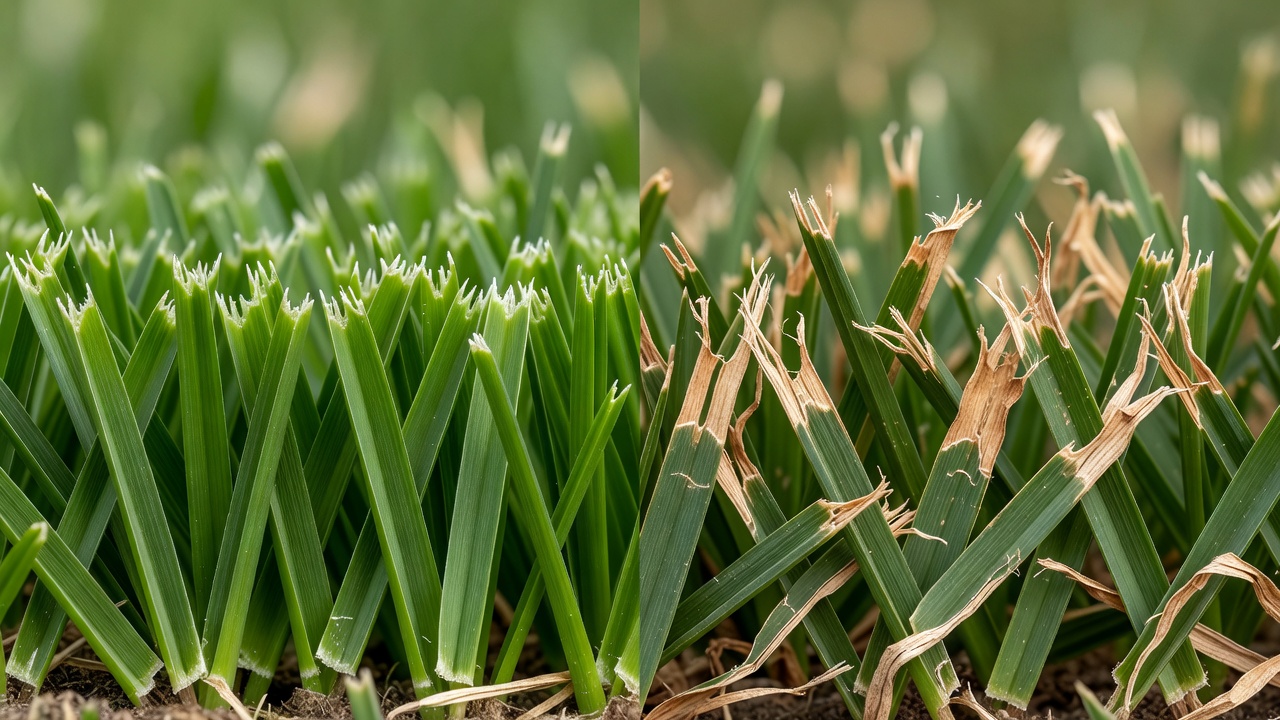
A dull blade tears rather than cuts grass, leaving ragged, brown-tipped leaf ends visible within days. Clean-cut grass heals quickly; torn tissue exposes the plant to fungal and bacterial infection, browning the entire blade and stressing the lawn. Dull blades also force your mower engine to work harder, consuming more fuel and increasing wear on the deck bearings and spindle. Over a full season, the cumulative stress on your turf—combined with visible cosmetic damage—is reason enough to keep a sharp blade.
Check your blade every few mowing sessions: stop the mower, disconnect the spark plug wire, and inspect the cutting edge. A sharp blade glints; a dull one reflects light diffusely or shows a visible flat band along the edge.
Rotary vs. Reel vs. Riding Mower Blades: Know What You’re Working With
This guide focuses on rotary mower blades, the spinning horizontal blades found on most residential push and walk-behind mowers. They are the easiest to sharpen at home and account for the vast majority of lawn equipment.
Reel mower blades (the helical or cylindrical blade assembly on manual and powered reel mowers) require a different method called “lapping”—a precision grinding process best left to a professional or mower dealer. Attempting to file a reel blade at home typically ruins the alignment.
Riding mower blades follow the same rotary sharpening steps as push mowers, but you’ll need a way to safely lift the deck (use jack stands or follow the owner’s manual for deck-lift procedures). Deck height adjustments on riding mowers vary widely, so consult your manual before starting.
Tools and Safety Gear You Need Before You Start
Essential PPE:
- Heavy work gloves (leather or nitrile-coated)
- Safety glasses or face shield
- Closed-toe shoes
Required tools (choose one sharpening method):
- Mill bastard file (10–12 inches) — lowest cost, slowest, most beginner-friendly
- Drill-powered blade sharpener attachment — mid-speed, guides the angle automatically, requires a cordless drill
- Angle grinder with a metal grinding wheel (4.5–5 inch) — fastest, highest risk of overheating or removing too much metal; requires experience
Additional tools:
- Vise or C-clamp to secure the blade
- Blade balancer (a nail driven into a wood block, or a cone balancer)
- Torque wrench (adjustable 0–50 ft-lb range for walk-behind mowers)
- Flat-head screwdriver or wrench to fit your mower’s arbor bolt
- Bevel gauge or protractor (optional but helpful)
- Water bucket and quenching cloth (if using an angle grinder)
Safety critical step: Always disconnect the spark plug wire before touching the blade. This prevents accidental engine starting and is a non-negotiable first action.
Step-by-Step: How to Remove Your Mower Blade Safely
1. Disconnect the spark plug wire. Pull the wire cap off the spark plug. Do not just switch off the engine—disconnecting the wire ensures the mower cannot start accidentally.
2. Position the mower. Place the mower on a flat, level surface. If you have a mower lift or jack, use it. If not, you can tip the mower on its side (air filter side up to prevent oil leaking into the carburetor). On riding mowers, use jack stands under the frame.
3. Drain or stabilize fuel. If you’re tipping the mower, drain the fuel tank or use a fuel stabilizer to prevent spillage. Check your manual for the safest approach for your model.
4. Block the blade. Insert a block of wood between the blade and the deck to prevent it from spinning as you loosen the bolt.
5. Break loose the arbor bolt. This is the bolt that holds the blade to the spindle shaft. Many mower blades have reverse-threaded bolts—turn counterclockwise (lefty tighty, righty loosey reversed) to remove. If your bolt won’t budge turning left, try right. Check your manual if unsure. Once loose, remove by hand or with a wrench.
6. Inspect the blade. Before sharpening, look for cracks, deep bends, warping, or large chips. If the blade is cracked or severely bent, replace it instead of sharpening (see the replacement section below).
How to Sharpen a Mower Blade: Three Methods Compared
All three methods aim to maintain or restore the existing 30-degree bevel angle—the angle between the cutting edge and the flat faces of the blade. Sharpen each wing of the blade equally and remove the same amount of material from each side to keep the blade balanced.
Method 1: Mill Bastard File (Beginner-Friendly)
Clamp the blade securely in a vise with one wing facing up. Hold the file at a 30-degree angle to the blade face (imagine the file leaning slightly back from vertical). Make long, smooth strokes away from your body, moving the full length of the file down the edge. Lift the file on the return stroke (do not drag it backward). Repeat 8–12 strokes per wing, checking your progress. The goal is a thin, continuous bright line along the edge.
Pros: Low cost, full control, no electricity, minimal risk of heat damage.
Cons: Slow (20–30 minutes total), requires physical effort and consistent technique.
Method 2: Drill-Powered Sharpener Attachment
Insert the sharpener bit into your cordless drill and follow the manufacturer’s angle guide (typically preset to 30 degrees). Hold the drill steady and let the spinning bit do the work with light pressure. Work from the center of the edge outward, using short passes. Repeat on the other wing.
Pros: Faster (10–15 minutes), guides the correct angle, less physical strain.
Cons: Requires a drill, bit attachment may not be readily available, still requires care to sharpen evenly.
Method 3: Angle Grinder (Fast but Aggressive)
Clamp the blade firmly. Wear a full face shield in addition to safety glasses. Switch on the grinder and bring the spinning wheel lightly to the blade edge at a shallow angle, letting the wheel’s momentum do the work. Use short, quick passes rather than prolonged grinding. After each pass, quench the blade edge in water to prevent heat damage (overheating can draw the temper from the steel and dull the edge permanently). Repeat on the other wing.
Pros: Fastest (5–10 minutes), effective for heavy dulling or light nicks.
Cons: Highest risk of removing too much metal, overheating the edge, or creating an unsafe angle if technique is poor. Requires experience and full attention.
General tip for all methods: Remove equal amounts of metal from each wing to preserve balance. Check your progress frequently with the bevel gauge if you have one.
When to Replace Instead of Sharpen
Replace the blade if you observe any of the following:
- Visible cracks — a cracked blade is unsafe and will worsen quickly.
- Bends or warping — bend a blade back and forth and it will crack. A warped blade causes severe vibration.
- Deep notches or chips — if a chip would require removing more than 1/8 inch of metal to smooth out, replacement is more efficient.
- Worn thickness — if the blade has been sharpened many times and is noticeably thinner than when new, replacement prevents blade failure under normal use.
- Corrosion or rust damage — heavy rust weakens the blade and may indicate it’s near the end of service life.
A replacement blade typically costs $20–$60, depending on mower type and brand. A professional shop sharpening runs $15–$40. If you sharpen yourself, the decision is driven by whether the blade is still structurally sound.
How to Balance a Mower Blade (And Why Skipping This Step Damages Your Mower)
An unbalanced blade vibrates as it spins, accelerating wear on the spindle bearings and deck mounting points. Over time, vibration cracks welds, loosens bolts, and can cause catastrophic spindle failure—a repair that costs hundreds of dollars.
Balancing method 1: Nail in a wood block
Drive a large nail (¼ inch diameter or wider) into the center of a piece of wood, standing it vertically. Slip the blade’s center hole onto the nail so the blade hangs freely. If one end dips lower, that end is heavier. Use a file or sandpaper to remove material from the flat (non-beveled) side of the heavy end until the blade hangs level.
Balancing method 2: Cone balancer
A cone balancer is a metal or plastic cone that mounts on a shaft. Place the blade’s center hole on the cone tip and spin it gently. A balanced blade spins freely; an unbalanced one stops with the heavy end down. Remove material from the flat back side of the heavy end as above.
Check balance after sharpening and after every reinstallation, especially the first time—it’s the difference between a smooth cut and costly spindle damage.
How to Reinstall the Blade and Torque the Bolt Correctly
1. Orient the blade correctly. Blades are directional. Look for an arrow stamped on the blade indicating the direction of rotation, or check your manual. The cutting edge bevels forward (in the direction of rotation).
2. Hand-tighten the arbor bolt. Slide the blade back onto the spindle shaft and start the bolt by hand, ensuring it threads smoothly. Do not force it.
3. Torque to specification. Use your torque wrench set to the correct value. For most walk-behind rotary mowers, the spec is 35–50 ft-lb. Riding mowers often require 70–90 ft-lb. Consult your mower’s owner’s manual for the exact torque value—using too little torque risks the blade coming loose; too much can strip the bolt or spindle threads.
4. Reconnect the spark plug wire. Push the wire cap firmly back onto the spark plug. Tug it gently to confirm it’s seated.
5. Test run. Start the mower and let it idle for a few seconds. Listen and feel for abnormal vibration. If the mower vibrates heavily, stop immediately, reconnect the spark plug wire, and recheck blade balance and bolt torque.
How Often Should You Sharpen Your Mower Blade?
A general guideline is every 20–25 hours of mowing time. For a typical homeowner mowing a quarter-acre lawn once a week during growing season, that translates to once per season (spring or early summer). Heavy use—commercial mowing, large properties, or mowing over sandy soil or gravel—may require sharpening every 2–3 weeks.
Factors that accelerate dulling:
- Sandy or silty soil (abrasive particles dull the blade quickly)
- Mowing over sticks, stones, or debris
- Wet grass (causes some blade drag and heat buildup)
- Tall or thick grass requiring more cutting force
A blade can typically be sharpened 5–10 times before it becomes too thin to use safely. After that, replacement is necessary. You’ll know the blade is wearing out when sharpening yields only slight improvement and the blade edge appears noticeably thinner than when new.
A quick mid-season visual check—stopping the mower, disconnecting the spark plug, and inspecting the blade edge—takes 30 seconds and tells you whether you can wait until season’s end or need to sharpen now.